1. ആമുഖം
This manual provides comprehensive instructions for the installation, operation, and maintenance of the Kenmore 11029522800 Washer Clutch & Motor Coupler Kit. This kit is designed to replace worn or damaged clutch and motor coupler components in compatible Kenmore washing machines, restoring optimal performance and extending the appliance's lifespan.
Key benefits of this kit include:
- Ensures smooth and efficient operation of your Kenmore 11029522800 washer.
- Contributes to the prolonged lifespan of the washer's clutch and motor coupler.
- Designed for an easy installation process, facilitating maintenance and repair.
2 സുരക്ഷാ വിവരങ്ങൾ
ഉപകരണ അറ്റകുറ്റപ്പണികൾ നടത്തുമ്പോൾ എപ്പോഴും സുരക്ഷയ്ക്ക് മുൻഗണന നൽകുക. ഈ സുരക്ഷാ മാർഗ്ഗനിർദ്ദേശങ്ങൾ പാലിക്കുന്നതിൽ പരാജയപ്പെടുന്നത് വ്യക്തിപരമായ പരിക്കിനോ ഉപകരണത്തിന് കേടുപാടിനോ കാരണമാകാം.
- പവർ വിച്ഛേദിക്കുക: Before beginning any repair, always unplug the washing machine from its power source to prevent electrical shock.
- ജലവിതരണം: Turn off the water supply to the washing machine to prevent leaks.
- സംരക്ഷണ ഗിയർ ധരിക്കുക: Wear appropriate personal protective equipment, such as work gloves and safety glasses, to protect against sharp edges and potential debris.
- ഒരു പ്രൊഫഷണലുമായി ബന്ധപ്പെടുക: If you are unsure about any step of the installation process, consult a qualified appliance repair technician.
- ശരിയായ ഉപകരണങ്ങൾ: Use only the correct tools for the job to avoid damaging components.
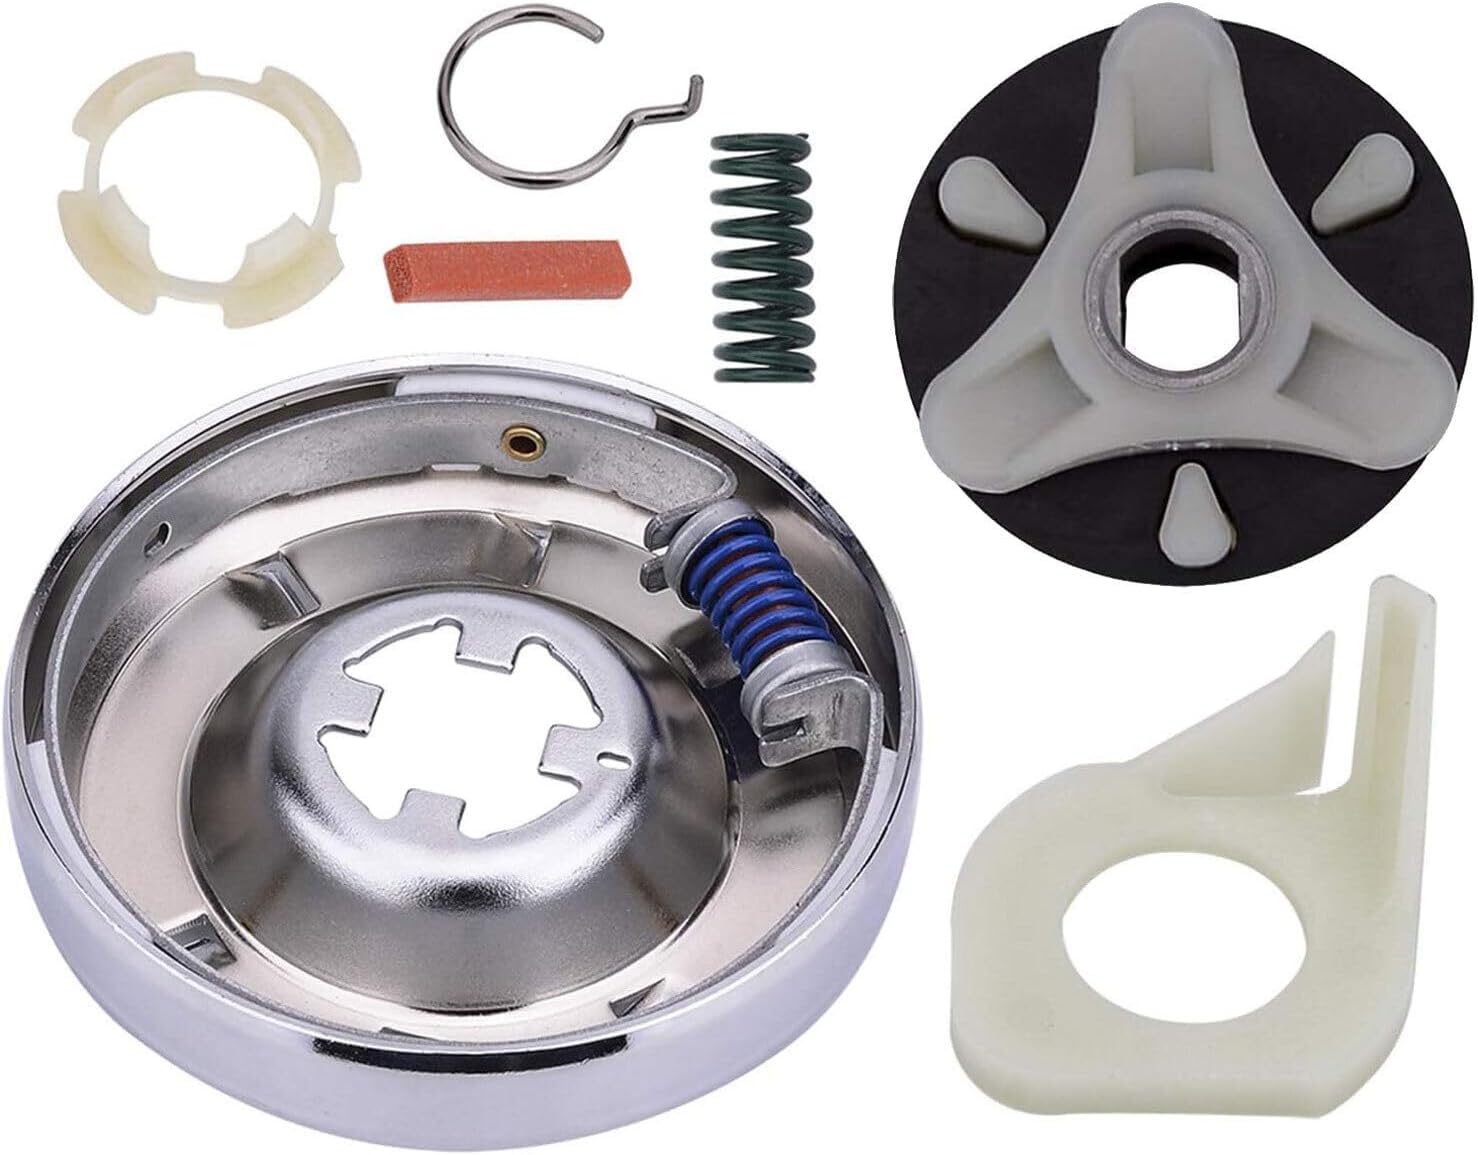
3. പാക്കേജ് ഉള്ളടക്കം
Carefully unpack the kit and verify that all components are present and undamaged. The kit typically includes the following parts:
- Washer Clutch Assembly (outer drum with brake shoes and spring)
- Motor Coupler (three-part rubber and plastic assembly)
- Brake Cam/Actuator
- Spring (for clutch assembly)
- സി-ക്ലിപ്പ്
- Other small associated components
4. ഇൻസ്റ്റലേഷൻ നിർദ്ദേശങ്ങൾ
The following steps outline a general procedure for replacing the washer clutch and motor coupler. Specific washer models may vary, so always refer to your appliance's service manual for detailed instructions.
- വാഷിംഗ് മെഷീൻ തയ്യാറാക്കുക: Disconnect the washer from power and water supply. Pull the washer away from the wall to access the rear.
- ആക്സസ് ഘടകങ്ങൾ: Depending on your washer model, you may need to remove the back panel, front panel, or tilt the washer back to access the motor and transmission area.
- Remove Old Motor Coupler: Locate the motor coupler connecting the motor to the transmission. It typically consists of two plastic halves with a rubber insert. Carefully pry or unclip the old coupler components and remove them.
- Remove Old Clutch Assembly: The clutch assembly is usually located at the bottom of the transmission, often secured by a large nut or clips. You may need a spanner wrench or specialized tool to remove it. Note the orientation of all parts as you disassemble.
- Install New Clutch Assembly: Install the new clutch assembly, ensuring all springs, brake shoes, and the brake cam are correctly positioned. Secure it according to your washer's specifications.
- Install New Motor Coupler: Attach the new motor coupler halves to the motor shaft and transmission input shaft, then insert the rubber connector. Ensure a secure fit.
- വാഷർ വീണ്ടും കൂട്ടിച്ചേർക്കുക: Reattach any panels or components that were removed. Ensure all connections are secure.
- ടെസ്റ്റ് ഓപ്പറേഷൻ: Reconnect power and water. Run a short wash cycle to verify proper operation and check for any leaks or unusual noises.
For visual guidance, search for specific repair videos for your Kenmore washer model on reputable platforms. Always ensure the video source is reliable.
5. പ്രവർത്തിക്കുന്നു (ഇൻസ്റ്റാളേഷന് ശേഷമുള്ള പരിശോധന)
After successful installation, perform the following checks:
- പ്രാരംഭ ചക്രം: Run an empty wash cycle (without clothes) to observe the washer's performance.
- Spin Cycle: Pay close attention during the spin cycle. The basket should spin smoothly and reach full speed without excessive noise or vibration.
- Agitation: Verify that the agitator moves correctly during the wash phase.
- ബ്രേക്കിംഗ്: When the spin cycle ends, the basket should come to a stop within a reasonable timeframe, indicating the clutch brake is functioning.
- ചോർച്ച: Check for any water leaks around the base of the washer.
If any issues are observed, refer to the troubleshooting section or consult a professional.
6. പരിപാലനം
While the clutch and motor coupler are designed for durability, regular maintenance of your washing machine can help prolong the life of all its components:
- ഓവർലോഡിംഗ് ഒഴിവാക്കുക: Do not overload the washer, as this puts excessive strain on the motor, transmission, clutch, and coupler.
- Balance Loads: Ensure laundry loads are balanced to prevent excessive vibration during the spin cycle, which can stress mechanical parts.
- പതിവ് വൃത്തിയാക്കൽ: Keep the washer clean, including the tub and dispenser, to prevent buildup that could affect performance.
- ആനുകാലികമായി പരിശോധിക്കുക: If you notice unusual noises or performance issues, inspect the accessible components for wear or damage.
7. പ്രശ്നപരിഹാരം
If your washer exhibits problems after installing the kit, consider the following common issues:
| പ്രശ്നം | സാധ്യമായ കാരണം | പരിഹാരം |
|---|---|---|
| Washer not spinning or agitating | Motor coupler incorrectly installed or damaged; clutch not engaging. | Re-inspect motor coupler for proper alignment and secure fit. Check clutch assembly for correct installation and spring tension. |
| Loud grinding or squealing noise during spin | Clutch brake shoes worn or misaligned; foreign object in clutch. | Inspect clutch assembly for proper seating and ensure no debris is present. |
| Washer leaks from bottom | Loose hose connections; damaged tub seal (unrelated to this kit but often accessed during repair). | Check all water hose connections. If the leak persists, investigate other potential sources. |
| Basket spins slowly or not at all | Clutch not fully engaging; motor coupler slipping. | Verify clutch spring tension and ensure motor coupler is securely connected and not stripped. |
If troubleshooting steps do not resolve the issue, it is recommended to contact a certified appliance repair technician.
8 സ്പെസിഫിക്കേഷനുകൾ
- ഉൽപ്പന്നത്തിൻ്റെ പേര്: Washer Clutch & Motor Coupler Kit
- അനുയോജ്യമായ ബ്രാൻഡ്: കെൻമോർ
- മോഡൽ നമ്പർ: 11029522800
- നിർമ്മാതാവ്: 20 SECOND SOAP (as per product listing)
- ഭാഗം തരം: മാറ്റിസ്ഥാപിക്കൽ കിറ്റ്
9. വാറൻ്റിയും പിന്തുണയും
Warranty information for this product is typically provided by the seller or manufacturer at the time of purchase. Please retain your proof of purchase for any warranty claims.
For technical support or further assistance, please contact the retailer where the kit was purchased or refer to the manufacturer's official support channels. Always provide your model number (11029522800) when seeking support.


