1. പ്രധാന സുരക്ഷാ നിർദ്ദേശങ്ങൾ
Always read and understand all safety warnings and instructions before operating this welding machine. Failure to follow these instructions may result in electric shock, fire, serious injury, or death.
- വൈദ്യുതാഘാതം കൊല്ലാൻ സാധ്യതയുണ്ട്: Do not touch live electrical parts. Wear dry welding gloves and protective clothing. Insulate yourself from work and ground.
- Fumes and Gases Can Be Dangerous: Keep your head out of the fumes. Use ventilation or exhaust to remove fumes from the breathing zone.
- Arc Rays Can Burn Eyes and Skin: Wear a welding helmet with a proper shade of filter to protect your face and eyes when welding or watching. Wear appropriate protective clothing to protect your skin.
- തീപിടുത്ത, സ്ഫോടന അപകട സാധ്യത: Protect yourself and others from flying sparks and hot metal. Remove all flammables within 35 feet (10 meters) of the welding area.
- ചൂടുള്ള ഭാഗങ്ങൾ ഗുരുതരമായ പൊള്ളലിന് കാരണമാകും: Allow cooling period before touching welded material.
- ഓവർകറന്റ്, ഓവർവോൾtage, Overheating Protection: The machine is equipped with built-in protection. If activated, allow the machine to cool down before resuming operation.
For detailed safety information, refer to relevant industry standards and local regulations.
2. പാക്കേജ് ഉള്ളടക്കം
Carefully unpack the welding machine and check for any damage. Ensure all items listed below are present:

Figure 2.1: HVM140 Welder and Included Accessories
This image displays the HZXVOGEN HVM140 welding machine along with its complete set of accessories, including the MIG torch, electrode holder, earth clamp, flux core wire, brush hammer, and welding rods.
- HZXVOGEN HVM140 Welding Machine (1 unit)
- MIG Torch (1 unit)
- Electrode Holder (1 unit)
- ഭൂമി Clamp (1 യൂണിറ്റ്)
- Flux Core Wire (0.8mm or 1.0mm, 1 spool)
- Brush Hammer (1 unit)
- Welding Rods (5 pieces)
- ഉപയോക്തൃ മാനുവൽ (1 കോപ്പി)
3. ഉൽപ്പന്നം കഴിഞ്ഞുview
The HZXVOGEN HVM140 is a versatile 3-in-1 multi-process inverter welding machine designed for various welding applications. It supports Gasless MIG, MMA (Stick), and Lift TIG welding modes.
3.1 പ്രധാന സവിശേഷതകൾ

Figure 3.1: 3-in-1 Multi-Process Capabilities
This image highlights the HVM140's ability to perform Gasless MIG, MMA (Stick), and Lift TIG welding, showcasing its versatility for different welding tasks.
- 3-in-1 Multi-Process: Supports Gasless MIG, MMA (Stick), and Lift TIG welding modes.
- IGBT Inverter Technology: Provides stable arc, high efficiency, and energy saving.
- Digital Rotating Screen: Intuitive one-button control for easy and quick adjustment of welding parameters.
- വിആർഡി (വാല്യംtagഇ റിഡക്ഷൻ ഉപകരണം): Enhances safety, especially in MMA mode, by reducing open-circuit voltage.
- ചർച്ചാവിഷയം: Improves arc ignition in MMA mode, preventing electrode sticking.
- Anti-Stick: Automatically reduces current if the electrode sticks, making it easier to remove.
- ആർക്ക് ഫോഴ്സ്: Provides additional current during short arc length, preventing the arc from extinguishing.
- കാര്യക്ഷമമായ കൂളിംഗ് ഫാൻ: Reduces internal dust accumulation and prolongs machine lifespan.
- പോർട്ടബിൾ, ഒതുക്കമുള്ളത്: Lightweight design (approx. 3.7 kg) with a convenient handle for easy transport.
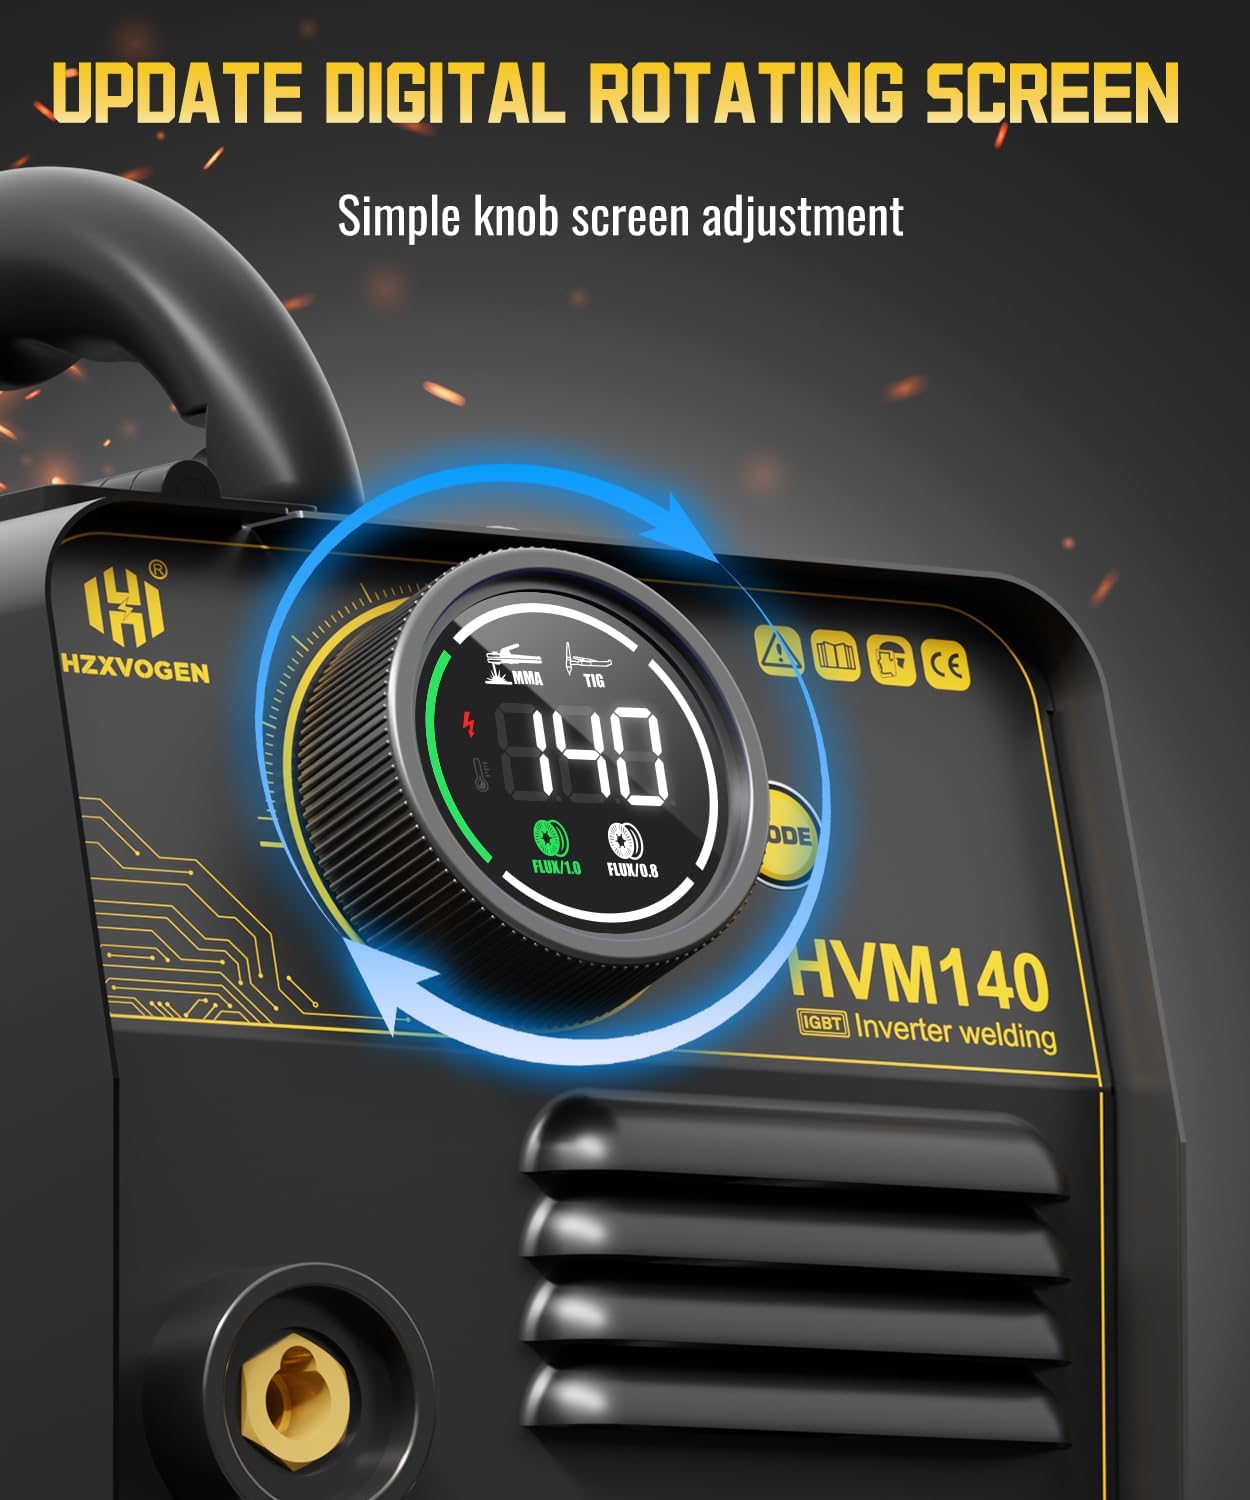
Figure 3.2: Digital Control Interface
This image shows the digital display and single knob control of the HVM140, allowing for precise and easy adjustment of welding parameters.

Figure 3.3: Professional Welder Features
This image visually represents the advanced features of the HVM140, including IGBT technology, VRD, Hot Start, efficient cooling, Anti-Stick, and Arc Force, contributing to professional welding performance.
4. സജ്ജീകരണം
4.1 പ്രാരംഭ പരിശോധന
Before connecting the machine, inspect all cables, connections, and the machine casing for any signs of damage. Ensure the work area is clean, dry, and well-ventilated, free from flammable materials.
4.2 പവർ കണക്ഷൻ
- മെഷീനിലെ പവർ സ്വിച്ച് "ഓഫ്" സ്ഥാനത്താണെന്ന് ഉറപ്പാക്കുക.
- Connect the power cord to a suitable power outlet. The HVM140 supports a range of input voltages (refer to specifications for details).
4.3 Gasless MIG Setup
- വയർ ഫീഡർ കവർ തുറക്കുക.
- Install the flux core wire spool onto the spindle. Ensure the wire unwinds smoothly.
- Thread the wire through the wire feeder mechanism and into the MIG torch liner.
- Close the wire feeder cover.
- Connect the MIG torch to the designated MIG output terminal on the front panel.
- ഭൂമിയെ ബന്ധിപ്പിക്കുക clamp to the work piece. Ensure a good electrical connection.
- Turn on the machine. Press and hold the wire feed button (usually on the front panel or torch trigger) for approximately 5 seconds to feed the wire through the torch until it exits the contact tip.

Figure 4.1: Wire Feeding Mechanism
This diagram illustrates the internal wire feeding system of the HVM140, detailing how to install the flux core wire spool and feed the wire into the MIG torch for operation.
4.4 MMA (Stick) Setup
- Connect the electrode holder cable to the positive (+) terminal on the front panel.
- ഭൂമിയെ ബന്ധിപ്പിക്കുക clamp cable to the negative (-) terminal on the front panel.
- Securely insert the welding electrode into the electrode holder.
- ഭൂമിയെ ബന്ധിപ്പിക്കുക clamp വർക്ക് പീസിലേക്ക്.
4.5 Lift TIG Setup
- Connect the TIG torch (not included) to the negative (-) terminal on the front panel.
- ഭൂമിയെ ബന്ധിപ്പിക്കുക clamp cable to the positive (+) terminal on the front panel.
- Ensure a suitable tungsten electrode is installed in the TIG torch.
- ഭൂമിയെ ബന്ധിപ്പിക്കുക clamp വർക്ക് പീസിലേക്ക്.
- Note: This machine supports Lift TIG, which means arc initiation is done by touching the tungsten to the workpiece and lifting it slightly. No high-frequency start.
5. പ്രവർത്തന നിർദ്ദേശങ്ങൾ
5.1 മോഡ് തിരഞ്ഞെടുക്കൽ
Turn on the machine. Use the mode selection button (usually near the digital display) to cycle through MIG, MMA, and Lift TIG modes. The selected mode will be indicated on the digital screen.
5.2 നിലവിലെ ക്രമീകരണം
Once the desired mode is selected, use the single control knob to adjust the welding current (Amperage). The digital display will show the current setting. Refer to welding charts for recommended current settings based on material thickness and welding process.
5.3 Welding Techniques
Proper welding technique is crucial for quality welds. Practice on scrap material before welding critical components.
- MIG വെൽഡിംഗ്: Maintain a consistent stick-out and travel speed. Use a slight push or pull angle depending on the application.
- എംഎംഎ വെൽഡിംഗ്: Maintain a short arc length. Use a slight weaving motion for wider beads.
- Lift TIG Welding: Touch the tungsten to the workpiece to initiate the arc, then quickly lift it a small distance (1-3mm) to establish the arc. Maintain a consistent arc length and travel speed.
5.4 ഡ്യൂട്ടി സൈക്കിൾ
The HVM140 has a 60% duty cycle at its maximum output. This means it can operate continuously for 6 minutes out of every 10-minute period at maximum current before requiring a 4-minute cooling period. Exceeding the duty cycle can damage the machine. The machine's built-in thermal protection will activate if it overheats.

Figure 5.1: Duty Cycle Explanation
This graphic explains the 60% duty cycle of the HVM140, indicating that for every 10 minutes of operation at maximum output, the machine can work for 6 minutes and requires a 4-minute break to cool down.
6. പരിപാലനം
പതിവ് അറ്റകുറ്റപ്പണികൾ നിങ്ങളുടെ വെൽഡിംഗ് മെഷീനിന്റെ ദീർഘായുസ്സും ഒപ്റ്റിമൽ പ്രകടനവും ഉറപ്പാക്കുന്നു.
- വൃത്തിയാക്കൽ: Regularly clean the machine's exterior with a dry cloth. Use compressed air to blow out dust from the cooling vents. Ensure the machine is unplugged before cleaning.
- കേബിൾ പരിശോധന: Periodically inspect all cables (power, MIG torch, electrode holder, earth clamp) for cuts, abrasions, or loose connections. Replace damaged cables immediately.
- MIG ടോർച്ച് പരിപാലനം: Clean the contact tip and gas nozzle regularly. Replace worn contact tips and diffusers.
- വയർ ഫീഡർ: Keep the wire feeder rollers clean and free of debris. Ensure proper tension on the wire spool.
- സംഭരണം: Store the machine in a clean, dry, and dust-free environment when not in use.
7. പ്രശ്നപരിഹാരം
This section provides solutions to common issues you might encounter. For problems not listed here, contact customer support.
| പ്രശ്നം | സാധ്യമായ കാരണം | പരിഹാരം |
|---|---|---|
| മെഷീൻ പവർ ഓൺ ചെയ്യുന്നില്ല. | No power supply; Power switch off; Internal fuse blown. | Check power outlet and cord; Turn on power switch; Contact service for fuse replacement. |
| ആർക്ക് ഇല്ല. | Poor earth clamp connection; Incorrect mode selected; Wire feed issue (MIG); Electrode not making contact (MMA/TIG). | Ensure good earth connection; Select correct mode; Check wire feed path; Ensure electrode/tungsten touches workpiece. |
| Wire not feeding (MIG). | Wire tangled; Rollers not tensioned correctly; Contact tip blocked; Liner clogged. | Untangle wire; Adjust roller tension; Clean/replace contact tip; Clean/replace liner. |
| Machine overheats / Thermal protection activates. | Exceeded duty cycle; Poor ventilation; Fan blocked. | Allow machine to cool down; Ensure adequate airflow around machine; Clear fan vents. |
8 സ്പെസിഫിക്കേഷനുകൾ
Technical specifications for the HZXVOGEN HVM140 welding machine:
| മോഡൽ നമ്പർ | HVM140 |
| നിർമ്മാതാവ് | H HZXVOGEN |
| അളവുകൾ (L x W x H) | ഏകദേശം 22 x 23 x 33 സെ.മീ (8.7 x 9.1 x 13 ഇഞ്ച്) |
| പാക്കേജ് അളവുകൾ | 37.9 x 27.3 x 19.9 സെ.മീ (14.9 x 10.7 x 7.8 ഇഞ്ച്) |
| ഭാരം | Approx. 3.7 kg (8.16 lbs) - Machine only |
| പാക്കേജ് ഭാരം | 6.18 കി.ഗ്രാം (13.62 പൗണ്ട്) |
| നിലവിലെ ശ്രേണി | 30 - 140 എ |
| Supported Wire Diameter (MIG) | 0.8 mm, 1.0 mm Flux Core Wire |
| പവർ തരം | Gasless (Flux Core) for MIG |
| ASIN | B0DBL932XG |

Figure 8.1: Portable and Compact Design
This image provides a visual representation of the HVM140's compact dimensions and lightweight design, emphasizing its portability for various work environments.
9. വാറൻ്റിയും പിന്തുണയും
HZXVOGEN is committed to providing high-quality products and excellent customer service.
- വാറൻ്റി: This product comes with a 3-Year Extended Warranty. Please retain your proof of purchase for warranty claims.
- ഉപഭോക്തൃ പിന്തുണ: For any questions, technical assistance, or warranty inquiries, please contact HZXVOGEN customer support. Our team is available 24/7 to assist you.
- ബന്ധപ്പെടാനുള്ള വിവരങ്ങൾ: Refer to the contact details provided on the product packaging or the official HZXVOGEN webസൈറ്റ്.

Figure 9.1: Warranty and Support Information
This image confirms the product's certifications (DEELAY, UL), the availability of a 3-Year Extended Warranty, and 24/7 customer support, ensuring reliability and assistance.


