1. ആമുഖം
This manual provides comprehensive instructions for the setup, operation, and maintenance of your Flashforge Guider 3 Ultra Professional Level 3D Printer. Please read this manual thoroughly before operating the device to ensure safe and efficient use.

Image 1.1: The Flashforge Guider 3 Ultra 3D Printer, showcasing its large build volume and enclosed design.
2. ഉൽപ്പന്നം കഴിഞ്ഞുview
The Flashforge Guider 3 Ultra is a professional-grade 3D printer designed for high-speed and high-accuracy printing. It features a dual extruder system, a large build volume, and advanced functionalities for diverse applications.
2.1 പ്രധാന സവിശേഷതകൾ
- Dual Extruder Design: Supports printing with two different materials or colors, including soluble support materials for complex geometries.
- Large Build Volume: Single Extruder: 330x330x600 mm; Dual Extruder: 300x330x600 mm.
- ഹൈ-സ്പീഡ് പ്രിന്റിംഗ്: Maximum speed of 500mm/s and acceleration of 20000mm/s².
- വിപുലമായ തണുപ്പിക്കൽ സംവിധാനം: Dual-fan air-blowing system for improved molding accuracy.
- Wide Filament Compatibility: Supports PLA, ABS, PETG, HIPS, PP, TPU, PLA-GF, PPS-CF, ASA, PC, Nylon, and more with a maximum extruder temperature of 350°C.
- ഉപയോക്തൃ സൗഹൃദ സവിശേഷതകൾ: Auto One-click Leveling, Quick-release Nozzle, Flexible Steel Plate, HEPA 13 Air Filtration System, Filament Drying Chamber, Remote Video Monitoring, Filament Run-out Reminder, and Power Loss Recovery.

Image 2.1: Illustration of the large build volume capabilities for both single and dual extruder configurations.
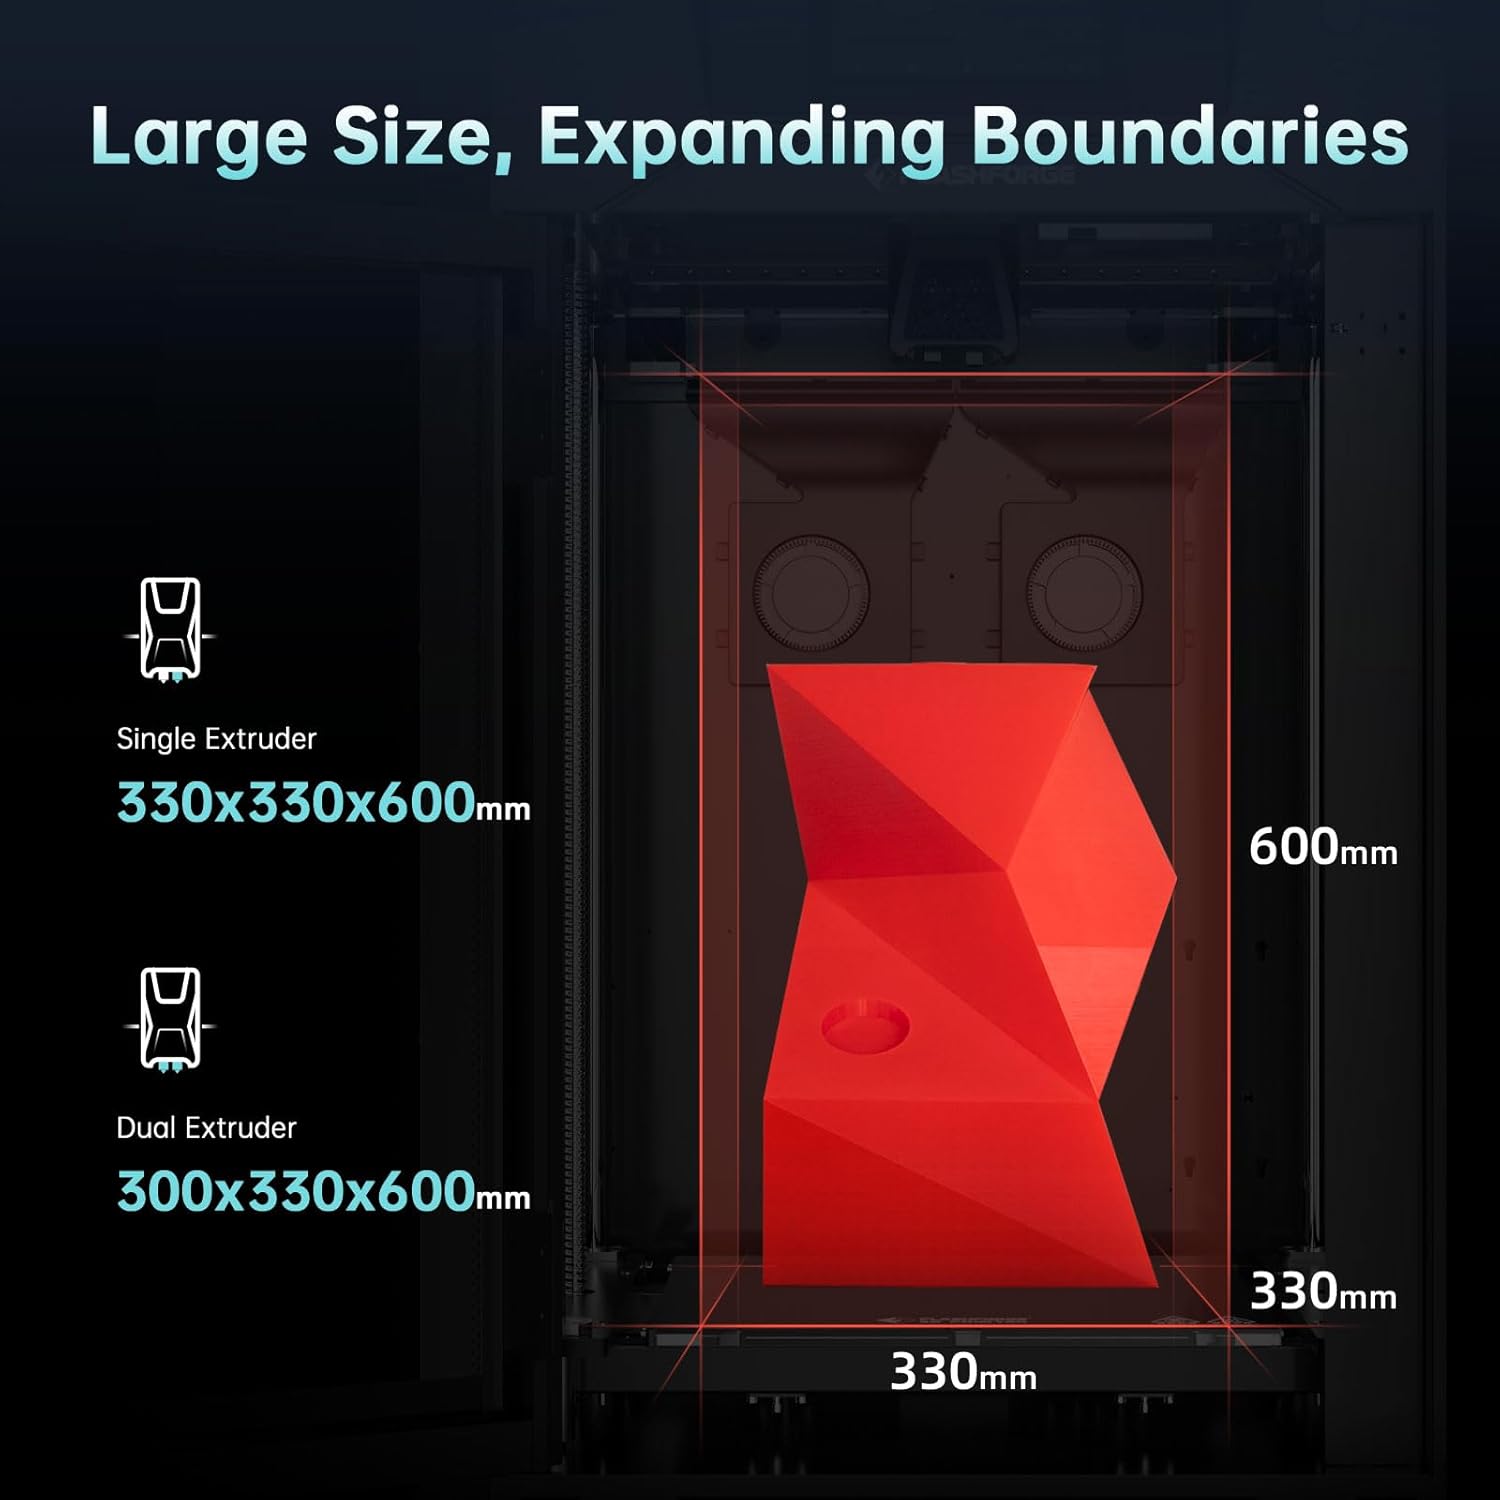
Image 2.2: Depiction of various filament types compatible with the Guider 3 Ultra, highlighting the 350°C maximum extruder temperature.

Image 2.3: Visual representation of the dual-fan air-blowing cooling system and the printer's high speed and acceleration capabilities.

Image 2.4: Diagram illustrating various advanced features such as automatic leveling, quick-release extruder, HEPA 13 filter, filament drying chamber, remote monitoring, and power loss recovery.
3. ബോക്സിൽ എന്താണുള്ളത്?
അൺപാക്ക് ചെയ്യുമ്പോൾ, താഴെ പട്ടികപ്പെടുത്തിയിരിക്കുന്ന എല്ലാ ഇനങ്ങളും നിലവിലുണ്ടെന്നും നല്ല നിലയിലാണെന്നും ദയവായി പരിശോധിക്കുക.
- G3U 3D Printer
- പവർ കേബിൾ
- ഗ്രീസ് (x2)
- പശ
- ബ്രഷ്
- സ്ക്രാപ്പർ
- സൂചി-മൂക്ക് പ്ലയർ
- ഡയഗണൽ പ്ലയർ
- നേരായ സ്ക്രൂഡ്രൈവർ
- പിൻ ഉപകരണം അൺലോക്കുചെയ്യുന്നു
- അലൻ റെഞ്ച് സെറ്റ്
- Elbow Tweezers
- Nozzle Assembly (x2)
- ചൂട് പ്രതിരോധം കയ്യുറകൾ
- Filament (x2)
- USB Disk (containing User Manual)
- വിൽപ്പനാനന്തര സേവന കാർഡ്
- ദ്രുത ആരംഭ ഗൈഡ്
- Fuse (x2)
- Desiccant (x12)
- Flexible Steel Build Plate

Image 3.1: Visual representation of all components included in the Flashforge Guider 3 Ultra package.
4. സജ്ജീകരണം
Follow these steps to set up your Flashforge Guider 3 Ultra 3D Printer for the first time.
4.1 അൺപാക്കിംഗും പ്ലേസ്മെന്റും
- പാക്കേജിംഗിൽ നിന്ന് പ്രിന്ററും എല്ലാ അനുബന്ധ ഉപകരണങ്ങളും ശ്രദ്ധാപൂർവ്വം നീക്കം ചെയ്യുക.
- Place the printer on a stable, level surface in a well-ventilated area. Ensure there is enough space around the printer for operation and maintenance.
- Remove all protective packaging materials, including tape and foam inserts, from inside and outside the printer.
4.2 പവർ കണക്ഷൻ
- പ്രിന്ററിന്റെ പവർ ഇൻപുട്ട് പോർട്ടിലേക്ക് പവർ കേബിൾ ബന്ധിപ്പിക്കുക.
- പവർ കേബിളിന്റെ മറ്റേ അറ്റം ഒരു ഗ്രൗണ്ടഡ് ഇലക്ട്രിക്കൽ ഔട്ട്ലെറ്റിലേക്ക് പ്ലഗ് ചെയ്യുക.
- Turn on the printer using the power switch, typically located at the rear or side of the unit.
4.3 Initial Configuration and Leveling
- Upon first power-on, the printer's smart LCD touch screen will guide you through the initial setup process.
- Follow the on-screen prompts for language selection and network configuration (Wi-Fi or Ethernet).
- Utilize the "Auto One-click Leveling" function as prompted. This automated process will calibrate the print bed for optimal adhesion and print quality.
5. ഓപ്പറേഷൻ
This section details the steps for operating your Flashforge Guider 3 Ultra 3D Printer.
5.1 ലോഡിംഗ് ഫിലമെന്റ്
- Ensure the printer is powered on and the extruder is at room temperature or preheated to the filament's loading temperature.
- Open the filament drying chamber and place the filament spool inside.
- Feed the filament through the designated path to the extruder. Follow the on-screen instructions for loading, which may involve automatic feeding.
- Confirm that the filament is properly loaded and extruding smoothly from the nozzle.
5.2 Preparing a Print Job
- Prepare your 3D model using compatible slicing software (e.g., FlashPrint, Slic3r, Cura). Configure print settings such as layer height, infill, and support structures.
- Save the sliced G-code file to a USB disk or transfer it to the printer via Ethernet or Wi-Fi.
- Insert the USB disk into the printer's USB port or access the file through the network connection on the touch screen.
5.3 ഒരു പ്രിന്റ് ആരംഭിക്കുന്നു
- On the touch screen, navigate to the print file അത് തിരഞ്ഞെടുക്കുക.
- Confirm the print settings and initiate the print job. The printer will begin heating the nozzle and build plate.
- Monitor the first few layers to ensure proper adhesion and extrusion. Adjust settings if necessary.
5.4 Monitoring and Remote Control
The Guider 3 Ultra supports remote video monitoring, allowing you to check print progress from a connected device. Refer to the detailed user manual on the USB disk for instructions on setting up remote monitoring.

ചിത്രം 5.1: ഉദാamples of applications for the Guider 3 Ultra, including rapid development, manufacturing assistive devices, end-use parts, architecture, art, and teaching aids.

Image 5.2: Explanation of raft support, showing how it aids in easy removal and saves printing time.
6. പരിപാലനം
പതിവ് അറ്റകുറ്റപ്പണികൾ നിങ്ങളുടെ 3D പ്രിന്ററിന്റെ ദീർഘായുസ്സും മികച്ച പ്രകടനവും ഉറപ്പാക്കുന്നു.
6.1 Cleaning the Build Plate
- After each print, allow the build plate to cool down.
- Carefully remove the printed object.
- Clean the flexible steel build plate with isopropyl alcohol and a lint-free cloth to remove any residue.
6.2 നോസൽ പരിപാലനം
- Periodically inspect the nozzle for clogs or wear.
- Use the provided unclogging pin tool to clear any blockages.
- The quick-release nozzle design allows for easy replacement when necessary. Refer to the full manual for replacement instructions.
6.3 ലൂബ്രിക്കേഷൻ
- Apply a small amount of the provided grease to the guide rods and lead screws every few months, or as recommended in the full user manual, to ensure smooth movement.
6.4 എയർ ഫിൽട്ടറേഷൻ സിസ്റ്റം
- The HEPA 13 air filtration system helps maintain air quality. Check and replace the filter net periodically according to usage.
7. പ്രശ്നപരിഹാരം
നിങ്ങൾ അഭിമുഖീകരിച്ചേക്കാവുന്ന പൊതുവായ പ്രശ്നങ്ങളും അവയുടെ സാധ്യമായ പരിഹാരങ്ങളും ഈ വിഭാഗം അഭിസംബോധന ചെയ്യുന്നു.
| പ്രശ്നം | സാധ്യമായ കാരണം | പരിഹാരം |
|---|---|---|
| ഫിലമെന്റ് പുറത്തെടുക്കുന്നില്ല | അടഞ്ഞുപോയ നോസൽ, തെറ്റായ താപനില, പിണഞ്ഞ ഫിലമെന്റ്. | Clear nozzle with pin tool, verify temperature settings, check filament path. |
| ആദ്യ പാളിയുടെ മോശം അഡീഷൻ | Unleveled build plate, dirty build plate, incorrect Z-offset. | Perform auto-leveling, clean build plate, adjust Z-offset in software. |
| Print quality issues (e.g., layer shifting) | Loose belts, excessive print speed, unstable printer. | Check and tighten belts, reduce print speed, ensure printer is on a stable surface. |
| Printer not connecting to network | Incorrect Wi-Fi password, network interference, cable issue. | Re-enter Wi-Fi credentials, try Ethernet connection, restart router. |
| Power loss during print | പവർ യൂtage. | The printer has power loss recovery; it should resume printing automatically once power is restored. |
For more detailed troubleshooting, refer to the full user manual on the provided USB disk or contact Flashforge support.
8 സ്പെസിഫിക്കേഷനുകൾ
Detailed technical specifications for the Flashforge Guider 3 Ultra 3D Printer.
| വിഭാഗം | സ്പെസിഫിക്കേഷൻ |
|---|---|
| പ്രിന്റ് സാങ്കേതികവിദ്യ | ഫ്യൂസ്ഡ് ഡെപ്പോസിഷൻ മോഡലിംഗ് (FDM) |
| എക്സ്ട്രൂഡർ അളവ് | 2 |
| പ്രിൻ്റിംഗ് പ്രിസിഷൻ | ±0.15mm or ±0.002mm/mm (The larger values shall prevail) |
| സ്ഥാനനിർണ്ണയ കൃത്യത | X/Y-axis 0.011mm; Z-axis 0.0025mm |
| പ്രിൻ്റിംഗ് സ്പീഡ് | പരമാവധി. 500mm/s |
| Printing Acceleration | 20000mm/s² |
| പാളി കനം | 0.05 - 0.4 മി.മീ. |
| Build Volume (Single Extruder) | 330 x 330 x 600 മിമി |
| Build Volume (Dual Extruder) | 300 x 330 x 600 മിമി |
| നോസൽ തരം | High-strength nozzle |
| നോസൽ വ്യാസം | 0.4mm (Default), (0.6/0.8mm) (Optional) |
| പരമാവധി എക്സ്ട്രൂഡർ താപനില | 350 °C |
| പരമാവധി പ്ലാറ്റ്ഫോം താപനില | 120 °C |
| Printing Bed | Flexible steel plate |
| പിന്തുണയ്ക്കുന്ന ഫിലമെന്റ് | PLA/PETG/ASA/ABS/PC/PA/PLA-CF/PETG-CF/PA-CF/PA-GF |
| ഉപകരണ വലുപ്പം | 635(L) * 550(W) * 1070(H)mm |
| ഇനത്തിൻ്റെ ഭാരം | 154 പൗണ്ട് (70 കിലോഗ്രാം) |
| വൈദ്യുതി വിതരണം | AC100-240V, 50-60Hz, 850W MAX |
| ഓൺ-മോഡ് വൈദ്യുതി ഉപഭോഗം | 850 വാട്ട്സ് |
| പ്രിന്റിംഗ് കണക്ഷൻ | U Disk/Ethernet/WiFi |
| Smart LCD Touch Screen | 7-ഇഞ്ച് |
| Fully-enclosed Design | അതെ |
| ഓട്ടോമാറ്റിക് ലെവലിംഗ് | അതെ |
| ഫിലമെന്റ് റൺ ഔട്ട് റിമൈൻഡർ | അതെ |
| Replaceable Build Plate | അതെ |
| Ultra-silent Design | അതെ |
| പവർ ലോസ് റിക്കവറി | അതെ |
| വിദൂര വീഡിയോ നിരീക്ഷണം | അതെ |
| HEPA 13 Air Filter Net | അതെ |
| ക്ലൗഡ് പ്ലാറ്റ്ഫോം | അതെ |
| അനുയോജ്യമായ ഓപ്പറേറ്റിംഗ് സിസ്റ്റം | Windows XP/Vista/7/8/10/Mac OS |
| ഇൻപുട്ട് File ഫോർമാറ്റ് | 3MF/STL/OBJ/FPP/BMP/PNG/JPG/JPEG File |
| ഔട്ട്പുട്ട് File ഫോർമാറ്റ് | GX/G/Gcode |

Image 8.1: A detailed table summarizing the print, mechanical, electrical, and other specifications of the printer.
9. വാറൻ്റിയും പിന്തുണയും
Flashforge is committed to providing excellent customer service and support for your Guider 3 Ultra 3D Printer.
9.1 വാറൻ്റി വിവരങ്ങൾ
Please refer to the After-sales Service Card included in your package for specific warranty terms and conditions. Generally, Flashforge products come with a manufacturer's warranty covering defects in materials and workmanship.
9.2 സാങ്കേതിക പിന്തുണ
If you encounter any issues not covered in this manual or require further assistance, Flashforge's professional technical team is available 24/7. You can contact them via email for support.
- ഓൺലൈൻ ഉറവിടങ്ങൾ: Visit the official Flashforge webപതിവുചോദ്യങ്ങൾ, പുതുക്കിയ മാനുവലുകൾ, സോഫ്റ്റ്വെയർ ഡൗൺലോഡുകൾ എന്നിവയ്ക്കുള്ള സൈറ്റ്.
- ഇമെയിൽ പിന്തുണ: Refer to your After-sales Service Card or the Flashforge webഉചിതമായ പിന്തുണാ ഇമെയിൽ വിലാസത്തിനായി സൈറ്റ് സന്ദർശിക്കുക.


