1. ആമുഖം
This manual provides essential information for the safe and efficient operation of your Pretul DESI-36P2 3.6V Cordless Screwdriver. Please read it thoroughly before first use and keep it for future reference. This compact cordless screwdriver is designed for light-duty fastening tasks, featuring a two-position handle and an integrated LED work light.

ചിത്രം 1: Pretul DESI-36P2 Cordless Screwdriver. This image shows the screwdriver in its straight configuration, highlighting its compact design and yellow and black color scheme.
2 സുരക്ഷാ വിവരങ്ങൾ
തീ, വൈദ്യുതാഘാതം, വ്യക്തിപരമായ പരിക്കുകൾ എന്നിവ കുറയ്ക്കുന്നതിന് വൈദ്യുത ഉപകരണങ്ങൾ ഉപയോഗിക്കുമ്പോൾ എല്ലായ്പ്പോഴും അടിസ്ഥാന സുരക്ഷാ മുൻകരുതലുകൾ പാലിക്കുക.
- വർക്ക് ഏരിയ സുരക്ഷ: നിങ്ങളുടെ ജോലിസ്ഥലം വൃത്തിയുള്ളതും നല്ല വെളിച്ചമുള്ളതുമായി സൂക്ഷിക്കുക. അലങ്കോലമായതോ ഇരുണ്ടതോ ആയ പ്രദേശങ്ങൾ അപകടങ്ങൾ ക്ഷണിച്ചുവരുത്തുന്നു.
- ഇലക്ട്രിക്കൽ സുരക്ഷ: പവർ ടൂളുകൾ മഴയിലോ നനഞ്ഞ അവസ്ഥയിലോ തുറന്നുകാട്ടരുത്. പവർ ടൂളിലേക്ക് വെള്ളം കയറുന്നത് വൈദ്യുതാഘാതത്തിനുള്ള സാധ്യത വർദ്ധിപ്പിക്കും.
- വ്യക്തിഗത സുരക്ഷ: ജാഗ്രത പാലിക്കുക, നിങ്ങൾ എന്താണ് ചെയ്യുന്നതെന്ന് കാണുക, ഒരു പവർ ടൂൾ പ്രവർത്തിപ്പിക്കുമ്പോൾ സാമാന്യബുദ്ധി ഉപയോഗിക്കുക. നിങ്ങൾ ക്ഷീണിതനായിരിക്കുമ്പോഴോ മയക്കുമരുന്ന്, മദ്യം, മരുന്നിൻ്റെ സ്വാധീനത്തിലായിരിക്കുമ്പോഴോ ഒരു പവർ ടൂൾ ഉപയോഗിക്കരുത്.
- ഉപകരണ ഉപയോഗവും പരിചരണവും: പവർ ടൂൾ നിർബന്ധിക്കരുത്. നിങ്ങളുടെ ആപ്ലിക്കേഷനായി ശരിയായ പവർ ടൂൾ ഉപയോഗിക്കുക. അത് രൂപകൽപ്പന ചെയ്തിരിക്കുന്ന നിരക്കിൽ ഇത് മികച്ചതും സുരക്ഷിതവുമായ ജോലി ചെയ്യും.
- ബാറ്ററി കെയർ: നിർമ്മാതാവ് വ്യക്തമാക്കിയ ചാർജർ ഉപയോഗിച്ച് മാത്രം റീചാർജ് ചെയ്യുക. ഒരു തരം ബാറ്ററി പായ്ക്കിന് അനുയോജ്യമായ ഒരു ചാർജർ മറ്റൊരു ബാറ്ററി പാക്കിനൊപ്പം ഉപയോഗിക്കുമ്പോൾ തീപിടിത്തം ഉണ്ടാക്കിയേക്കാം.
3. ഉൽപ്പന്ന ഘടകങ്ങളും സവിശേഷതകളും
Familiarize yourself with the parts of your Pretul DESI-36P2 cordless screwdriver.
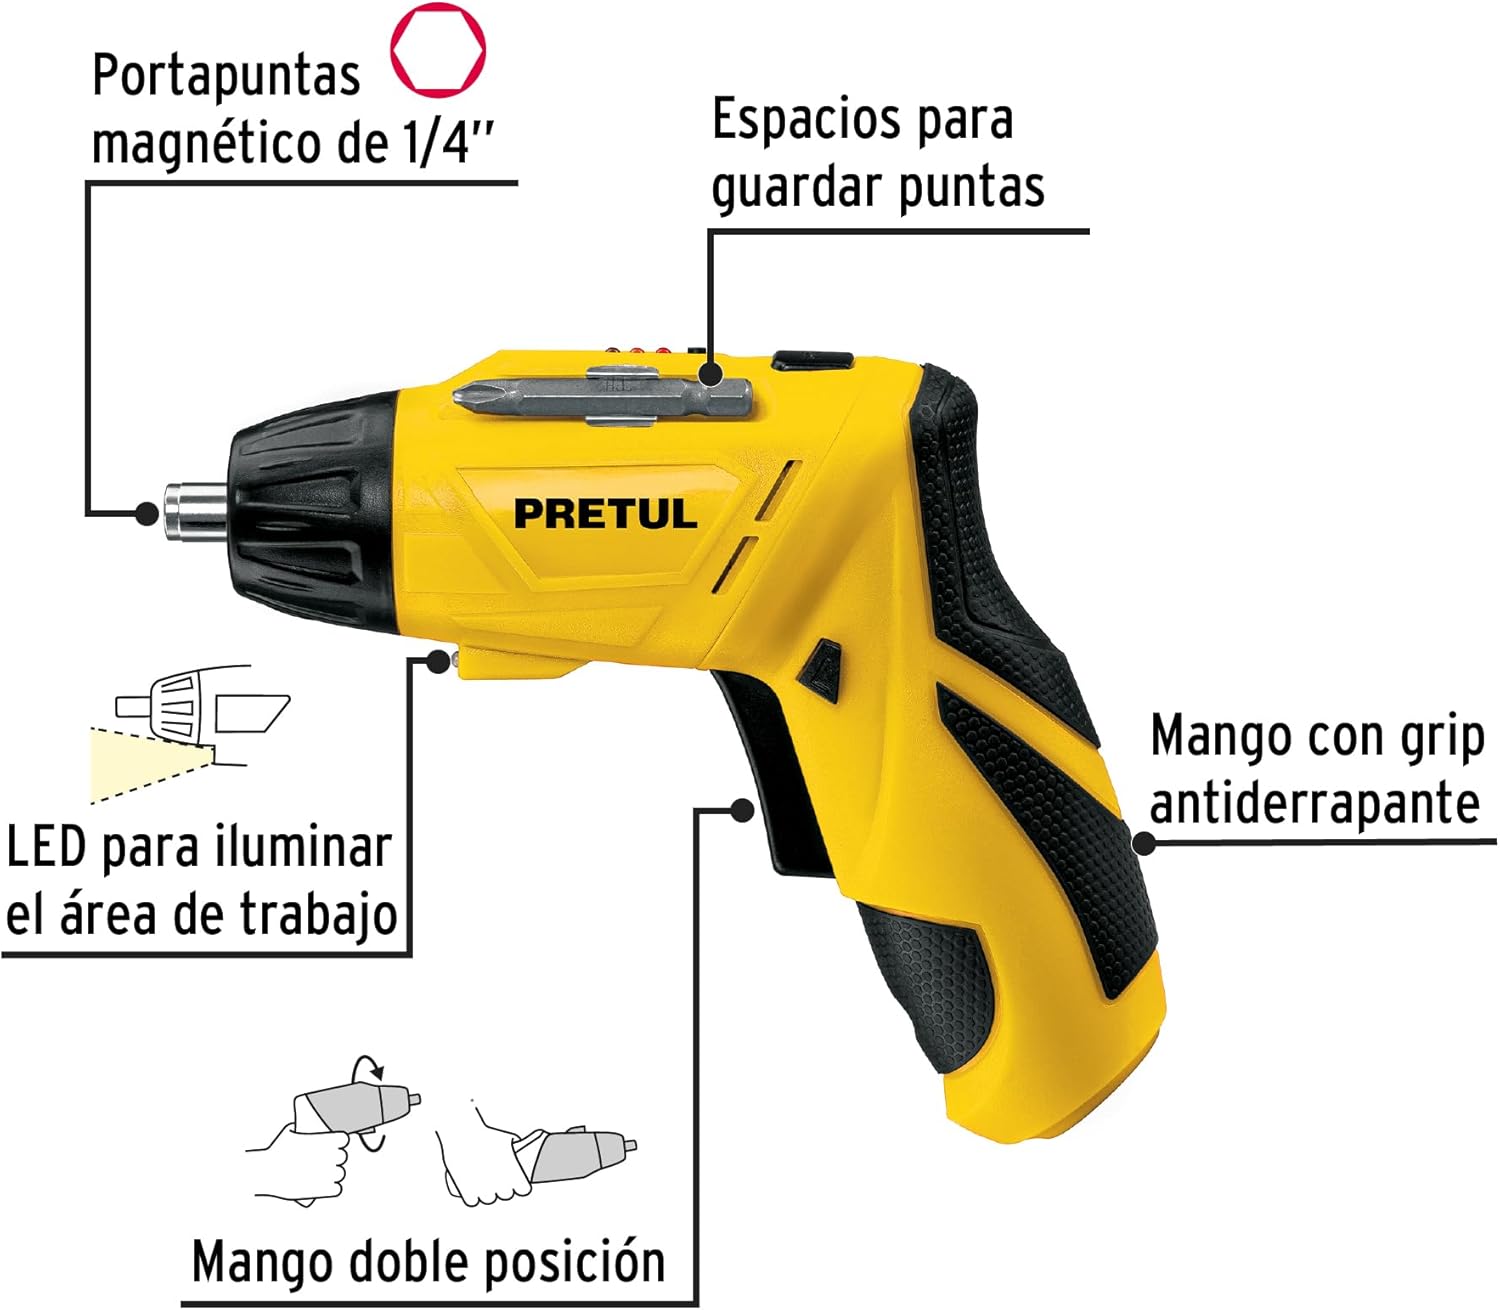
ചിത്രം 2: Key features of the Pretul DESI-36P2. This diagram illustrates the magnetic 1/4" bit holder, bit storage slots, anti-slip grip handle, LED work light, and the two-position handle mechanism.
- Magnetic 1/4" Hex Bit Holder: Securely holds screwdriver bits for quick changes.
- Bit Storage Slots: Conveniently located on the tool for storing extra bits.
- Anti-slip Grip Handle: Provides comfortable and secure handling during operation.
- LED വർക്ക് ലൈറ്റ്: Illuminates the work area for improved visibility in dimly lit spaces.
- Two-Position Handle: Allows the screwdriver to be used in a straight or pistol-grip configuration for versatility and access in tight spaces.
- ഫോർവേഡ്/റിവേഴ്സ് സ്വിച്ച്: Controls the direction of rotation for tightening and loosening screws.
- പവർ ബട്ടൺ: Activates the screwdriver.
4. സജ്ജീകരണം
4.1 പ്രാരംഭ ചാർജിംഗ്
Before first use, fully charge the screwdriver's internal battery. Connect the charger to a standard electrical outlet and then to the charging port on the screwdriver. The charging indicator (if present) will show the charging status. Disconnect the charger once the battery is fully charged.
4.2 Attaching Screwdriver Bits
- Select the appropriate 1/4" hex screwdriver bit for your task.
- Insert the bit firmly into the magnetic bit holder at the front of the screwdriver until it is securely seated.
- To remove a bit, simply pull it out from the holder.
4.3 Adjusting Handle Position
The screwdriver features a two-position handle for enhanced versatility:
- Pistol Grip: Standard configuration for most tasks.
- Straight Grip: For reaching into confined spaces. To change the handle position, firmly grasp the handle and the body of the screwdriver, then pivot the handle until it locks into the desired position.
5. പ്രവർത്തന നിർദ്ദേശങ്ങൾ
5.1 പവർ ഓൺ/ഓഫ്
Press and hold the power button to activate the screwdriver. Release the button to stop operation. The LED work light will activate when the power button is pressed.
5.2 ഭ്രമണ ദിശ തിരഞ്ഞെടുക്കൽ
Use the forward/reverse switch, typically located near the trigger, to select the desired rotation direction:
- Push the switch to the left for forward rotation (tightening screws).
- Push the switch to the right for reverse rotation (loosening screws).
- Ensure the switch is in the center position to lock the tool and prevent accidental activation.
5.3 ഫാസ്റ്റണിംഗ് സ്ക്രൂകൾ
- Ensure the correct bit is installed and the rotation direction is set to forward.
- Place the bit onto the screw head, applying gentle pressure.
- Press the power button to start driving the screw. Release the button once the screw is fully seated or the desired torque is reached.
5.4 അയവുള്ള സ്ക്രൂകൾ
- Ensure the correct bit is installed and the rotation direction is set to reverse.
- Place the bit onto the screw head, applying gentle pressure.
- Press the power button to start loosening the screw. Release the button once the screw is free.
6. പരിപാലനം
പതിവ് അറ്റകുറ്റപ്പണികൾ മികച്ച പ്രകടനം ഉറപ്പാക്കുകയും നിങ്ങളുടെ ഉപകരണത്തിന്റെ ആയുസ്സ് വർദ്ധിപ്പിക്കുകയും ചെയ്യുന്നു.
- വൃത്തിയാക്കൽ: ഉപകരണത്തിന്റെ വെന്റിലേഷൻ ഓപ്പണിംഗുകൾ വൃത്തിയായും അവശിഷ്ടങ്ങൾ ഇല്ലാതെയും സൂക്ഷിക്കുക. മൃദുവായ, ഡി ഉപയോഗിക്കുക.amp പുറംഭാഗം വൃത്തിയാക്കാൻ തുണി ഉപയോഗിക്കുക. കഠിനമായ രാസവസ്തുക്കളോ ഉരച്ചിലുകളുള്ള ക്ലീനറുകളോ ഉപയോഗിക്കരുത്.
- ബിറ്റ് ഹോൾഡർ: Periodically inspect the bit holder for wear or damage. Clean any accumulated dust or metal shavings.
- ബാറ്ററി സംഭരണം: Store the screwdriver in a cool, dry place away from direct sunlight and extreme temperatures. For long-term storage, ensure the battery is partially charged (around 50%).
- പരിശോധന: Regularly check for loose screws, damaged cords (if applicable), or any other conditions that may affect safe operation.
7. പ്രശ്നപരിഹാരം
നിങ്ങളുടെ സ്ക്രൂഡ്രൈവറിൽ പ്രശ്നങ്ങൾ നേരിടുകയാണെങ്കിൽ, ഇനിപ്പറയുന്ന പൊതുവായ പ്രശ്നങ്ങളും പരിഹാരങ്ങളും പരിശോധിക്കുക:
| പ്രശ്നം | സാധ്യമായ കാരണം | പരിഹാരം |
|---|---|---|
| സ്ക്രൂഡ്രൈവർ ഓണാക്കുന്നില്ല. | ബാറ്ററി ഡിസ്ചാർജ് ചെയ്തു. | ബാറ്ററി പൂർണ്ണമായും ചാർജ് ചെയ്യുക. |
| സ്ക്രൂഡ്രൈവറിന് പവർ ഇല്ല. | ബാറ്ററി കുറവാണ്. | ബാറ്ററി റീചാർജ് ചെയ്യുക. |
| സ്ക്രൂ ഹെഡിൽ നിന്ന് ബിറ്റ് തെന്നിമാറുന്നു. | തെറ്റായ ബിറ്റ് വലുപ്പം അല്ലെങ്കിൽ തേഞ്ഞ ബിറ്റ്. | ശരിയായ ബിറ്റ് വലുപ്പം ഉപയോഗിക്കുക; തേഞ്ഞ ബിറ്റുകൾ മാറ്റിസ്ഥാപിക്കുക. |
| Handle does not lock into position. | Not fully pivoted. | Ensure the handle is fully pivoted until it clicks into place. |
ഈ പരിഹാരങ്ങൾ പരീക്ഷിച്ചതിനു ശേഷവും പ്രശ്നം നിലനിൽക്കുകയാണെങ്കിൽ, ഉപഭോക്തൃ പിന്തുണയുമായി ബന്ധപ്പെടുക.
8 സ്പെസിഫിക്കേഷനുകൾ
Technical specifications for the Pretul DESI-36P2 Cordless Screwdriver.

ചിത്രം 3: Dimensions of the Pretul DESI-36P2. This image shows the screwdriver with measurements indicating a length of 17.5 cm and a height of 13 cm.
| ഫീച്ചർ | സ്പെസിഫിക്കേഷൻ |
|---|---|
| മോഡൽ നമ്പർ | DESI-36P2 (26402) |
| ബ്രാൻഡ് | വില |
| പവർ ഉറവിടം | ബാറ്ററി |
| ബാറ്ററി വോളിയംtage | 3.6 വോൾട്ട് |
| വേഗത | 230 ആർപിഎം |
| ടോർക്ക് | 3E+1 Pound-inches (approximately 30 in-lbs) |
| ബിറ്റ് ഹോൾഡർ | 1/4" Hex Magnetic |
| മെറ്റീരിയൽ | പ്ലാസ്റ്റിക്, മെറ്റൽ |
| അളവുകൾ (L x H) | 17.5 cm x 13 cm (approximate, based on image) |
| ഭാരം | 530 ഗ്രാം (0.53 കി.ഗ്രാം) |
| ഉൾപ്പെടുത്തിയ ഘടകങ്ങൾ | 5 Phillips bits 1" (PH1, PH2, PH3), Charger, 2 Phillips bits 2" (PH1, PH2), 1/4" Magnetic extension |
9. വാറൻ്റിയും പിന്തുണയും
The Pretul DESI-36P2 Cordless Screwdriver comes with a 1 വർഷത്തെ വാറൻ്റി വാങ്ങിയ തീയതി മുതൽ. വാറന്റി ക്ലെയിമുകൾക്കായി നിങ്ങളുടെ വാങ്ങിയതിന്റെ തെളിവ് സൂക്ഷിക്കുക.

ചിത്രം 4: Product packaging showing the included components and a "1 year warranty" seal.
For technical support, service, or warranty inquiries, please contact Pretul customer service through their official channels or the retailer where the product was purchased.


