1. ആമുഖം
This manual provides comprehensive instructions for the installation, operation, and maintenance of your Antec CX700 ATX Mid Tower Gaming Case. Designed for PC enthusiasts, this case features a sleek, modern design with a tempered glass side panel and pre-installed ARGB fans to enhance visual appeal and ensure optimal airflow. Please read this manual thoroughly before beginning assembly to ensure proper setup and safe operation.
2 സ്പെസിഫിക്കേഷനുകൾ
| ഫീച്ചർ | വിശദാംശങ്ങൾ |
|---|---|
| ബ്രാൻഡ് | Antec |
| മോഡൽ നമ്പർ | CX700 |
| കേസ് തരം | മിഡ് ടവർ |
| മദർബോർഡ് അനുയോജ്യത | ATX |
| നിറം | കറുപ്പ് |
| മെറ്റീരിയൽ | അലോയ് സ്റ്റീൽ, പ്ലാസ്റ്റിക് |
| ഇനത്തിൻ്റെ ഭാരം | 5.5 കിലോഗ്രാം (12.1 പൗണ്ട്) |
| തണുപ്പിക്കൽ രീതി | വായു |
| Pre-installed ARGB Fans | 3 (Front-mounted) |
| ഫാൻ പിന്തുണ (പരമാവധി) | Front: 3x120mm, Top: 3x120mm, Rear: 1x120mm, Bottom: 3x120mm |
| USB 3.0 പോർട്ടുകൾ | 2 |
| USB Type-C Ports | 1 |
| ഓഡിയോ പോർട്ടുകൾ | Headphone, Microphone |
| ജിപിയു ക്ലിയറൻസ് (പരമാവധി) | 410 മിമി (16.14 ഇഞ്ച്) |
| HDD Support | 3.5 ഇഞ്ച് |
| SSD Support | 2.5 ഇഞ്ച് |
| PSU Length (Max) | 225 മി.മീ |
3. പാക്കേജ് ഉള്ളടക്കം
- Antec CX700 ATX Mid Tower Gaming Case
- Pre-installed ARGB Fans (3 fans, typically front-mounted as per product title)
- Accessory Box (Screws, cable ties, user manual)
- ടെമ്പർഡ് ഗ്ലാസ് സൈഡ് പാനൽ
4. സജ്ജീകരണ നിർദ്ദേശങ്ങൾ
4.1 അൺപാക്കിംഗും പരിശോധനയും
Carefully remove the case from its packaging. Inspect for any signs of damage during transit. The tempered glass panel is fragile; handle with care.
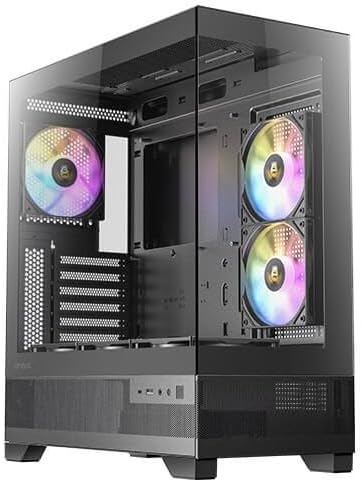
ചിത്രം 1: മുൻവശവും വശവും view of the Antec CX700 case, showcasing the tempered glass panel and pre-installed fans.
4.2 സൈഡ് പാനലുകൾ നീക്കം ചെയ്യൽ
To access the interior for component installation, remove the tempered glass side panel and the solid rear side panel.
- Locate the thumbscrews on the rear of the case securing the tempered glass panel.
- Carefully unscrew these thumbscrews.
- Gently pull the tempered glass panel away from the chassis. Lay it flat on a soft, clean surface to prevent scratches or damage.
- Repeat the process for the solid rear side panel if necessary for cable management access.

ചിത്രം 2: പിൻഭാഗം view of the Antec CX700 case, showing the rear fan and expansion slots. The side panel is removed for internal access.
4.3 മദർബോർഡ് ഇൻസ്റ്റാളേഷൻ
Install your ATX motherboard into the designated area. Ensure all standoffs are correctly aligned and secured.
4.4 ഘടക ഇൻസ്റ്റാളേഷൻ
Install your CPU, RAM, GPU (up to 410mm length), storage drives (3.5" HDD, 2.5" SSD), and power supply unit (PSU, up to 225mm length) according to their respective manuals and the case's layout.

ചിത്രം 3: മുകളിൽ view of the Antec CX700 case, highlighting the pre-installed fans and internal layout for component placement.
4.5 കേബിൾ മാനേജ്മെന്റ്
Utilize the cable routing cutouts and tie-down points behind the motherboard tray to manage cables effectively. This improves airflow and aesthetics.
4.6 Front Panel I/O Connections
Connect the front panel I/O cables (USB 3.0, USB Type-C, HD Audio, Power, Reset, LED) to the corresponding headers on your motherboard.
- പവർ ബട്ടൺ: Initiates system power.
- റീസെറ്റ് ബട്ടൺ: സിസ്റ്റം പുനരാരംഭിക്കുന്നു.
- USB 3.0 പോർട്ടുകൾ (x2): അതിവേഗ ഡാറ്റ കൈമാറ്റത്തിനായി.
- USB Type-C Port (x1): For modern device connectivity.
- ഹെഡ്ഫോൺ ജാക്ക്: ഓഡിയോ ഔട്ട്പുട്ട്.
- മൈക്രോഫോൺ ജാക്ക്: ഓഡിയോ ഇൻപുട്ട്.
5. പ്രവർത്തന നിർദ്ദേശങ്ങൾ
Once all components are installed and connected, replace the side panels. Connect your peripherals, monitor, and power cable. Press the power button on the top panel to start your system. The pre-installed ARGB fans will illuminate, providing customizable lighting effects.
6. പരിപാലനം
Regular maintenance ensures optimal performance and longevity of your PC case and components.
- പൊടി ഫിൽട്ടറുകൾ: The case includes magnetic dust filters (e.g., on the top panel) that can be easily removed and cleaned with water or a soft brush. Clean these regularly to maintain airflow and prevent dust buildup inside the case.
- ഇന്റീരിയർ ക്ലീനിംഗ്: Periodically open the side panels and use compressed air to remove dust from internal components and fans. Ensure the system is powered off and unplugged before cleaning.
- ടെമ്പർഡ് ഗ്ലാസ്: Clean the tempered glass panel with a microfiber cloth and a non-abrasive glass cleaner. Avoid harsh chemicals.
7. പ്രശ്നപരിഹാരം
നിങ്ങൾക്ക് പ്രശ്നങ്ങൾ നേരിടുകയാണെങ്കിൽ, ഇനിപ്പറയുന്ന പൊതുവായ ട്രബിൾഷൂട്ടിംഗ് ഘട്ടങ്ങൾ പരിശോധിക്കുക:
- സിസ്റ്റം ഓണാക്കുന്നില്ല:
- പവർ സപ്ലൈ വാൾ ഔട്ട്ലെറ്റുമായി ശരിയായി ബന്ധിപ്പിച്ചിട്ടുണ്ടെന്നും PSU സ്വിച്ച് 'ഓൺ' സ്ഥാനത്താണെന്നും ഉറപ്പാക്കുക.
- എല്ലാ പവർ കേബിളുകളും (24-പിൻ ATX, 8-പിൻ CPU, GPU-യ്ക്കുള്ള PCIe) മദർബോർഡിലേക്കും ഘടകങ്ങളിലേക്കും സുരക്ഷിതമായി ബന്ധിപ്പിച്ചിട്ടുണ്ടെന്ന് ഉറപ്പാക്കുക.
- മദർബോർഡിന്റെ മുൻ പാനൽ ഹെഡറുമായി ഫ്രണ്ട് പാനൽ പവർ ബട്ടൺ കേബിൾ ശരിയായി ബന്ധിപ്പിച്ചിട്ടുണ്ടോയെന്ന് പരിശോധിക്കുക.
- Fans Not Spinning / ARGB Not Lighting Up:
- Confirm that the fan power cables and ARGB cables are correctly connected to the motherboard or a dedicated ARGB controller.
- Refer to your motherboard manual for proper ARGB header connections and software control.
- ഡിസ്പ്ലേ ഔട്ട്പുട്ട് ഇല്ല:
- Ensure your monitor cable is connected to the graphics card (GPU) output, not the motherboard's integrated graphics ports (unless using integrated graphics).
- ഗ്രാഫിക്സ് കാർഡ് അതിന്റെ PCIe സ്ലോട്ടിൽ വീണ്ടും സ്ഥാപിക്കുക.
8. വാറൻ്റിയും പിന്തുണയും
The Antec CX700 ATX Mid Tower Gaming Case comes with a standard manufacturer's warranty. For specific warranty terms, duration, and to register your product, please visit the official Antec webസൈറ്റിൽ ബന്ധപ്പെടുക അല്ലെങ്കിൽ അവരുടെ ഉപഭോക്തൃ പിന്തുണയുമായി ബന്ധപ്പെടുക. വാറന്റി ക്ലെയിമുകൾക്കായി നിങ്ങളുടെ വാങ്ങിയതിന്റെ തെളിവ് സൂക്ഷിക്കുക.
For further technical assistance or support, please refer to the Antec support resources available online.


