1. ആമുഖം
This manual provides detailed instructions for setting up, operating, and maintaining your YOOSEE KAP X330 Wireless WiFi Repeater Router. Please read this manual carefully before using the device to ensure optimal performance, extended network coverage, and safety. This device is designed to easily expand the range of your existing WLAN network or create a new access point.
2. ഉൽപ്പന്നം കഴിഞ്ഞുview
2.1 പ്രധാന സവിശേഷതകൾ
- Extends the range of your WLAN network easily.
- Provides Internet access for computers located at the edge or outside the range of your main access point.
- Supports both Wireless Repeater Mode and standard Access Point (AP) Mode.
- Utilizes WLAN 802.11N for high-speed wireless access.
- Compatible with 802.11G (54 Mbps) and 802.11B (11 Mbps) standards.
- Operates on the 2.4GHz WLAN frequency.
- Ensures maximum WLAN network security with WPA2, WPA, and WEP (64/128-bit) encryptions.
- Features integrated antennas for compact design.
- Bivolt (110V / 220V) power input for versatile use.
- Supports WPS (Wi-Fi Protected Setup) for easy connection.
2.2 പാക്കേജ് ഉള്ളടക്കം
- 1x YOOSEE KAP X330 Wireless WiFi Repeater Router
- 1x ഉപയോക്തൃ മാനുവൽ
2.3 ഭൗതിക വിവരണം
The KAP X330 is a compact, white device designed to plug directly into a wall outlet. It features indicator lights on the front panel and an Ethernet port on the side for wired connections.
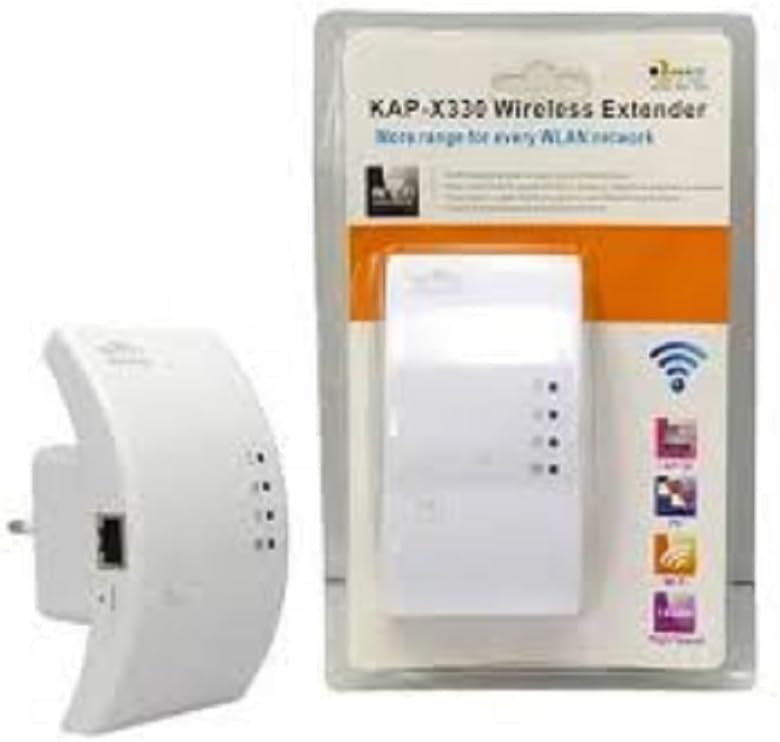
Figure 2.1: YOOSEE KAP X330 Wireless Repeater in its retail packaging and as a standalone unit. The packaging highlights its 'KAP-X330 Wireless Extender' name and 'More range for every WLAN network' slogan. The device itself is white with indicator lights and an Ethernet port visible.
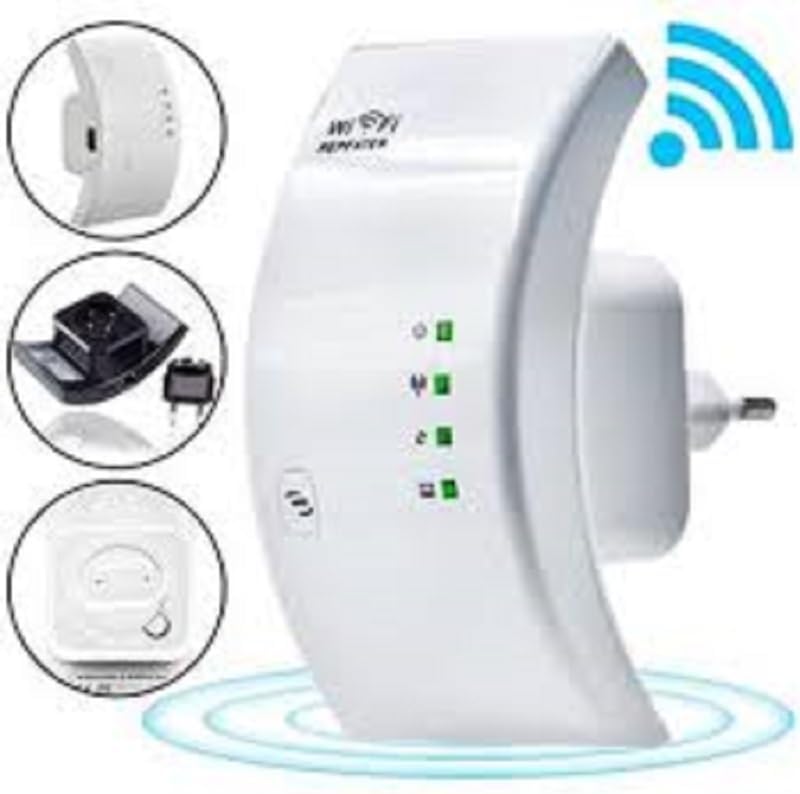
Figure 2.2: A closer look at the YOOSEE KAP X330 Wireless Repeater, emphasizing its design and features. It shows the device plugged into an outlet, with indicator lights illuminated. Insets highlight the side view with an Ethernet port, the power plug, and a reset button, along with a prominent WiFi signal icon.
3. സജ്ജീകരണ ഗൈഡ്
3.1 പവർ ചെയ്യുന്നു
- Plug the KAP X330 into a standard electrical outlet within the range of your existing WiFi network (for Repeater Mode) or near your wired internet source (for AP Mode).
- Wait for the power indicator light to turn on, indicating the device is ready.
3.2 കണക്ഷൻ മോഡുകൾ
The KAP X330 supports two main operational modes:
- റിപ്പീറ്റർ മോഡ്: Extends the coverage of an existing wireless network.
- എപി (ആക്സസ് പോയിന്റ്) മോഡ്: Creates a new wireless network from a wired Ethernet connection.
3.3 Configuration Steps (Repeater Mode)
- Connect to the Repeater: On your computer or smartphone, connect to the repeater's default WiFi network (SSID usually starts with 'Wireless-N' or similar, without a password).
- പ്രവേശനം Web ഇൻ്റർഫേസ്: എ തുറക്കുക web ബ്രൗസർ ചെയ്ത് സ്ഥിരസ്ഥിതി IP വിലാസം നൽകുക (ഉദാ.
192.168.1.1or192.168.10.1) or the default domain name (e.g.,repeater.net). Refer to the label on the device or the quick start guide for the exact address. - ലോഗിൻ: Enter the default username and password (commonly 'admin' for both).
- റിപ്പീറ്റർ മോഡ് തിരഞ്ഞെടുക്കുക: On the setup page, select 'Repeater Mode'.
- നെറ്റ്വർക്കുകൾക്കായി സ്കാൻ ചെയ്യുക: The device will scan for available wireless networks. Select your home WiFi network from the list.
- പാസ്വേഡ് നൽകുക: Enter the password for your home WiFi network.
- Configure Extended SSID (Optional): You can choose to keep the same SSID as your main network or create a new one (e.g., 'YourNetwork_EXT').
- ക്രമീകരണങ്ങൾ സംരക്ഷിക്കുക: Click 'Apply' or 'Save'. The repeater will restart.
- വീണ്ടും ബന്ധിപ്പിക്കുക: After the restart, connect your devices to the extended WiFi network.
3.4 Configuration Steps (AP Mode)
- ഇതർനെറ്റ് കേബിൾ ബന്ധിപ്പിക്കുക: Connect an Ethernet cable from your router or modem to the LAN/WAN port on the KAP X330.
- Connect to the Repeater: On your computer or smartphone, connect to the repeater's default WiFi network (SSID usually starts with 'Wireless-N' or similar, without a password).
- പ്രവേശനം Web ഇൻ്റർഫേസ്: എ തുറക്കുക web ബ്രൗസർ ചെയ്ത് സ്ഥിരസ്ഥിതി IP വിലാസം നൽകുക (ഉദാ.
192.168.1.1or192.168.10.1) or the default domain name (e.g.,repeater.net). - ലോഗിൻ: Enter the default username and password (commonly 'admin' for both).
- എപി മോഡ് തിരഞ്ഞെടുക്കുക: On the setup page, select 'AP Mode'.
- Configure New Network: നിങ്ങളുടെ പുതിയ വയർലെസ് നെറ്റ്വർക്കിനായി ഒരു പുതിയ SSID (നെറ്റ്വർക്ക് നാമം) ഉം ശക്തമായ ഒരു പാസ്വേഡും സജ്ജമാക്കുക.
- ക്രമീകരണങ്ങൾ സംരക്ഷിക്കുക: Click 'Apply' or 'Save'. The device will restart.
- വീണ്ടും ബന്ധിപ്പിക്കുക: After the restart, connect your devices to the newly created WiFi network.
3.5 WPS Setup (Wi-Fi Protected Setup)
WPS allows for a quick and easy connection to your main router without needing to enter the password manually.
- Plug in the KAP X330 and wait for it to power on.
- നിങ്ങളുടെ പ്രധാന റൂട്ടറിലെ WPS ബട്ടൺ അമർത്തുക.
- Within two minutes, press the WPS button on the KAP X330.
- The devices will automatically connect and configure the repeater. The signal indicator lights on the repeater should show a strong connection.
4. ഓപ്പറേഷൻ
4.1 ഇൻഡിക്കേറ്റർ ലൈറ്റുകൾ
The KAP X330 features several indicator lights on its front panel to provide status information:
- പവർ എൽഇഡി: ഉപകരണം ഓണാണോ എന്ന് സൂചിപ്പിക്കുന്നു.
- WLAN/WiFi LED: Shows wireless activity and connection status.
- ലാൻ/വാൻ എൽഇഡി: Indicates activity on the Ethernet port.
- സിഗ്നൽ ശക്തി LED-കൾ: (If present) Indicate the strength of the signal received from the main router in Repeater Mode. More lights usually mean a stronger signal.
4.2 ഒപ്റ്റിമൽ പ്ലേസ്മെന്റ്
For best performance in Repeater Mode, place the KAP X330 halfway between your main router and the area where you need extended WiFi coverage. Avoid placing it near large metal objects, concrete walls, or other devices that emit radio frequency interference (e.g., microwaves, cordless phones).
5. പരിപാലനം
5.1 വൃത്തിയാക്കൽ
To clean the device, unplug it from the power outlet. Use a soft, dry cloth to wipe the exterior. Do not use liquid cleaners or aerosol sprays.
5.2 ഫേംവെയർ അപ്ഡേറ്റുകൾ
Periodically check the YOOSEE official website for firmware updates. Firmware updates can improve performance, add new features, or fix bugs. Follow the instructions provided with the firmware update package carefully.
6. പ്രശ്നപരിഹാരം
6.1 No Internet Access After Setup
- Ensure the repeater is receiving a strong signal from your main router (check signal strength LEDs).
- Verify that you entered the correct WiFi password for your main network during setup.
- Try restarting both your main router and the KAP X330.
- If in AP Mode, ensure the Ethernet cable is securely connected and your main router is providing internet.
6.2 Weak Signal or Slow Speed
- Relocate the KAP X330 closer to your main router, ensuring it's still within the desired coverage area.
- Avoid physical obstructions like thick walls or large metal objects.
- മറ്റ് ഇലക്ട്രോണിക് ഉപകരണങ്ങളിൽ നിന്നുള്ള ഇടപെടൽ പരിശോധിക്കുക.
6.3 ആക്സസ് ചെയ്യാൻ കഴിയില്ല Web ഇൻ്റർഫേസ്
- Ensure your device is connected to the repeater's WiFi network (or via Ethernet if in AP mode).
- Verify the IP address or domain name entered in the browser is correct.
- നിങ്ങളുടെ ബ്രൗസറിന്റെ കാഷെ മായ്ക്കുക അല്ലെങ്കിൽ മറ്റൊരു ബ്രൗസർ പരീക്ഷിക്കുക.
- നിങ്ങളുടെ കമ്പ്യൂട്ടറിലെ ഏതെങ്കിലും VPN അല്ലെങ്കിൽ ഫയർവാൾ സോഫ്റ്റ്വെയർ താൽക്കാലികമായി പ്രവർത്തനരഹിതമാക്കുക.
6.4 ഫാക്ടറി റീസെറ്റ്
If you encounter persistent issues or forget your login credentials, you can perform a factory reset:
- With the device powered on, use a paperclip or a thin object to press and hold the reset button (usually located in a small pinhole) for about 5-10 seconds.
- Release the button when the indicator lights flash or the device restarts.
- The device will revert to its factory default settings, and you will need to reconfigure it.
7 സ്പെസിഫിക്കേഷനുകൾ
| ഫീച്ചർ | സ്പെസിഫിക്കേഷൻ |
|---|---|
| നിർമ്മാതാവ് | യൂസി |
| മോഡൽ | KAP-X330 |
| വയർലെസ് സ്റ്റാൻഡേർഡ് | 802.11n (compatible with 802.11g/b) |
| ആവൃത്തി | 2.4GHz |
| സുരക്ഷാ പ്രോട്ടോക്കോളുകൾ | WPA2, WPA, WEP (64/128-bit) |
| പ്രത്യേക സവിശേഷതകൾ | WPS, Standard AP Mode |
| പവർ ഇൻപുട്ട് | Bivolt 110V / 220V |
| അളവുകൾ (L x W x H) | 15 x 12 x 8 സെ.മീ |
| ഭാരം | 200 ഗ്രാം |
| അനുയോജ്യമായ ഉപകരണങ്ങൾ | Laptop, Smartphone, Tablet, Smart TV |
8. വാറൻ്റിയും പിന്തുണയും
For warranty information and technical support, please refer to the contact details provided by your retailer or visit the official YOOSEE webവാറന്റി ക്ലെയിമുകൾക്കുള്ള വാങ്ങലിന്റെ തെളിവായി നിങ്ങളുടെ വാങ്ങൽ രസീത് സൂക്ഷിക്കുക.


