ആമുഖം
This manual provides detailed instructions for setting up, operating, maintaining, and troubleshooting your GMKtec Mini PC M2 Pro. Please read this guide thoroughly to ensure proper use and to maximize the performance and longevity of your device.
1. സജ്ജീകരണം
Follow these steps to set up your GMKtec Mini PC M2 Pro for the first time.
1.1 അൺബോക്സിംഗും ഘടകങ്ങളും
പാക്കേജിംഗിൽ നിന്ന് എല്ലാ ഘടകങ്ങളും ശ്രദ്ധാപൂർവ്വം നീക്കം ചെയ്യുക. ഇനിപ്പറയുന്ന ഇനങ്ങൾ നിങ്ങളുടെ പക്കലുണ്ടെന്ന് ഉറപ്പാക്കുക:
- GMKtec Mini PC M2 Pro unit
- പവർ അഡാപ്റ്റർ
- HDMI കേബിൾ
- VESA Mount Bracket (if included)
- ഉപയോക്തൃ മാനുവൽ (ഈ പ്രമാണം)

Figure 1.1: The GMKtec Mini PC M2 Pro unit, showcasing its compact design and various ports on the rear.
1.2 പെരിഫറലുകൾ ബന്ധിപ്പിക്കുന്നു
Connect your display, keyboard, and mouse to the Mini PC.
- Connect your monitor(s) to the HDMI or USB Type-C ports using the provided HDMI cable or a compatible cable. The Mini PC supports up to three 4K displays simultaneously.
- Connect your USB keyboard and mouse to any available USB 3.2 ports.
- For wired network access, connect an Ethernet cable to the RJ45 2.5G port.
- For audio output, connect speakers or headphones to the 3.5mm audio jack.

Figure 1.2: Detailed diagram illustrating the various input/output ports on the GMKtec Mini PC M2 Pro, including USB-A 3.2, Power Button, Audio (3.5mm CTIA), RJ45 (2.5G), HDMI (4K@60Hz), USB Type-C (DP/DATA), and DC power input.
1.3 പവർ ചെയ്യുന്നു
എല്ലാ പെരിഫറലുകളും ബന്ധിപ്പിച്ചുകഴിഞ്ഞാൽ:
- Connect the power adapter to the DC-in port on the Mini PC.
- പവർ അഡാപ്റ്റർ ഒരു പവർ ഔട്ട്ലെറ്റിൽ പ്ലഗ് ചെയ്യുക.
- മിനി പിസിയുടെ മുൻവശത്തുള്ള പവർ ബട്ടൺ അമർത്തുക. പവർ ഇൻഡിക്കേറ്റർ ലൈറ്റ് പ്രകാശിക്കും.
- The system will boot up. Follow the on-screen instructions for initial Windows 11 Pro setup.
2. പ്രവർത്തന നിർദ്ദേശങ്ങൾ
This section covers the general operation and key features of your Mini PC.
2.1 പ്രകടനം കഴിഞ്ഞുview
The GMKtec Mini PC M2 Pro is equipped with an Intel Core i7-1195G7 processor, offering robust performance for daily tasks, office applications, and multimedia consumption. It features 4 cores and 8 threads with a maximum turbo frequency of 5.0 GHz.

Figure 2.1: Performance comparison highlighting the Intel Core i7-1195G7 processor's capabilities relative to other CPUs, demonstrating its efficiency for demanding tasks.
2.2 ഡിസ്പ്ലേ കോൺഫിഗറേഷൻ
The Mini PC supports multiple display outputs, allowing for an expanded workspace or multi-monitor setups.
- Two HDMI ports (4K @ 60Hz)
- One USB Type-C port (4K @ 60Hz)
You can connect up to three independent 4K displays simultaneously for enhanced productivity in office, design, or entertainment scenarios.

Figure 2.2: An illustration of the Mini PC connected to three external monitors, demonstrating its triple display output capability for various applications like office work, film, and design.
2.3 നെറ്റ്വർക്കും കണക്റ്റിവിറ്റിയും
The Mini PC offers comprehensive connectivity options:
- Wi-Fi 6: അതിവേഗ വയർലെസ് ഇന്റർനെറ്റ് ആക്സസിനായി.
- ബ്ലൂടൂത്ത് 5.2: കീബോർഡുകൾ, മൗസുകൾ, ഹെഡ്ഫോണുകൾ തുടങ്ങിയ വയർലെസ് പെരിഫറലുകൾ ബന്ധിപ്പിക്കുന്നതിന്.
- 2.5G RJ45 Ethernet: Provides ultra-fast wired network speeds for stable and rapid data transfer.
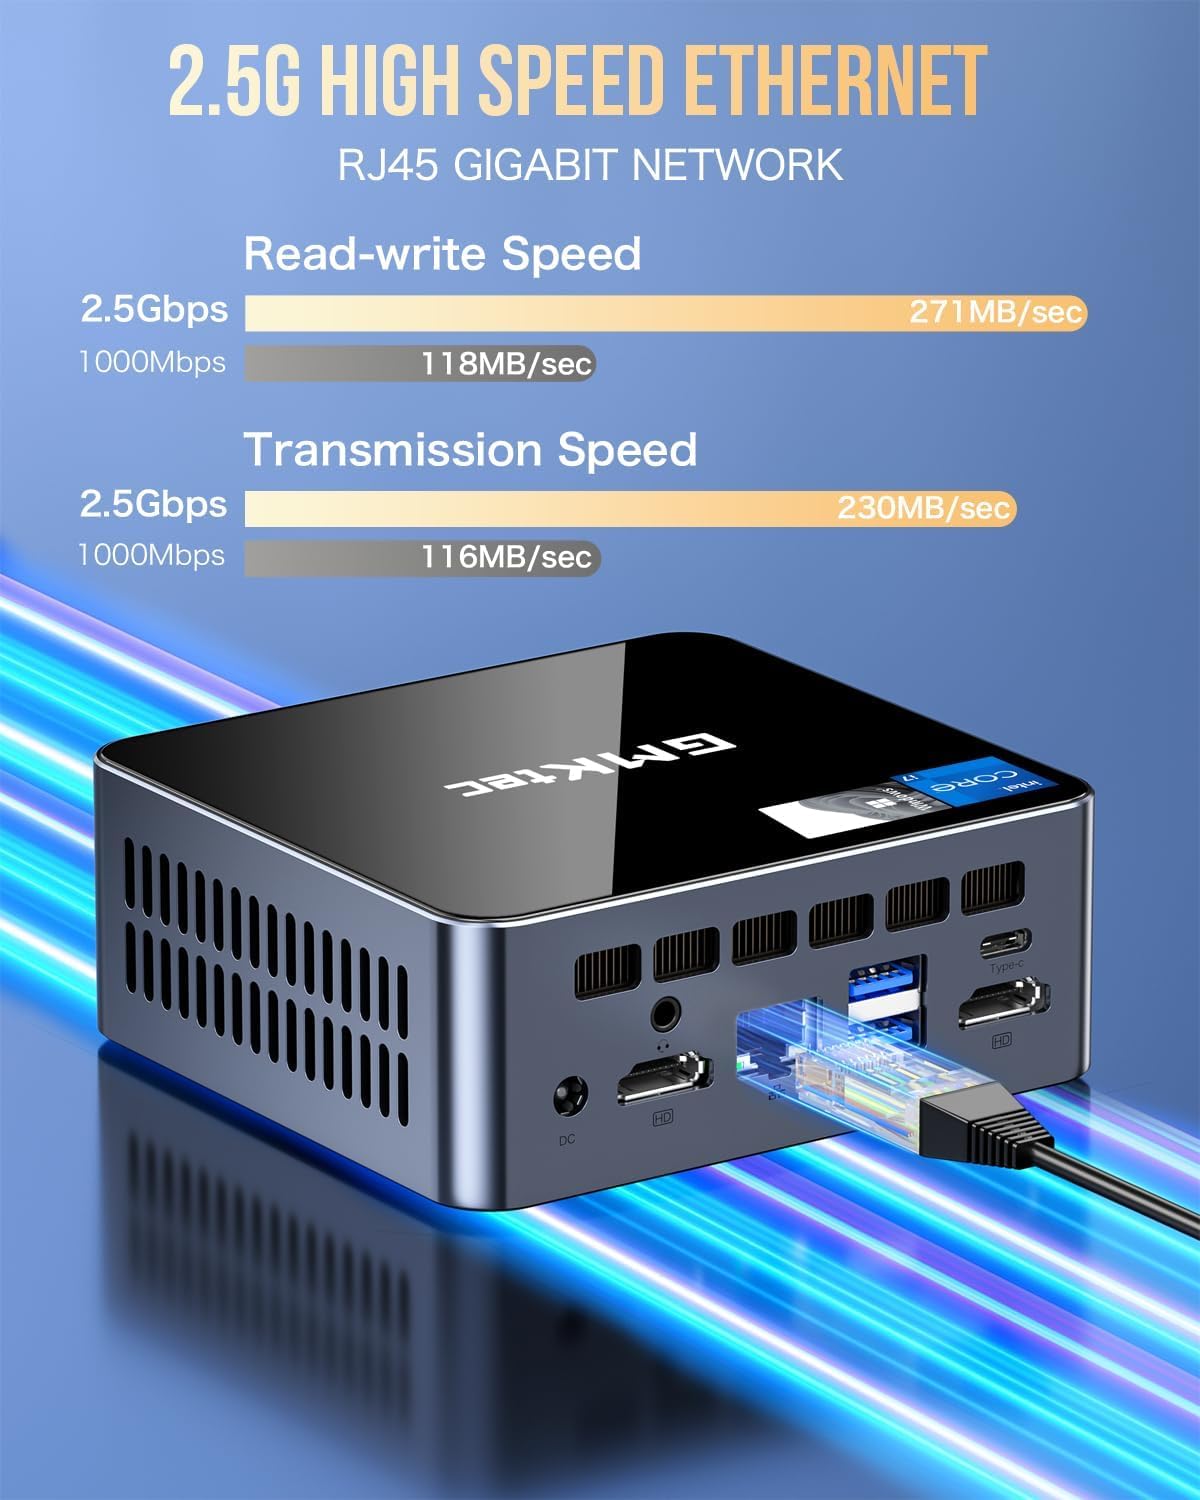
Figure 2.3: Visual representation of the 2.5G high-speed Ethernet port, highlighting its read-write and transmission speeds for efficient network performance.
2.4 പ്ലേസ്മെന്റ് ഓപ്ഷനുകൾ
The compact design of the GMKtec Mini PC M2 Pro allows for flexible placement:
- ഡെസ്ക്ടോപ്പ് പ്ലേസ്മെന്റ്: Its small footprint makes it ideal for traditional desktop setups, saving valuable desk space.
- VESA ഇൻസ്റ്റാളേഷൻ: The included VESA mount bracket allows you to attach the Mini PC to the back of a compatible monitor or to a wall, creating a clean and clutter-free workspace.

Figure 2.4: Demonstrates both desktop placement and VESA installation options for the Mini PC, illustrating how it can be discreetly mounted behind a monitor.
3. പരിപാലനം
Proper maintenance ensures the longevity and optimal performance of your Mini PC.
3.1 വൃത്തിയാക്കൽ
- Regularly clean the exterior of the Mini PC with a soft, dry cloth.
- Use compressed air to clear dust from ventilation grilles to prevent overheating. Ensure the device is powered off before cleaning.
- ലിക്വിഡ് ക്ലീനറുകളോ ഉരച്ചിലുകളുള്ള വസ്തുക്കളോ ഉപയോഗിക്കുന്നത് ഒഴിവാക്കുക.
3.2 സോഫ്റ്റ്വെയർ അപ്ഡേറ്റുകൾ
- Keep your operating system (Windows 11 Pro) updated to the latest version to ensure security and performance improvements.
- Regularly check for driver updates for your Intel graphics and other components from the GMKtec official website or Intel's support pages.
3.3 സംഭരണ വികസനം
The Mini PC offers flexible storage expansion options:
- The M.2 2280 NVMe (PCIe3.0) SSD can be expanded up to 2TB.
- An additional M.2 2242 SATA slot is available for expansion up to 2TB.
- DDR4 dual-channel RAM supports expansion up to 64GB.
For detailed instructions on upgrading components, please refer to the official GMKtec support resources or consult a qualified technician.
4. പ്രശ്നപരിഹാരം
നിങ്ങൾ നേരിട്ടേക്കാവുന്ന പൊതുവായ പ്രശ്നങ്ങളെ ഈ വിഭാഗം അഭിസംബോധന ചെയ്യുകയും പരിഹാരങ്ങൾ നൽകുകയും ചെയ്യുന്നു.
4.1 വൈദ്യുതിയില്ല
- പവർ അഡാപ്റ്റർ മിനി പിസിയിലേക്കും പ്രവർത്തിക്കുന്ന ഒരു പവർ ഔട്ട്ലെറ്റിലേക്കും സുരക്ഷിതമായി ബന്ധിപ്പിച്ചിട്ടുണ്ടെന്ന് ഉറപ്പാക്കുക.
- മറ്റൊരു ഉപകരണം പ്ലഗ് ഇൻ ചെയ്ത് പവർ ഔട്ട്ലെറ്റ് പ്രവർത്തനക്ഷമമാണെന്ന് ഉറപ്പാക്കുക.
- Check if the power adapter's indicator light (if any) is on.
4.2 ഡിസ്പ്ലേ ഔട്ട്പുട്ട് ഇല്ല
- Confirm that the monitor is powered on and set to the correct input source (HDMI, USB-C).
- Ensure the HDMI or USB-C cable is securely connected to both the Mini PC and the monitor.
- Try connecting the Mini PC to a different monitor or using a different cable to rule out display or cable issues.
4.3 നെറ്റ്വർക്ക് കണക്റ്റിവിറ്റി പ്രശ്നങ്ങൾ
- വയർഡ് (ഇഥർനെറ്റ്): Check if the Ethernet cable is properly connected and if the network lights on the RJ45 port are active. Restart your router/modem.
- വയർലെസ് (വൈ-ഫൈ): Ensure Wi-Fi is enabled in Windows settings. Verify you are connected to the correct network and enter the password correctly. Restart your Wi-Fi router.
- ബ്ലൂടൂത്ത്: Ensure Bluetooth is enabled in Windows settings and that the device you are trying to connect is in pairing mode.
4.4 സിസ്റ്റം സ്ലോഡൗൺ അല്ലെങ്കിൽ ഫ്രീസിംഗ്
- പശ്ചാത്തലത്തിൽ പ്രവർത്തിക്കുന്ന അനാവശ്യ ആപ്ലിക്കേഷനുകൾ അടയ്ക്കുക.
- ഉയർന്ന CPU, RAM, അല്ലെങ്കിൽ ഡിസ്ക് ഉപയോഗത്തിനായി ടാസ്ക് മാനേജർ (Ctrl+Shift+Esc) പരിശോധിക്കുക.
- Ensure the Mini PC has adequate ventilation and is not overheating. Clean dust from vents if necessary.
- ക്ഷുദ്രവെയറുകൾക്കോ വൈറസുകൾക്കോ വേണ്ടി ഒരു സിസ്റ്റം സ്കാൻ പ്രവർത്തിപ്പിക്കുക.
5 സ്പെസിഫിക്കേഷനുകൾ
Detailed technical specifications for the GMKtec Mini PC M2 Pro.
| ഫീച്ചർ | സ്പെസിഫിക്കേഷൻ |
|---|---|
| ബ്രാൻഡ് | ജിഎംകെടെക് |
| മോഡൽ നമ്പർ | GMKtec NUCBOX M2 Pro |
| പ്രോസസ്സർ | Intel Core i7-1195G7 (4 Cores, 8 Threads, up to 5.0GHz) |
| ഗ്രാഫിക്സ് | Intel Iris Xe Graphics G7 |
| റാം | 16GB DDR4 3200MHz (Expandable up to 64GB) |
| സംഭരണം | 512GB PCIe SSD (M.2 2280 NVMe, Expandable up to 2TB) + M.2 2242 SATA slot (Expandable up to 2TB) |
| ഓപ്പറേറ്റിംഗ് സിസ്റ്റം | വിൻഡോസ് 11 പ്രോ |
| വീഡിയോ ഔട്ട്പുട്ട് | 2 x HDMI (4K@60Hz), 1 x USB Type-C (4K@60Hz) - Supports Triple Display |
| USB പോർട്ടുകൾ | 4 x USB 3.2 |
| നെറ്റ്വർക്ക് | Wi-Fi 6, Bluetooth 5.2, 1 x RJ45 2.5G Ethernet |
| ഓഡിയോ | 3.5mm CTIA Audio Jack |
| അളവുകൾ | ഏകദേശം 11.38 x 10.59 x 4.24 സെ.മീ (4.48 x 4.17 x 1.67 ഇഞ്ച്) |
| നിറം | കറുപ്പ് |
6. വാറൻ്റിയും പിന്തുണയും
GMKtec is committed to providing excellent customer service and product support.
6.1 വാറൻ്റി വിവരങ്ങൾ
Your GMKtec Mini PC M2 Pro comes with a 1 വർഷത്തെ പരിമിത വാറൻ്റി from the date of purchase. This warranty covers defects in design and manufacturing. Please retain your proof of purchase for warranty claims.
6.2 ഉപഭോക്തൃ പിന്തുണ
For any technical assistance, troubleshooting, or warranty inquiries, please contact GMKtec's professional after-sales team:
- ഇമെയിൽ: support@gmktec.com
- ഓൺലൈൻ പിന്തുണ: Visit the official GMKtec website for FAQs, driver downloads, and additional support resources.
Figure 6.1: Contact information for GMKtec customer support, including email for after-sales inquiries.


