1. ആമുഖം
നിങ്ങളുടെ ലാ ലായുടെ ശരിയായ ഇൻസ്റ്റാളേഷൻ, പ്രവർത്തനം, പരിപാലനം എന്നിവയ്ക്ക് ആവശ്യമായ വിവരങ്ങൾ ഈ മാനുവൽ നൽകുന്നു.View 2K സോളാർ ക്യാമറ ഔട്ട്ഡോർ വയർലെസ് സെക്യൂരിറ്റി സിസ്റ്റം. മികച്ച പ്രകടനവും സുരക്ഷയും ഉറപ്പാക്കാൻ ഉൽപ്പന്നം ഉപയോഗിക്കുന്നതിന് മുമ്പ് ദയവായി ഈ മാനുവൽ നന്നായി വായിക്കുക. തുടർച്ചയായ വൈദ്യുതിക്കായി സംയോജിത സോളാർ പാനലുകളുള്ള നാല് (4) 2K QHD വയർലെസ് ക്യാമറകൾ ഈ സിസ്റ്റത്തിൽ ഉൾപ്പെടുന്നു.
2. ഉൽപ്പന്നം കഴിഞ്ഞുview
ലാView 2K സോളാർ ക്യാമറ എന്നത് ഉപയോഗ എളുപ്പത്തിനും സമഗ്രമായ നിരീക്ഷണത്തിനുമായി രൂപകൽപ്പന ചെയ്തിരിക്കുന്ന ഉയർന്ന പ്രകടനമുള്ള ഔട്ട്ഡോർ സുരക്ഷാ പരിഹാരമാണ്. പ്രധാന സവിശേഷതകളിൽ ഇവ ഉൾപ്പെടുന്നു:
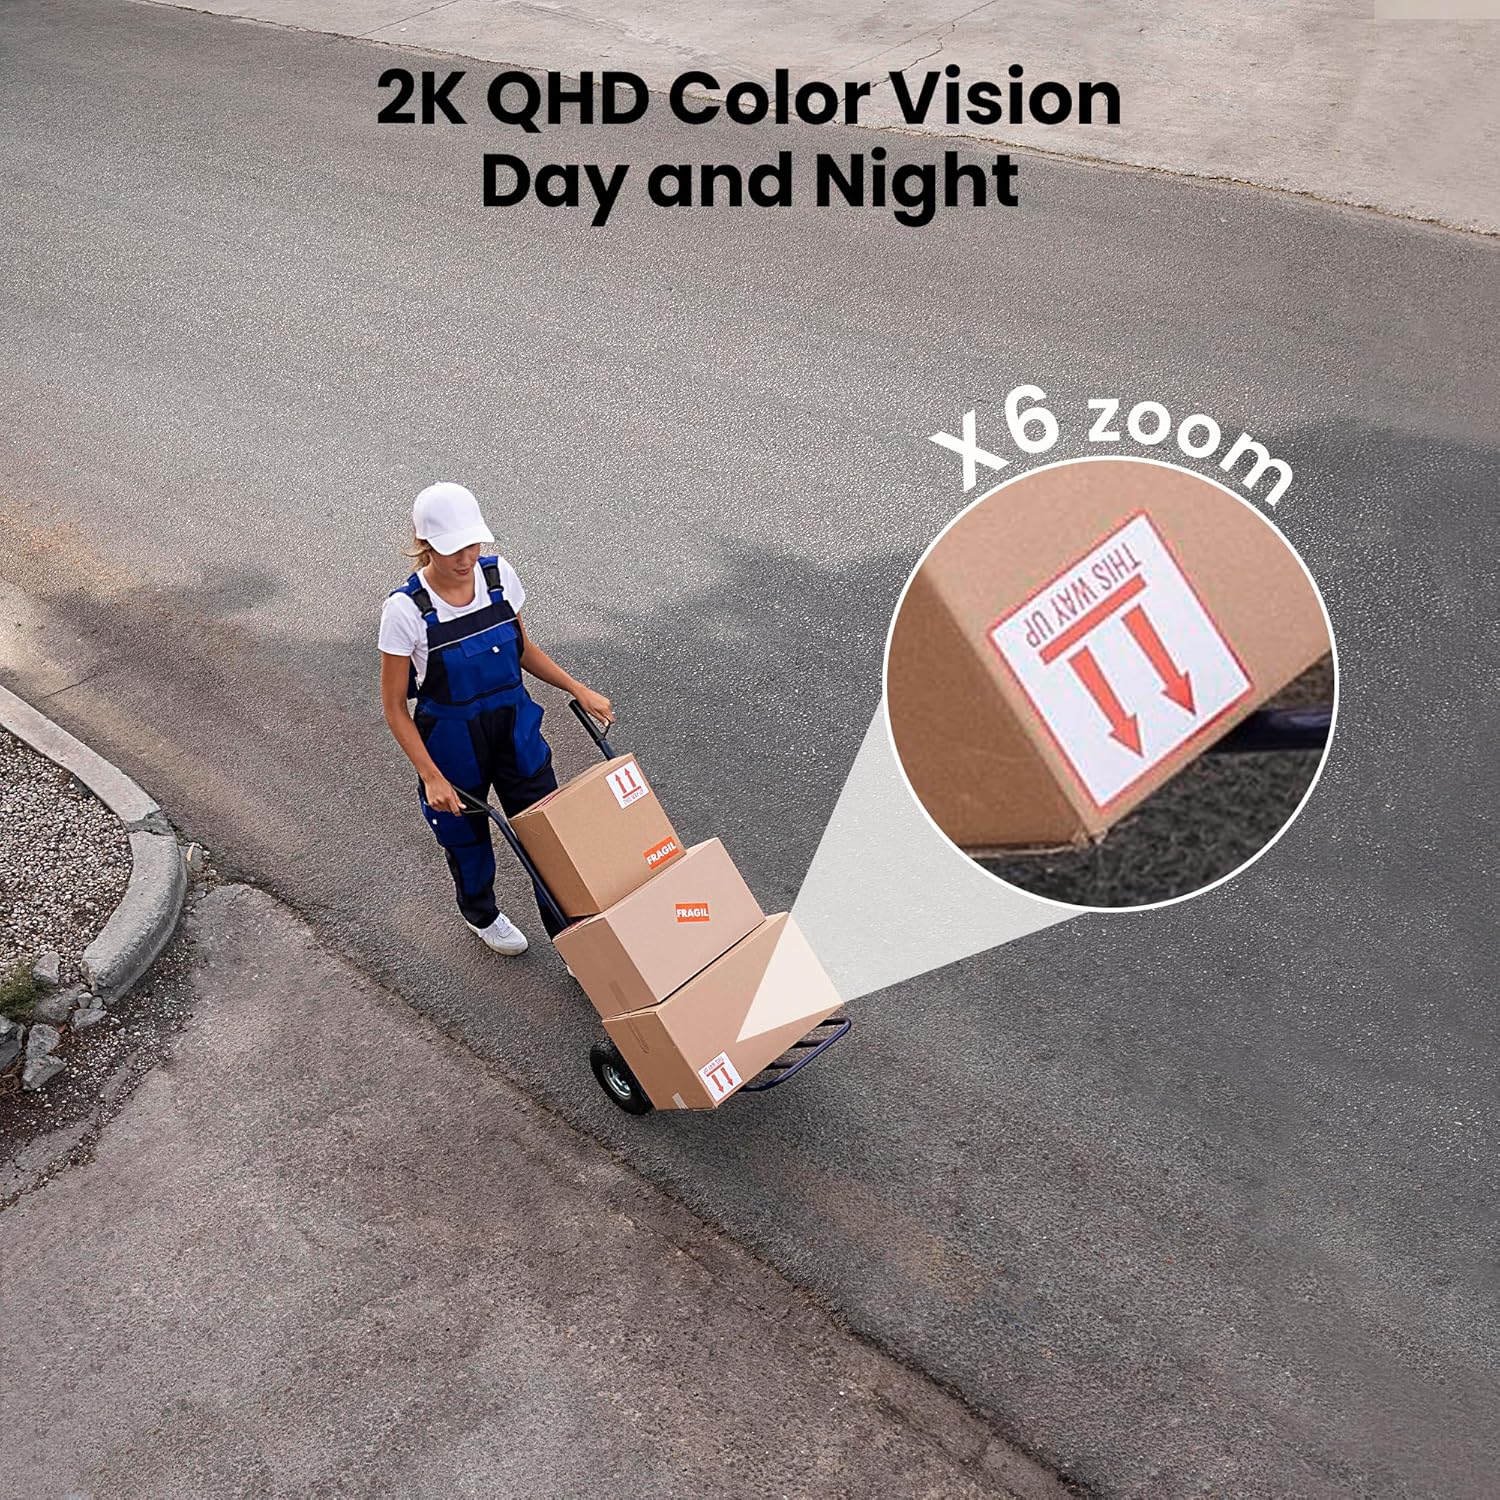
- 2K QHD & കളർ നൈറ്റ് വിഷൻ: രാവും പകലും വളരെ വ്യക്തമായ വർണ്ണ ചിത്രങ്ങൾ പകർത്തുന്നു.
- 100% വയർലെസ്സും സൗരോർജ്ജവും: വയറിംഗും മാനുവൽ റീചാർജിംഗും ഒഴിവാക്കുന്നു.
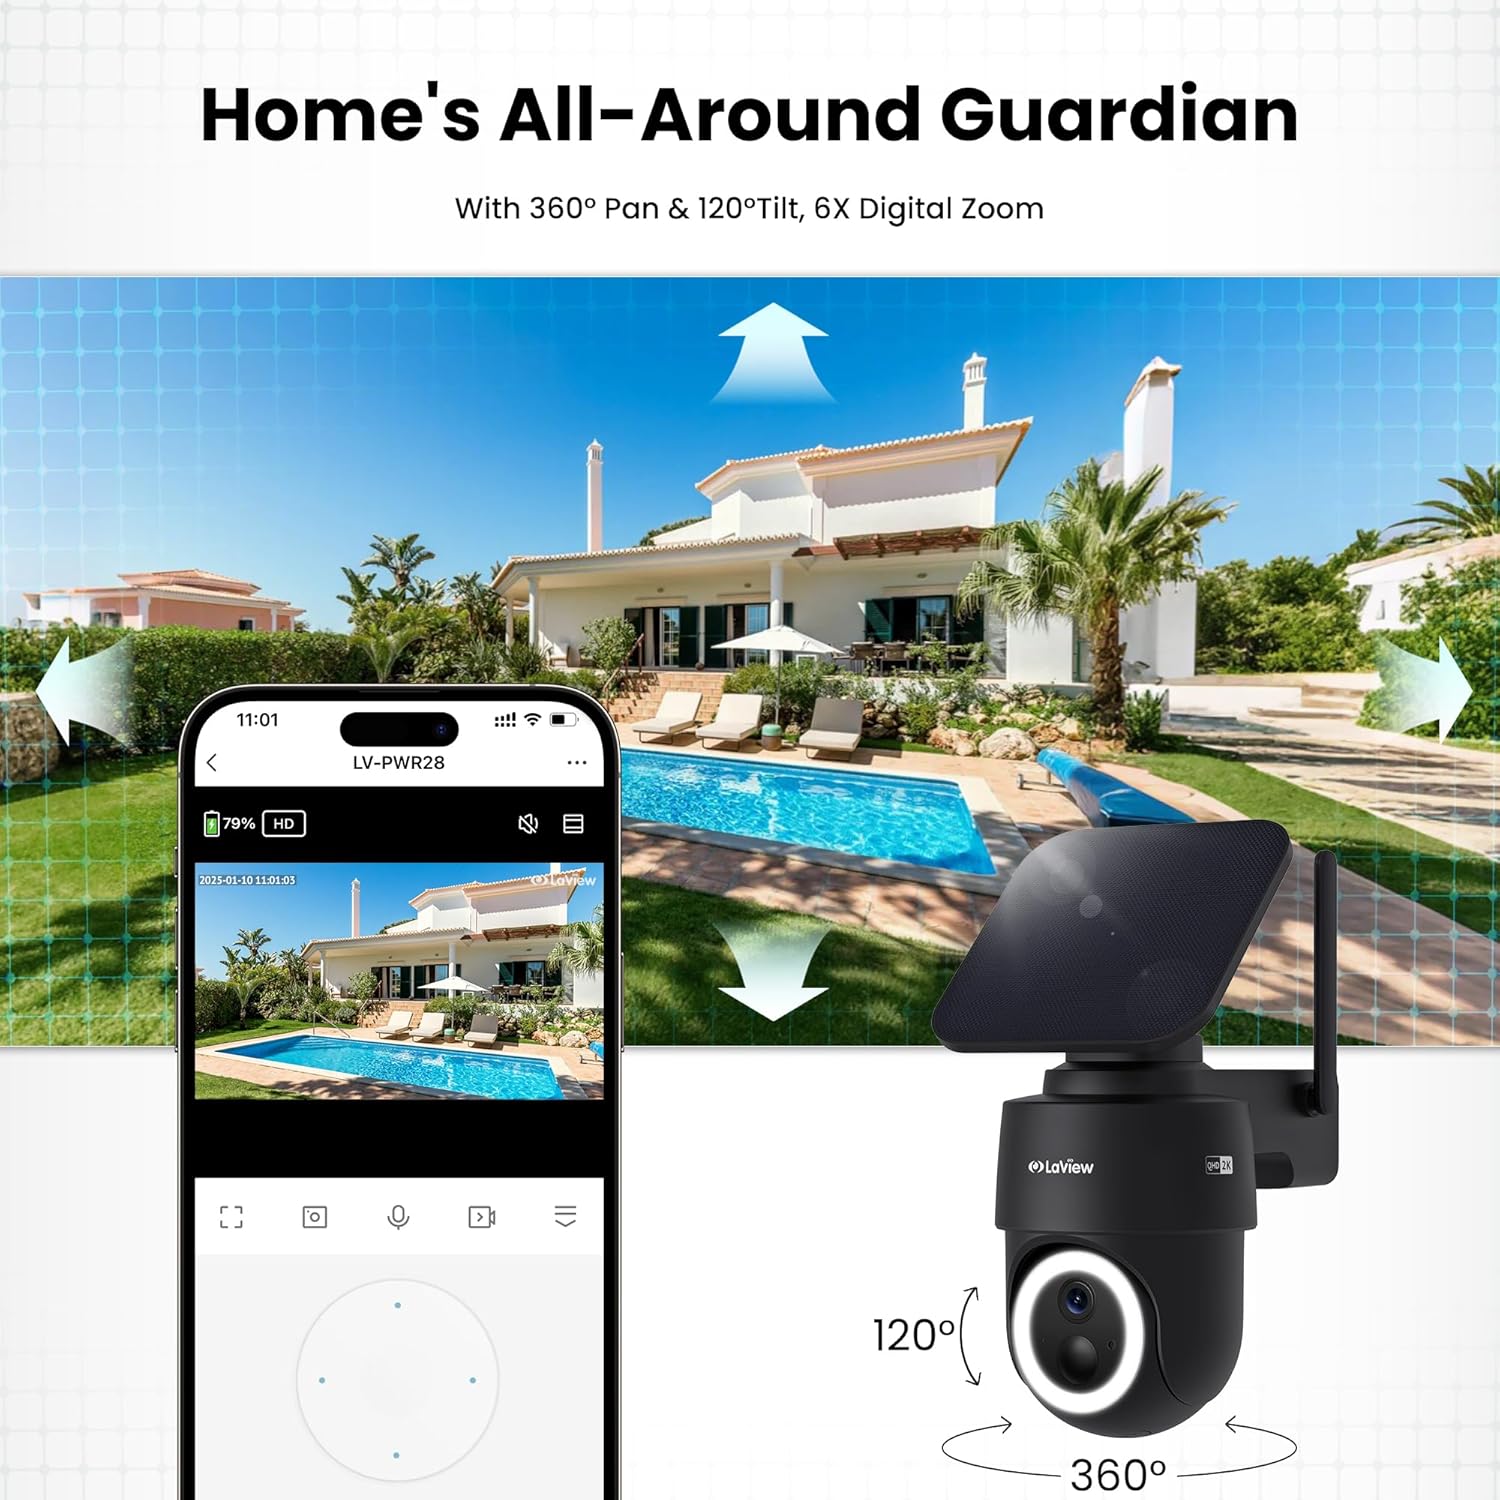
- 360° പാൻ & 120° ചരിവ്: ബ്ലൈൻഡ് സ്പോട്ടുകളില്ലാതെ പൂർണ്ണ കവറേജ് നൽകുന്നു.
- സ്മാർട്ട് PIR കണ്ടെത്തൽ: ആളുകളെയും വാഹനങ്ങളെയും വളർത്തുമൃഗങ്ങളെയും കൃത്യമായി കണ്ടെത്തുന്നതിലൂടെ തെറ്റായ അലാറങ്ങൾ കുറയ്ക്കുന്നു.
- ടു-വേ ഓഡിയോ: സന്ദർശകരുമായി ആശയവിനിമയം സാധ്യമാക്കുകയോ നുഴഞ്ഞുകയറ്റക്കാരെ തടയുകയോ ചെയ്യുന്നു.
- IP65 കാലാവസ്ഥാ പ്രതിരോധം: കഠിനമായ ബാഹ്യ സാഹചര്യങ്ങളെ നേരിടാൻ രൂപകൽപ്പന ചെയ്തിരിക്കുന്നു.
- മൾട്ടി-യൂസർ പങ്കിടൽ: ഒരേസമയം 20 എണ്ണം വരെ പിന്തുണയ്ക്കുന്നു viewers.
- സ്മാർട്ട് ഹോം അനുയോജ്യത: Amazon Alexa, Google Assistant എന്നിവയിൽ പ്രവർത്തിക്കുന്നു.

ചിത്രം 1: ലാView 2K സോളാർ ക്യാമറ ഔട്ട്ഡോർ വയർലെസ് സെക്യൂരിറ്റി സിസ്റ്റം (4 പായ്ക്ക്)
3. ബോക്സിൽ എന്താണുള്ളത്?
നിങ്ങളുടെ ലാView 2K സോളാർ ക്യാമറ സിസ്റ്റത്തിൽ താഴെ പറയുന്ന ഘടകങ്ങൾ ഉൾപ്പെടുന്നു:
- 4 x ലView 2K സോളാർ ക്യാമറ ബോഡികൾ
- 4 x സോളാർ പാനലുകൾ (മോഡൽ വകഭേദത്തെ ആശ്രയിച്ച് സംയോജിതമോ വേറിട്ടതോ)
- മൗണ്ടിംഗ് ഹാർഡ്വെയർ (സ്ക്രൂകൾ, ആങ്കറുകൾ, മൗണ്ടിംഗ് ബ്രാക്കറ്റുകൾ)
- USB-C ചാർജിംഗ് കേബിൾ
- ക്വിക്ക് സ്റ്റാർട്ട് ഗൈഡ് / യൂസർ മാനുവൽ

ചിത്രം 2: ലാ-യുടെ സാധാരണ ബോക്സ് ഉള്ളടക്കങ്ങൾView 2K സോളാർ ക്യാമറ.
4. സജ്ജീകരണം
4.1 പ്രാരംഭ ക്യാമറ സജ്ജീകരണം
- ക്യാമറ ചാർജ് ചെയ്യുക: ഇൻസ്റ്റാൾ ചെയ്യുന്നതിന് മുമ്പ് നൽകിയിരിക്കുന്ന USB-C കേബിൾ ഉപയോഗിച്ച് ക്യാമറ ബാറ്ററി പൂർണ്ണമായും ചാർജ് ചെയ്യുക.
- ആപ്പ് ഡൗൺലോഡ് ചെയ്യുക: "Wans" ഡൗൺലോഡ് ചെയ്ത് ഇൻസ്റ്റാൾ ചെയ്യുക.View നിങ്ങളുടെ സ്മാർട്ട്ഫോണിന്റെ ആപ്പ് സ്റ്റോറിൽ നിന്ന് "ക്ലൗഡ്" ആപ്പ് (Android, iOS എന്നിവയിൽ ലഭ്യമാണ്).
- പവർ ഓൺ: ക്യാമറയുടെ അടിയിലുള്ള വാട്ടർപ്രൂഫ് കവർ തുറക്കുക. ഒരു മണിനാദം കേൾക്കുന്നതുവരെയും ക്യാമറ സ്വയം പരിശോധന ആരംഭിക്കുന്നതുവരെയും പവർ ബട്ടൺ ഏകദേശം 5 സെക്കൻഡ് അമർത്തിപ്പിടിക്കുക.
- ജോടിയാക്കൽ: വാൻസ് തുറക്കുകView ക്ലൗഡ് ആപ്പ്, ഒരു അക്കൗണ്ട് സൃഷ്ടിച്ച് ലോഗിൻ ചെയ്യുക. "+" അല്ലെങ്കിൽ "ഉപകരണം ചേർക്കുക" ബട്ടൺ ടാപ്പ് ചെയ്യുക. ആപ്പ് സമീപത്തുള്ള ഉപകരണങ്ങളെ ബ്ലൂടൂത്ത് വഴി സ്വയമേവ കണ്ടെത്തും. ജോടിയാക്കൽ പ്രക്രിയ പൂർത്തിയാക്കാൻ ആപ്പിനുള്ളിലെ നിർദ്ദേശങ്ങൾ പാലിക്കുക. നിങ്ങളുടെ സ്മാർട്ട്ഫോൺ 2.4GHz വൈഫൈ നെറ്റ്വർക്കിലേക്ക് കണക്റ്റുചെയ്തിട്ടുണ്ടെന്ന് ഉറപ്പാക്കുക.
4.2 ഫിസിക്കൽ ഇൻസ്റ്റലേഷൻ
- ഒരു ലൊക്കേഷൻ തിരഞ്ഞെടുക്കുക: നല്ല വൈ-ഫൈ സിഗ്നൽ ശക്തിയും ആവശ്യത്തിന് സൂര്യപ്രകാശം ലഭിക്കുന്നതുമായ ഒരു ഔട്ട്ഡോർ സ്ഥലം സോളാർ പാനലിനായി തിരഞ്ഞെടുക്കുക. ക്യാമറ IP65 കാലാവസ്ഥയെ പ്രതിരോധിക്കുന്നതാണ്.
- ക്യാമറ ഘടിപ്പിക്കുക: നിങ്ങളുടെ ചുമരിൽ ഡ്രിൽ ഹോളുകൾ അടയാളപ്പെടുത്താൻ നൽകിയിരിക്കുന്ന മൗണ്ടിംഗ് ടെംപ്ലേറ്റ് ഉപയോഗിക്കുക. ദ്വാരങ്ങൾ തുരത്തുക, ആങ്കറുകൾ തിരുകുക, ക്യാമറയുടെ മൗണ്ടിംഗ് ബ്രാക്കറ്റ് സ്ക്രൂകൾ ഉപയോഗിച്ച് ഉറപ്പിക്കുക. ക്യാമറ ബോഡി ബ്രാക്കറ്റിൽ ഘടിപ്പിക്കുക.
- സോളാർ പാനൽ മൌണ്ട് ചെയ്യുക: സോളാർ പാനൽ വേറിട്ടതാണെങ്കിൽ, ദിവസം മുഴുവൻ നേരിട്ട് സൂര്യപ്രകാശം പരമാവധി ലഭിക്കുന്ന സ്ഥലത്ത് അത് സ്ഥാപിക്കുക. ക്യാമറയുടെ 5V ചാർജിംഗ് പോർട്ടുമായി സോളാർ പാനൽ കേബിൾ ബന്ധിപ്പിക്കുക.
ചിത്രം 3: ലാ-യ്ക്കുള്ള ഫ്ലെക്സിബിൾ ഇൻസ്റ്റലേഷൻ ഓപ്ഷനുകൾView 2K സോളാർ ക്യാമറ.
5. പ്രവർത്തന നിർദ്ദേശങ്ങൾ
5.1 തത്സമയം View ക്യാമറ നിയന്ത്രണവും
- വാൻസ് തുറക്കുകView നിങ്ങളുടെ ക്യാമറയിൽ നിന്ന് തത്സമയ ഫീഡ് ആക്സസ് ചെയ്യുന്നതിനുള്ള ക്ലൗഡ് ആപ്പ്.
- പൂർണ്ണ കവറേജിനായി ഓൺ-സ്ക്രീൻ നിയന്ത്രണങ്ങൾ ഉപയോഗിച്ച് ക്യാമറ 360° തിരശ്ചീനമായി പാൻ ചെയ്യുക, ലംബമായി 120° ചരിക്കുക.
- 6X ഡിജിറ്റൽ സൂം സവിശേഷത ഉപയോഗപ്പെടുത്തി view 2K QHD റെസല്യൂഷനിലുള്ള വിശദാംശങ്ങൾ.

ചിത്രം 4: നിങ്ങളുടെ ഫോണിൽ നിന്ന് നേരിട്ട് 360° പാനും 120° ടിൽറ്റും നിയന്ത്രിക്കുക.
5.2 വീഡിയോ ഗുണനിലവാരവും രാത്രി കാഴ്ചയും
- വ്യക്തമായ ചിത്രങ്ങൾക്കായി ക്യാമറ 2K QHD വീഡിയോ റെസല്യൂഷൻ നൽകുന്നു.
- കളർ നൈറ്റ് വിഷൻ: F/1.6 അപ്പേർച്ചറുള്ള ഈ ക്യാമറ, കുറഞ്ഞ വെളിച്ചത്തിൽ പോലും വ്യക്തമായ വർണ്ണ ചിത്രങ്ങൾ പകർത്തുന്നു.
- ഇൻഫ്രാറെഡ് നൈറ്റ് വിഷൻ: പൂർണ്ണമായ ഇരുട്ടിൽ, കറുപ്പും വെളുപ്പും വീഡിയോയ്ക്കായി ക്യാമറ യാന്ത്രികമായി ഇൻഫ്രാറെഡ് മോഡിലേക്ക് മാറുന്നു.
ചിത്രം 5: 6X സൂമിലൂടെ രാവും പകലും 2K QHD കളർ വിഷൻ അനുഭവിക്കുക.
5.3 മോഷൻ ഡിറ്റക്ഷനും അലേർട്ടുകളും
- പിഐആർ കണ്ടെത്തൽ: നൂതനമായ PIR സെൻസറും ഇന്റലിജന്റ് അൽഗോരിതങ്ങളും മനുഷ്യന്റെയും വാഹനങ്ങളുടെയും വളർത്തുമൃഗങ്ങളുടെയും ചലനം കൃത്യമായി കണ്ടെത്തുകയും തെറ്റായ അലാറങ്ങൾ കുറയ്ക്കുകയും ചെയ്യുന്നു.
- ഇഷ്ടാനുസൃതമാക്കാവുന്ന മേഖലകൾ: ആപ്പിനുള്ളിൽ നിർദ്ദിഷ്ട കണ്ടെത്തൽ സംവേദനക്ഷമതയും സോണുകളും സജ്ജമാക്കുക.
- തൽക്ഷണ അലേർട്ടുകൾ: ചലനം കണ്ടെത്തുമ്പോൾ നിങ്ങളുടെ സ്മാർട്ട്ഫോണിൽ പുഷ് അറിയിപ്പുകൾ സ്വീകരിക്കുക.
- സൈറണും സ്പോട്ട്ലൈറ്റും: ചലനം കണ്ടെത്തുമ്പോൾ സൈറണും സ്പോട്ട്ലൈറ്റും പ്രവർത്തനക്ഷമമാക്കുന്നതിന് ക്യാമറ കോൺഫിഗർ ചെയ്യുക.

ചിത്രം 6: ചലന കണ്ടെത്തലിൽ യാന്ത്രിക-റെക്കോർഡ്, വ്യക്തമായ പ്രവർത്തന ട്രാക്കിംഗിനായി ചലന പാതകൾ പകർത്തൽ.
5.4 ടു-വേ ഓഡിയോ
- ക്യാമറയ്ക്ക് സമീപമുള്ള ആരുമായും ആശയവിനിമയം നടത്താൻ ആപ്പിലെ മൈക്രോഫോണും സ്പീക്കറും ഉപയോഗിക്കുക.

ചിത്രം 7: ടു-വേ ടോക്ക് ഫംഗ്ഷണാലിറ്റിയുമായി ബന്ധം നിലനിർത്തുക.
5.5 സംഭരണ ഓപ്ഷനുകൾ
- മൈക്രോ എസ്ഡി കാർഡ്: റെക്കോർഡിംഗുകളുടെ ലോക്കൽ സ്റ്റോറേജിനായി നിയുക്ത സ്ലോട്ടിൽ ഒരു മൈക്രോ എസ്ഡി കാർഡ് (256GB വരെ, ഉൾപ്പെടുത്തിയിട്ടില്ല) ചേർക്കുക.
- ക്ലൗഡ് സംഭരണം: 30 ദിവസത്തെ സൗജന്യ ട്രയലിനൊപ്പം ഓപ്ഷണൽ ക്ലൗഡ് സ്റ്റോറേജ് ലഭ്യമാണ്. തുടർച്ചയായ ക്ലൗഡ് സേവനത്തിന് ഒരു സബ്സ്ക്രിപ്ഷൻ ആവശ്യമാണ്.

ചിത്രം 8: ഡ്യുവൽ സ്റ്റോറേജ് ഓപ്ഷനുകൾ: മൈക്രോ എസ്ഡി കാർഡും ക്ലൗഡ് സ്റ്റോറേജും.
5.6 സ്മാർട്ട് ഹോം ഇന്റഗ്രേഷൻ
- ക്യാമറ ആമസോൺ അലക്സയുമായും ഗൂഗിൾ അസിസ്റ്റന്റുമായും പൊരുത്തപ്പെടുന്നു. ക്യാമറ ബന്ധിപ്പിക്കുന്നതിന് നിങ്ങളുടെ സ്മാർട്ട് ഹോം ആപ്പിലെ നിർദ്ദേശങ്ങൾ പാലിക്കുക.

ചിത്രം 9: ആമസോൺ അലക്സ, ഗൂഗിൾ അസിസ്റ്റന്റ് പോലുള്ള സ്മാർട്ട് ഹോം ഉപകരണങ്ങളിൽ പ്രവർത്തിക്കുന്നു.
6. പരിപാലനം
6.1 ബാറ്ററി ചാർജിംഗ്
- സംയോജിത സോളാർ പാനൽ ക്യാമറയുടെ റീചാർജ് ചെയ്യാവുന്ന ബാറ്ററി തുടർച്ചയായി ചാർജ് ചെയ്യുന്നു. ഒപ്റ്റിമൽ ചാർജിംഗിനായി സോളാർ പാനൽ വൃത്തിയുള്ളതും തടസ്സങ്ങളില്ലാത്തതുമാണെന്ന് ഉറപ്പാക്കുക.
- ആവശ്യമെങ്കിൽ, നൽകിയിരിക്കുന്ന കേബിൾ ഉപയോഗിച്ച് USB-C പോർട്ട് വഴി ക്യാമറ നേരിട്ട് ചാർജ് ചെയ്യാനും കഴിയും.

ചിത്രം 10: പോർട്ടബിൾ സോളാർ പാനൽ ഉപയോഗിച്ച് എന്നെന്നേക്കുമായി പ്രവർത്തിക്കുന്നു.
6.2 കാലാവസ്ഥാ പ്രതിരോധം
- ക്യാമറയ്ക്ക് IP65 കാലാവസ്ഥാ പ്രതിരോധ റേറ്റിംഗ് ഉണ്ട്, പൊടിയിൽ നിന്നും വാട്ടർ ജെറ്റുകളിൽ നിന്നും ഇതിനെ സംരക്ഷിക്കുന്നു. 14°F മുതൽ 122°F (-10°C മുതൽ 50°C വരെ) വരെയുള്ള താപനിലയിൽ ഇത് പ്രവർത്തിക്കുന്നു.

ചിത്രം 11: എല്ലാ സാഹചര്യങ്ങൾക്കും അനുയോജ്യമായ IP65 കാലാവസ്ഥാ പ്രതിരോധ രൂപകൽപ്പന.
6.3 വൃത്തിയാക്കൽ
- ക്യാമറ ലെൻസും സോളാർ പാനലും ഒരു സോഫ്റ്റ്, ഡി ക്ലീനർ ഉപയോഗിച്ച് പതിവായി വൃത്തിയാക്കുക.amp വ്യക്തമായ ഇമേജ് ഗുണനിലവാരവും കാര്യക്ഷമമായ ചാർജിംഗും ഉറപ്പാക്കാൻ തുണി.
7. പ്രശ്നപരിഹാരം
- ക്യാമറ വൈഫൈയിലേക്ക് കണക്റ്റ് ചെയ്യുന്നില്ല: നിങ്ങളുടെ വൈഫൈ നെറ്റ്വർക്ക് 2.4GHz ആണെന്ന് ഉറപ്പാക്കുക. നിങ്ങളുടെ റൂട്ടറും സ്മാർട്ട്ഫോണും റീബൂട്ട് ചെയ്യുക. ഒരു മണിനാദം കേൾക്കുന്നത് വരെ റീസെറ്റ് ബട്ടൺ 5 സെക്കൻഡ് അമർത്തിപ്പിടിച്ച് ക്യാമറ റീസെറ്റ് ചെയ്യുക, തുടർന്ന് വീണ്ടും ജോടിയാക്കാൻ ശ്രമിക്കുക.
- പതിവ് തെറ്റായ അലാറങ്ങൾ: പ്രസക്തമല്ലാത്ത ചലന സ്രോതസ്സുകളിൽ നിന്നുള്ള അനാവശ്യ അലേർട്ടുകൾ കുറയ്ക്കുന്നതിന് ആപ്പിനുള്ളിൽ PIR കണ്ടെത്തൽ സംവേദനക്ഷമത ക്രമീകരിക്കുകയും കണ്ടെത്തൽ മേഖലകൾ ഇഷ്ടാനുസൃതമാക്കുകയും ചെയ്യുക.
- മോശം ചിത്രത്തിന്റെ ഗുണനിലവാരം: ക്യാമറ ലെൻസ് വൃത്തിയുള്ളതാണെന്നും തടസ്സങ്ങളില്ലെന്നും ഉറപ്പാക്കുക. വൈഫൈ സിഗ്നൽ ശക്തി പരിശോധിക്കുക.
- ബാറ്ററി ചാർജുചെയ്യുന്നില്ല: സോളാർ പാനലിൽ നേരിട്ട് സൂര്യപ്രകാശം ലഭിക്കുന്നുണ്ടെന്നും അഴുക്കോ തടസ്സങ്ങളോ ഇല്ലെന്നും ഉറപ്പാക്കുക. സോളാർ പാനൽ കേബിൾ ക്യാമറയുമായി സുരക്ഷിതമായി ബന്ധിപ്പിച്ചിട്ടുണ്ടെന്ന് ഉറപ്പാക്കുക.
8 സ്പെസിഫിക്കേഷനുകൾ
| മോഡലിൻ്റെ പേര് | എൽവി-പിഡബ്ല്യുആർ28ക്യു-ബി-4പികെ |
| ഇൻഡോർ/ഔട്ട്ഡോർ ഉപയോഗം | ഔട്ട്ഡോർ |
| പവർ ഉറവിടം | സൗരോർജ്ജം |
| കണക്റ്റിവിറ്റി പ്രോട്ടോക്കോൾ | വൈഫൈ (2.4GHz മാത്രം) |
| വീഡിയോ ക്യാപ്ചർ റെസല്യൂഷൻ | 2K QHD (സ്പെസിഫിക്കേഷനുകളിൽ 3K പരാമർശിച്ചിരിക്കുന്നു, പക്ഷേ സവിശേഷതകളിൽ 2K QHD) |
| കൺട്രോളർ തരം | ആമസോൺ അലക്സ |
| മൗണ്ടിംഗ് തരം | മതിൽ മൗണ്ട് |
| കാലാവസ്ഥാ പ്രൂഫ് റേറ്റിംഗ് | IP65 |
| പ്രവർത്തന താപനില | 14°F മുതൽ 122°F വരെ (-10°C മുതൽ 50°C വരെ) |
| ഇനത്തിന്റെ അളവുകൾ (L x W x H) | 10 x 13 x 9 ഇഞ്ച് |
| ഇനത്തിൻ്റെ ഭാരം | 7.88 പൗണ്ട് |
| യു.പി.സി | 192728016859 |
9. വാറണ്ടിയും പിന്തുണയും
- 1 വർഷത്തെ റീപ്ലേസ്മെന്റ് വാറന്റി: നിങ്ങളുടെ ലാView 2K സോളാർ ക്യാമറ സിസ്റ്റത്തിന് 1 വർഷത്തെ റീപ്ലേസ്മെന്റ് വാറണ്ടി ലഭ്യമാണ്.
- ആജീവനാന്ത സാങ്കേതിക പിന്തുണ: LaView വേഗത്തിലുള്ളതും വിശ്വസനീയവുമായ പരിഹാരങ്ങൾക്കായി ഫോൺ വഴി ആജീവനാന്ത സാങ്കേതിക പിന്തുണ വാഗ്ദാനം ചെയ്യുന്നു.
- വൺ-ഓൺ-വൺ ഉപഭോക്തൃ സേവനം: വ്യക്തിഗതമാക്കിയ സഹായത്തിനായി സമർപ്പിത ഉപഭോക്തൃ സേവനം ലഭ്യമാണ്.

ചിത്രം 12: ലാView സമഗ്രമായ വിൽപ്പനാനന്തര പിന്തുണ നൽകുന്നു.