പ്രധാനപ്പെട്ട സുരക്ഷാ വിവരങ്ങൾ
ഈ മോണിറ്റർ ഉപയോഗിക്കുന്നതിന് മുമ്പ് ദയവായി എല്ലാ നിർദ്ദേശങ്ങളും ശ്രദ്ധാപൂർവ്വം വായിക്കുക. ഭാവിയിലെ റഫറൻസിനായി ഈ മാനുവൽ സൂക്ഷിക്കുക.
- തീപിടുത്തമോ ഷോക്കോ മൂലമുള്ള അപകടങ്ങൾ ഒഴിവാക്കാൻ മോണിറ്ററിനെ മഴയിലോ ഈർപ്പത്തിലോ തുറന്നുവെക്കരുത്.
- മോണിറ്റർ തുറക്കരുത് casing. ഉള്ളിൽ ഉപയോക്തൃ-സേവനയോഗ്യമായ ഭാഗങ്ങളൊന്നുമില്ല. എല്ലാ സേവനങ്ങളും യോഗ്യതയുള്ള ഉദ്യോഗസ്ഥർക്ക് റഫർ ചെയ്യുക.
- മോണിറ്ററിന് ചുറ്റും ശരിയായ വായുസഞ്ചാരം ഉറപ്പാക്കുക. വായുസഞ്ചാര ദ്വാരങ്ങൾ അടയ്ക്കരുത്.
- നിർമ്മാതാവ് നൽകുന്ന പവർ അഡാപ്റ്ററും കേബിളുകളും മാത്രം ഉപയോഗിക്കുക.
- മോണിറ്റർ കൂടുതൽ നേരം ഉപയോഗിക്കുന്നില്ലെങ്കിൽ ഔട്ട്ലെറ്റിൽ നിന്ന് പവർ പ്ലഗ് വിച്ഛേദിക്കുക.
പാക്കേജ് ഉള്ളടക്കം
നിങ്ങളുടെ പാക്കേജിൽ എല്ലാ ഇനങ്ങളും ഉണ്ടെന്ന് ഉറപ്പാക്കുക:
- GIGABYTE MO32U Monitor
- പവർ കേബിൾ
- HDMI 2.1 കേബിൾ
- ഡിപി കേബിൾ (ഡിസ്പ്ലേപോർട്ട് കേബിൾ)
- USB cable (USB Type-A to Type-B upstream cable)
- ക്വിക്ക് സ്റ്റാർട്ട് ഗൈഡ് / യൂസർ മാനുവൽ (ഈ ഡോക്യുമെന്റ്)
സജ്ജമാക്കുക
1. സ്റ്റാൻഡ് അസംബ്ലി
Carefully remove the monitor and stand components from the packaging. Attach the stand neck to the monitor panel, ensuring it clicks securely into place. Then, attach the base to the stand neck and tighten the screws if necessary. The stand allows for height adjustment (up to 130mm) and tilt (-5° to +21°).
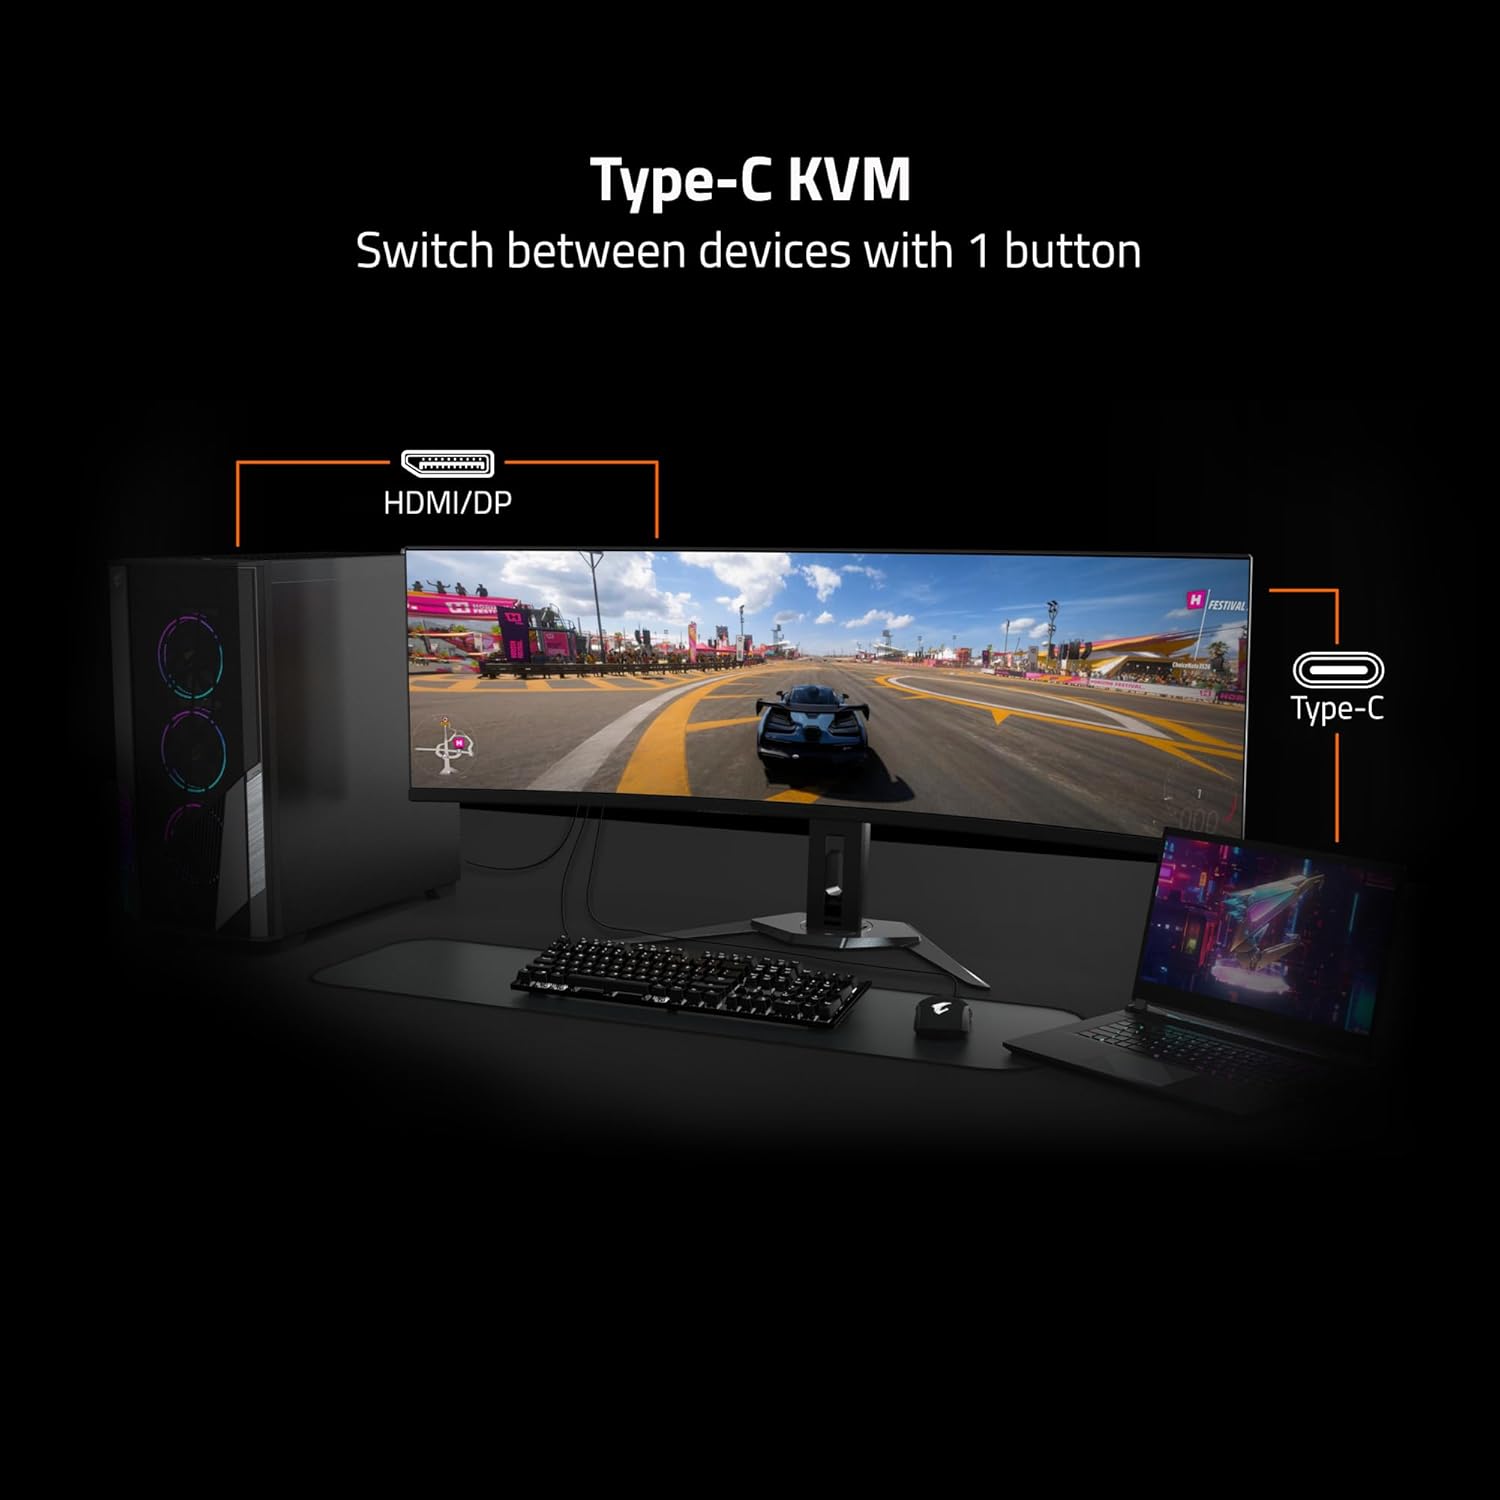
Image: Adjustable Stand and VESA Wall Mount points.
2. VESA Wall Mount Installation
The monitor supports VESA 100x100mm mounting. If using a VESA compatible wall mount or arm, remove the stand from the monitor. Secure the VESA mount to the monitor using appropriate screws (not included) according to the mount manufacturer's instructions. Refer to the image above for VESA mount point location.
3. Connecting Your Monitor
Connect the necessary cables to the corresponding ports on the back of the monitor and to your computer or other devices. Ensure all connections are secure.
- ശക്തി: മോണിറ്ററിലേക്കും പവർ ഔട്ട്ലെറ്റിലേക്കും പവർ കേബിൾ ബന്ധിപ്പിക്കുക.
- വീഡിയോ ഇൻപുട്ട്: Use the provided HDMI 2.1 or DisplayPort 1.4 cables to connect to your graphics card. The monitor also supports USB Type-C for video input.
- USB അപ്സ്ട്രീം: Connect the USB upstream cable (USB Type-A to Type-B) from your computer to the monitor's USB 3.0 Upstream port to enable the monitor's USB downstream ports and KVM functionality.
- USB ഡൗൺസ്ട്രീം: Connect USB devices (keyboard, mouse, USB drives) to the USB 3.0 Downstream ports.
- ഇയർഫോൺ ജാക്ക്: ഹെഡ്ഫോണുകളോ ബാഹ്യ സ്പീക്കറുകളോ ബന്ധിപ്പിക്കുക.

Image: I/O Ports diagram on the back of the monitor.
നിങ്ങളുടെ മോണിറ്റർ പ്രവർത്തിപ്പിക്കുന്നു
1. പവർ ഓൺ/ഓഫ്
മോണിറ്റർ ഓണാക്കാനോ ഓഫാക്കാനോ സാധാരണയായി മോണിറ്ററിന്റെ പിൻഭാഗത്തോ താഴെയോ സ്ഥിതി ചെയ്യുന്ന പവർ ബട്ടൺ അമർത്തുക. മോണിറ്റർ ഓണായിരിക്കുമ്പോൾ പവർ ഇൻഡിക്കേറ്റർ ലൈറ്റ് പ്രകാശിക്കും.
3. കെവിഎം പ്രവർത്തനം
The GIGABYTE MO32U features a built-in KVM (Keyboard, Video, Mouse) switch, allowing you to control multiple devices (e.g., a desktop PC and a laptop) with a single set of keyboard and mouse connected to the monitor. To use KVM, ensure both devices are connected to the monitor via video inputs (HDMI/DP and Type-C) and the USB upstream cable is connected to the primary device. You can switch between devices using a dedicated KVM button or through the OSD menu.

Image: Type-C KVM setup for switching between devices.
4. ഡിസ്പ്ലേ ക്രമീകരണങ്ങളും സവിശേഷതകളും
The MO32U monitor offers advanced display features for an optimized viewഅനുഭവം:
- റെസല്യൂഷനും പുതുക്കൽ നിരക്കും: Enjoy a 4K UHD (3840x2160) resolution with a 165Hz refresh rate for smooth visuals.
- പ്രതികരണ സമയം: Experience ultra-fast 0.03ms GTG (Gray-to-Gray) response time, minimizing motion blur.
- എഎംഡി ഫ്രീസിങ്ക് പ്രീമിയം പ്രോ: സ്ക്രീൻ കീറലും മുരടിപ്പും ഒഴിവാക്കാൻ മോണിറ്ററിന്റെ പുതുക്കൽ നിരക്ക് നിങ്ങളുടെ GPU യുടെ ഫ്രെയിം റേറ്റുമായി സമന്വയിപ്പിക്കുന്നു.
- QD-OLED പാനൽ: Delivers vibrant colors, deep blacks, and high contrast (1.5M:1) with 99% DCI-P3 color gamut and 10-bit color depth.
- VESA DisplayHDR True Black 400: Provides enhanced contrast and color accuracy for HDR content.
- VESA ClearMR 9000: Ensures high motion clarity.
- നേത്ര സംരക്ഷണ സവിശേഷതകൾ: Includes Flicker-Free and Low Blue Light technologies, certified by Eyesafe, to reduce eye strain during prolonged use.

Image: Key display features and certifications.

Image: Visual comparison of 0.03ms/165Hz performance versus 5ms/60Hz.
5. GIGABYTE OLED Care
The monitor incorporates GIGABYTE OLED Care, an AI-based algorithm designed to minimize the risk of OLED burn-in issues. This suite of technologies operates in the background with minimal user interference. OLED Care includes various adjustable settings within the OSD menu to help protect the panel and extend its lifespan.
മെയിൻ്റനൻസ്
ശരിയായ അറ്റകുറ്റപ്പണി നിങ്ങളുടെ മോണിറ്ററിന്റെ ദീർഘായുസ്സും മികച്ച പ്രകടനവും ഉറപ്പാക്കുന്നു.
- സ്ക്രീൻ വൃത്തിയാക്കൽ: മൃദുവായ, ലിന്റ് രഹിത തുണി ഉപയോഗിച്ച് സ്ക്രീൻ സൌമ്യമായി തുടയ്ക്കുക. കഠിനമായ പാടുകൾക്ക്, നേരിയ തോതിൽ dampen the cloth with water or a non-abrasive screen cleaner. Do not spray liquid directly onto the screen.
- സി വൃത്തിയാക്കൽasing: മോണിറ്റർ തുടയ്ക്കാൻ മൃദുവായതും ഉണങ്ങിയതുമായ തുണി ഉപയോഗിക്കുക casing. വീര്യം കൂടിയ ഡിറ്റർജന്റുകൾ അല്ലെങ്കിൽ ഉരച്ചിലുകൾ ഉള്ള ക്ലീനറുകൾ ഉപയോഗിക്കുന്നത് ഒഴിവാക്കുക.
- OLED പരിചരണം: Allow the monitor to perform its automatic OLED Care functions. Avoid prolonged display of static images at high brightness settings.
ട്രബിൾഷൂട്ടിംഗ്
നിങ്ങളുടെ മോണിറ്ററിൽ പ്രശ്നങ്ങൾ നേരിടുകയാണെങ്കിൽ, ഇനിപ്പറയുന്ന പൊതുവായ പരിഹാരങ്ങൾ പരിശോധിക്കുക:
- ശക്തിയില്ല: മോണിറ്ററിലേക്കും പ്രവർത്തിക്കുന്ന ഒരു പവർ ഔട്ട്ലെറ്റിലേക്കും പവർ കേബിൾ സുരക്ഷിതമായി ബന്ധിപ്പിച്ചിട്ടുണ്ടെന്ന് ഉറപ്പാക്കുക. പവർ ഇൻഡിക്കേറ്റർ ലൈറ്റ് ഓണാണോ എന്ന് പരിശോധിക്കുക.
- സിഗ്നലില്ല: Verify that the video cables (HDMI, DisplayPort, USB-C) are correctly connected to both the monitor and your source device. Ensure the correct input source is selected in the monitor's OSD menu.
- മിന്നിമറയുന്ന അല്ലെങ്കിൽ വികലമായ ചിത്രം: Check cable connections. Ensure your graphics card drivers are up to date. Try adjusting the refresh rate in your operating system's display settings.
- ഇമേജ് നിലനിർത്തൽ/ബേൺ-ഇൻ: While OLED Care minimizes this risk, prolonged static images can contribute. Utilize OLED Care features and avoid displaying static content for extended periods.
- കെവിഎം മാറുന്നില്ല: Ensure the USB upstream cable is connected to the active source device and that the KVM function is properly configured in the OSD menu.
If the problem persists after trying these steps, contact GIGABYTE customer support.
സ്പെസിഫിക്കേഷനുകൾ
| ഫീച്ചർ | വിശദാംശങ്ങൾ |
|---|---|
| ബ്രാൻഡ് | ജിഗാബൈറ്റ് |
| മോഡൽ നമ്പർ | MO32U |
| സ്ക്രീൻ വലിപ്പം | 32 ഇഞ്ച് |
| ഡിസ്പ്ലേ തരം | QD OLED |
| റെസലൂഷൻ | 4 കെ യുഎച്ച്ഡി (3840 x 2160) |
| പുതുക്കിയ നിരക്ക് | 165 Hz |
| പ്രതികരണ സമയം | 0.03 Milliseconds GTG |
| വീക്ഷണാനുപാതം | 16:9 |
| കോൺട്രാസ്റ്റ് റേഷ്യോ | 1.5M:1 |
| തെളിച്ചം | 1000 Candela per Square Meter (Peak) |
| വർണ്ണ ഗാമറ്റ് | 99% DCI-P3 |
| Viewing ആംഗിൾ | 178 ഡിഗ്രി |
| കണക്റ്റിവിറ്റി | 2x HDMI 2.1, 1x DisplayPort 1.4, 1x USB Type-C, 1x USB 3.0 Upstream, 3x USB 3.0 Downstream, 1x Earphone Jack |
| അഡാപ്റ്റീവ് സമന്വയം | എഎംഡി ഫ്രീസിങ്ക് പ്രീമിയം പ്രോ |
| HDR പിന്തുണ | VESA ഡിസ്പ്ലേHDR ട്രൂ ബ്ലാക്ക് 400 |
| കെ.വി.എം | Yes, Type-C KVM |
| മൗണ്ടിംഗ് തരം | VESA 100x100mm, Height Adjustable Stand |
| വൈദ്യുതി ഉപഭോഗം | 54 വാട്ട്സ് |
| നിറം | കറുപ്പ് |
വാറൻ്റി വിവരങ്ങൾ
This GIGABYTE MO32U monitor comes with a 3 വർഷത്തെ നിർമ്മാതാവിന്റെ വാറന്റി. For detailed terms and conditions, please refer to the warranty card included in your product packaging or visit the official GIGABYTE webസൈറ്റ്.
പിന്തുണ
For technical assistance, troubleshooting beyond this manual, or warranty claims, please contact GIGABYTE customer support. You can find contact information and additional resources on the official GIGABYTE webസൈറ്റ്.
ഓൺലൈൻ ഉറവിടങ്ങൾ: Visit the GIGABYTE support page for drivers, FAQs, and further documentation.


