1. സജ്ജീകരണ ഗൈഡ്
1.1 അൺബോക്സിംഗും പാക്കേജ് ഉള്ളടക്കങ്ങളും
Carefully unpack your GenMachine Ren Pro Mini PC and verify all contents. The package should include the following items:
- GenMachine Ren Pro Mini PC
- ഉപയോക്തൃ മാനുവൽ
- പവർ അഡാപ്റ്റർ
- HD Line (HDMI Cable)
- സ്ക്രൂകൾ ഉപയോഗിച്ച് മൗണ്ടിംഗ് ബ്രാക്കറ്റ്
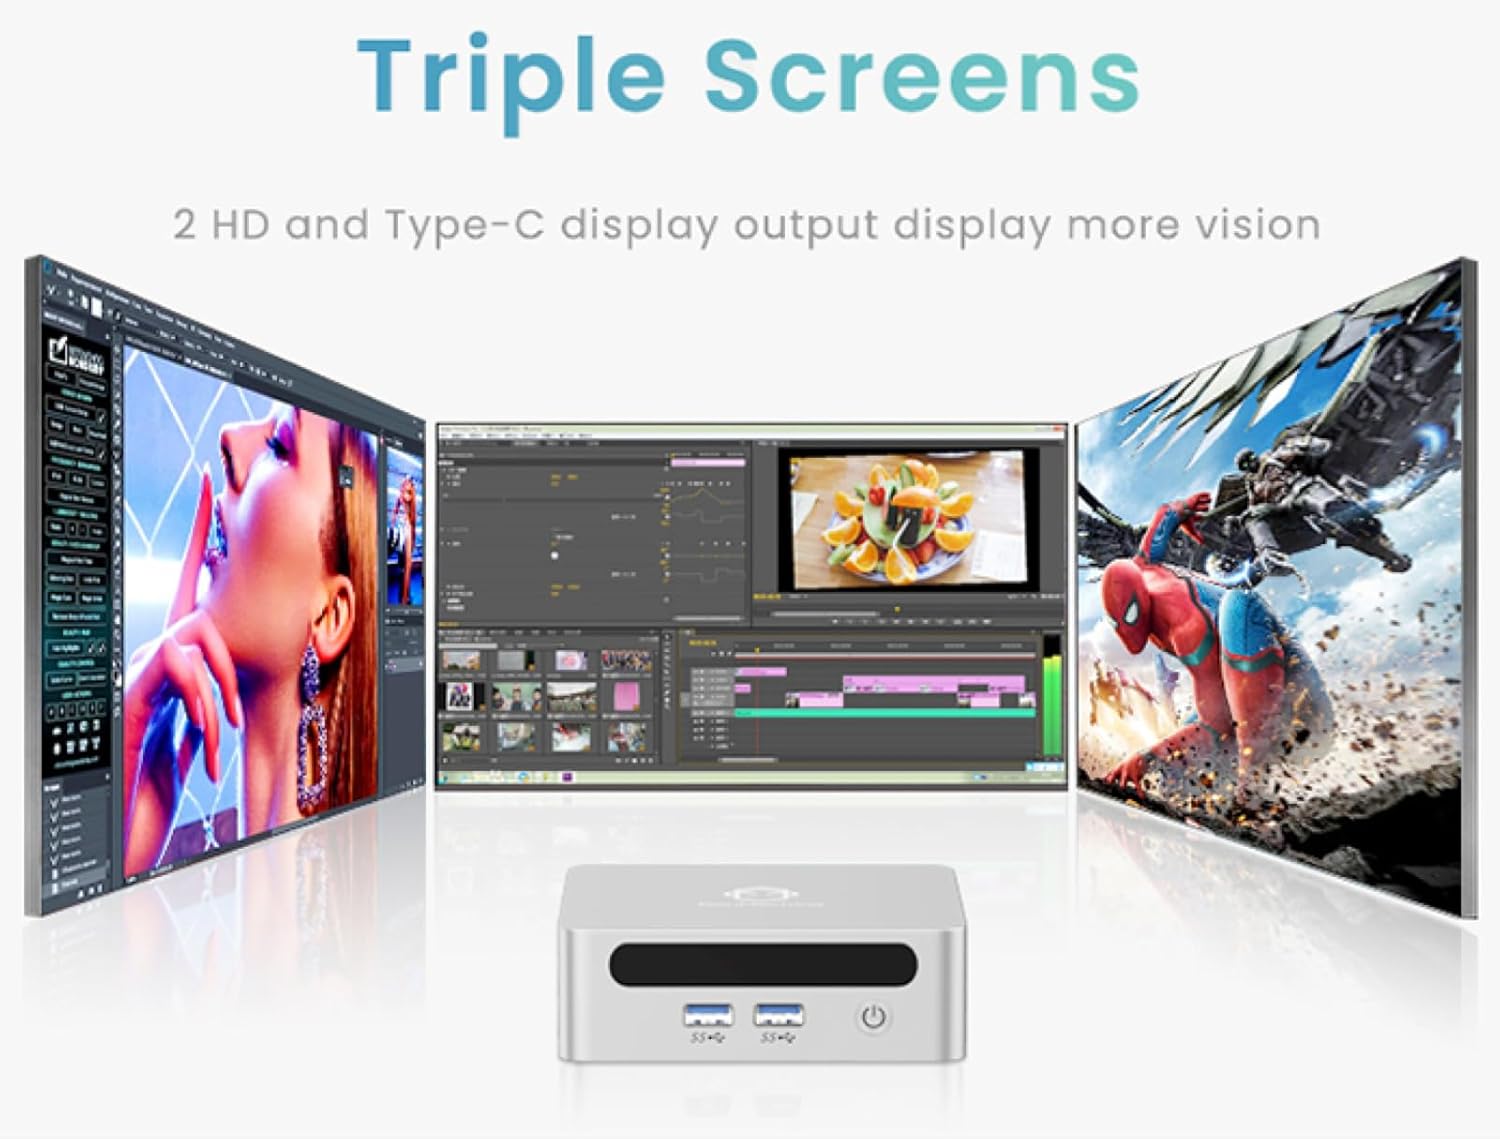
Image: The GenMachine Ren Pro Mini PC and its included accessories, neatly arranged in the packaging. This includes the Mini PC unit, user manual, power adapter, HDMI cable, and a mounting bracket with screws.
1.2 ഭൗതിക ബന്ധങ്ങൾ
Before powering on your Mini PC, connect all necessary peripherals.
ഫ്രണ്ട് പാനൽ പോർട്ടുകൾ:
- പവർ ബട്ടൺ: ഉപകരണം ഓൺ/ഓഫ് ചെയ്യാൻ ഉപയോഗിക്കുന്നു.
- ഓഡിയോ ജാക്ക്: ഹെഡ്ഫോണുകളോ ബാഹ്യ സ്പീക്കറുകളോ ബന്ധിപ്പിക്കുന്നതിന്.
- USB 3.0 പോർട്ടുകൾ (x2): For connecting USB devices like keyboards, mice, or external storage.
- യുഎസ്ബി ടൈപ്പ്-സി പോർട്ട്: Supports data transfer and display output.
പിൻ പാനൽ പോർട്ടുകൾ:
- ഡിസി പവർ ഇൻപുട്ട്: ഉൾപ്പെടുത്തിയ പവർ അഡാപ്റ്റർ ഇവിടെ ബന്ധിപ്പിക്കുക.
- ലാൻ പോർട്ടുകൾ (x2): For wired network connections (Ethernet).
- എച്ച്ഡിഎംഐ പോർട്ട്: For connecting to a display (up to 4K resolution).
- ഡിസ്പ്ലേ പോർട്ട് (ഡിപി): For connecting to another display (up to 4K resolution).
- USB 3.0 പോർട്ടുകൾ (x2): പെരിഫറലുകൾക്കായി അധിക യുഎസ്ബി പോർട്ടുകൾ.

ചിത്രം: വിശദമായത് view of the GenMachine Ren Pro Mini PC's front and rear panels, highlighting the various input/output ports including USB, audio, LAN, HDMI, DisplayPort, and DC power input.
1.3 Mounting the Mini PC
The GenMachine Ren Pro Mini PC comes with a VESA mounting bracket, allowing you to attach it to the back of a compatible monitor or TV for a clutter-free workspace.
- Attach the VESA bracket to the back of your monitor using the provided screws.
- മിനി പിസി മൌണ്ട് ചെയ്ത ബ്രാക്കറ്റിലേക്ക് സ്ലൈഡ് ചെയ്യുക, അത് സുരക്ഷിതമായി സ്ഥലത്ത് ക്ലിക്ക് ചെയ്യുന്നതുവരെ.

Image: The compact size of the GenMachine Ren Pro Mini PC is shown alongside an illustration of how it can be mounted to the back of a monitor using the VESA bracket, saving desk space.
1.4 പ്രാരംഭ പവർ ഓൺ
After connecting all peripherals and the power adapter, press the power button on the front panel to turn on the Mini PC. The system will boot up, and you may be prompted to complete the initial Windows setup if it's the first use.
2. പ്രവർത്തന നിർദ്ദേശങ്ങൾ
2.1 അടിസ്ഥാന ഉപയോഗം
The GenMachine Ren Pro Mini PC runs on a pre-installed operating system (OS). Once booted, you can navigate the desktop environment using your connected mouse and keyboard. It is designed for various tasks including office work, creative design, and gaming.
2.2 മൾട്ടി-ഡിസ്പ്ലേ പിന്തുണ
The Mini PC supports up to three displays simultaneously, allowing for enhanced productivity. You can connect displays via the HDMI, DisplayPort, and the front USB Type-C port.

Image: A visual representation of the GenMachine Ren Pro Mini PC connected to and driving three separate monitors, demonstrating its multi-display capability for various applications like video editing and gaming.
2.3 നെറ്റ്വർക്കും വയർലെസ് കണക്റ്റിവിറ്റിയും
The Mini PC offers robust connectivity options:
- Wi-Fi 6: For fast and stable wireless internet access.
- ബ്ലൂടൂത്ത് 5.2: For connecting wireless peripherals such as headphones, speakers, and game controllers.
- 2.5G Ethernet: Two LAN ports provide high-speed wired network connections, offering 2.5 times the speed of traditional gigabit ports.
Image: The GenMachine Ren Pro Mini PC highlighting its advanced connectivity features, including Wi-Fi 6 for fast wireless networking and USB4 ports for high-speed data transfer and display output.
2.4 പ്രകടനം കഴിഞ്ഞുview
The Mini PC is equipped with an AMD Ryzen 7 6800H processor, 16GB of LPDDR5 RAM, and a 512GB SSD, providing powerful performance for demanding applications and smooth multitasking.
Image: A visual breakdown of the GenMachine Ren Pro Mini PC's internal components, emphasizing the AMD Ryzen 7 6800H processor and LPDDR5 memory for efficient performance.
3. പരിപാലനം
3.1 വൃത്തിയാക്കൽ
മികച്ച പ്രകടനവും ദീർഘായുസ്സും ഉറപ്പാക്കാൻ, നിങ്ങളുടെ മിനി പിസി പതിവായി വൃത്തിയാക്കുക:
- പുറംഭാഗം തുടയ്ക്കാൻ മൃദുവായതും ഉണങ്ങിയതുമായ തുണി ഉപയോഗിക്കുക.
- Use compressed air to clear dust from ventilation grilles and ports.
- ഉപകരണത്തിൽ നേരിട്ട് ലിക്വിഡ് ക്ലീനറുകൾ ഉപയോഗിക്കുന്നത് ഒഴിവാക്കുക.
3.2 സോഫ്റ്റ്വെയർ അപ്ഡേറ്റുകൾ
Keep your operating system and drivers updated to ensure security, stability, and optimal performance. Regularly check for updates through your OS settings.
3.3 സ്റ്റോറേജ് മാനേജ്മെൻ്റ്
ആനുകാലികമായി റീview and manage your storage to free up space. Uninstall unused applications and delete unnecessary fileസിസ്റ്റം വേഗത നിലനിർത്താൻ.
4. പ്രശ്നപരിഹാരം
4.1 വൈദ്യുതിയില്ല
- പവർ അഡാപ്റ്റർ മിനി പിസിയിലേക്കും പ്രവർത്തിക്കുന്ന ഒരു പവർ ഔട്ട്ലെറ്റിലേക്കും സുരക്ഷിതമായി ബന്ധിപ്പിച്ചിട്ടുണ്ടെന്ന് ഉറപ്പാക്കുക.
- മറ്റൊരു ഉപകരണം പ്ലഗ് ഇൻ ചെയ്ത് പവർ ഔട്ട്ലെറ്റ് പ്രവർത്തനക്ഷമമാണെന്ന് ഉറപ്പാക്കുക.
4.2 ഡിസ്പ്ലേ ഔട്ട്പുട്ട് ഇല്ല
- HDMI അല്ലെങ്കിൽ DisplayPort കേബിൾ മിനി പിസിയിലും മോണിറ്ററിലും ദൃഢമായി ബന്ധിപ്പിച്ചിട്ടുണ്ടോയെന്ന് പരിശോധിക്കുക.
- മോണിറ്റർ ഓണാക്കിയിട്ടുണ്ടെന്നും ശരിയായ ഇൻപുട്ട് ഉറവിടത്തിലേക്ക് സജ്ജീകരിച്ചിട്ടുണ്ടെന്നും ഉറപ്പാക്കുക.
- ലഭ്യമെങ്കിൽ മറ്റൊരു ഡിസ്പ്ലേ കേബിളോ മോണിറ്ററോ പരീക്ഷിച്ചുനോക്കൂ.
4.3 നെറ്റ്വർക്ക് കണക്റ്റിവിറ്റി പ്രശ്നങ്ങൾ
- For Wi-Fi, ensure the Mini PC is within range of your wireless router and the correct password is entered.
- For wired connections, check the Ethernet cable and ensure your router is functioning correctly.
- Restart your router and the Mini PC.
4.4 സിസ്റ്റം സ്ലോഡൗൺ
- പശ്ചാത്തലത്തിൽ പ്രവർത്തിക്കുന്ന അനാവശ്യ ആപ്ലിക്കേഷനുകൾ അടയ്ക്കുക.
- Check for and install any pending operating system or driver updates.
- Ensure sufficient free storage space on the SSD.
5 സ്പെസിഫിക്കേഷനുകൾ
| ഫീച്ചർ | വിശദാംശങ്ങൾ |
|---|---|
| പ്രോസസ്സർ | AMD Ryzen 7 6800H (3.2 GHz, up to 4.7GHz) |
| റാം | 16GB LPDDR5 6400MHz |
| സംഭരണം | 512GB 2280 SSD |
| ഗ്രാഫിക്സ് | ഇന്റഗ്രേറ്റഡ് എഎംഡി റേഡിയൻ ഗ്രാഫിക്സ് |
| പരമാവധി സ്ക്രീൻ റെസല്യൂഷൻ | 3840x2160 (4K) |
| കണക്റ്റിവിറ്റി | Wi-Fi 6, Bluetooth 5.2, 2x 2.5G LAN |
| തുറമുഖങ്ങൾ (മുൻവശം) | Power Button, Audio Jack, 2x USB 3.0, 1x USB Type-C |
| പോർട്ടുകൾ (പിൻഭാഗം) | DC Power, 2x LAN, HDMI, DisplayPort, 2x USB 3.0 |
| അളവുകൾ (LxWxH) | 5 x 5 x 1.45 ഇഞ്ച് |
| ഭാരം | 1.7 പൗണ്ട് |
| ഓപ്പറേറ്റിംഗ് സിസ്റ്റം | OS (Pre-installed) |
6. വാറൻ്റിയും പിന്തുണയും
6.1 വാറൻ്റി വിവരങ്ങൾ
This GenMachine Ren Pro Mini PC typically comes with a manufacturer's warranty. Please refer to the warranty card included in your package or visit the official GenMachine webവിശദമായ വാറന്റി നിബന്ധനകൾക്കും വ്യവസ്ഥകൾക്കും സൈറ്റ്.
6.2 ഉപഭോക്തൃ പിന്തുണ
For technical assistance, troubleshooting, or any product-related inquiries, please contact GenMachine customer support through the following channels:
- ഓൺലൈൻ പിന്തുണ: സന്ദർശിക്കുക GenMachine Store on Amazon പതിവുചോദ്യങ്ങൾക്കും കോൺടാക്റ്റ് ഓപ്ഷനുകൾക്കും.
- ഇമെയിൽ: നിങ്ങളുടെ ഉൽപ്പന്ന പാക്കേജിംഗ് അല്ലെങ്കിൽ ഔദ്യോഗിക webപിന്തുണ ഇമെയിൽ വിലാസത്തിനായുള്ള സൈറ്റ്.
7. ഉൽപ്പന്ന വീഡിയോകൾ
7.1 GenMachine Mini PC Gaming PC Desktop Overview
Video: An official seller video providing an overview of the GenMachine Mini PC, showcasing its design, features, and potential uses for gaming and desktop applications. This video highlights the compact form factor and connectivity options.


