1. പ്രധാന സുരക്ഷാ നിർദ്ദേശങ്ങൾ
Please read and understand all instructions and warnings before assembling and using this product. Failure to follow these instructions may result in injury or damage to the product.
- അസംബ്ലി സുരക്ഷ: Always assemble with at least two people. Wear appropriate safety gear, such as gloves, to prevent cuts from wire mesh or metal edges. Ensure all connections are secure before use.
- പ്ലേസ്മെൻ്റ്: Choose a level, stable surface for installation. Avoid placing the coop near unstable structures or in areas prone to strong winds without additional anchoring.
- Predator Protection: While the coop offers protection, consider additional measures like burying the bottom edges of the mesh or adding hardware cloth for enhanced security against determined predators.
- കാലാവസ്ഥാ സാഹചര്യങ്ങൾ: In anticipation of severe weather (e.g., strong winds, heavy snow), remove the waterproof cover and consider adding sandbags or other weights to the interior corners for increased stability.
- Animal Safety: Regularly inspect the coop for any damage or loose parts that could harm your animals. Ensure the door latch is always securely closed.
2. പാക്കേജ് ഉള്ളടക്കം
Verify all components are present before beginning assembly. If any parts are missing or damaged, contact VEVOR customer support.
| ഘടകം | അളവ് |
|---|---|
| Galvanized Steel Pipes (various lengths/shapes) | സജ്ജമാക്കുക |
| Metal Base Connectors | സജ്ജമാക്കുക |
| Hexagonal Wire Mesh (PVC-coated) | Roll(s) |
| Waterproof PE Tarp (Dome Roof) | 1 |
| ഡോർ ഫ്രെയിം ഘടകങ്ങൾ | സജ്ജമാക്കുക |
| ഡോർ ലാച്ച് മെക്കാനിസം | 1 |
| സിപ്പ് ബന്ധങ്ങൾ | Approx. 100 (additional may be needed) |
| Ball Bungee Cords | സജ്ജമാക്കുക |
| Reinforced Ground Stakes | സജ്ജമാക്കുക |
| Wrench/Assembly Tools | 1 |
| ഇൻസ്ട്രക്ഷൻ മാനുവൽ | 1 |
3. അസംബ്ലി നിർദ്ദേശങ്ങൾ
Assembly typically requires two people and can take approximately 3-4 hours. Follow the steps carefully for proper construction.
3.1. Base Frame Installation
- Lay out the bottom steel pipes on a flat, level surface according to the desired footprint of the coop.
- Connect the steel pipes to the metal base connectors, ensuring the snap buttons engage securely.
3.2. Vertical Support and Upper Frame Installation
- Insert the vertical support steel pipes into the base connectors, ensuring they click into place.
- Install the connectors on both ends of the support poles for the arched roof sections.
- Assemble the upper frame by connecting the curved steel pipes to the vertical supports and horizontal crossbars. Ensure all connections are firm.
3.3. വാതിൽ ഇൻസ്റ്റാളേഷൻ
- Assemble the door frame components using the provided patches and bolts. Tighten with the included wrench.
- Install the assembled door onto the main frame, securing it with the provided screws.
- Attach the door latch mechanism. Ensure it operates smoothly and provides secure closure. Note: Some users recommend adding an additional carabiner or clip lock for extra security.
3.4. Wire Mesh and Cover Installation
- Unroll the hexagonal wire mesh and carefully wrap it around the entire frame, starting from the bottom.
- Secure the mesh to the frame using the provided zip ties. Ensure the mesh is taut and covers all openings. Tip: Many users find it beneficial to use additional zip ties for a more secure and predator-resistant installation, especially around the base and door edges.
- Place the waterproof PE tarp over the dome roof section of the coop.
- Secure the tarp to the frame using the ball bungee cords, threading them through the grommets and around the frame pipes.
3.5. Ground Anchoring
- Drive the reinforced ground stakes into the ground through the designated holes in the base connectors to anchor the coop.
- For added stability, especially in windy areas, consider burying the bottom edges of the mesh or placing heavy objects like concrete buckets or stones around the base.
3.6. വിഷ്വൽ അസംബ്ലി ഗൈഡ്
For a visual demonstration of the assembly process, please refer to the official VEVOR installation video below:
Video: VEVOR Installation Video of Chicken Coop. This video demonstrates the step-by-step assembly of the chicken coop frame, mesh, and cover.
Video: Chicken Pen Installation by TOPWIN Direct. This video provides an overview of the chicken pen installation process, focusing on frame and mesh setup.
4. പ്രവർത്തന നിർദ്ദേശങ്ങൾ
4.1 ഉദ്ദേശിച്ച ഉപയോഗം
This VEVOR Large Metal Chicken Coop is designed to provide a secure and spacious outdoor enclosure for various poultry and small animals, including chickens, ducks, geese, and rabbits.
4.2. Animal Capacity
The coop offers a generous space suitable for approximately 20-27 standard-sized chickens, or a comparable number of other small animals, allowing them ample room to move and rest comfortably.
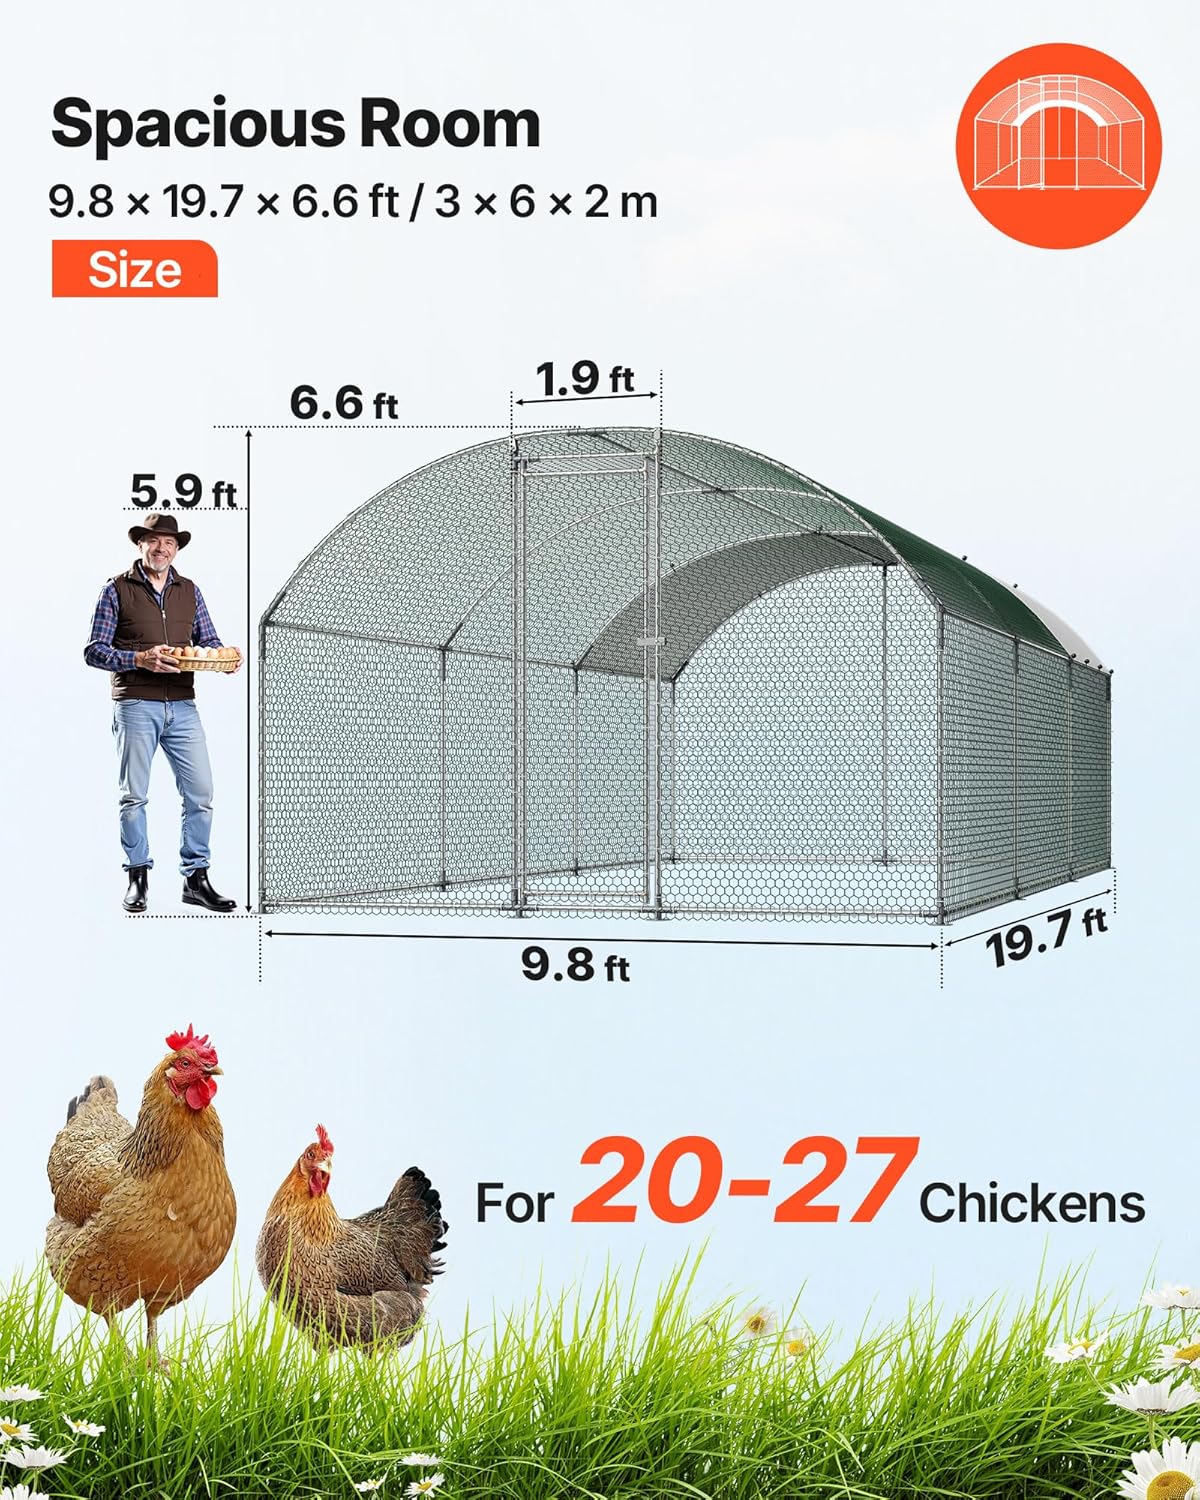
Image: Spacious Room and Capacity. This diagram illustrates the dimensions of the coop (9.8 x 19.7 x 6.6 ft) and its capacity for 20-27 chickens.
4.3. Access and Feeding
The coop features a walk-in door for easy access, facilitating feeding, watering, and cleaning. Ensure the door is securely latched after each entry and exit.

Image: Walk-in Design for Easier Cleaning & Feeding. This image demonstrates the large door and extended latch for convenient access.
5. പരിപാലനം
5.1. പതിവായി വൃത്തിയാക്കൽ
Periodically clean the interior of the coop to maintain a hygienic environment for your animals. Remove droppings, old bedding, and any debris.
5.2. പരിശോധന
Regularly inspect the entire structure for any signs of wear, damage, or loose connections. Check the wire mesh for tears or weak points, and ensure all pipes and connectors are secure. Pay close attention to the door latch for proper functionality.
5.3. Weather Preparation
The waterproof PE tarp provides protection from sun and rain. In extreme weather conditions, such as high winds or heavy snowfall, it is recommended to temporarily remove the tarp to prevent damage to the coop structure. Ensure the coop is adequately anchored to the ground to prevent displacement by wind.

Image: All-Weather Shelter. This image illustrates the waterproof tarp's function in protecting poultry from sun and rain.
6. പ്രശ്നപരിഹാരം
- വാതിൽ ശരിയായി അടയ്ക്കാതിരിക്കൽ: If the door appears tilted or does not close smoothly, check the frame for proper alignment. Minor adjustments to the frame or door hinges may be necessary.
- Coop Instability in Wind: Ensure all ground stakes are fully inserted. For increased stability, add extra anchoring points, bury the bottom mesh edges, or place heavy objects inside the coop.
- Predator Intrusion: While the mesh provides a barrier, small or determined predators may attempt to dig under or chew through the mesh. Reinforce the bottom perimeter with hardware cloth or heavy materials. Regularly inspect for any breaches.
- Insufficient Zip Ties: The provided quantity of zip ties may be sufficient for basic assembly, but for enhanced security and mesh tension, additional zip ties are recommended.
7 സ്പെസിഫിക്കേഷനുകൾ
| ഫീച്ചർ | വിശദാംശങ്ങൾ |
|---|---|
| മോഡലിൻ്റെ പേര് | മെറ്റൽ ചിക്കൻ കോപ്പ് |
| മോഡൽ നമ്പർ | ACR362 |
| ഉൽപ്പന്ന അളവുകൾ (L x W x H) | 118.11" x 236.22" x 78.74" (approx. 19.6 x 9.8 x 6.5 ft) |
| ഇനത്തിൻ്റെ ഭാരം | 104.7 പൗണ്ട് |
| ഫ്രെയിം മെറ്റീരിയൽ | Galvanized Steel Pipes (1" thick) |
| മെഷ് മെറ്റീരിയൽ | PVC-Coated Hexagonal Wire Mesh |
| കവർ മെറ്റീരിയൽ | Polyethylene (PE) Waterproof Tarp |
| മേൽക്കൂര ശൈലി | Dome Roof |
| നിറം | Silver (Frame), White (Tarp) |
| ടാർഗെറ്റ് പ്രേക്ഷകർ | Chicken, Duck, Goose, Rabbit |

Image: Product Dimensions. This diagram provides a visual representation of the coop's measurements.
8. വാറൻ്റിയും പിന്തുണയും
For warranty information, product support, or to inquire about replacement parts, please refer to the official VEVOR webസൈറ്റിൽ ബന്ധപ്പെടുക അല്ലെങ്കിൽ അവരുടെ ഉപഭോക്തൃ സേവനവുമായി നേരിട്ട് ബന്ധപ്പെടുക. വാറന്റി ക്ലെയിമുകൾക്കായി നിങ്ങളുടെ വാങ്ങൽ രസീത് സൂക്ഷിക്കുക.


