1. ആമുഖം
This manual provides detailed instructions for the setup, operation, maintenance, and troubleshooting of your NIMO Mini PC Desktop, Model DNB1. Please read this manual thoroughly before using the device to ensure proper functionality and to maximize your user experience. Keep this manual for future reference.

Image 1.1: The NIMO Mini PC Desktop DNB1, a compact and powerful computing device.
2. ബോക്സിൽ എന്താണുള്ളത്?
Carefully unpack your NIMO Mini PC Desktop and verify that all items listed below are included:
- NIMO Mini PC Desktop (DNB1)
- ഉപയോക്തൃ മാനുവൽ (ഈ പ്രമാണം)
- മൌണ്ടിംഗ് ബ്രാക്കറ്റ്
- പവർ അഡാപ്റ്റർ

Image 2.1: Contents of the NIMO Mini PC Desktop packaging, including the Mini PC, user manual, VESA mount, and power adapter.
3. ഉൽപ്പന്നം കഴിഞ്ഞുview
The NIMO Mini PC Desktop DNB1 is designed for versatility and performance. Familiarize yourself with its various ports and features.
3.1. Front and Rear Panel Interfaces

ചിത്രം 3.1: വിശദമായത് view of the NIMO Mini PC Desktop DNB1's interfaces, including USB, HDMI, LAN, Type-C, and power ports.
- DC-IN പോർട്ട്: പവർ അഡാപ്റ്ററുമായി ബന്ധിപ്പിക്കുന്നു.
- USB 3.2 ടൈപ്പ്-എ പോർട്ടുകൾ (x3): കീബോർഡുകൾ, മൗസുകൾ, ബാഹ്യ സംഭരണ ഉപകരണങ്ങൾ തുടങ്ങിയ പെരിഫറലുകൾ ബന്ധിപ്പിക്കുന്നതിന്.
- HDMI 2.0 പോർട്ടുകൾ (x2): For connecting to displays, supporting up to 4K resolution.
- ലാൻ പോർട്ട് (ഗിഗാബിറ്റ് ഇതർനെറ്റ്): വയർഡ് നെറ്റ്വർക്ക് കണക്ഷനായി.
- ഓഡിയോ പോർട്ട്: ഹെഡ്ഫോണുകളോ ബാഹ്യ സ്പീക്കറുകളോ ബന്ധിപ്പിക്കുന്നതിന്.
- Type-C Port (Multifunction): Supports data transfer and display output.
- SD കാർഡ് റീഡർ: For reading and writing to SD memory cards.
- പവർ ബട്ടൺ: ഉപകരണം ഓണാക്കാനോ ഓഫാക്കാനോ.
- റീസെറ്റ് ബട്ടൺ: ഉപകരണം പുനരാരംഭിക്കാൻ.
4. സജ്ജീകരണ ഗൈഡ്
Follow these steps to set up your NIMO Mini PC Desktop.
4.1. പ്രാരംഭ കണക്ഷൻ
- പെരിഫറലുകൾ ബന്ധിപ്പിക്കുക: Connect your keyboard, mouse, and any other USB devices to the available USB 3.2 ports.
- ഡിസ്പ്ലേ(കൾ) ബന്ധിപ്പിക്കുക: Connect your monitor(s) to the HDMI 2.0 ports. The Mini PC supports up to three 4K displays simultaneously.
- നെറ്റ്വർക്ക് ബന്ധിപ്പിക്കുക (ഓപ്ഷണൽ): For a wired internet connection, connect an Ethernet cable to the LAN port. For wireless, ensure your WiFi network is available during initial setup.
- പവർ ബന്ധിപ്പിക്കുക: Plug the power adapter into the DC-IN port on the Mini PC, then plug the adapter into a power outlet.
4.2. VESA മൗണ്ട് ഇൻസ്റ്റലേഷൻ
The included VESA mount allows you to attach the Mini PC to the back of a compatible monitor or to a wall, saving desk space.
- Attach the VESA bracket to the back of your monitor using the provided screws. Ensure the monitor has VESA mounting holes (typically 75x75mm or 100x100mm).
- Slide the NIMO Mini PC Desktop onto the mounted bracket until it clicks securely into place.
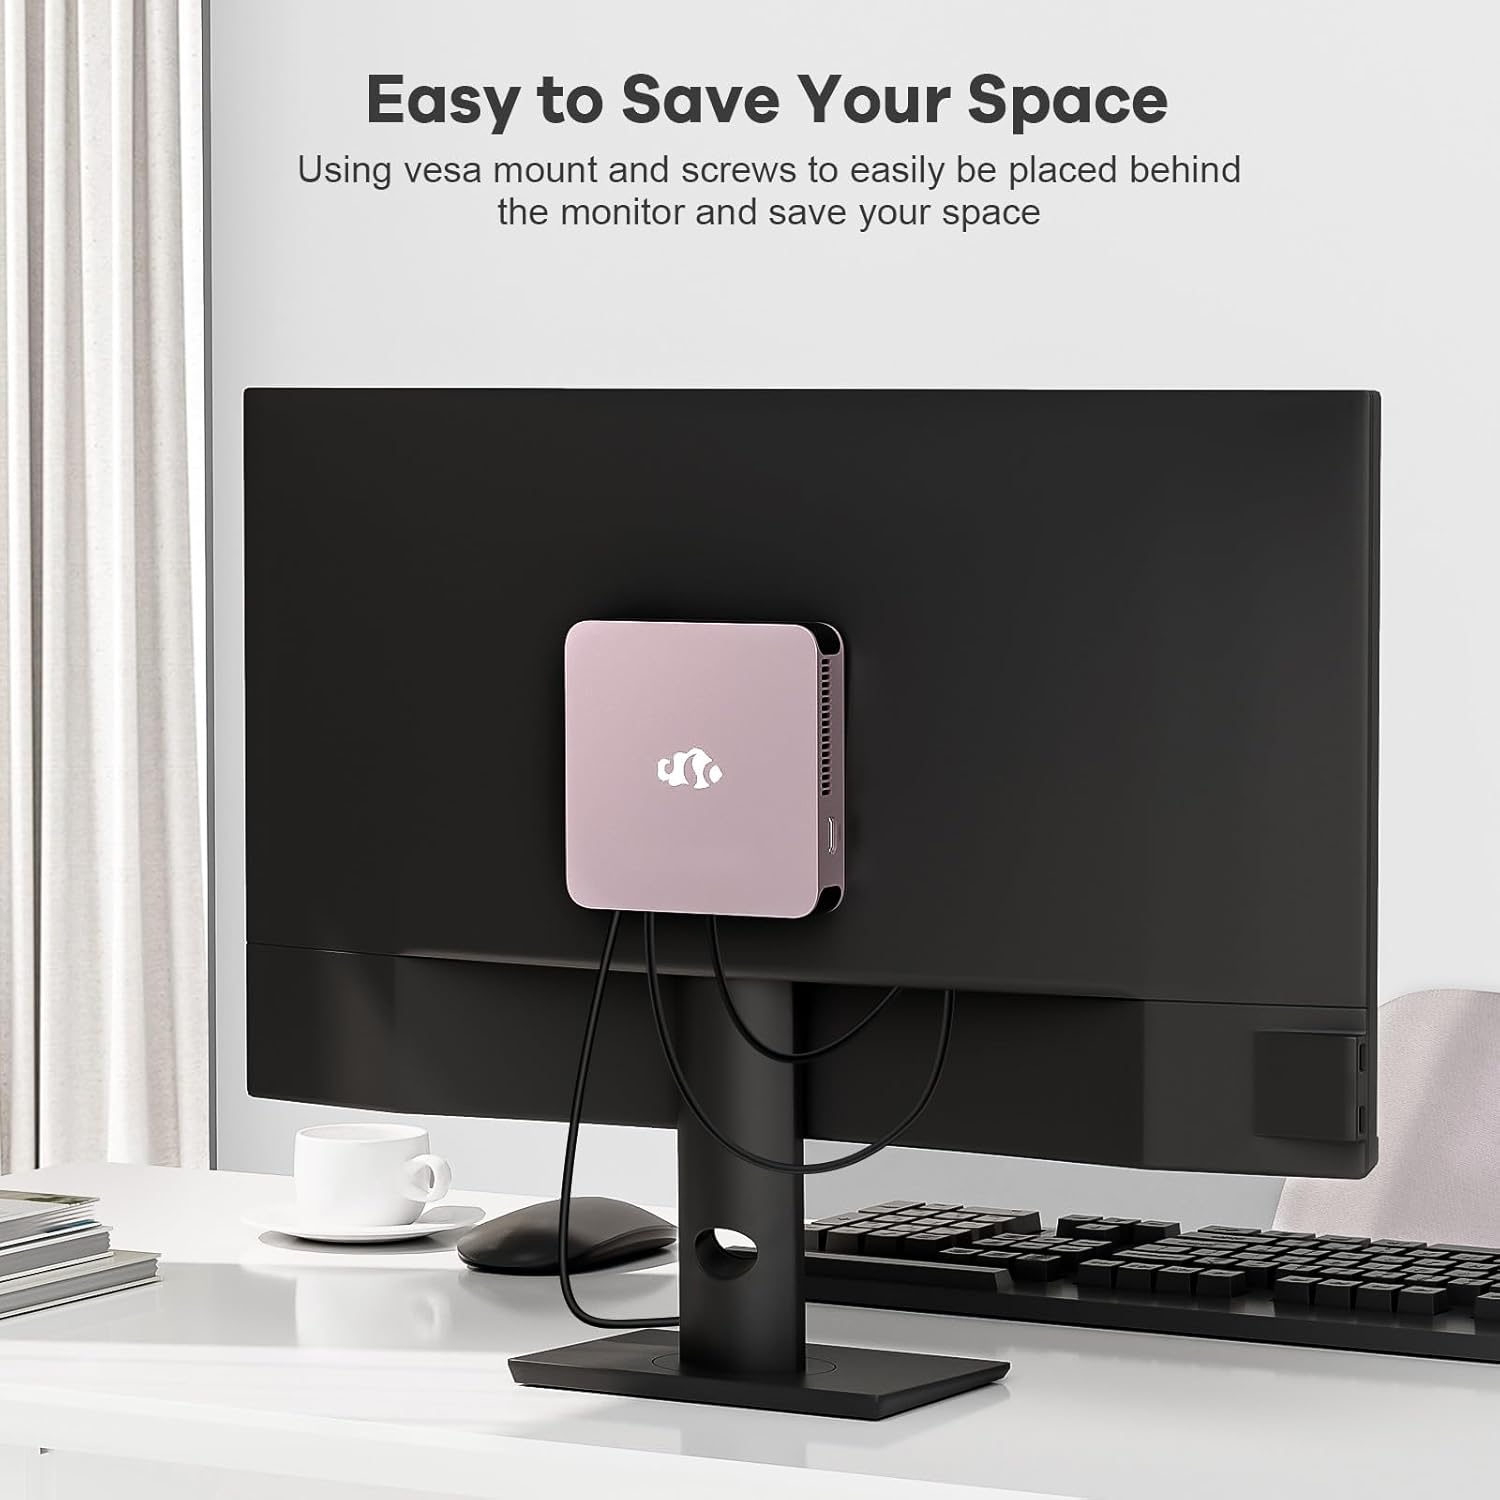
Image 4.1: The NIMO Mini PC Desktop DNB1 mounted on the back of a monitor using the VESA bracket, demonstrating space-saving placement.
5. പ്രവർത്തന നിർദ്ദേശങ്ങൾ
5.1. പവർ ഓൺ/ഓഫ്
- പവർ ഓണാക്കാൻ: Press the Power Button once. The power indicator light will illuminate.
- പവർ ഓഫ് ചെയ്യാൻ: From the operating system, select 'Shut Down'. Alternatively, press and hold the Power Button for 5-7 seconds to force a shutdown (use only when necessary).
5.2. Initial Boot and Windows 11 Setup
Upon first power-on, the system will guide you through the Windows 11 setup process. Follow the on-screen prompts to configure language, region, network, and user accounts.
5.3. നെറ്റ്വർക്കുകളിലേക്ക് ബന്ധിപ്പിക്കുന്നു
- വയർഡ് കണക്ഷൻ: If an Ethernet cable is connected to the LAN port, the system will automatically detect and connect to the wired network.
- Wireless Connection (WiFi 6): Access the network settings in Windows 11, select your desired WiFi network, and enter the password.
- Bluetooth Connection (Bluetooth 5.2): Enable Bluetooth in Windows 11 settings, search for devices, and pair with your Bluetooth peripherals.
5.4. Using Multiple Displays
The NIMO Mini PC supports up to three 4K displays. Connect your monitors to the available HDMI and Type-C ports. Windows 11 display settings allow you to extend, duplicate, or show only on one display.

Image 5.1: The NIMO Mini PC Desktop DNB1 supporting a triple monitor 4K display setup, enhancing productivity and multimedia experiences.
6. പരിപാലനം
Proper maintenance ensures the longevity and optimal performance of your Mini PC.
- വൃത്തിയാക്കൽ: മിനി പിസിയുടെ പുറംഭാഗം വൃത്തിയാക്കാൻ മൃദുവായതും ഉണങ്ങിയതുമായ തുണി ഉപയോഗിക്കുക. വെന്റുകളിലെ പൊടിപടലങ്ങൾ ഒഴിവാക്കാൻ, കംപ്രസ് ചെയ്ത വായു ഉപയോഗിക്കുക. ഉപകരണത്തിൽ നേരിട്ട് ലിക്വിഡ് ക്ലീനറുകൾ ഉപയോഗിക്കരുത്.
- വെൻ്റിലേഷൻ: Ensure the ventilation openings are not blocked to prevent overheating. Operate the device in a well-ventilated area.
- സോഫ്റ്റ്വെയർ അപ്ഡേറ്റുകൾ: Regularly update your Windows operating system and drivers to maintain security and performance.
- ഡാറ്റ ബാക്കപ്പ്: പ്രധാനപ്പെട്ട ഡാറ്റ ഇടയ്ക്കിടെ ഒരു ബാഹ്യ ഡ്രൈവിലേക്കോ ക്ലൗഡ് സംഭരണത്തിലേക്കോ ബാക്കപ്പ് ചെയ്യുക.
7. പ്രശ്നപരിഹാരം
നിങ്ങൾ നേരിട്ടേക്കാവുന്ന പൊതുവായ പ്രശ്നങ്ങളെ ഈ വിഭാഗം അഭിസംബോധന ചെയ്യുന്നു.
7.1. പവർ ഇല്ല
- പവർ അഡാപ്റ്റർ മിനി പിസിയിലേക്കും പ്രവർത്തിക്കുന്ന ഒരു പവർ ഔട്ട്ലെറ്റിലേക്കും സുരക്ഷിതമായി ബന്ധിപ്പിച്ചിട്ടുണ്ടെന്ന് ഉറപ്പാക്കുക.
- മറ്റൊരു ഉപകരണം പ്ലഗ് ഇൻ ചെയ്ത് പവർ ഔട്ട്ലെറ്റ് പ്രവർത്തനക്ഷമമാണെന്ന് ഉറപ്പാക്കുക.
- പവർ അഡാപ്റ്ററിൽ എന്തെങ്കിലും ദൃശ്യമായ കേടുപാടുകൾ ഉണ്ടോ എന്ന് പരിശോധിക്കുക.
7.2. ഡിസ്പ്ലേ ഔട്ട്പുട്ട് ഇല്ല
- Confirm that the monitor is powered on and set to the correct input source (HDMI, Type-C).
- Check that the HDMI or Type-C cable is securely connected to both the Mini PC and the monitor.
- ലഭ്യമെങ്കിൽ മറ്റൊരു ഡിസ്പ്ലേ കേബിളോ മോണിറ്ററോ പരീക്ഷിച്ചുനോക്കൂ.
7.3. ഇൻ്റർനെറ്റ് കണക്ഷൻ ഇല്ല
- വയർ: Ensure the Ethernet cable is properly connected and your router/modem is working.
- വയർലെസ്: Check WiFi settings in Windows 11, ensure WiFi is enabled, and you are connected to the correct network with the correct password. Restart your router/modem if necessary.
7.4. പെരിഫറലുകൾ പ്രതികരിക്കുന്നില്ല
- മറ്റൊരു USB പോർട്ടിലേക്ക് പെരിഫറൽ ബന്ധിപ്പിക്കാൻ ശ്രമിക്കുക.
- പെരിഫറലിന്റെ ഡ്രൈവറുകൾ ഇൻസ്റ്റാൾ ചെയ്തിട്ടുണ്ടെന്നും കാലികമാണെന്നും ഉറപ്പാക്കുക.
- സാധ്യമെങ്കിൽ മറ്റൊരു കമ്പ്യൂട്ടറിൽ പെരിഫറൽ പരിശോധിക്കുക.
8 സ്പെസിഫിക്കേഷനുകൾ
Detailed technical specifications for the NIMO Mini PC Desktop DNB1.
| ഫീച്ചർ | സ്പെസിഫിക്കേഷൻ |
|---|---|
| മോഡൽ | DNB1 |
| പ്രോസസ്സർ | Intel 12th Gen N100 (up to 3.4 GHz) |
| കോറുകൾ/ത്രെഡുകൾ | 4 കോറുകൾ / 4 ത്രെഡുകൾ |
| ഗ്രാഫിക്സ് | ഇൻ്റൽ UHD ഗ്രാഫിക്സ് |
| റാം | 16 GB DDR5 |
| സംഭരണം | 512 GB PCIe SSD |
| പരമാവധി സ്ക്രീൻ റെസല്യൂഷൻ | 3840x2160 പിക്സലുകൾ (4K) |
| ഡിസ്പ്ലേ ഔട്ട്പുട്ട് | 2x HDMI 2.0, 1x Type-C (supports triple display) |
| USB പോർട്ടുകൾ | 3x USB 3.2 Type-A, 1x USB Type-C |
| നെറ്റ്വർക്ക് | Gigabit Ethernet (LAN), WiFi 6 |
| ബ്ലൂടൂത്ത് | ബ്ലൂടൂത്ത് 5.2 |
| ഓപ്പറേറ്റിംഗ് സിസ്റ്റം | വിൻഡോസ് 11 |
| ഇനത്തിൻ്റെ ഭാരം | 1.76 പൗണ്ട് |
| പവർ ഉറവിടം | DC |

Image 8.1: Summary of key features including Intel 12th Gen N100 processor, 4K Ultra HD support, Bluetooth 5.2, LPDDR5, WiFi 6, and PCIe SSD.
9. വാറൻ്റിയും പിന്തുണയും
NIMO is committed to providing excellent customer service and product reliability.
- തിരികെ നൽകൽ നയം: You may request a return or exchange within 90 days of purchase.
- സാങ്കേതിക സഹായം: The NIMO Mini PC Desktop comes with 2 years of technical support. If you encounter any issues, please contact our dedicated customer support team for assistance.
For support, please refer to the contact information provided with your purchase or visit the official NIMO webസൈറ്റ്.


