1. ഉൽപ്പന്നം കഴിഞ്ഞുview
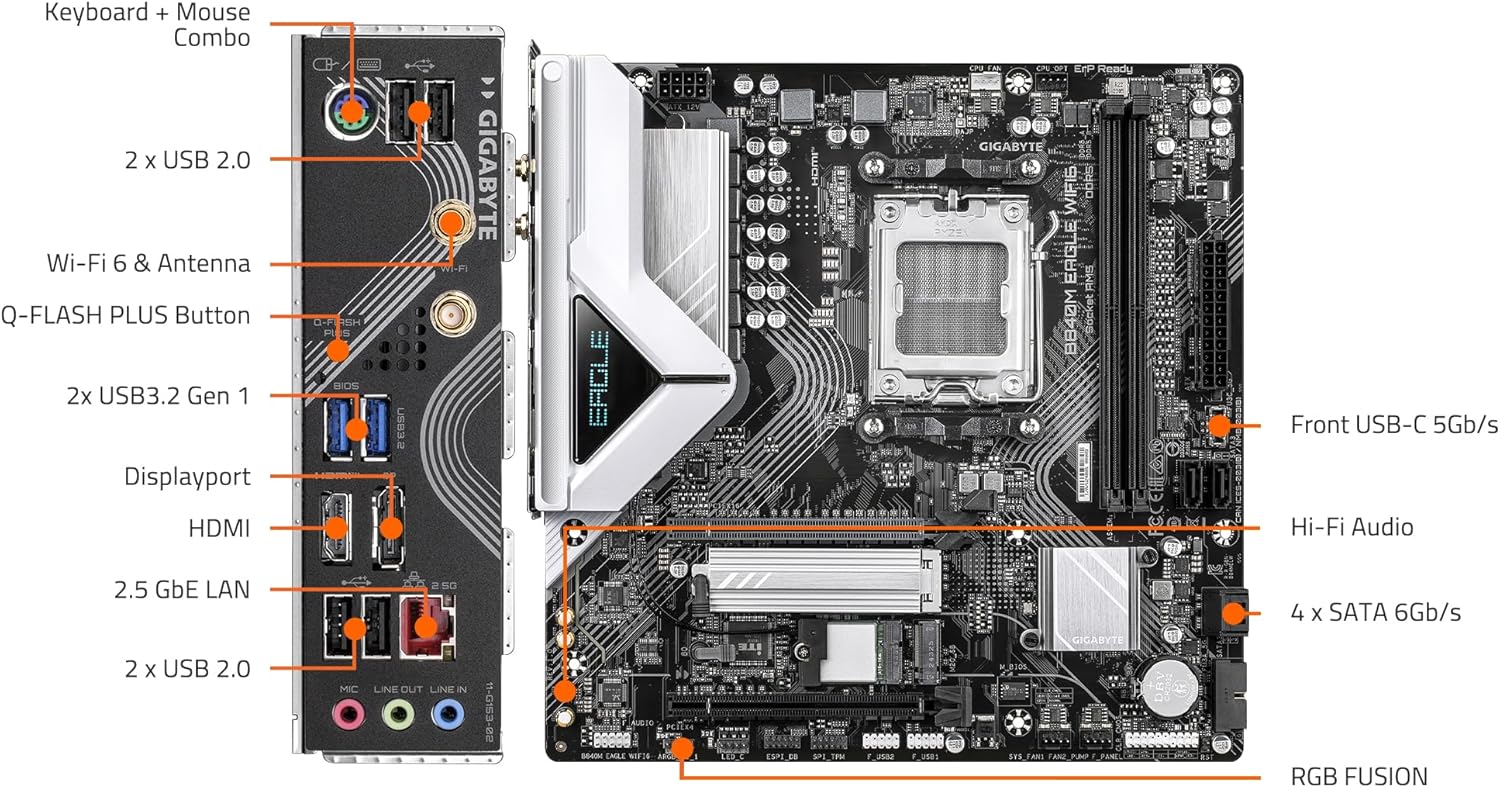
The GIGABYTE B840M Eagle WIFI6 is a Micro-ATX motherboard designed for AMD Socket AM5 processors, supporting AMD Ryzen 9000, 8000, and 7000 series. It features DDR5 memory support, dual M.2 slots, PCIe 4.0 connectivity, USB 3.2 Gen 1, WIFI6, and 2.5GbE LAN. This motherboard is engineered to provide a stable and high-performance foundation for your personal computer system.


2 പ്രധാന സവിശേഷതകൾ
- എഎംഡി സോക്കറ്റ് എഎം5: AMD Ryzen 9000 / Ryzen 8000 / Ryzen 7000 സീരീസ് പ്രോസസ്സറുകളെ പിന്തുണയ്ക്കുന്നു.
- DDR5 അനുയോജ്യമാണ്: Features 2 DIMM slots for DDR5 memory.
- പവർ ഡിസൈൻ: Robust 5+2+2 power phase design for stable performance.
- തെർമലുകൾ: കാര്യക്ഷമമായ താപ വിസർജ്ജനത്തിനായി VRM, M.2 തെർമൽ ഗാർഡുകൾ എന്നിവ കൊണ്ട് സജ്ജീകരിച്ചിരിക്കുന്നു.
- കണക്റ്റിവിറ്റി: Includes PCIe 4.0, 2x M.2 Slots, and USB-C ports.
- DIY സൗഹൃദം: Features M.2 EZ-Latch, PCIe EZ-Latch, and Wi-Fi EZ-Plug for simplified installation.
- നെറ്റ്വർക്കിംഗ്: Integrated WIFI6 and 2.5GbE LAN for high-speed network connectivity, plus BT 5.3.
3. സജ്ജീകരണ ഗൈഡ്
This section provides a general guide for installing your GIGABYTE B840M Eagle WIFI6 motherboard. Always refer to the detailed instructions provided with your CPU, RAM, and other components for specific installation procedures.
3.1. തയ്യാറാക്കൽ
- Ensure your workspace is clean and well-lit.
- ഘടകങ്ങൾ കൈകാര്യം ചെയ്യുന്നതിന് മുമ്പ് ഒരു നിലത്തുകിടക്കുന്ന ലോഹ വസ്തുവിൽ സ്പർശിച്ചുകൊണ്ട് സ്റ്റാറ്റിക് വൈദ്യുതി ഡിസ്ചാർജ് ചെയ്യുക.
- Gather all necessary components: CPU, CPU cooler, RAM, M.2 SSDs, graphics card, power supply, and PC case.
3.2. സിപിയു ഇൻസ്റ്റലേഷൻ
- Locate the AMD Socket AM5 on the motherboard.
- സിപിയു സോക്കറ്റ് നിലനിർത്തൽ ലിവർ തുറക്കുക.
- Carefully align the CPU with the socket, ensuring the golden triangle on the CPU matches the triangle on the socket. Do not force the CPU into place.
- സിപിയു സുരക്ഷിതമാക്കാൻ റിട്ടൻഷൻ ലിവർ അടയ്ക്കുക.
3.3. സിപിയു കൂളർ ഇൻസ്റ്റലേഷൻ
Install your chosen CPU cooler according to its manufacturer's instructions. Ensure proper thermal paste application for optimal cooling.
3.4. റാം ഇൻസ്റ്റാളേഷൻ
- DDR5 DIMM സ്ലോട്ടുകളുടെ രണ്ടറ്റത്തുമുള്ള ക്ലിപ്പുകൾ തുറക്കുക.
- സ്ലോട്ടിലെ കീയുമായി മൊഡ്യൂളിലെ നോച്ച് പൊരുത്തപ്പെടുന്നുണ്ടെന്ന് ഉറപ്പാക്കിക്കൊണ്ട്, RAM മൊഡ്യൂൾ സ്ലോട്ടുമായി വിന്യസിക്കുക.
- ക്ലിപ്പുകൾ ശരിയായ സ്ഥാനത്ത് വരുന്നത് വരെ RAM മൊഡ്യൂളിന്റെ രണ്ട് അറ്റങ്ങളിലും ദൃഢമായി അമർത്തുക.
3.5. M.2 SSD ഇൻസ്റ്റലേഷൻ
The motherboard features 2 M.2 slots with EZ-Latch. Refer to the motherboard diagram for their locations.
- Locate an M.2 slot and remove the M.2 Thermal Guard if present.
- സ്ലോട്ടിലേക്ക് ഒരു കോണിൽ M.2 SSD തിരുകുക.
- Gently push down the SSD and secure it using the M.2 EZ-Latch mechanism.
- Reinstall the M.2 Thermal Guard.
3.6. മദർബോർഡ് മൗണ്ടിംഗ്
- Install the I/O shield into your PC case (if not pre-attached).
- നിങ്ങളുടെ പിസി കേസിലെ സ്റ്റാൻഡ്ഓഫുകൾക്കൊപ്പം മദർബോർഡ് വിന്യസിക്കുക.
- മദർബോർഡ് സ്ക്രൂകൾ ഉപയോഗിച്ച് ഉറപ്പിക്കുക, അമിതമായി മുറുകുന്നില്ലെന്ന് ഉറപ്പാക്കുക.
3.7. പവർ കണക്ഷനുകൾ
- നിങ്ങളുടെ പവർ സപ്ലൈയിൽ നിന്ന് മദർബോർഡിലേക്ക് 24-പിൻ ATX മെയിൻ പവർ കണക്ടർ ബന്ധിപ്പിക്കുക.
- Connect the 8-pin (or 4+4-pin) ATX 12V CPU power connector.
3.8. ഫ്രണ്ട് പാനലും പെരിഫറൽ കണക്ഷനുകളും
Connect the front panel headers (power button, reset button, USB ports, audio jacks) and other peripherals (SATA drives, case fans) to the appropriate headers on the motherboard. Refer to the labeled diagram below for assistance.

3.9. ഗ്രാഫിക്സ് കാർഡ് ഇൻസ്റ്റലേഷൻ
- Open the PCIe EZ-Latch on the primary PCIe x16 slot.
- Insert your graphics card firmly into the slot until it clicks into place.
- സ്ക്രൂകൾ ഉപയോഗിച്ച് ഗ്രാഫിക്സ് കാർഡ് പിസി കേസിൽ ഉറപ്പിക്കുക.
- നിങ്ങളുടെ പവർ സപ്ലൈയിൽ നിന്ന് ആവശ്യമായ ഏതെങ്കിലും PCIe പവർ കേബിളുകൾ ഗ്രാഫിക്സ് കാർഡിലേക്ക് ബന്ധിപ്പിക്കുക.
4. പ്രവർത്തന നിർദ്ദേശങ്ങൾ
4.1. ആദ്യ ബൂട്ടും BIOS/UEFI സജ്ജീകരണവും
- എല്ലാ ഘടകങ്ങളും പെരിഫറലുകളും ബന്ധിപ്പിച്ച ശേഷം, നിങ്ങളുടെ സിസ്റ്റം ഓൺ ചെയ്യുക.
- നിയുക്ത കീ അമർത്തുക (സാധാരണയായി DEL or F2) during startup to enter the BIOS/UEFI setup utility.
- Configure boot order, system time, and other essential settings as needed. Save changes and exit.
4.2. ഓപ്പറേറ്റിംഗ് സിസ്റ്റം ഇൻസ്റ്റലേഷൻ
Insert your operating system installation media (USB drive or DVD) and follow the on-screen prompts to install your preferred OS.
4.3. ഡ്രൈവർ ഇൻസ്റ്റാളേഷൻ
After OS installation, install the latest drivers for your motherboard, graphics card, and other components. You can find the latest drivers on the GIGABYTE official website for your B840M Eagle WIFI6 motherboard.
4.4. നെറ്റ്വർക്ക് കണക്റ്റിവിറ്റി
- വയർഡ് ലാൻ: Connect an Ethernet cable to the 2.5GbE LAN port on the rear I/O panel.
- Wireless (WIFI6): Attach the included Wi-Fi antennas to the connectors on the rear I/O panel. Ensure Wi-Fi drivers are installed for wireless connectivity.
5. പരിപാലനം
നിങ്ങളുടെ മദർബോർഡിന്റെയും പിസി സിസ്റ്റത്തിന്റെയും ദീർഘായുസ്സും മികച്ച പ്രകടനവും ഉറപ്പാക്കാൻ പതിവ് അറ്റകുറ്റപ്പണികൾ സഹായിക്കുന്നു.
- പൊടി വൃത്തിയാക്കൽ: Periodically clean dust from inside your PC case, especially from fans, heatsinks, and motherboard components, using compressed air. Ensure the system is powered off and unplugged before cleaning.
- ബയോസ്/യുഇഎഫ്ഐ അപ്ഡേറ്റുകൾ: GIGABYTE പരിശോധിക്കുക website for the latest BIOS/UEFI updates. Updates can improve compatibility, stability, and performance. Follow GIGABYTE's instructions carefully when updating the BIOS.
- ഡ്രൈവർ അപ്ഡേറ്റുകൾ: പുതിയ സോഫ്റ്റ്വെയറുമായും ഹാർഡ്വെയറുമായും അനുയോജ്യതയും ഒപ്റ്റിമൽ പ്രകടനവും ഉറപ്പാക്കാൻ നിങ്ങളുടെ സിസ്റ്റം ഡ്രൈവറുകൾ അപ്ഡേറ്റ് ചെയ്ത് സൂക്ഷിക്കുക.
- ഘടക പരിശോധനകൾ: Occasionally check all cable connections (power, data, front panel) to ensure they are secure.
6. പ്രശ്നപരിഹാരം
നിങ്ങൾ നേരിട്ടേക്കാവുന്ന സാധാരണ പ്രശ്നങ്ങളെ ഈ വിഭാഗം അഭിസംബോധന ചെയ്യുന്നു. കൂടുതൽ സങ്കീർണ്ണമായ പ്രശ്നങ്ങൾക്ക്, GIGABYTE പിന്തുണ പരിശോധിക്കുക. webസൈറ്റ് അല്ലെങ്കിൽ സാങ്കേതിക പിന്തുണയുമായി ബന്ധപ്പെടുക.
6.1. പവർ ഇല്ല / പോസ്റ്റ് ഇല്ല (പവർ-ഓൺ സെൽഫ്-ടെസ്റ്റ്)
- Ensure all power cables (24-pin ATX, 8-pin CPU, PCIe power) are securely connected.
- പവർ സപ്ലൈ ഓണാക്കി ശരിയായി പ്രവർത്തിക്കുന്നുണ്ടെന്ന് ഉറപ്പാക്കുക.
- ഫ്രണ്ട് പാനൽ കണക്ഷനുകൾ പരിശോധിക്കുക, പ്രത്യേകിച്ച് പവർ ബട്ടൺ ഹെഡർ.
- റാം മൊഡ്യൂളുകളും ഗ്രാഫിക്സ് കാർഡും വീണ്ടും ഇൻസ്റ്റാൾ ചെയ്യുക.
- Try booting with minimal components (CPU, one RAM stick, graphics card) to isolate the issue.
- Clear CMOS by removing the CMOS battery for a few minutes or using the clear CMOS jumper (refer to motherboard manual for exact location).
6.2. സിസ്റ്റം അസ്ഥിരത / ക്രാഷുകൾ
- എല്ലാ ഡ്രൈവർമാരും കാലികമാണെന്ന് ഉറപ്പാക്കുക.
- അമിതമായി ചൂടാകുന്നത് ഒഴിവാക്കാൻ സിപിയു, ജിപിയു താപനില പരിശോധിക്കുക.
- തകരാറുള്ള RAM പരിശോധിക്കാൻ മെമ്മറി ഡയഗ്നോസ്റ്റിക് ഉപകരണങ്ങൾ പ്രവർത്തിപ്പിക്കുക.
- Verify power supply wattagഎല്ലാ ഘടകങ്ങൾക്കും e മതിയാകും.
6.3. നെറ്റ്വർക്ക് കണക്റ്റിവിറ്റി പ്രശ്നങ്ങൾ
- വയർ: Check Ethernet cable connection and router/modem status. Ensure LAN drivers are installed.
- വയർലെസ്: Ensure Wi-Fi antennas are properly attached and Wi-Fi drivers are installed. Check Wi-Fi network settings in your operating system.
6.4. Peripheral Not Detected
- Ensure the peripheral is correctly connected to the appropriate port.
- Install the latest drivers for the peripheral.
- Test the peripheral on another port or another system if possible.
7 സാങ്കേതിക സവിശേഷതകൾ
| ഫീച്ചർ | സ്പെസിഫിക്കേഷൻ |
|---|---|
| സിപിയു സോക്കറ്റ് | എഎംഡി സോക്കറ്റ് എഎം5 |
| അനുയോജ്യമായ പ്രോസസ്സറുകൾ | എഎംഡി റൈസൺ 9000 / റൈസൺ 8000 / റൈസൺ 7000 സീരീസ് |
| ചിപ്സെറ്റ് | എഎംഡി ബി840 |
| റാം മെമ്മറി ടെക്നോളജി | DDR5 |
| മെമ്മറി സ്ലോട്ടുകൾ | 2x DIMMs |
| മെമ്മറി ക്ലോക്ക് സ്പീഡ് | 5200 MHz വരെ (ഒസി വഴി ഉയർന്നത്) |
| സംഭരണം | 2x M.2 Slots, 4x SATA 6Gb/s |
| PCIe സ്ലോട്ടുകൾ | PCIe 4.0 |
| USB പോർട്ടുകൾ | യുഎസ്ബി 3.2 ജെൻ 1, യുഎസ്ബി-സി |
| നെറ്റ്വർക്കിംഗ് | WIFI6, 2.5GbE LAN, BT 5.3 |
| ഫോം ഫാക്ടർ | മൈക്രോ-എടിഎക്സ് |
| അളവുകൾ (LxWxH) | 8.82 x 8.82 x 1 ഇഞ്ച് |
| ഇനത്തിൻ്റെ ഭാരം | 4.4 പൗണ്ട് |
| ഓപ്പറേറ്റിംഗ് സിസ്റ്റം പിന്തുണ | വിൻഡോസ് 11 |
8. വാറൻ്റിയും പിന്തുണയും
വിശദമായ വാറന്റി വിവരങ്ങൾ, സാങ്കേതിക പിന്തുണ, ഡ്രൈവർ ഡൗൺലോഡുകൾ, ബയോസ് അപ്ഡേറ്റുകൾ എന്നിവയ്ക്കായി, ദയവായി ഔദ്യോഗിക GIGABYTE സന്ദർശിക്കുക. website. You can find product-specific support by navigating to the support section and searching for your model, B840M Eagle WIFI6.
GIGABYTE ഔദ്യോഗികം Webസൈറ്റ്: https://www.gigabyte.com/
Always ensure you are downloading software and drivers from the official manufacturer's website to prevent security risks.


