ആമുഖം
Thank you for choosing the POWERTEC PRO Large Format Tile Cutter. This manual provides essential information for the safe and effective operation, assembly, maintenance, and troubleshooting of your new tile cutter. Designed for professional tilers and contractors, this tool is engineered to handle large tiles and slabs up to 140 inches, making it suitable for a wide range of applications including expansive flooring and intricate countertop designs. It is capable of cutting various materials such as ceramic, porcelain, marble, and granite with a thickness range of 3-12mm.
സുരക്ഷാ വിവരങ്ങൾ
Always read and understand all safety warnings and instructions before operating this tool. Failure to follow the warnings and instructions may result in serious injury.
- ഉചിതമായ വ്യക്തിഗത സംരക്ഷണ ഉപകരണങ്ങൾ (PPE) ധരിക്കുക: Always wear safety glasses, gloves, and sturdy footwear when operating the tile cutter.
- വർക്ക് ഏരിയ സുരക്ഷ: Keep your work area clean, well-lit, and free of clutter. Ensure adequate space for handling large tiles.
- വർക്ക്പീസ് സുരക്ഷിതമാക്കുക: Always ensure the tile or slab is stable and properly supported before scoring and breaking.
- Handle sharp components with care: The scoring wheel and broken tile edges are sharp. Exercise caution to prevent cuts.
- കുട്ടികളെയും അടുത്തിരിക്കുന്നവരെയും അകറ്റി നിർത്തുക: Do not allow unauthorized persons near the tool during operation.
- ഉപയോഗിക്കുന്നതിന് മുമ്പ് ഉപകരണം പരിശോധിക്കുക: Check for any damaged parts, loose connections, or wear. Do not operate if the tool is damaged.
- Use the correct scoring wheel: Ensure the 114-degree titanium-coated tungsten carbide scoring wheel (22mm) is properly installed and in good condition.
പാക്കേജ് ഉള്ളടക്കം
Carefully unpack all components and verify that you have received all items listed below. If any parts are missing or damaged, contact POWERTEC customer support.
- 2 x 59" Base Guide Rails
- 1 x 31.5" Base Guide Rail
- 1 x Scoring Carriage with Ø22 mm Scoring Wheel
- 1 x Tile Breaker Plier
- 2 x Positioning Fixtures
- 2 x Base Guide Rail Clamps
- 1 x ചുമക്കുന്ന ബാഗ്
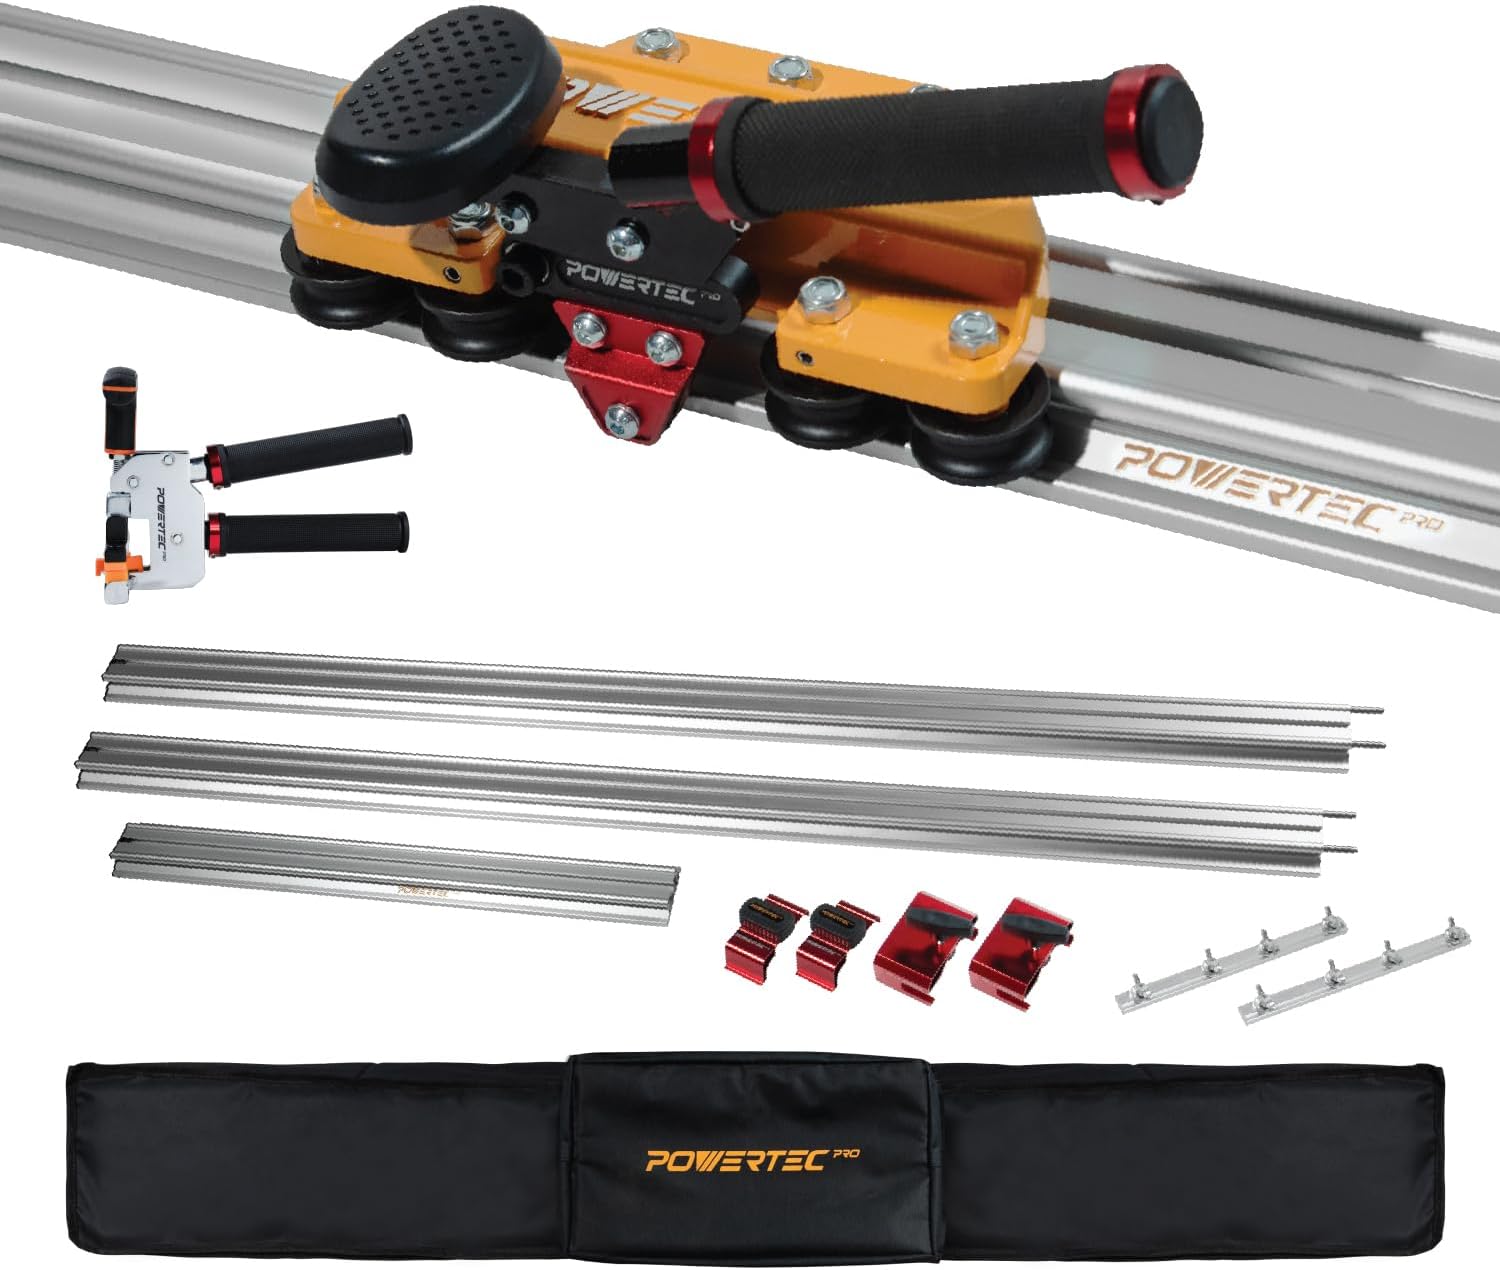
Image: All components of the POWERTEC PRO Large Format Tile Cutter, including guide rails, scoring carriage, tile breaker, clampകൾ, ചുമക്കുന്ന ബാഗ്.
ഘടകങ്ങൾ പൂർത്തിയായിview
Familiarize yourself with the main parts of the POWERTEC PRO Large Format Tile Cutter:
- Guide Rail: The aluminum track along which the scoring carriage glides. Composed of multiple sections for extended length.
- Scoring Carriage: The assembly that holds the scoring wheel and moves along the guide rail.
- Carriage Handle: Ergonomic handle on the scoring carriage for comfortable grip and control.
- Grip Knob: Additional knob on the scoring carriage for enhanced control during scoring.
- Tungsten Carbide Scoring Wheel: The cutting wheel (Ø22 mm, 114-degree titanium-coated) that scores the tile surface.
- Positioning Fixture: Used to secure the tile and ensure accurate alignment with the guide rail.
- Guide Rail Clamp: Secures the guide rail to the tile or work surface.
- Tile Breaker Plier: A separate tool used to cleanly separate the tile after it has been scored.
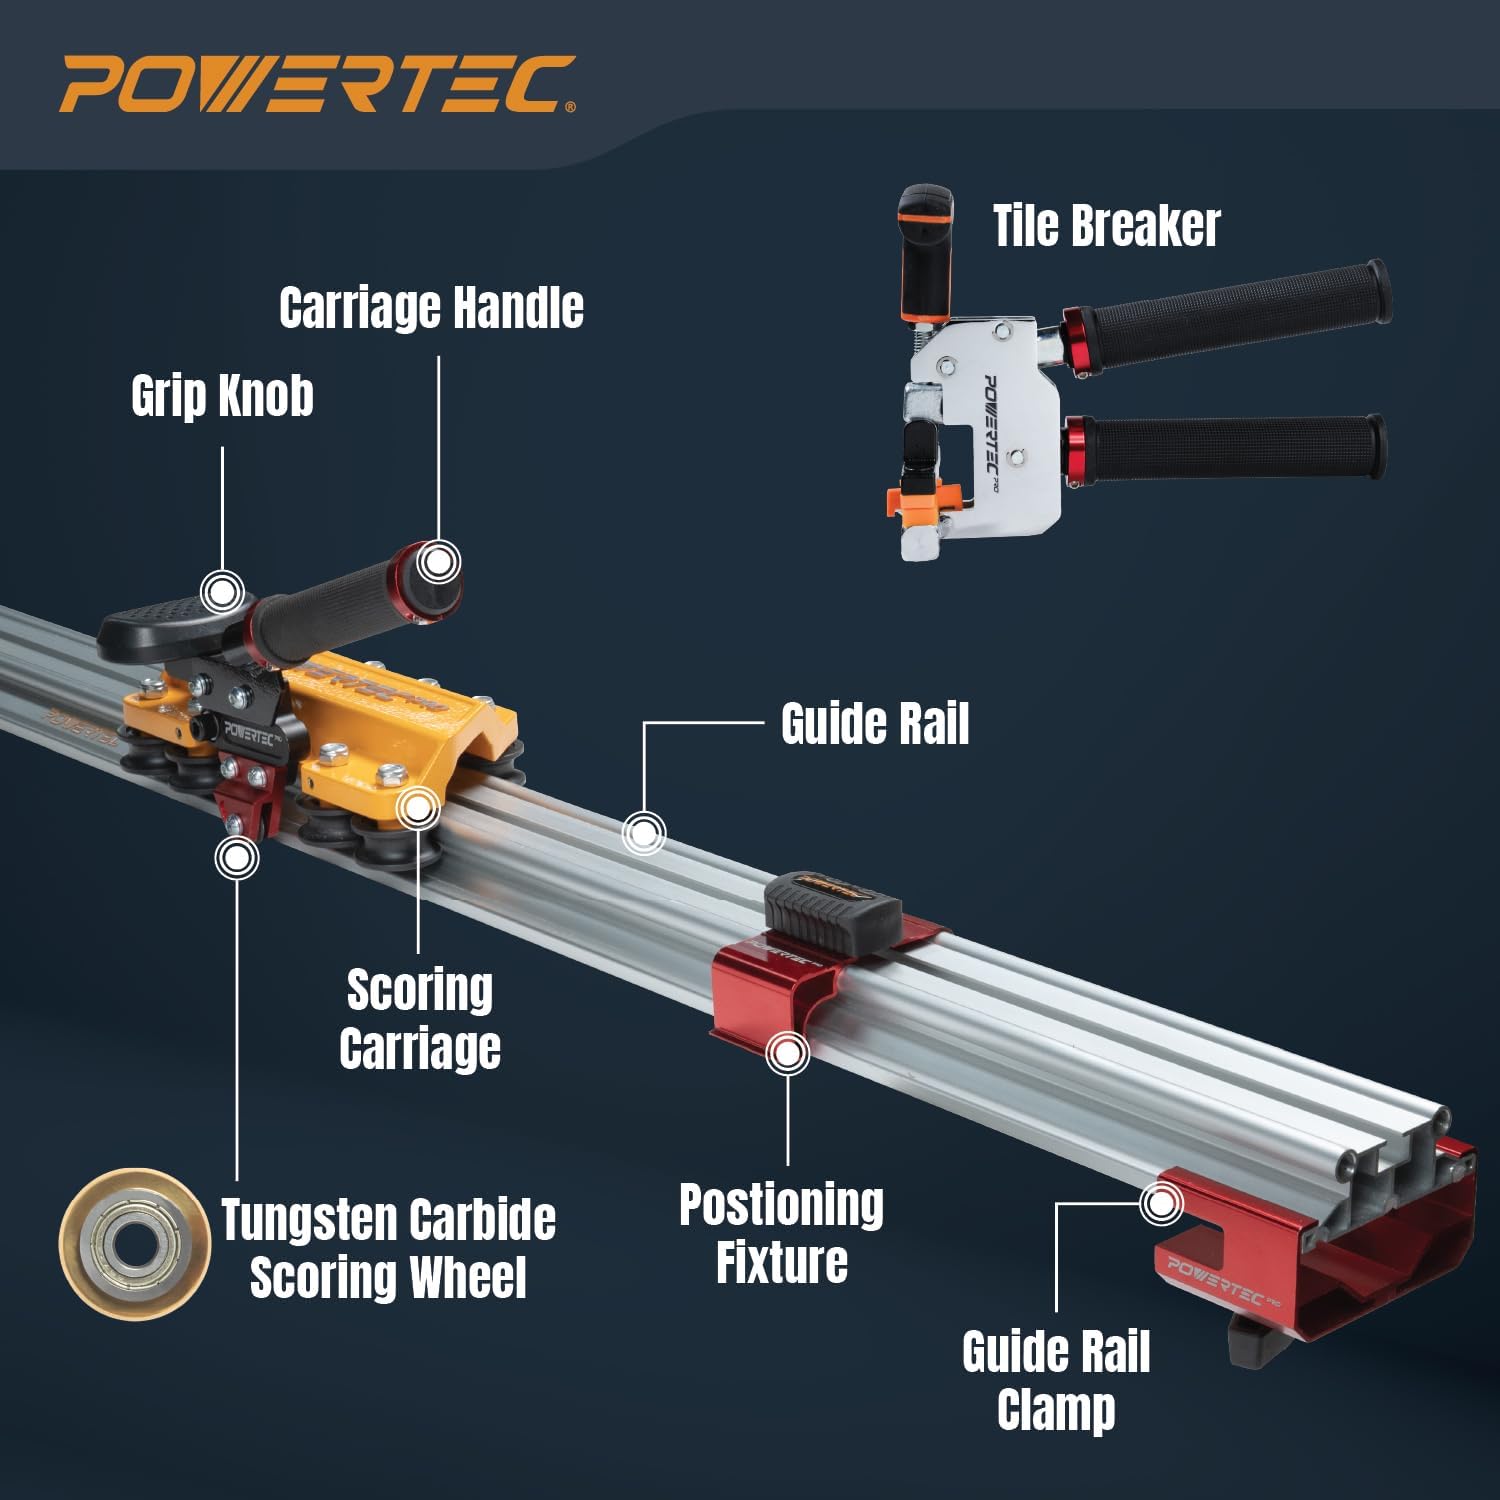
Image: Labeled diagram showing the main components of the tile cutter, including the guide rail, scoring carriage, handles, scoring wheel, positioning fixture, guide rail clamp, and tile breaker.
സജ്ജീകരണ നിർദ്ദേശങ്ങൾ
Follow these steps to assemble your POWERTEC PRO Large Format Tile Cutter:
- Assemble the Guide Rails: Connect the two 59" base guide rails and the 31.5" base guide rail using the provided connectors to achieve the desired length, up to 140 inches. Ensure the connections are secure and the rails are aligned.
- Attach the Scoring Carriage: Slide the scoring carriage onto the assembled guide rail. Ensure the seven wear-resistant rollers are properly seated in the rail grooves for smooth movement.
- Position the Tile: Place the tile or slab on a stable, flat surface. Position the guide rail on top of the tile, aligning the desired cut line with the scoring wheel's path.
- Secure the Guide Rail: Use the guide rail clamps to firmly secure the guide rail to the tile or work surface. This prevents movement during the scoring process.
- Use Positioning Fixtures (Optional): For repetitive cuts or added stability, attach the positioning fixtures to the guide rail and against the edge of the tile.

ചിത്രം: ക്ലോസ്-അപ്പ് view of the guide rail sections being connected to form a longer track.
പ്രവർത്തന നിർദ്ദേശങ്ങൾ
This section details the process of scoring and breaking tiles using the POWERTEC PRO Large Format Tile Cutter.
Scoring the Tile
- Prepare the Tile: Ensure the tile surface is clean and free of debris. Mark your desired cut line clearly.
- Align the Scoring Wheel: Position the scoring carriage at the starting edge of the tile. Align the scoring wheel precisely with your marked cut line. The anti-slip bottom strips on the guide rail provide stability.
- Apply Pressure and Score: Grasp the carriage handle and grip knob firmly. Apply consistent, moderate downward pressure on the scoring carriage. Push the carriage smoothly and steadily along the guide rail in a single, continuous motion from one end of the tile to the other. Avoid stopping or re-scoring the same line.
- Check the Score Line: A successful score will be a clean, continuous line across the tile surface.

Image: Close-up of the anti-slip bottom strips on the guide rail, designed to provide stability during scoring.

Image: Demonstrates aligning the scoring line with the indicator on the scoring carriage for precise cuts.
Breaking the Tile
- Position the Tile Breaker: After scoring, remove the guide rail. Place the tile on a flat, stable surface, ensuring the scored line is directly over a slight elevation or a breaking bar (if available).
- Apply Pressure with Tile Breaker: Use the included tile breaker plier. Position the jaws of the plier directly over the scored line. Apply firm, even pressure until the tile cleanly separates along the score line.
- Clean Edges: Carefully handle the broken tile pieces. The edges may be sharp.

Image: The POWERTEC PRO Large Format Tile Cutter in action, demonstrating its capability to cut large slabs up to 70" x 140" with a maximum cutting thickness of 12mm.
മെയിൻ്റനൻസ്
Proper maintenance will extend the life of your POWERTEC PRO Tile Cutter.
- വൃത്തിയാക്കൽ: After each use, wipe down the guide rails and scoring carriage with a clean, dry cloth to remove tile dust and debris.
- Scoring Wheel Inspection: Regularly inspect the titanium-coated tungsten carbide scoring wheel for wear or damage. Replace the wheel if it becomes dull or chipped to ensure clean cuts.
- ലൂബ്രിക്കേഷൻ: Occasionally apply a light lubricant to the guide rail and scoring carriage rollers to ensure smooth operation.
- സംഭരണം: Store the tile cutter in its carrying bag in a dry, clean environment to protect it from dust and moisture.
ട്രബിൾഷൂട്ടിംഗ്
നിങ്ങൾ അഭിമുഖീകരിച്ചേക്കാവുന്ന പൊതുവായ പ്രശ്നങ്ങളും അവയുടെ സാധ്യമായ പരിഹാരങ്ങളും ഈ വിഭാഗം അഭിസംബോധന ചെയ്യുന്നു.
| പ്രശ്നം | സാധ്യമായ കാരണം | പരിഹാരം |
|---|---|---|
| Tile not scoring cleanly or breaking unevenly. | Dull or damaged scoring wheel; Insufficient or inconsistent pressure; Guide rail not secured; Tile not clean. | Replace scoring wheel; Apply consistent, firm pressure; Ensure guide rail is clamped securely; Clean tile surface before scoring. |
| Scoring carriage not gliding smoothly. | Debris on guide rail or rollers; Rollers worn or damaged; Lack of lubrication. | Clean guide rail and rollers; Inspect and replace worn rollers; Apply light lubricant to guide rail. |
| Difficulty breaking tile after scoring. | Score line not deep enough; Incorrect use of tile breaker; Tile material too thick or hard for manual breaking. | Ensure a single, firm score pass; Position tile breaker correctly over the score line; For very hard or thick tiles, consider alternative cutting methods if manual breaking is not effective. |
| Guide rail shifts during scoring. | Clamps not tight enough; Anti-slip strips worn. | Tighten guide rail clamps securely; Inspect anti-slip strips and replace if worn. |
സ്പെസിഫിക്കേഷനുകൾ
- മോഡൽ നമ്പർ: 71982
- പരമാവധി കട്ടിംഗ് ദൈർഘ്യം: 140 ഇഞ്ച് വരെ (355.6 സെ.മീ)
- പരമാവധി കട്ടിംഗ് കനം: 3-12 മി.മീ
- Scoring Wheel: Ø22 mm, 114-degree titanium-coated tungsten carbide
- Guide Rail System: 2 x 59" base guide rails, 1 x 31.5" base guide rail (connectable)
- റോളറുകൾ: 7 wear-resistant rollers with ball bearing system
- ഉൽപ്പന്ന അളവുകൾ: Approximately 61.42 x 7.09 x 9.45 inches (assembled for shortest length)
- ഇനത്തിൻ്റെ ഭാരം: ഏകദേശം 55 പൗണ്ട് (24.9 കി.ഗ്രാം)
- ഉൾപ്പെടുത്തിയ ഘടകങ്ങൾ: Large Format Tile Cutter (assembly required), Tile Breaker, Carrying Bag
വാറൻ്റിയും പിന്തുണയും
POWERTEC PRO products are manufactured to high-quality standards. For warranty information, technical support, or to purchase replacement parts, please visit the official POWERTEC webസൈറ്റിൽ ബന്ധപ്പെടുകയോ അവരുടെ ഉപഭോക്തൃ സേവന വിഭാഗവുമായി ബന്ധപ്പെടുകയോ ചെയ്യുക. ഏതെങ്കിലും വാറന്റി ക്ലെയിമുകൾക്ക് വാങ്ങിയതിന്റെ തെളിവായി നിങ്ങളുടെ വാങ്ങൽ രസീത് സൂക്ഷിക്കുക.
For customer support, you may refer to the contact information provided with your product packaging or visit the POWERTEC store on Amazon: POWERTEC Store.


