1. ആമുഖം
This manual provides detailed instructions for the setup, operation, maintenance, and troubleshooting of your UPERFECT Mini LED Portable Monitor 14" 2.5K. Please read this manual thoroughly before using the product to ensure optimal performance and longevity.
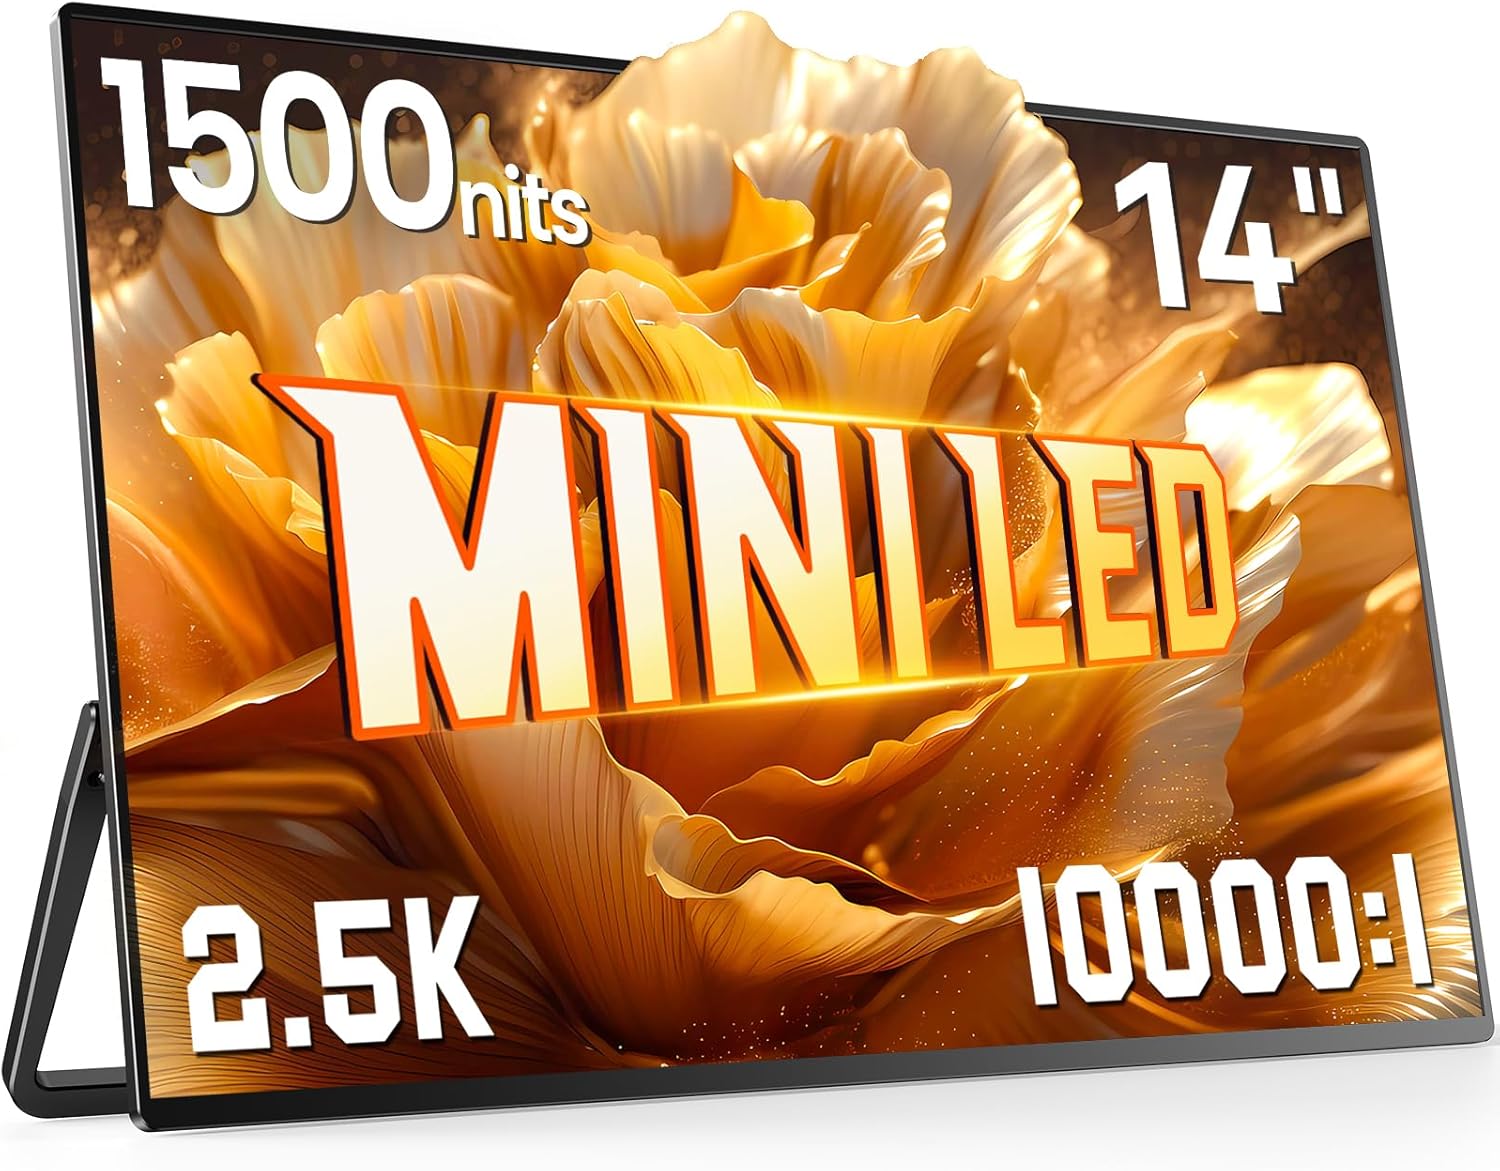
Image 1.1: The UPERFECT Mini LED Portable Monitor 14" 2.5K, showcasing അതിന്റെ സ്ലിം ഡിസൈനും ഊർജ്ജസ്വലമായ ഡിസ്പ്ലേയും.
2. പാക്കേജ് ഉള്ളടക്കം
താഴെ പട്ടികപ്പെടുത്തിയിരിക്കുന്ന എല്ലാ ഇനങ്ങളും നിങ്ങളുടെ ഉൽപ്പന്ന പാക്കേജിംഗിൽ ഉണ്ടെന്ന് ഉറപ്പാക്കുക:
- UPERFECT Mini LED Portable Monitor 14" 2.5K
- USB-C to USB-C Cable (for power and video signal)
- Mini-HDMI to HDMI Cable (for video signal)
- USB-A to USB-C Cable (for power)
- പവർ അഡാപ്റ്റർ
- ഉപയോക്തൃ മാനുവൽ (ഈ പ്രമാണം)
Note: Specific cable types and quantities may vary slightly.
3. ഉൽപ്പന്ന സവിശേഷതകൾ
The UPERFECT Mini LED Portable Monitor offers advanced display technology and design for enhanced portability and visual experience.
- മിനി എൽഇഡി സാങ്കേതികവിദ്യ: Utilizes advanced Mini LED backlighting for precise light control and superior image quality.
- High Brightness & Contrast: Features up to 1500 nits peak brightness and a 10000:1 dynamic contrast ratio for vivid and clear visuals, even in bright environments.
- 2.5K റെസല്യൂഷൻ: Delivers a crystal-clear 2560x1600 resolution for detailed imagery.
- Fast Response Time & FreeSync: Equipped with a 1ms response time and FreeSync support for smooth, tear-free motion, ideal for gaming and fast-paced content.
- അൾട്രാ-സ്ലിം & ലൈറ്റ്വെയ്റ്റ് ഡിസൈൻ: Constructed with a full metal body, measuring only 0.2 inches at its thinnest point and weighing approximately 1.16 lbs, ensuring high portability.
- Integrated Kickstand & VESA Mount: Includes a 180° folding kickstand for flexible positioning and VESA compatibility (75x75 mm) for alternative mounting options.
- 16:10 Aspect Ratio: Optimized for productivity and compatibility with various devices, including MacBooks.
3.1 Mini LED Technology Overview

Image 3.1: A diagram showing the layers of a Mini LED display, highlighting the backlight zones and dynamic contrast ratio capabilities.
Mini LED technology enhances display performance by using significantly smaller LEDs for backlighting, allowing for more precise control over brightness and contrast across the screen. This results in deeper blacks, brighter whites, and improved HDR performance compared to traditional LCD panels.
3.2 High Brightness and Clarity
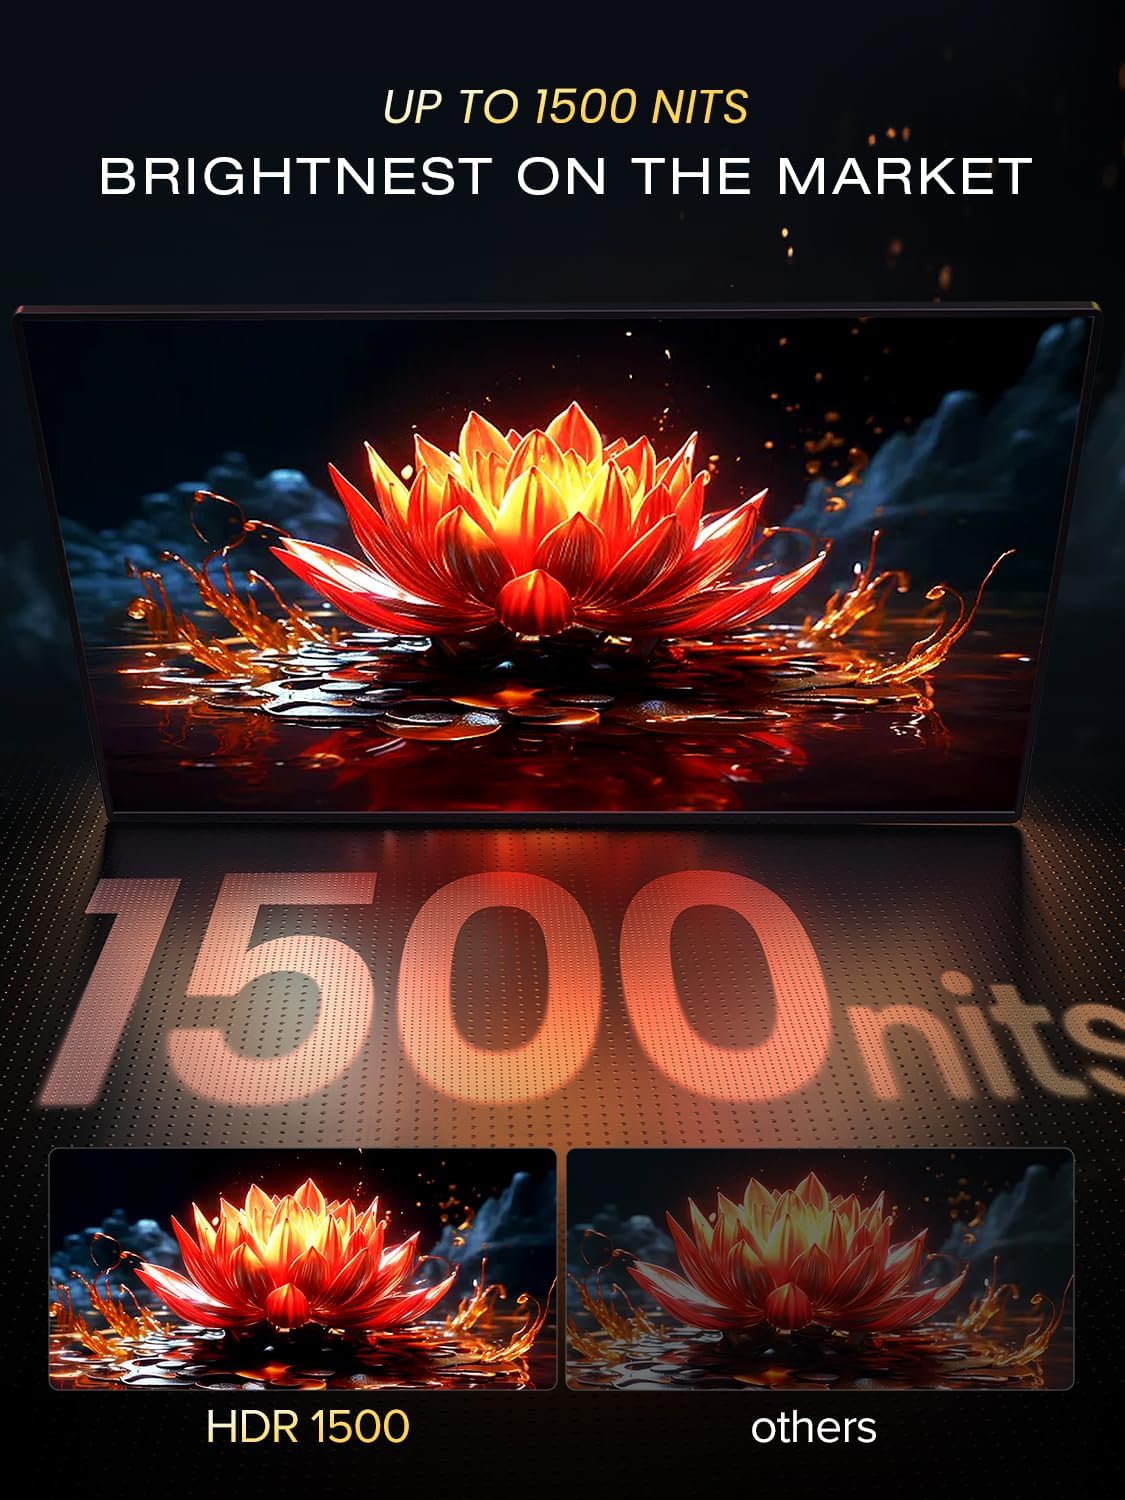
Image 3.2: A visual comparison demonstrating the enhanced clarity and vibrancy of 1500 nits brightness (HDR 1500) compared to a standard display.
With a peak brightness of 1500 nits, the monitor ensures visibility and vibrant colors even in brightly lit environments or direct sunlight. The 2560x1600 resolution provides sharp and detailed images.

Image 3.3: An illustration emphasizing the 2.5K clarity, showing fine details in a graphic.
3.3 രൂപകൽപ്പനയും പോർട്ടബിലിറ്റിയും

ചിത്രം 3.4: ഒരു സൈഡ് പ്രോfile view of the monitor, highlighting its thinness (0.2 inches) and lightweight construction (1.16 lbs).
The monitor's ultra-slim profile and lightweight aluminum construction make it highly portable, suitable for travel and mobile workstations.
3.4 ഗെയിമിംഗ് പ്രകടനം

Image 3.5: A gaming visual demonstrating the benefits of 1ms response time and FreeSync technology for smooth gameplay.
With a rapid 1ms response time and FreeSync Premium Pro support, the monitor minimizes motion blur and screen tearing, providing a fluid gaming experience.
3.5 Integrated Stand and VESA Mount

Image 3.6: The monitor displayed with its integrated kickstand and also mounted on a VESA arm, showing versatility in placement.
The built-in 180° folding kickstand allows for easy adjustment of viewing angles. For more permanent setups, the monitor is compatible with VESA 75x75 mm mounts.
3.6 16:10 Aspect Ratio

Image 3.7: A visual comparison demonstrating the difference between 16:9 and 16:10 aspect ratios, showing how 16:10 provides more vertical screen space.
The 16:10 aspect ratio provides additional vertical screen real estate compared to traditional 16:9 displays, which can be beneficial for productivity tasks and document viewing.
4. സജ്ജീകരണ ഗൈഡ്
Follow these steps to set up your UPERFECT portable monitor.
4.1 ഒരു ഉപകരണത്തിലേക്ക് ബന്ധിപ്പിക്കുന്നു
The monitor supports connections via USB-C and Mini-HDMI.
- USB-C Connection (Single Cable Solution):
- If your device (laptop, smartphone, etc.) has a full-featured USB-C port that supports DisplayPort Alternate Mode and power delivery, connect one end of the provided USB-C to USB-C cable to your device and the other end to one of the monitor's USB-C ports.
- The monitor will receive both video signal and power through this single cable.
- HDMI കണക്ഷൻ (വീഡിയോ മാത്രം):
- Connect one end of the provided Mini-HDMI to HDMI cable to your device's HDMI port and the Mini-HDMI end to the monitor's Mini-HDMI port.
- For power, connect the provided USB-A to USB-C cable from a power source (e.g., power adapter, laptop USB-A port) to the monitor's other USB-C port.
Important: Ensure your device's USB-C port supports video output and power delivery for single-cable functionality. If not, separate power will be required.
4.2 മോണിറ്റർ പവർ ചെയ്യുന്നു
The monitor can be powered in several ways:
- Via USB-C (from compatible device): As described above, a single USB-C cable can provide both power and video.
- പവർ അഡാപ്റ്റർ വഴി: Connect the provided power adapter to a wall outlet and then to one of the monitor's USB-C ports using the USB-A to USB-C cable.
- Via External Power Bank: A compatible power bank can also supply power to the monitor via a USB-C cable.
4.3 പ്രാരംഭ ഉപയോഗം
Once connected and powered, the monitor should automatically detect the input signal. You may need to adjust display settings on your connected device (e.g., extend display, duplicate display) to configure how the portable monitor functions.
5. പ്രവർത്തന നിർദ്ദേശങ്ങൾ
This section details how to navigate the monitor's On-Screen Display (OSD) menu and adjust settings.
5.1 OSD മെനു നാവിഗേഷൻ
The monitor features control buttons, typically located on the side or back, to access and navigate the OSD menu. Refer to the physical buttons on your monitor for exact layout.
- പവർ ബട്ടൺ: മോണിറ്റർ ഓൺ/ഓഫ് ചെയ്യാൻ അമർത്തുക.
- മെനു ബട്ടൺ: OSD മെനു തുറക്കാൻ അമർത്തുക.
- Navigation Buttons (Up/Down or Joystick): Use to scroll through menu options and adjust values.
- Enter/Select Button: ഒരു തിരഞ്ഞെടുപ്പ് സ്ഥിരീകരിക്കാൻ അമർത്തുക അല്ലെങ്കിൽ ഒരു ഉപമെനു നൽകുക.
5.2 സാധാരണ സജ്ജീകരണങ്ങൾ
Within the OSD menu, you can adjust various display parameters:
- തെളിച്ചം/തീവ്രത: മൊത്തത്തിലുള്ള പ്രകാശത്തിന്റെയും ദൃശ്യതീവ്രതയുടെയും അളവ് ക്രമീകരിക്കുക.
- വർണ്ണ ക്രമീകരണങ്ങൾ: വർണ്ണ താപനില, നിറം, സാച്ചുറേഷൻ എന്നിവ പരിഷ്കരിക്കുക.
- ഇൻപുട്ട് ഉറവിടം: Manually select between USB-C and Mini-HDMI inputs if auto-detection fails.
- HDR മോഡ്: Enable or disable High Dynamic Range for compatible content.
- FreeSync: Toggle FreeSync on/off for adaptive synchronization with compatible graphics cards.
- വീക്ഷണ അനുപാതം: Choose between different aspect ratio modes (e.g., Full, 16:9, 16:10).
- വോളിയം: Adjust the volume of the integrated speakers or connected headphones.
6. പരിപാലനം
ശരിയായ അറ്റകുറ്റപ്പണി നിങ്ങളുടെ മോണിറ്ററിന്റെ ദീർഘായുസ്സും മികച്ച പ്രകടനവും ഉറപ്പാക്കുന്നു.
6.1 സ്ക്രീൻ വൃത്തിയാക്കൽ
- മോണിറ്റർ ഓഫാക്കി പവറിൽ നിന്ന് വിച്ഛേദിക്കുക.
- Use a soft, lint-free cloth (e.g., microfiber cloth) to gently wipe the screen surface.
- കഠിനമായ അടയാളങ്ങൾക്ക്, നേരിയ dampതുണിയിൽ വെള്ളം അല്ലെങ്കിൽ ഇലക്ട്രോണിക് ഉപകരണങ്ങൾക്കായി പ്രത്യേകം രൂപകൽപ്പന ചെയ്ത സ്ക്രീൻ-ക്ലീനിംഗ് ലായനി ഉപയോഗിക്കുക. സ്ക്രീനിലേക്ക് നേരിട്ട് ദ്രാവകം തളിക്കരുത്.
- Avoid using abrasive cleaners, alcohol, or ammonia-based solutions, as these can damage the screen coating.
6.2 പൊതു പരിചരണം
- ഭാരമുള്ള വസ്തുക്കൾ മോണിറ്ററിൽ വയ്ക്കുന്നത് ഒഴിവാക്കുക.
- Protect the screen from sharp objects to prevent scratches.
- Store the monitor in a cool, dry place when not in use, preferably in its original packaging or a protective sleeve.
- തീവ്രമായ താപനിലയിലോ ഈർപ്പത്തിലോ മോണിറ്ററിനെ തുറന്നുകാട്ടരുത്.
7. പ്രശ്നപരിഹാരം
If you encounter issues with your monitor, refer to the following common problems and solutions.
| പ്രശ്നം | സാധ്യമായ പരിഹാരം |
|---|---|
| ഡിസ്പ്ലേ ഇല്ല/കറുത്ത സ്ക്രീൻ |
|
| "സിഗ്നൽ ഇല്ല" എന്ന സന്ദേശം |
|
| മിന്നുന്ന സ്ക്രീൻ |
|
| ശബ്ദമില്ല |
|
| മോണിറ്റർ ഓണാക്കുന്നില്ല |
|
If the problem persists after trying these solutions, please contact UPERFECT customer support.
8 സ്പെസിഫിക്കേഷനുകൾ
| ഫീച്ചർ | വിശദാംശങ്ങൾ |
|---|---|
| മോഡൽ നമ്പർ | 14 |
| സ്ക്രീൻ വലിപ്പം | 14 ഇഞ്ച് |
| റെസലൂഷൻ | 2560 x 1600 Pixels (2.5K QWXGA) |
| വീക്ഷണാനുപാതം | 16:10 |
| ചിത്രത്തിന്റെ തെളിച്ചം | 1500 Candela (Nits) |
| കോൺട്രാസ്റ്റ് റേഷ്യോ | 10000:1 (ഡൈനാമിക്) |
| പ്രതികരണ സമയം | 1മി.എസ് |
| പാനൽ തരം | മിനി എൽഇഡി |
| സ്ക്രീൻ ഉപരിതലം | മാറ്റ് |
| കണക്റ്റിവിറ്റി | 2x USB-C, 1x Mini-HDMI |
| വെസെ മൌണ്ട് | 75x75 മി.മീ |
| ഉൽപ്പന്ന അളവുകൾ | 14 x 8 x 0.2 ഇഞ്ച് (ഏകദേശം) |
| ഇനത്തിൻ്റെ ഭാരം | 2.2 പൗണ്ട് |
9. വാറൻ്റിയും പിന്തുണയും
UPERFECT products are designed and manufactured to the highest quality standards. For information regarding warranty coverage, technical support, or service inquiries, please refer to the warranty card included with your product or visit the official UPERFECT webസൈറ്റ്.
ബന്ധപ്പെടാനുള്ള വിവരങ്ങൾ:
- Webസൈറ്റ്: www.uperfectmonitor.com
- ഇമെയിൽ: support@uperfectmonitor.com
Please have your product model number (Model: 14) and purchase information ready when contacting support.


