1. ആമുഖം
Thank you for choosing the Olvy A10 Cordless Stick Vacuum Cleaner with Mop Function. This appliance is designed for efficient cleaning of various floor types, offering both vacuuming and mopping capabilities. Please read this manual thoroughly before use to ensure proper operation, maintenance, and safety.

Image: The Olvy A10 Cordless Stick Vacuum Cleaner in its full assembly, alongside various attachments and the wall mount.
2. സുരക്ഷാ നിർദ്ദേശങ്ങൾ
തീപിടുത്തം, വൈദ്യുതാഘാതം അല്ലെങ്കിൽ പരിക്ക് എന്നിവ കുറയ്ക്കുന്നതിന്, ഒരു വൈദ്യുത ഉപകരണം ഉപയോഗിക്കുമ്പോൾ എല്ലായ്പ്പോഴും അടിസ്ഥാന സുരക്ഷാ മുൻകരുതലുകൾ പാലിക്കുക.
- ഉപകരണം ഉപയോഗിക്കുന്നതിന് മുമ്പ് എല്ലാ നിർദ്ദേശങ്ങളും വായിക്കുക.
- പുറത്തോ നനഞ്ഞ പ്രതലങ്ങളിലോ ഉപയോഗിക്കരുത്.
- കളിപ്പാട്ടമായി ഉപയോഗിക്കാൻ അനുവദിക്കരുത്. കുട്ടികൾ അല്ലെങ്കിൽ അടുത്ത് ഉപയോഗിക്കുമ്പോൾ വളരെ ശ്രദ്ധ ആവശ്യമാണ്.
- ഈ മാനുവലിൽ വിവരിച്ചിരിക്കുന്നതുപോലെ മാത്രം ഉപയോഗിക്കുക. നിർമ്മാതാവ് ശുപാർശ ചെയ്യുന്ന അറ്റാച്ച്മെൻ്റുകൾ മാത്രം ഉപയോഗിക്കുക.
- കേടായ ചരടോ പ്ലഗോ ഉപയോഗിച്ച് ഉപയോഗിക്കരുത്. ഉപകരണം ശരിയായി പ്രവർത്തിക്കുന്നില്ലെങ്കിൽ, അത് താഴെ വീണിട്ടുണ്ടെങ്കിൽ, കേടുപാടുകൾ സംഭവിച്ചിട്ടുണ്ടെങ്കിൽ, പുറത്ത് വച്ചിട്ടുണ്ടെങ്കിൽ, അല്ലെങ്കിൽ വെള്ളത്തിൽ വീണിട്ടുണ്ടെങ്കിൽ, അത് ഒരു സർവീസ് സെന്ററിലേക്ക് തിരികെ നൽകുക.
- ചരട് ഉപയോഗിച്ച് വലിക്കുകയോ കൊണ്ടുപോകുകയോ ചെയ്യരുത്, ചരട് ഒരു ഹാൻഡിലായി ഉപയോഗിക്കുക, ചരടിൽ ഒരു വാതിൽ അടയ്ക്കുക, അല്ലെങ്കിൽ മൂർച്ചയുള്ള അരികുകളിലോ മൂലകളിലോ ചരട് വലിക്കുക. ചരടിന് മുകളിലൂടെ ഉപകരണം പ്രവർത്തിപ്പിക്കരുത്. ചൂടായ പ്രതലങ്ങളിൽ നിന്ന് ചരട് സൂക്ഷിക്കുക.
- ചരട് വലിച്ചുകൊണ്ട് അൺപ്ലഗ് ചെയ്യരുത്. അൺപ്ലഗ് ചെയ്യാൻ, പ്ലഗ് പിടിക്കുക, ചരടല്ല.
- നനഞ്ഞ കൈകളാൽ പ്ലഗ്ഗോ ഉപകരണമോ കൈകാര്യം ചെയ്യരുത്.
- ഒരു വസ്തുവും തുറസ്സുകളിൽ ഇടരുത്. ഒരു ഓപ്പണിംഗും തടഞ്ഞിരിക്കുമ്പോൾ ഉപയോഗിക്കരുത്; പൊടി, ലിൻ്റ്, മുടി, വായുപ്രവാഹം കുറയ്ക്കുന്ന എന്തും എന്നിവ ഒഴിവാക്കുക.
- മുടി, അയഞ്ഞ വസ്ത്രങ്ങൾ, വിരലുകൾ, ശരീരത്തിൻ്റെ എല്ലാ ഭാഗങ്ങളും തുറസ്സുകളിൽ നിന്നും ചലിക്കുന്ന ഭാഗങ്ങളിൽ നിന്നും അകറ്റി നിർത്തുക.
- അൺപ്ലഗ് ചെയ്യുന്നതിനുമുമ്പ് എല്ലാ നിയന്ത്രണങ്ങളും ഓഫാക്കുക.
- കോണിപ്പടികളിൽ വൃത്തിയാക്കുമ്പോൾ കൂടുതൽ ശ്രദ്ധിക്കണം.
- ഗ്യാസോലിൻ പോലുള്ള കത്തുന്നതോ കത്തുന്നതോ ആയ ദ്രാവകങ്ങൾ എടുക്കാനോ അവ ഉള്ള സ്ഥലങ്ങളിൽ ഉപയോഗിക്കാനോ ഉപയോഗിക്കരുത്.
- കത്തുന്നതോ പുകവലിക്കുന്നതോ ആയ സിഗരറ്റ്, തീപ്പെട്ടി, ചൂടുള്ള ചാരം എന്നിവയൊന്നും എടുക്കരുത്.
- ഡസ്റ്റ് കപ്പ് കൂടാതെ/അല്ലെങ്കിൽ ഫിൽട്ടറുകൾ ഇല്ലാതെ ഉപയോഗിക്കരുത്.
- അവിചാരിതമായി ആരംഭിക്കുന്നത് തടയുക. ബാറ്ററി പാക്കിലേക്ക് കണക്റ്റ് ചെയ്യുന്നതിനും ഉപകരണം എടുക്കുന്നതിനും കൊണ്ടുപോകുന്നതിനും മുമ്പ് സ്വിച്ച് ഓഫ് പൊസിഷനിൽ ആണെന്ന് ഉറപ്പാക്കുക.
- നിർമ്മാതാവ് വ്യക്തമാക്കിയ ചാർജർ ഉപയോഗിച്ച് മാത്രം റീചാർജ് ചെയ്യുക. ഒരു തരം ബാറ്ററി പായ്ക്കിന് അനുയോജ്യമായ ഒരു ചാർജർ മറ്റൊരു ബാറ്ററി പാക്കിനൊപ്പം ഉപയോഗിക്കുമ്പോൾ തീപിടിത്തം ഉണ്ടാക്കിയേക്കാം.
- ദുരുപയോഗ സാഹചര്യങ്ങളിൽ, ബാറ്ററിയിൽ നിന്ന് ദ്രാവകം പുറന്തള്ളപ്പെട്ടേക്കാം; സമ്പർക്കം ഒഴിവാക്കുക. അബദ്ധത്തിൽ സമ്പർക്കം ഉണ്ടായാൽ, വെള്ളത്തിൽ കഴുകുക. ദ്രാവകം കണ്ണുകളുമായി സമ്പർക്കം പുലർത്തുകയാണെങ്കിൽ, അധികമായി വൈദ്യസഹായം തേടുക. ബാറ്ററിയിൽ നിന്ന് പുറന്തള്ളുന്ന ദ്രാവകം പ്രകോപിപ്പിക്കലോ പൊള്ളലോ ഉണ്ടാക്കാം.
3. പാക്കേജ് ഉള്ളടക്കം
പാക്കേജിൽ എല്ലാ ഘടകങ്ങളും ഉണ്ടെന്ന് ഉറപ്പാക്കുക:
- പ്രധാന യൂണിറ്റ് (കൈയിൽ പിടിക്കാവുന്ന വാക്വം)
- ക്രമീകരിക്കാവുന്ന വിപുലീകരണ ട്യൂബ്
- ഫ്ലോർ ബ്രഷ് ഹെഡ്
- നീക്കം ചെയ്യാവുന്ന ബാറ്ററി
- വാട്ടർ ടാങ്ക് (തുടയ്ക്കാൻ)
- മോപ്പ് പാഡ്
- 2-ഇൻ-1 ബ്രഷ് ടൂൾ
- വിള്ളൽ ഉപകരണം
- വാൾ മൗണ്ട് ബ്രാക്കറ്റ്
- പവർ അഡാപ്റ്റർ
- Replacement HEPA Filter (2x)
- ഉപയോക്തൃ മാനുവൽ

Image: A visual representation of all components included with the Olvy A10 Cordless Stick Vacuum Cleaner.
4. ഉൽപ്പന്നം കഴിഞ്ഞുview
The Olvy A10 features a powerful 350W motor providing up to 35,000 Pa suction, an integrated mop function, and a multi-stage HEPA filtration system. It includes an intelligent LED display for monitoring status and an auto-mode for adaptive cleaning.
പ്രധാന സവിശേഷതകൾ:
- ശക്തമായ സക്ഷൻ: 350W motor with 35,000 Pa for deep cleaning on various surfaces.
- 2-ഇൻ-1 പ്രവർത്തനം: Seamlessly switch between vacuuming and mopping.
- ഇൻ്റലിജൻ്റ് എൽഇഡി ഡിസ്പ്ലേ: Provides real-time information on battery level, suction mode, and dust concentration.
- യാന്ത്രിക മോഡ്: Automatically adjusts suction power based on detected dirt levels.
- HEPA 13 Filtration: Captures 99.99% of fine particles, suitable for allergy sufferers.
- നീണ്ട പ്രവർത്തന സമയം: Up to 60 minutes on a single charge with a 2200 mAh removable battery.
- Lightweight and Versatile: Easy to maneuver and convert into a handheld vacuum for various cleaning tasks.

Image: Close-up of the intelligent LED display showing battery indicator, low power warning, auto mode, dust concentration, and control panel.

Image: The LED display indicating 'Auto-mode' and the current power level during operation.
5. സജ്ജീകരണവും അസംബ്ലിയും
5.1 പ്രാരംഭ ചാർജിംഗ്
Before first use, fully charge the battery. The battery takes approximately 4-5 hours to fully charge.
- റിലീസ് ബട്ടൺ അമർത്തി പ്രധാന യൂണിറ്റിൽ നിന്ന് ബാറ്ററി നീക്കം ചെയ്യുക.
- Connect the power adapter to the charging port on the battery.
- Plug the adapter into a power outlet. The battery indicator on the LED display will show charging status.
- പൂർണ്ണമായി ചാർജ് ചെയ്തുകഴിഞ്ഞാൽ, അഡാപ്റ്റർ വിച്ഛേദിക്കുക.

Image: The removable battery unit, highlighting its 2200 mAh capacity, 4-5 hour charging time, and up to 60 minutes run time.
5.2 വാക്വം ക്ലീനർ കൂട്ടിച്ചേർക്കൽ
- ബാറ്ററി അറ്റാച്ചുചെയ്യുക: Slide the charged battery into the main unit until it clicks into place.
- എക്സ്റ്റൻഷൻ ട്യൂബ് ഘടിപ്പിക്കുക: Connect the adjustable extension tube to the main unit. Ensure it clicks securely.
- ഫ്ലോർ ബ്രഷ് ഘടിപ്പിക്കുക: Connect the floor brush head to the other end of the extension tube.
- വാൾ മൗണ്ട് ഇൻസ്റ്റാൾ ചെയ്യുക (ഓപ്ഷണൽ): Choose a suitable location for the wall mount. Secure it to the wall using the provided screws and anchors. This allows for convenient storage and charging.
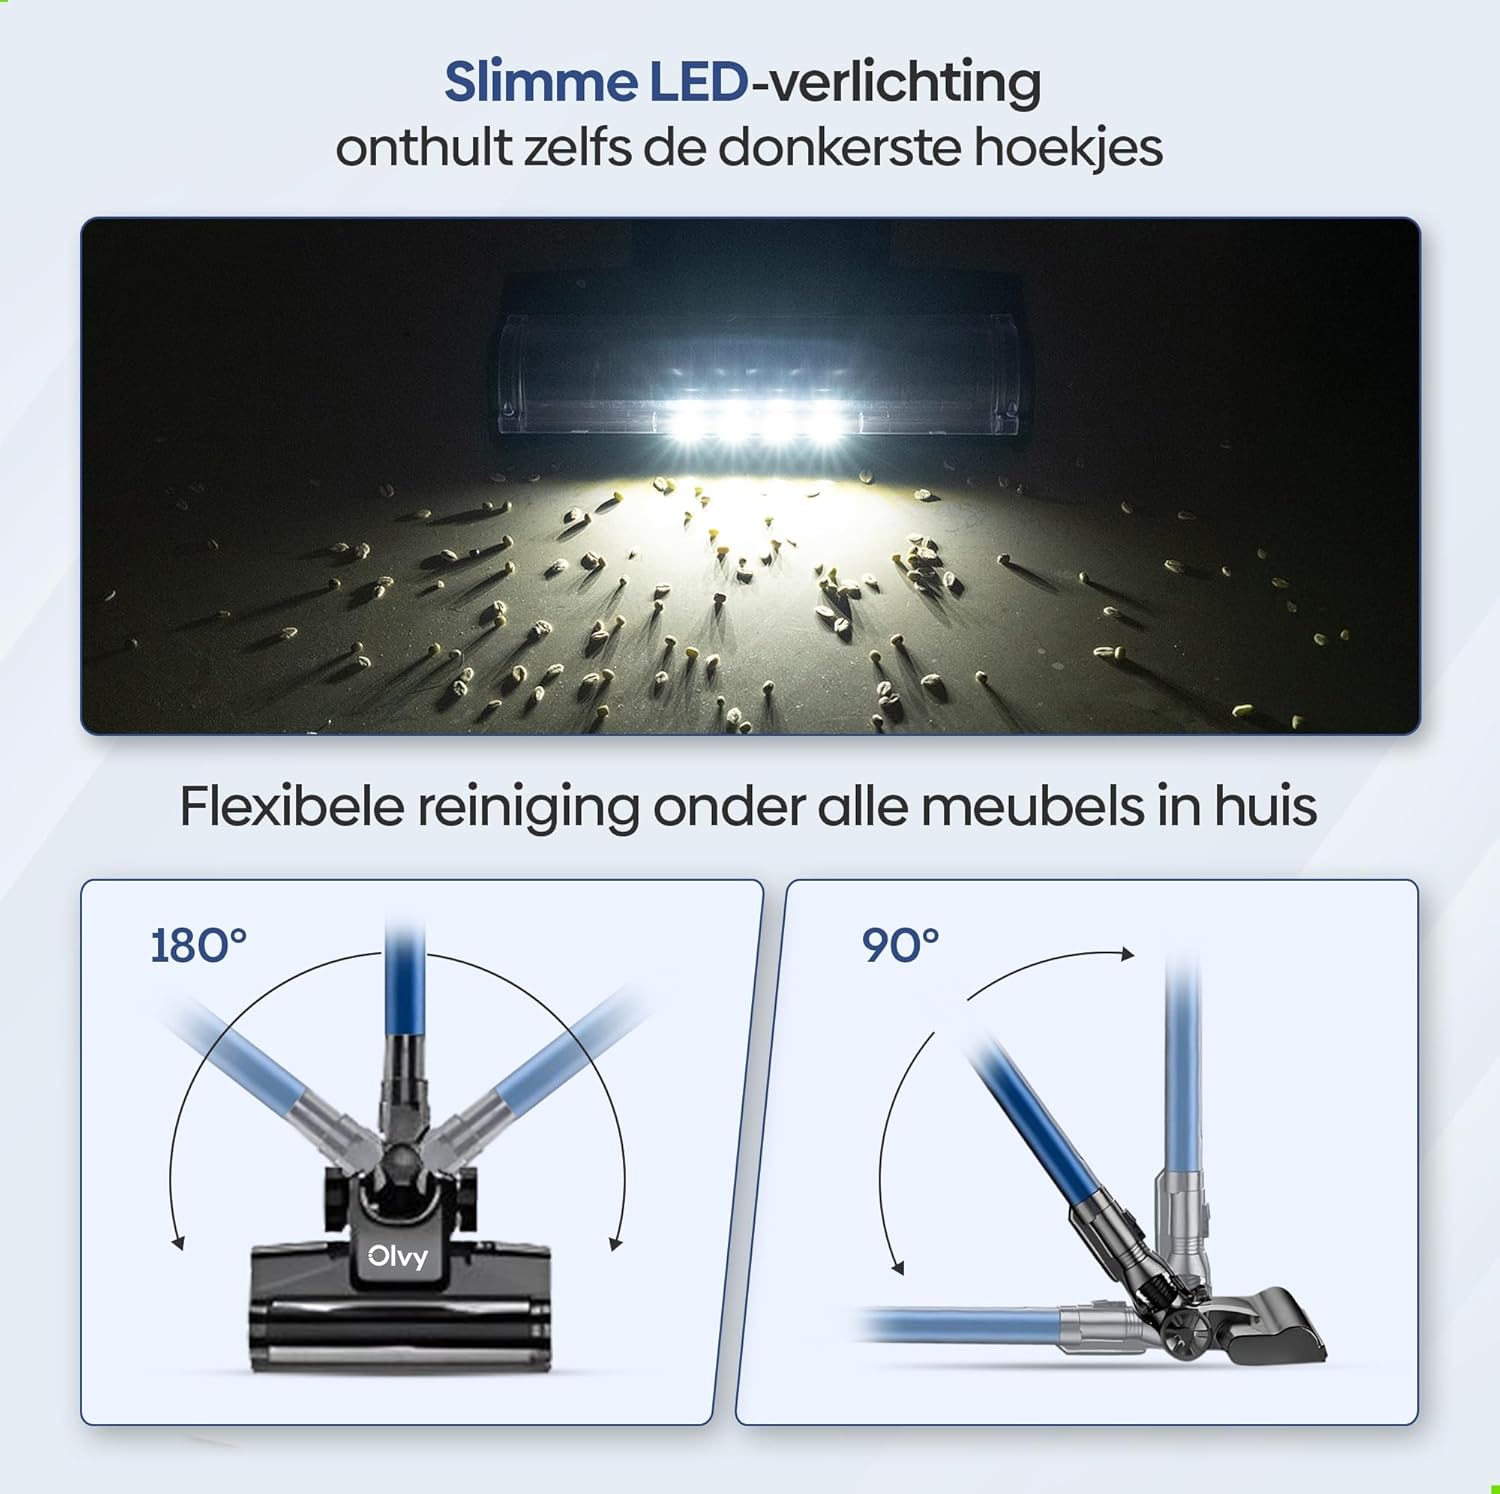
Image: The vacuum cleaner demonstrating both wall-mounted storage and self-standing capability.
6. പ്രവർത്തന നിർദ്ദേശങ്ങൾ
6.1 അടിസ്ഥാന പ്രവർത്തനം
- പവർ ഓൺ/ഓഫ്: വാക്വം ക്ലീനർ ഓണാക്കാനോ ഓഫാക്കാനോ പ്രധാന യൂണിറ്റിലെ പവർ ബട്ടൺ അമർത്തുക.
- സക്ഷൻ പവർ ക്രമീകരിക്കുക: The vacuum offers 5 suction levels. Use the control panel on the LED display to cycle through the power modes (Low, Normal, High, Turbo).
- യാന്ത്രിക മോഡ്: Activate the intelligent auto mode for automatic suction adjustment based on dirt detection. The LED display will show 'Auto' when this mode is active.
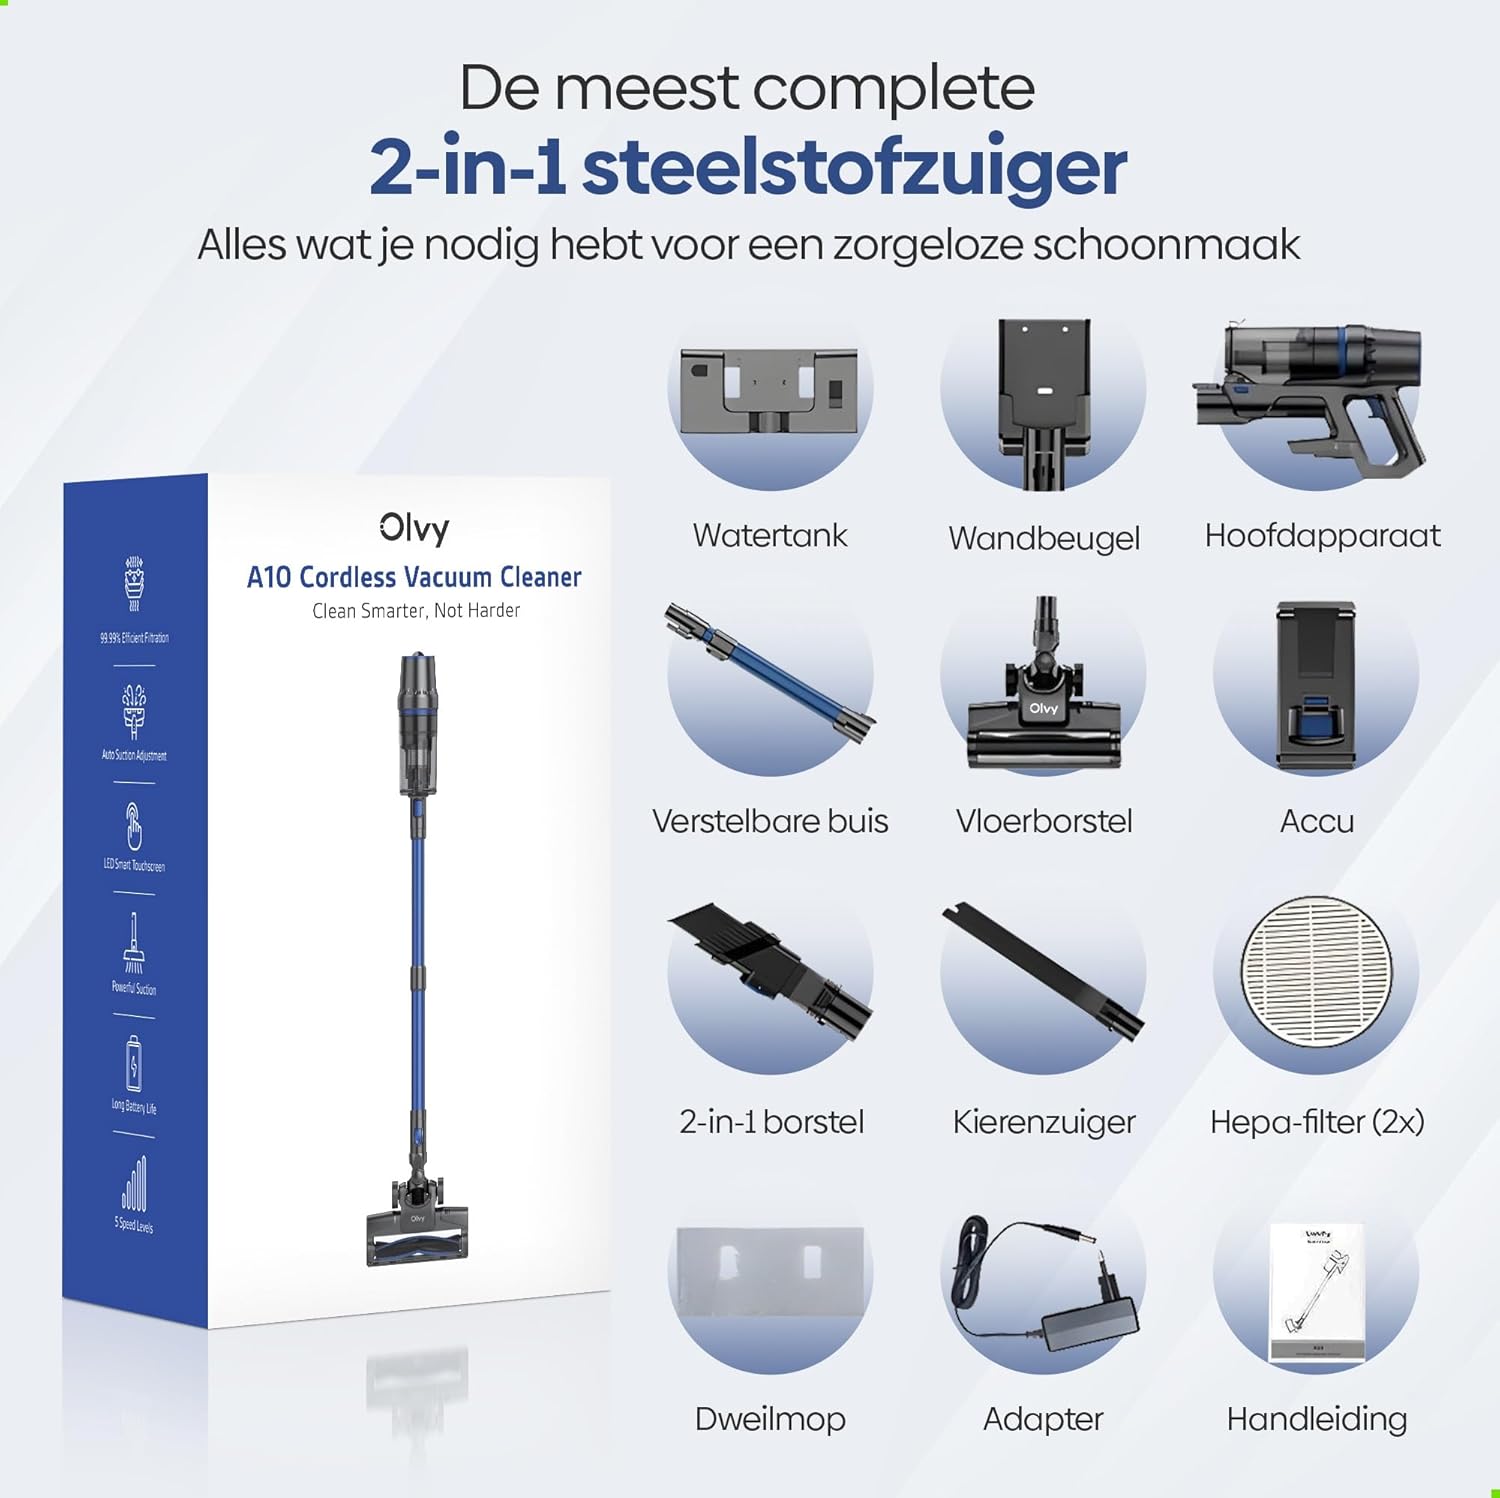
Image: The vacuum cleaner demonstrating its 4 suction levels (Low, Normal, High, Turbo) and intelligent auto mode, which adapts to dirt levels.
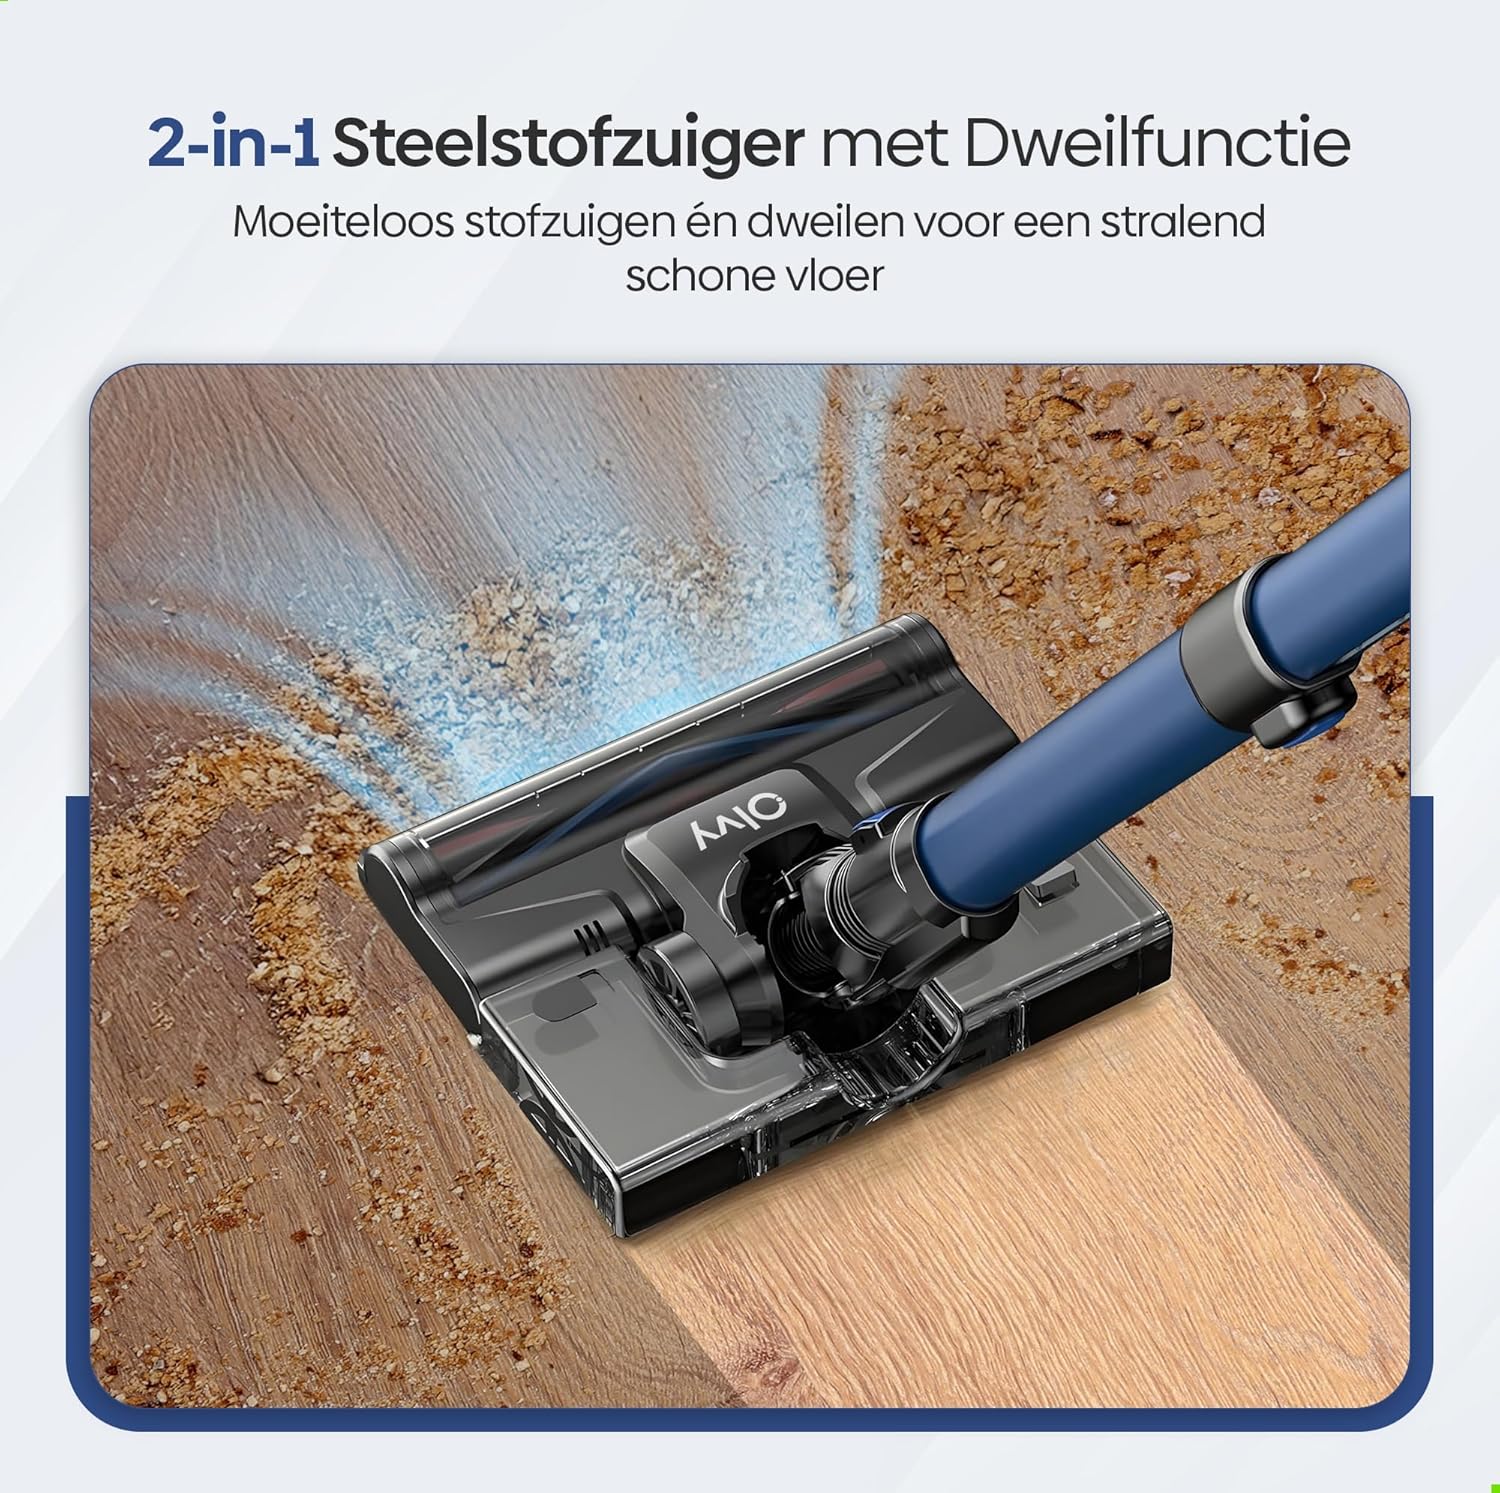
Image: A user operating the Olvy A10, showcasing its powerful 350W motor and 35,000 Pa suction for effective cleaning of various debris like hair, dust, crumbs, and sand.
6.2 Using the Mop Function
The integrated mop function allows for simultaneous vacuuming and wet cleaning of hard floors.
- വാട്ടർ ടാങ്ക് നിറയ്ക്കുക: Detach the water tank from the floor brush head. Fill it with clean water. Do not use corrosive liquids or detergents that may damage the tank or floor.
- Attach Mop Pad: Securely attach the mop pad to the bottom of the water tank.
- വാട്ടർ ടാങ്ക് വീണ്ടും ഘടിപ്പിക്കുക: Reinstall the filled water tank onto the floor brush head.
- Begin Mopping: Operate the vacuum cleaner as usual. The mop pad will dampen the floor as you vacuum, providing a streak-free clean.

ചിത്രം: വിശദമായ ഒരു ചിത്രം view of the 2-in-1 stick vacuum with mop function, showing water being dispensed for simultaneous vacuuming and mopping on a hard floor.

Image: The mop function of the Olvy A10 actively cleaning a hard floor, demonstrating its effectiveness in removing dirt and leaving a clean surface.
6.3 അറ്റാച്ചുമെന്റുകൾ ഉപയോഗിക്കുന്നത്
- 2-ഇൻ-1 ബ്രഷ് ടൂൾ: അപ്ഹോൾസ്റ്ററി, കർട്ടനുകൾ, അതിലോലമായ പ്രതലങ്ങൾ എന്നിവ വൃത്തിയാക്കാൻ അനുയോജ്യം.
- വിള്ളൽ ഉപകരണം: Perfect for reaching tight spaces, corners, and edges.
- To use, detach the extension tube and connect the desired attachment directly to the main unit.

Image: The Olvy A10 being used in different configurations, including as a stick vacuum for floors, a handheld for high areas, and for cleaning under furniture.

Image: The vacuum's LED lighting revealing hidden dust particles on the floor, and diagrams illustrating its 180° and 90° flexible head rotation for cleaning under furniture.
7. പരിപാലനം
Regular maintenance ensures optimal performance and extends the lifespan of your Olvy A10 vacuum cleaner.
7.1 ഡസ്റ്റ്ബിൻ ശൂന്യമാക്കൽ
Empty the dustbin regularly, especially when the 'Dust Concn' indicator on the LED display shows high concentration.
- വാക്വം ക്ലീനർ ഓഫാക്കിയിട്ടുണ്ടെന്ന് ഉറപ്പാക്കുക.
- പ്രധാന യൂണിറ്റിൽ നിന്ന് വേർപെടുത്താൻ ഡസ്റ്റ്ബിൻ റിലീസ് ബട്ടൺ അമർത്തുക.
- Hold the dustbin over a trash can and press the bottom release latch to open the lid and empty the contents.
- Close the lid and reattach the dustbin to the main unit.

Image: The dustbin being emptied with a single click, demonstrating its large 0.8L capacity.

Image: A user washing the dustbin under running water, illustrating the washable components for easy cleaning.
7.2 ഫിൽട്ടറുകൾ വൃത്തിയാക്കുന്നു
The Olvy A10 uses a multi-stage filtration system, including an HEPA filter, which should be cleaned regularly.
- ഡസ്റ്റ്ബിൻ നീക്കം ചെയ്യുക.
- Twist and pull out the filter assembly (HEPA filter, dust filter, stainless steel filter).
- Tap off loose dirt from each filter component.
- Rinse the filters under cold running water. Do not use hot water or detergents.
- Allow all filter components to air dry completely for at least 24 hours before reassembling. Do not use the vacuum with wet filters.
- Reassemble the filters and place them back into the dustbin, then reattach the dustbin to the main unit.

Image: A cutaway diagram illustrating the multi-stage HEPA filtration system, including the dustbin filter, stainless steel filter, dust filter, HEPA air filter, and air outlet filter.
7.3 ബ്രഷ് റോൾ വൃത്തിയാക്കൽ
കെട്ടിക്കിടക്കുന്ന മുടിയോ അവശിഷ്ടങ്ങളോ ഉണ്ടോ എന്ന് ഇടയ്ക്കിടെ ബ്രഷ് റോളിൽ പരിശോധിക്കുക.
- വാക്വം ക്ലീനർ ഓഫ് ചെയ്യുക.
- Press the release tab on the side of the floor brush head to remove the brush roll cover.
- ബ്രഷ് റോൾ ഉയർത്തുക.
- കെട്ടിക്കിടക്കുന്ന മുടിയോ നാരുകളോ മുറിച്ച് നീക്കം ചെയ്യാൻ കത്രികയോ ക്ലീനിംഗ് ടൂളോ ഉപയോഗിക്കുക.
- ബ്രഷ് റോൾ വീണ്ടും തിരുകുക, കവർ ഉറപ്പിക്കുക.
7.4 മോപ്പ് പാഡ് വൃത്തിയാക്കൽ
After each use of the mop function, remove and clean the mop pad.
- വാട്ടർ ടാങ്കിൽ നിന്ന് മോപ്പ് പാഡ് വേർപെടുത്തുക.
- Rinse the mop pad under running water or machine wash it with mild detergent.
- Allow the mop pad to air dry completely before storing or reusing.
8. പ്രശ്നപരിഹാരം
If you encounter any issues with your Olvy A10, refer to the following common problems and solutions:
| പ്രശ്നം | സാധ്യമായ കാരണം | പരിഹാരം |
|---|---|---|
| വാക്വം ഓണാക്കുന്നില്ല | ബാറ്ററി ചാർജ് ചെയ്തിട്ടില്ല അല്ലെങ്കിൽ ശരിയായി ഇൻസ്റ്റാൾ ചെയ്തിട്ടില്ല. | Charge the battery fully. Ensure the battery is securely clicked into the main unit. |
| കുറഞ്ഞ സക്ഷൻ പവർ | Dustbin is full. Filters are clogged. Brush roll is tangled. Obstruction in the nozzle or tube. | Empty the dustbin. Clean all filters thoroughly and ensure they are dry. Remove any hair or debris from the brush roll. Check for and remove any blockages. |
| ബ്രഷ് റോൾ കറങ്ങുന്നില്ല | Brush roll is tangled or jammed. | Turn off the vacuum. Remove the brush roll and clear any obstructions. |
| Mop function not working | Water tank is empty or not properly installed. Mop pad is dry. | Fill the water tank. Ensure the water tank is securely attached to the floor brush. Dampen the mop pad slightly before use if needed. |
| ചെറിയ റൺ സമയം | Battery not fully charged. Using high suction mode continuously. Battery degradation. | Ensure battery is fully charged. Use lower suction modes for longer run time. If battery life significantly decreases, consider replacing the battery. |
9 സ്പെസിഫിക്കേഷനുകൾ
| ഫീച്ചർ | സ്പെസിഫിക്കേഷൻ |
|---|---|
| ബ്രാൻഡ് | Olvy |
| മോഡൽ നമ്പർ | A10 |
| നിറം | കറുപ്പ് |
| ഉൽപ്പന്ന അളവുകൾ | 32 x 19 x 32 സെ.മീ |
| ഭാരം | 5 കി.ഗ്രാം |
| മോട്ടോർ പവർ | 350W |
| സക്ഷൻ പവർ | 35,000 Pa വരെ |
| വേഗതകളുടെ എണ്ണം | 5 (including Auto Mode) |
| ശബ്ദ നില | 55 ഡെസിബെൽ |
| റൺ ടൈം | 1 മണിക്കൂർ വരെ (60 മിനിറ്റ്) |
| ബാറ്ററി ശേഷി | 2200 mAh |
| ചാർജിംഗ് സമയം | 4-5 മണിക്കൂർ |
| ഫിൽട്ടർ തരം | HEPA 13 (Washable) |
| ഡസ്റ്റ്ബിൻ കപ്പാസിറ്റി | 0.8L |
| പവർ ഉറവിടം | ബാറ്ററി |
| ശുപാർശ ചെയ്യുന്ന ഉപരിതലങ്ങൾ | All floors (carpets, hard floors) |
| പ്രത്യേക സവിശേഷതകൾ | 2-in-1 Vacuum & Mop, LED Display, Auto Mode, Pet-friendly, Lightweight |
10. വാറൻ്റിയും പിന്തുണയും
Olvy products are manufactured to high-quality standards. For warranty information, technical support, or service inquiries, please refer to the contact information provided with your purchase documentation or visit the official Olvy webസൈറ്റ്. വാറന്റി ക്ലെയിമുകൾക്കായി നിങ്ങളുടെ വാങ്ങലിന്റെ തെളിവ് സൂക്ഷിക്കുക.


