1. ആമുഖം
Thank you for choosing the VINGLI Wooden Garden Arbor. This manual provides essential information for the safe assembly, operation, and maintenance of your new garden arbor. Please read these instructions carefully before beginning assembly and retain them for future reference.
പ്രധാനപ്പെട്ട സുരക്ഷാ വിവരങ്ങൾ
മുന്നറിയിപ്പ്: This product contains sharp edges. Handle with care during assembly and use. Keep away from children and pets. Do not expose to extreme weather conditions for prolonged periods to prevent damage or injury. Ensure all connections are securely fastened before use.
2. പാക്കേജ് ഉള്ളടക്കം
Before assembly, please verify that all components listed below are present and undamaged. If any parts are missing or damaged, please contact VINGLI customer support.
- Wooden Arch Pieces
- Wooden Side Lattice Panels
- പിന്തുണ ബീമുകൾ
- Metal Connection Plates
- സ്ക്രൂകളും ഫാസ്റ്റനറുകളും
- അസംബ്ലി നിർദ്ദേശങ്ങൾ
3. സജ്ജീകരണവും അസംബ്ലിയും
Assembly of the VINGLI Wooden Garden Arbor is designed to be straightforward, requiring no specialized tools. Follow these steps carefully for proper installation.
3.1 പായ്ക്ക് ചെയ്യലും തയ്യാറാക്കലും
- പാക്കേജിംഗിൽ നിന്ന് എല്ലാ ഘടകങ്ങളും ശ്രദ്ധാപൂർവ്വം അൺപാക്ക് ചെയ്യുക.
- Lay out all parts on a clean, flat, and soft surface to prevent scratches.
- Identify each component using the provided parts list and ensure all pieces are accounted for.
3.2 Assembling the Side Panels
The arbor features sturdy wooden construction with well-polished fir wood and solid connections for durability.

ചിത്രം 3.2.1: Components of the VINGLI Wooden Garden Arbor, highlighting the quality of the fir wood, robust metal connections, and overall stable structural design.
- Attach the horizontal support beams to the vertical side posts to form the lattice panels. Ensure the pre-drilled holes align.
- Secure these connections using the provided screws and fasteners. Do not overtighten.
- Repeat for the second side panel.
3.3 Attaching the Arch
The arched design is suitable for hanging decorations and provides a reasonable spacing for plant growth with its climbing grid.
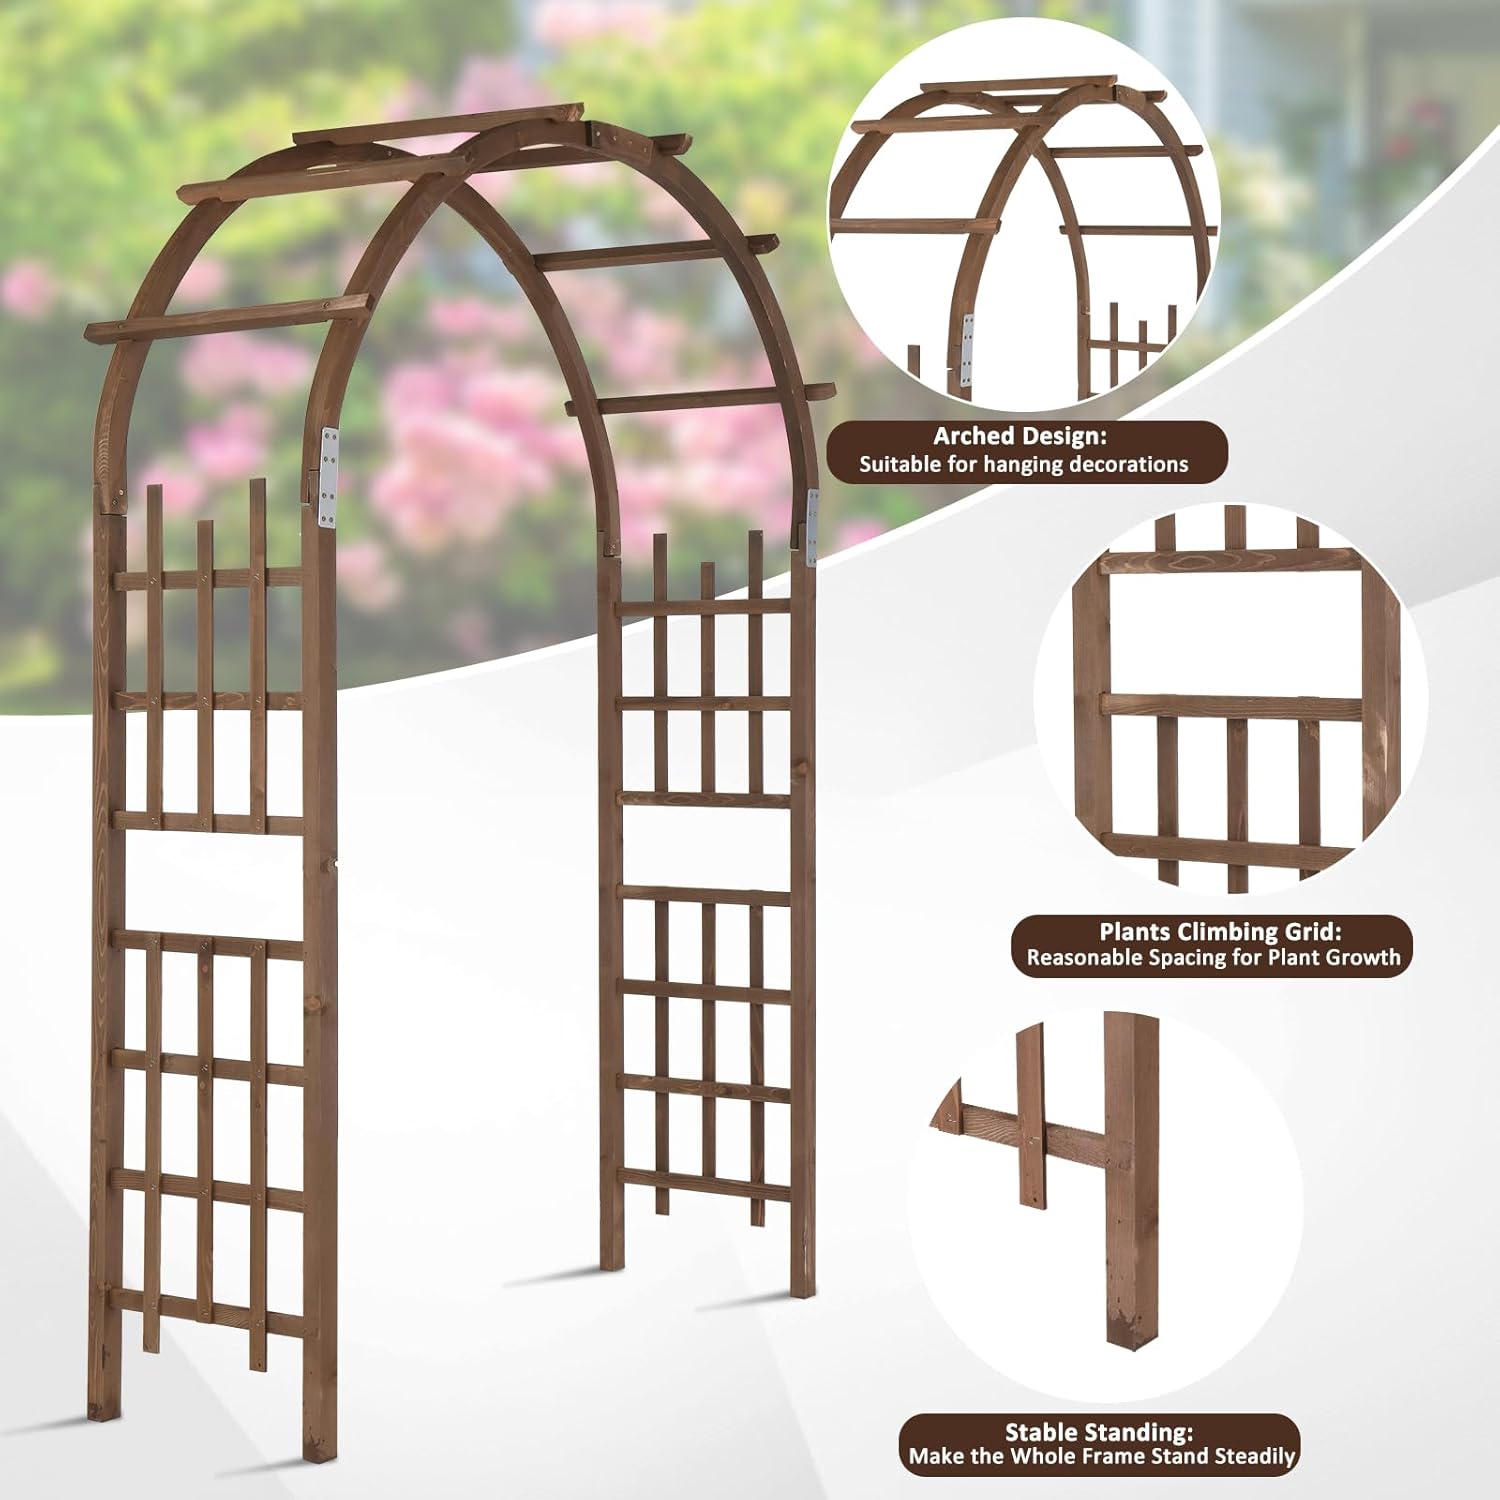
ചിത്രം 3.3.1: വിശദമായി view of the arbor's features, including the arched top for decorations, the grid pattern for climbing plants, and the stable base design.
- Carefully lift one side panel and position it upright.
- Attach one of the arch pieces to the top of the side panel using the metal connection plates and screws.
- Repeat for the second arch piece and the other side panel.
- Connect the two arch pieces at the top center, ensuring a secure fit.
3.4 Final Placement and Securing
Once assembled, the arbor should stand steadily. Consider its dimensions for optimal placement in your garden or patio.

ചിത്രം 3.4.1: Product dimensions of the VINGLI Wooden Garden Arbor, showing a height of 85.4 inches and a width of 58.1 inches.
- Move the assembled arbor to its desired location.
- Ensure the ground is level and stable to prevent tipping.
- For added stability, especially in windy conditions, consider anchoring the arbor to the ground using appropriate stakes (not included).
4. പ്രവർത്തനവും ഉപയോഗവും
The VINGLI Wooden Garden Arbor is designed for versatile use in various outdoor settings, providing both aesthetic appeal and practical support.
4.1 Supporting Climbing Plants
The integrated lattice panels provide an ideal structure for climbing plants such as roses, ivy, grapevines, and other creepers. Guide young plants gently through the lattice as they grow to encourage upward climbing.

ചിത്രം 4.1.1: The garden arbor beautifully integrated into a garden, supporting climbing roses.
4.2 Decorative Applications
The arbor can serve as a decorative entrance, a focal point in a garden, or a backdrop for special events. Its arched design is suitable for hanging lightweight decorations, lanterns, or floral arrangements.

ചിത്രം 4.2.1: Examples of the arbor's wide application, including garden paths, general garden decor, wedding ceremonies, and home entrances.

ചിത്രം 4.2.2: The arbor configured as a wedding arch, adorned with flowers, on a sandy beach.
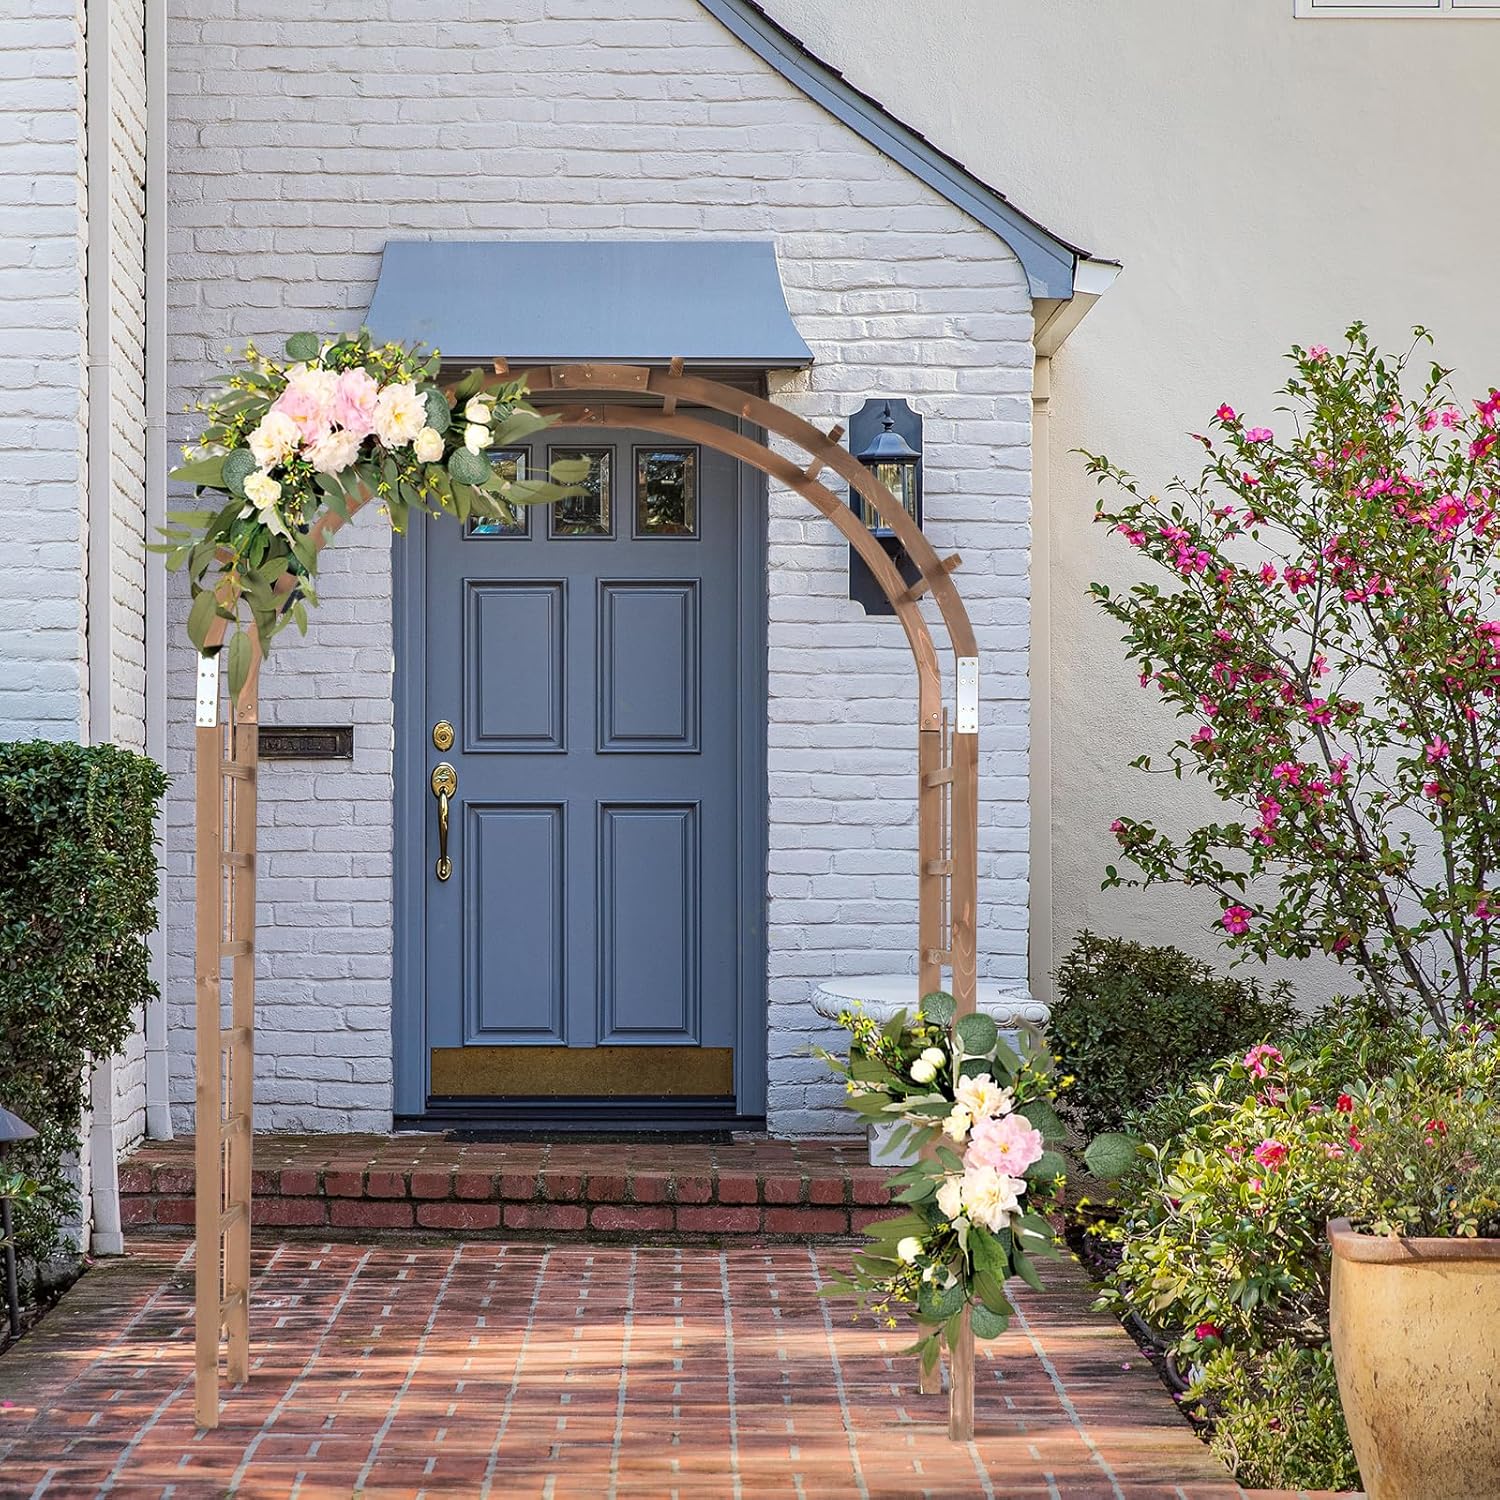
ചിത്രം 4.2.3: The arbor used as an elegant entrance to a home, decorated with floral arrangements.
5. പരിപാലനം
The VINGLI Wooden Garden Arbor is constructed from weather-resistant wood, designed for minimal maintenance. Regular care will help preserve its appearance and structural integrity.
- വൃത്തിയാക്കൽ: Periodically wipe down the wooden surfaces with a damp cloth to remove dirt, dust, and debris. For stubborn stains, a mild soap solution can be used, followed by rinsing with clean water and drying thoroughly.
- പരിശോധന: Annually inspect all screws and connections to ensure they remain tight. Retighten if necessary. Check for any signs of wood rot, cracks, or damage.
- കാലാവസ്ഥ സംരക്ഷണം: While weather-resistant, extreme conditions can affect the wood. In areas with harsh winters or prolonged heavy rain, consider applying a wood sealant or stain every few years to extend its lifespan and maintain its finish.
- Plant Management: Trim climbing plants regularly to prevent them from becoming too heavy or obstructing the arbor's structure.
6. പ്രശ്നപരിഹാരം
This section addresses common issues you might encounter with your garden arbor.
| പ്രശ്നം | സാധ്യമായ കാരണം | പരിഹാരം |
|---|
| Arbor feels unstable or wobbly. | അയഞ്ഞ കണക്ഷനുകൾ; അസമമായ നിലം; ആവശ്യത്തിന് നങ്കൂരമിടൽ ഇല്ല. | Check and tighten all screws and fasteners. Ensure the arbor is placed on a level surface. Consider using ground stakes or concrete footings for increased stability. |
| മരം മങ്ങിയതോ ഉണങ്ങിയതോ ആയി കാണപ്പെടുന്നു. | Exposure to sun and elements over time. | Apply a suitable outdoor wood stain or sealant to restore color and provide additional protection. |
| ഭാഗങ്ങൾ കൂട്ടിച്ചേർക്കുന്നതിലെ ബുദ്ധിമുട്ട്. | തെറ്റായ വിന്യാസം; ഹാർഡ്വെയർ കാണുന്നില്ല. | Refer to the assembly instructions and diagrams. Ensure parts are oriented correctly. Verify all hardware is present. Do not force components. |
7 സ്പെസിഫിക്കേഷനുകൾ
| ഫീച്ചർ | വിശദാംശങ്ങൾ |
|---|
| ബ്രാൻഡ് | വിംഗ്ലി |
| മോഡൽ നമ്പർ | VL-Arbor-G61000120 |
| നിറം | തവിട്ട് |
| മെറ്റീരിയൽ | മരം, ലോഹം |
| ഉൽപ്പന്ന അളവുകൾ (പ x അടി) | 58.1" x 85.4" |
| ശൈലി | Classic, Rustic |
| ആകൃതി | അർദ്ധവൃത്താകൃതി |
| അസംബ്ലി ആവശ്യമാണ് | അതെ |
| നിർമ്മാതാവ് | വിംഗ്ലി |
8. വാറൻ്റിയും പിന്തുണയും
VINGLI products are manufactured to high-quality standards. For specific warranty information, please refer to the documentation included with your purchase or visit the official VINGLI website. If you require assistance with assembly, missing parts, or have any questions regarding your VINGLI Wooden Garden Arbor, please contact VINGLI customer support.
ബന്ധപ്പെടാനുള്ള വിവരങ്ങൾ: Please refer to your purchase receipt or the VINGLI official webഏറ്റവും പുതിയ ഉപഭോക്തൃ പിന്തുണ കോൺടാക്റ്റ് വിശദാംശങ്ങൾക്കായുള്ള സൈറ്റ്.


