1. ആമുഖം
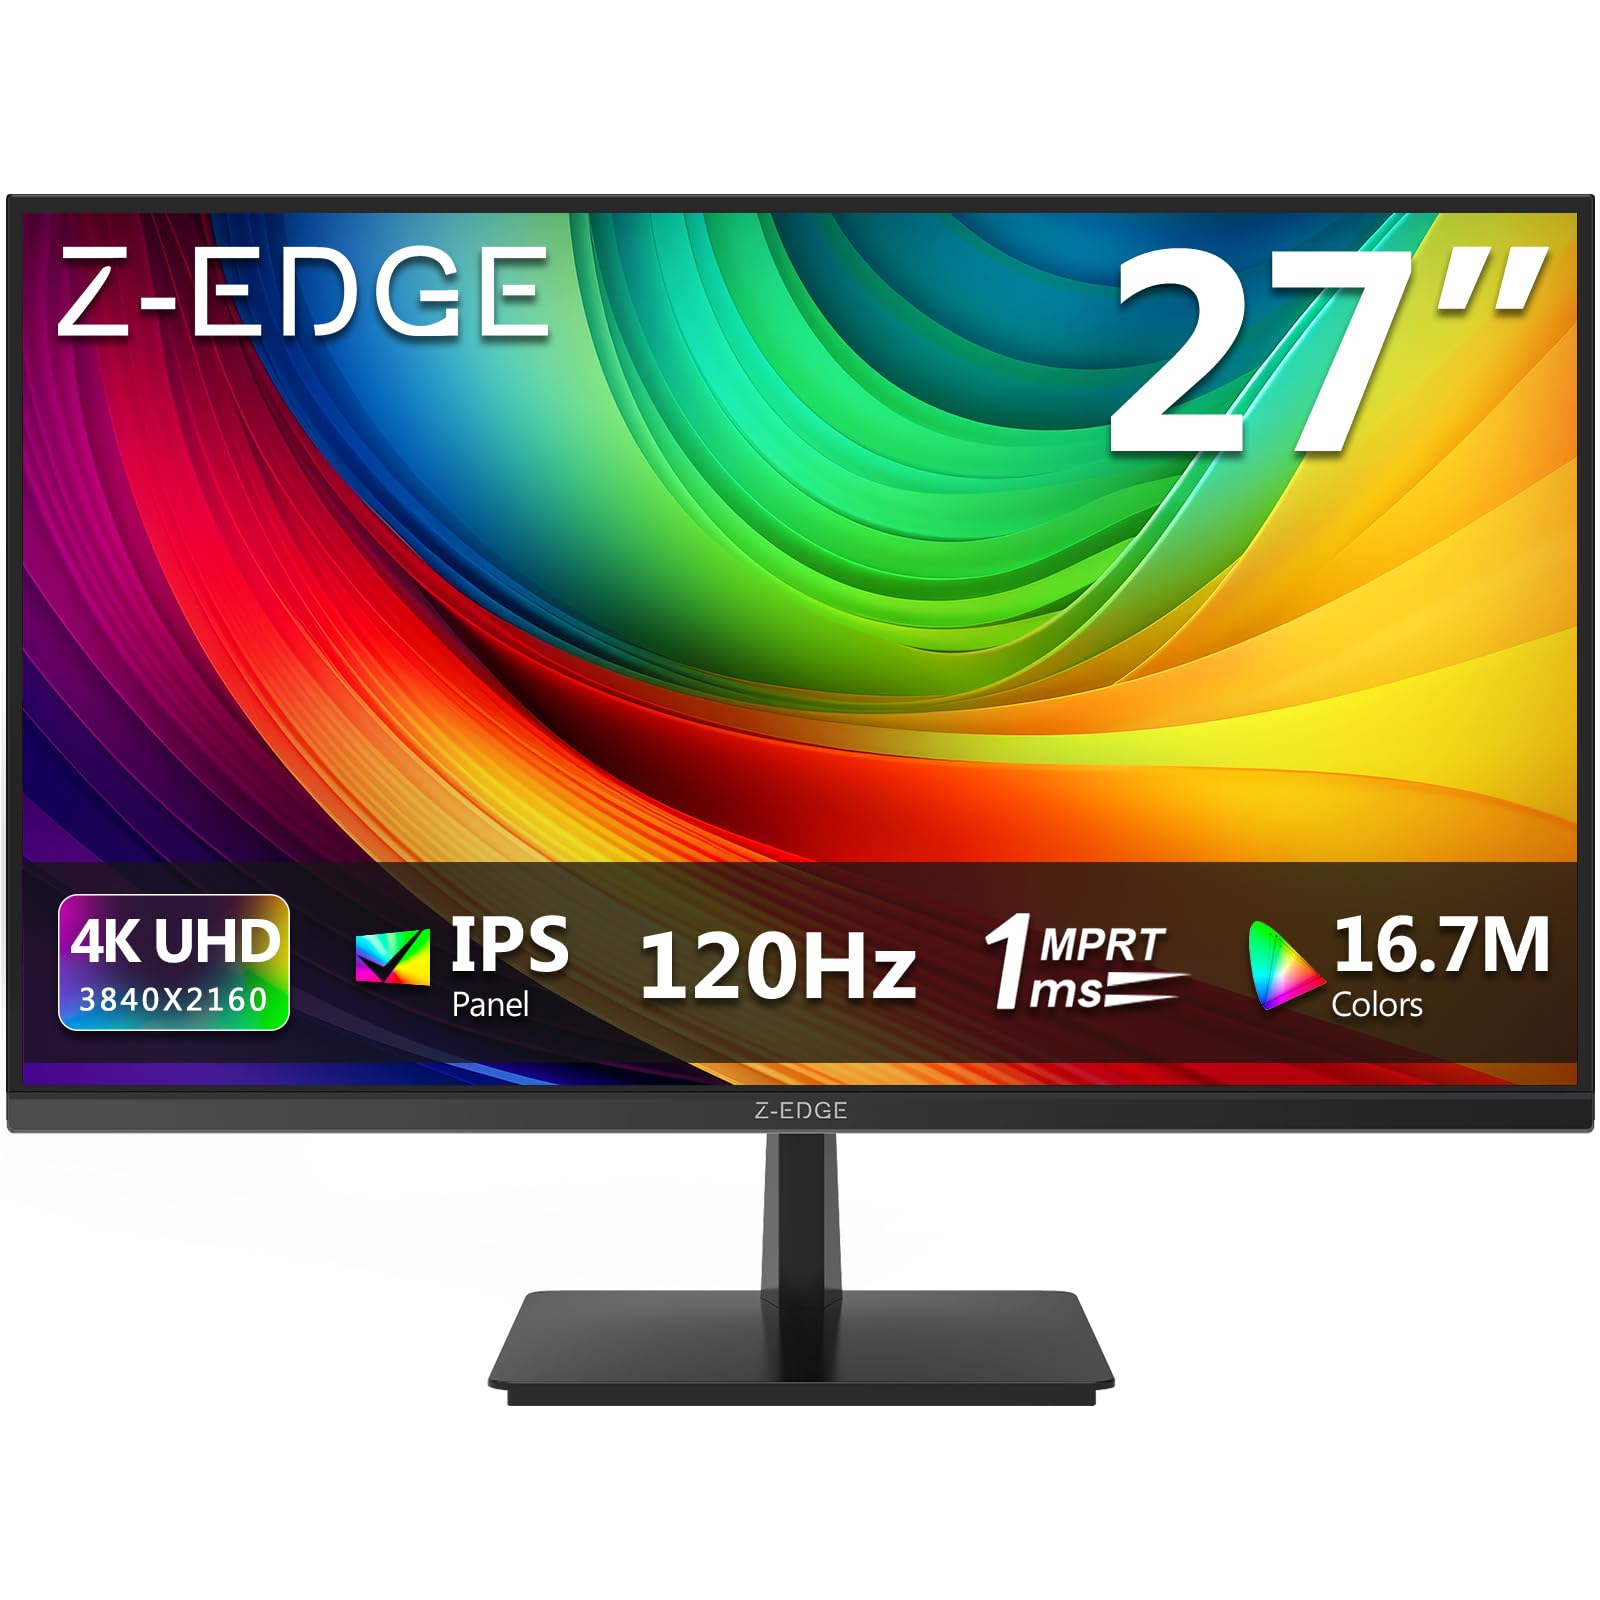
വാങ്ങിയതിന് നന്ദി.asing the Z-Edge 27-inch 4K UHD IPS Monitor, Model S274K. This monitor is designed to provide a high-quality visual experience for both professional and gaming applications, featuring a 3840x2160 resolution, 120Hz refresh rate, and 1ms response time. This manual provides essential information for setting up, operating, and maintaining your monitor to ensure optimal performance and longevity.

Image: Visual comparison demonstrating the clarity of 4K UHD (3840x2160) resolution compared to QHD (2560x1440) and FHD (1920x1080) on the Z-Edge monitor.
2 സുരക്ഷാ വിവരങ്ങൾ
ഈ ഉൽപ്പന്നം ഉപയോഗിക്കുന്നതിന് മുമ്പ് ദയവായി എല്ലാ നിർദ്ദേശങ്ങളും ശ്രദ്ധാപൂർവ്വം വായിക്കുക. ഭാവിയിലെ റഫറൻസിനായി ഈ മാനുവൽ സൂക്ഷിക്കുക.
- മഴ, ഈർപ്പം അല്ലെങ്കിൽ തീവ്രമായ താപനിലകൾ മോണിറ്ററിനെ ഏൽപ്പിക്കരുത്.
- മോണിറ്ററിന് ചുറ്റും ശരിയായ വായുസഞ്ചാരം ഉറപ്പാക്കുക. വായുസഞ്ചാര ദ്വാരങ്ങൾ അടയ്ക്കരുത്.
- മോണിറ്ററിനൊപ്പം നൽകിയിരിക്കുന്ന പവർ അഡാപ്റ്റർ മാത്രം ഉപയോഗിക്കുക.
- വൈദ്യുതി കമ്പിയിൽ ഭാരമുള്ള വസ്തുക്കൾ വയ്ക്കുന്നത് ഒഴിവാക്കുക.
- മോണിറ്റർ കൂടുതൽ നേരം ഉപയോഗിക്കുന്നില്ലെങ്കിൽ ഔട്ട്ലെറ്റിൽ നിന്ന് പവർ പ്ലഗ് വിച്ഛേദിക്കുക.
- മോണിറ്റർ സ്വയം സർവീസ് ചെയ്യാൻ ശ്രമിക്കരുത്. എല്ലാ സർവീസിംഗും യോഗ്യതയുള്ള ഉദ്യോഗസ്ഥർക്ക് റഫർ ചെയ്യുക.
3. പാക്കേജ് ഉള്ളടക്കം
നിങ്ങളുടെ പാക്കേജിൽ എല്ലാ ഇനങ്ങളും ഉണ്ടെന്ന് ഉറപ്പാക്കുക:
- Z-Edge 27-inch 4K UHD Monitor
- മോണിറ്റർ സ്റ്റാൻഡ് (ബേസും കഴുത്തും)
- പവർ അഡാപ്റ്റർ
- HDMI കേബിൾ
- ഉപയോക്തൃ മാനുവൽ (ഈ പ്രമാണം)
- സ്റ്റാൻഡ് അസംബ്ലിക്കുള്ള സ്ക്രൂകൾ
4. മോണിറ്റർ ഓവർview
4.1 ഫ്രണ്ട് View
ചിത്രം: മുൻഭാഗം view of the Z-Edge 27-inch 4K UHD monitor. This image shows the monitor displaying a vibrant scene, highlighting its slim bezels and overall design.
4.2 പിൻഭാഗം View തുറമുഖങ്ങളും

ചിത്രം: പിൻഭാഗം view of the Z-Edge 27-inch 4K UHD monitor. This image illustrates the monitor's connectivity options, including HDMI and DisplayPort inputs, and the VESA mounting pattern.
ലഭ്യമായ തുറമുഖങ്ങൾ:
- ഡിസി 12 വി: പവർ ഇൻപുട്ട് പോർട്ട്.
- HDMI 1/2 (2.0): Two HDMI input ports for connecting various devices.
- DP 1/2 (1.4): Two DisplayPort input ports for high-resolution connections.
- ഓഡിയോ Outട്ട്: ബാഹ്യ സ്പീക്കറുകളോ ഹെഡ്ഫോണുകളോ ബന്ധിപ്പിക്കുന്നതിനുള്ള 3.5mm ഓഡിയോ ജാക്ക്.

ചിത്രം: വിശദമായത് view of the monitor's input ports. This diagram clearly labels each port, including DC 12V power, two HDMI 2.0, two DisplayPort 1.4, and an audio output.
5. സജ്ജീകരണം
5.1 സ്റ്റാൻഡ് അസംബ്ലി
- സ്ക്രീൻ സംരക്ഷിച്ചുകൊണ്ട് മോണിറ്റർ അതിന്റെ പാക്കേജിംഗിൽ നിന്ന് ശ്രദ്ധാപൂർവ്വം നീക്കം ചെയ്യുക.
- നൽകിയിരിക്കുന്ന സ്ക്രൂകൾ ഉപയോഗിച്ച് മോണിറ്റർ പാനലിൽ സ്റ്റാൻഡ് നെക്ക് ഘടിപ്പിക്കുക.
- Connect the stand base to the stand neck, securing it with the remaining screws.
- കൂട്ടിച്ചേർത്ത മോണിറ്റർ ഒരു സ്ഥിരതയുള്ളതും പരന്നതുമായ പ്രതലത്തിൽ സ്ഥാപിക്കുക.
Alternatively, the monitor supports VESA 100x100mm mounting for wall mounts or monitor arms. Ensure the VESA mount is rated for the monitor's weight.
5.2 ഒരു ഉപകരണത്തിലേക്ക് ബന്ധിപ്പിക്കുന്നു
Connect your computer, game console, or other compatible device to the monitor using either an HDMI or DisplayPort cable.
- For 4K resolution at 120Hz, use a DisplayPort 1.4 cable or an HDMI 2.0 cable.
- Insert one end of the cable into the corresponding port on your device and the other end into an available HDMI or DP port on the monitor.
5.3 പവർ കണക്ഷൻ
- Connect the power adapter to the DC 12V port on the monitor.
- പവർ അഡാപ്റ്റർ ഒരു പവർ ഔട്ട്ലെറ്റിൽ പ്ലഗ് ചെയ്യുക.
6. പ്രവർത്തന നിർദ്ദേശങ്ങൾ
6.1 പവർ ഓൺ/ഓഫ്
മോണിറ്റർ ഓണാക്കാനോ ഓഫാക്കാനോ അതിൽ സ്ഥിതിചെയ്യുന്ന പവർ ബട്ടൺ അമർത്തുക. മോണിറ്റർ ഓണായിരിക്കുമ്പോൾ പവർ ഇൻഡിക്കേറ്റർ ലൈറ്റ് പ്രകാശിക്കും.
6.2 OSD മെനു നാവിഗേഷൻ
The On-Screen Display (OSD) menu allows you to adjust various monitor settings. Use the control buttons (usually located on the back or bottom of the monitor) to navigate the menu.
- Press a button to open the OSD menu.
- Use the directional buttons to move between options.
- ഒരു തിരഞ്ഞെടുപ്പ് സ്ഥിരീകരിക്കാൻ തിരഞ്ഞെടുക്കുക ബട്ടൺ അമർത്തുക അല്ലെങ്കിൽ ഒരു ഉപ-മെനു നൽകുക.
- OSD മെനു അടയ്ക്കാൻ എക്സിറ്റ് ബട്ടൺ അമർത്തുക.
6.3 ചിത്ര ക്രമീകരണങ്ങൾ
Adjust display characteristics to your preference:
- തെളിച്ചം: സ്ക്രീനിന്റെ മൊത്തത്തിലുള്ള പ്രകാശം ക്രമീകരിക്കുക.
- ദൃശ്യതീവ്രത: പ്രകാശമുള്ളതും ഇരുണ്ടതുമായ പ്രദേശങ്ങൾ തമ്മിലുള്ള വ്യത്യാസം പരിഷ്കരിക്കുക.
- വർണ്ണ താപനില: Select from preset modes (e.g., Warm, Cool, User) or adjust RGB values manually.
- വീക്ഷണ അനുപാതം: Choose between Full, 4:3, or 16:9.
6.4 ഗെയിമിംഗ് സവിശേഷതകൾ

Image: Visual representation of the difference between 120Hz and 60Hz refresh rates, illustrating how 120Hz provides a smoother and more fluid visual experience, especially for fast-paced content.
- FreeSync / Adaptive Sync: Enable this feature in the OSD menu and on your graphics card settings to synchronize the monitor's refresh rate with your GPU's frame rate, reducing screen tearing and stuttering.
- പ്രതികരണ സമയം (MPRT): Adjust for faster pixel response, beneficial for fast-paced gaming.

Image: Visual demonstration of FreeSync technology. The left side shows screen tearing and stuttering when FreeSync is off, while the right side displays smooth, fluid motion with FreeSync enabled.
6.5 ഇൻപുട്ട് തിരഞ്ഞെടുക്കൽ
If you have multiple devices connected, use the OSD menu or a dedicated input select button to switch between HDMI 1, HDMI 2, DP 1, and DP 2 inputs.
7. പരിപാലനം
7.1 മോണിറ്റർ വൃത്തിയാക്കുന്നു
- വൃത്തിയാക്കുന്നതിന് മുമ്പ് എല്ലായ്പ്പോഴും പവർ ഔട്ട്ലെറ്റിൽ നിന്ന് മോണിറ്റർ അഴിക്കുക.
- മൃദുവായ, ലിൻ്റ് രഹിത തുണി ഉപയോഗിക്കുകampവെള്ളം അല്ലെങ്കിൽ നേരിയതും, ഉരച്ചിലുകളില്ലാത്തതുമായ സ്ക്രീൻ ക്ലീനർ ഉപയോഗിച്ച് തുടയ്ക്കുക.
- ക്ലീനർ നേരിട്ട് സ്ക്രീനിൽ സ്പ്രേ ചെയ്യരുത്.
- Avoid using alcohol-based cleaners, ammonia, or abrasive materials.
7.2 പൊതു പരിചരണം
- മോണിറ്റർ നേരിട്ടുള്ള സൂര്യപ്രകാശത്തിൽ നിന്നും താപ സ്രോതസ്സുകളിൽ നിന്നും അകറ്റി നിർത്തുക.
- മോണിറ്ററിലോ അതിന്റെ കേബിളുകളിലോ ഭാരമുള്ള വസ്തുക്കൾ വയ്ക്കരുത്.
- മൂർച്ചയുള്ള വസ്തുക്കൾ ഉപയോഗിച്ച് സ്ക്രീനിൽ തൊടുന്നത് ഒഴിവാക്കുക.
8. പ്രശ്നപരിഹാരം
| പ്രശ്നം | സാധ്യമായ കാരണം | പരിഹാരം |
|---|---|---|
| സ്ക്രീനിൽ ചിത്രമൊന്നുമില്ല |
|
|
| ചിത്രം മങ്ങിയതോ വളച്ചൊടിച്ചതോ ആണ് |
|
|
| Screen tearing or stuttering (gaming) |
|
|
| No audio from headphones/speakers |
|
|
9 സ്പെസിഫിക്കേഷനുകൾ
| ഫീച്ചർ | വിശദാംശങ്ങൾ |
|---|---|
| ബ്രാൻഡ് | Z-എഡ്ജ് |
| മോഡൽ നമ്പർ | എസ് 274 കെ |
| സ്ക്രീൻ വലിപ്പം | 27 ഇഞ്ച് |
| പാനൽ തരം | ഐ.പി.എസ് |
| റെസലൂഷൻ | 4K UHD (3840 x 2160 പിക്സലുകൾ) |
| പുതുക്കിയ നിരക്ക് | 120 Hz |
| പ്രതികരണ സമയം | 1ms MPRT |
| വീക്ഷണാനുപാതം | 16:9 |
| തെളിച്ചം | 250 cd/m² |
| കോൺട്രാസ്റ്റ് റേഷ്യോ | 1000:1 |
| വർണ്ണ പിന്തുണ | 1.07 Billion Colors (99% sRGB) |
| Viewing ആംഗിൾ | 178° (H/V) |
| കണക്റ്റിവിറ്റി | 2x HDMI 2.0, 2x DisplayPort 1.4, Audio Out |
| പ്രത്യേക സവിശേഷതകൾ | Adjustable Tilt (-5°~15°), FreeSync, Flicker-Free, Ultra Slim Bezel |
| VESA അനുയോജ്യത | 100x100 മി.മീ |
| വൈദ്യുതി ഉപഭോഗം | 32 വാട്ട് |
| എനർജി എഫിഷ്യൻസി ക്ലാസ് | എഫ് (EPREL ലിങ്ക്) |

Image: Key display specifications including IPS Panel technology, 250 nits brightness, support for 16.7 million colors, and a 1000:1 contrast ratio.
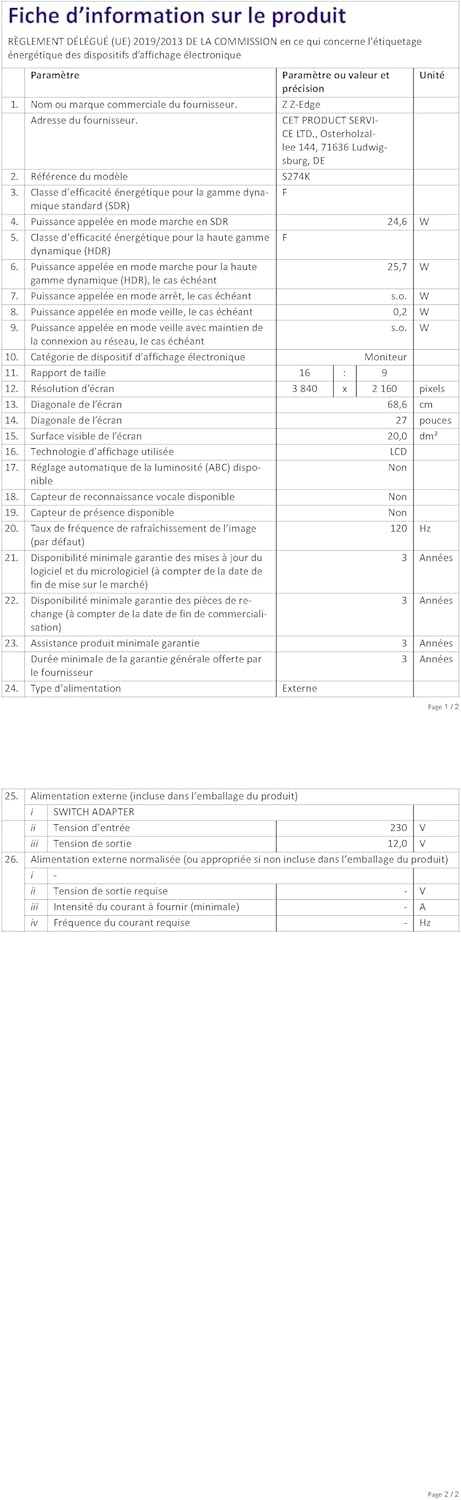
Image: EU Energy Label for the Z-Edge S274K monitor, indicating an energy efficiency class of F and energy consumption of 25 kWh per 1000 hours.
10. വാറൻ്റിയും പിന്തുണയും
10.1 നിർമ്മാതാവിന്റെ വാറന്റി
This Z-Edge monitor comes with a 1 വർഷത്തെ നിർമ്മാതാവിന്റെ വാറന്റി വാങ്ങിയ തീയതി മുതൽ. സാധാരണ ഉപയോഗത്തിലുള്ള മെറ്റീരിയലുകളിലും നിർമ്മാണത്തിലും ഉണ്ടാകുന്ന തകരാറുകൾ ഈ വാറന്റി ഉൾക്കൊള്ളുന്നു. ദുരുപയോഗം, അപകടങ്ങൾ, അനധികൃത പരിഷ്കാരങ്ങൾ അല്ലെങ്കിൽ ബാഹ്യ കാരണങ്ങൾ എന്നിവ മൂലമുണ്ടാകുന്ന നാശനഷ്ടങ്ങൾക്ക് ഇത് പരിരക്ഷ നൽകുന്നില്ല.
വാറന്റി ക്ലെയിമുകൾക്കായി, നിങ്ങളുടെ വാങ്ങിയതിന്റെ തെളിവ് സൂക്ഷിക്കുക.
10.2 ഉപഭോക്തൃ പിന്തുണ
If you encounter any issues not covered in the troubleshooting section or require further assistance, please contact Z-Edge customer support. Refer to the official Z-Edge webഏറ്റവും കാലികമായ കോൺടാക്റ്റ് വിവരങ്ങൾക്കും പിന്തുണാ ഉറവിടങ്ങൾക്കുമുള്ള സൈറ്റ്.


