1. ആമുഖം
Thank you for choosing the WALI Full Motion TV Wall Mount. This manual provides essential information for the safe and proper installation, operation, and maintenance of your new TV mount. Please read all instructions carefully before beginning installation to ensure optimal performance and safety.
ഉൽപ്പന്നം കഴിഞ്ഞുview
The WALI FTM-2/IT is a full motion articulating TV wall mount designed to securely hold most 32-70 inch flat and curved televisions. It offers extensive adjustability for an optimal viewing experience, including tilt, swivel, and extension capabilities.

Image: The WALI Full Motion TV Wall Mount, showcasing its articulating arms and TV mounting plate.
പ്രധാന സവിശേഷതകൾ
- അനുയോജ്യത: Fits most flat and curved 32-70 inch TVs weighing up to 88 lbs (40 kg). Supports VESA mounting patterns from 100x100mm to 400x400mm.
- Full Adjustment: Offers +3°/-15° tilt, +60°/-60° swivel, and +3°/-3° leveling for flexible viewകോണുകൾ.
- വിപുലീകരണം: Extends from 2.6 inches (6.6 cm) to 14 inches (35.6 cm) from the wall.
- കരുത്തുറ്റ നിർമ്മാണം: Made from high-grade steel for solid and stable support.
- മതിൽ തരങ്ങൾ: Can be mounted on vertical wood studs (12-16 inches apart), brick, or concrete walls. ഡ്രൈവ്വാളിൽ മാത്രം മൌണ്ട് ചെയ്യരുത്.
2 സുരക്ഷാ വിവരങ്ങൾ
Please read and understand all instructions before installation. If you have any questions, contact WALI customer support. Improper installation may cause property damage, serious injury, or death.
- ഈ ഉൽപ്പന്നം ഇൻഡോർ ഉപയോഗത്തിന് മാത്രമുള്ളതാണ്.
- മൗണ്ടിംഗ് ഉപരിതലത്തിന് മൗണ്ടിന്റെയും ടിവിയുടെയും സംയുക്ത ഭാരം സുരക്ഷിതമായി താങ്ങാൻ കഴിയുമെന്ന് ഉറപ്പാക്കുക.
- പരമാവധി ഭാര ശേഷി 88 പൗണ്ട് (40 കിലോഗ്രാം) കവിയരുത്.
- Always use a stud finder to locate wood studs. If mounting to brick or concrete, use appropriate anchors (included).
- Never mount to drywall alone.
- Use caution when handling heavy equipment. It is recommended to have at least two people for installation.
- എല്ലാ സ്ക്രൂകളും ദൃഢമായി മുറുക്കുക, പക്ഷേ അമിതമായി മുറുക്കരുത്.
- ഇൻസ്റ്റാളേഷൻ സമയത്ത് കുട്ടികളെയും വളർത്തുമൃഗങ്ങളെയും അകറ്റി നിർത്തുക.
- എല്ലാ കണക്ഷനുകളും സുരക്ഷിതമായി തുടരുന്നുവെന്ന് ഉറപ്പാക്കാൻ ഇടയ്ക്കിടെ പരിശോധിക്കുക.
3. പാക്കേജ് ഉള്ളടക്കം
Verify that all components are present and undamaged before installation. If any parts are missing or defective, contact WALI customer support for assistance.
- WALI TV Wall Mount Bracket (Black) x 1
- മൗണ്ടിംഗ് ഹാർഡ്വെയർ കിറ്റ് (വിവിധ സ്ക്രൂകൾ, വാഷറുകൾ, സ്പെയ്സറുകൾ, ആങ്കറുകൾ)
- ഉപയോക്തൃ മാനുവൽ x 1
4 സ്പെസിഫിക്കേഷനുകൾ
| സ്പെസിഫിക്കേഷൻ | വിശദാംശങ്ങൾ |
|---|---|
| മോഡൽ നമ്പർ | FTM-2/IT |
| ടിവി വലുപ്പ അനുയോജ്യത | 32-70 inches (flat and curved) |
| ഭാരം ശേഷി | 88 പൗണ്ട് വരെ (40 കി.ഗ്രാം) |
| VESA അനുയോജ്യത | 100x100mm, 100x150mm, 100x200mm, 150x150mm, 150x200mm, 200x100mm, 200x200mm, 300x200mm, 300x300mm, 400x200mm, 400x300mm, 400x400mm |
| ടിൽറ്റ് ആംഗിൾ | +3° / -15° |
| സ്വിവൽ ആംഗിൾ | +60° / -60° |
| ലെവലിംഗ് അഡ്ജസ്റ്റ്മെന്റ് | +3° / -3° |
| ചുമരിൽ നിന്നുള്ള വിപുലീകരണം | 2.6 ഇഞ്ച് (6.6 സെ.മീ) മുതൽ 14 ഇഞ്ച് (35.6 സെ.മീ) വരെ |
| മെറ്റീരിയൽ | ഉയർന്ന ഗ്രേഡ് സ്റ്റീൽ |
| നിറം | കറുപ്പ് |
| ഇനത്തിൻ്റെ ഭാരം | 7.59 പൗണ്ട് (3.44 കി.ഗ്രാം) |
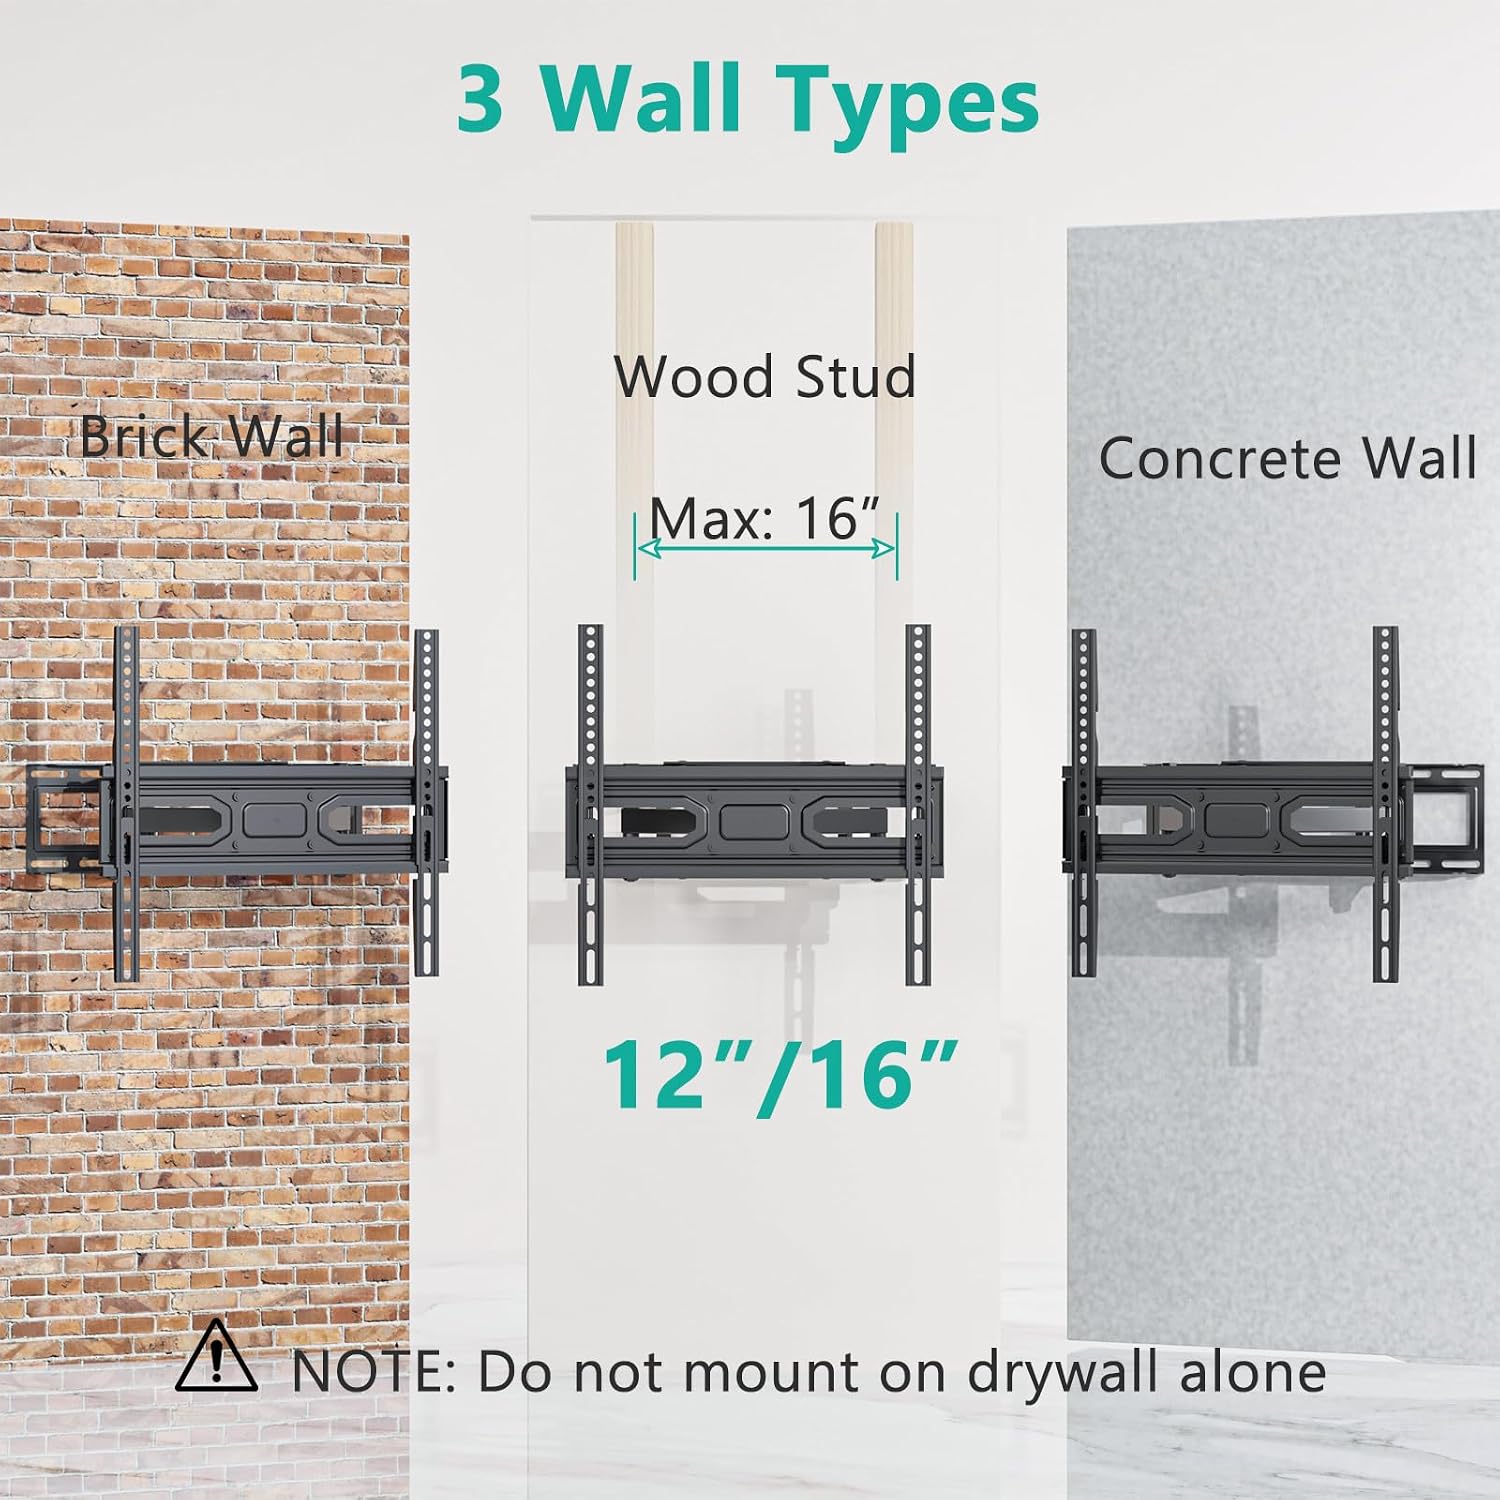
Image: Diagram illustrating TV size compatibility (32-70 inches) and various VESA mounting patterns supported by the mount.

Image: Diagram showing the maximum weight capacity of the mount, 40kg or 88lbs.
5. ഇൻസ്റ്റാളേഷൻ ഗൈഡ്
Follow these steps carefully for a secure installation. It is highly recommended to have two people for this process.
5.1 ആവശ്യമായ ഉപകരണങ്ങൾ (ഉൾപ്പെടുത്തിയിട്ടില്ല)
- പെൻസിൽ
- ഫിലിപ്സ് ഹെഡ് സ്ക്രൂഡ്രൈവർ
- ഡ്രിൽ
- സ്റ്റഡ് ഫൈൻഡർ (വുഡ് സ്റ്റഡ് ഇൻസ്റ്റാളേഷനായി)
- ലെവൽ
- ടേപ്പ് അളവ്
- Hammer (for concrete/brick anchors)
5.2 മതിൽ തയ്യാറാക്കൽ
Determine your wall type and mark the drilling locations.

Image: Illustration of the three compatible wall types: Brick Wall, Wood Stud (12-16 inches), and Concrete Wall. A warning states: Do NOT mount on drywall alone.
- വുഡ് സ്റ്റഡ് ഭിത്തികൾക്ക്: Use a stud finder to locate the edges of two adjacent wood studs. Mark the center of the studs at your desired mounting height. The studs must be between 12 and 16 inches apart.
- ഇഷ്ടിക അല്ലെങ്കിൽ കോൺക്രീറ്റ് ഭിത്തികൾക്ക്: Mark the desired mounting height. Ensure there are no hidden electrical wires or plumbing in the drilling path.
- Position the wall plate against the wall at the marked height and use a level to ensure it is straight. Mark the drilling points through the holes on the wall plate.
- Drill pilot holes at the marked locations. The drill bit size and depth will depend on your wall type and the specific lag bolts/anchors used. Refer to the hardware kit instructions for precise details.
5.3 Mount Assembly and Wall Attachment
- Attach the wall plate to the wall using the provided lag bolts and washers. For concrete/brick, insert the concrete anchors into the drilled holes before securing the lag bolts. Tighten all bolts firmly with a wrench, ensuring the mount is level and secure.
- Assemble the articulating arms to the wall plate if they are not pre-assembled. Follow the diagrams in the included paper manual for correct orientation and secure all connections.
5.4 TV Bracket Attachment
- പോറലുകൾ ഉണ്ടാകാതിരിക്കാൻ നിങ്ങളുടെ ടിവി മുഖം മൃദുവായതും വൃത്തിയുള്ളതുമായ ഒരു പ്രതലത്തിൽ ശ്രദ്ധാപൂർവ്വം വയ്ക്കുക.
- നിങ്ങളുടെ ടിവിയുടെ പിൻഭാഗത്തുള്ള VESA മൗണ്ടിംഗ് ദ്വാരങ്ങൾ തിരിച്ചറിയുക.
- Select the appropriate screws (M4, M6, M8), washers, and spacers from the hardware kit that fit your TV's VESA holes. Ensure the screws are long enough to securely engage the TV threads but not so long that they damage internal components.
- Attach the two vertical TV brackets to the back of your TV, aligning them with the VESA holes. Ensure the hooks on the brackets are facing upwards and the same direction. Tighten the screws securely.
5.5 Mounting the TV to the Wall Plate
- സഹായത്തോടെ, ബ്രാക്കറ്റുകൾ ഘടിപ്പിച്ചിരിക്കുന്ന ടിവി ശ്രദ്ധാപൂർവ്വം ഉയർത്തുക.
- Hook the TV brackets onto the horizontal bar of the wall mount. Ensure both brackets are securely seated on the bar.
- Locate the safety screws or locking mechanisms on the bottom of the TV brackets. Tighten these screws to secure the TV to the mount and prevent accidental dislodgement.

Image: Three-panel illustration showing the installation process: 1. Attaching the wall plate to the wall. 2. Attaching the TV brackets to the back of the TV. 3. Hanging the TV onto the wall mount and securing it.
6. പ്രവർത്തന നിർദ്ദേശങ്ങൾ (ക്രമീകരണങ്ങൾ)
Your WALI Full Motion TV Wall Mount allows for various adjustments to achieve the perfect viewing ആംഗിൾ.
6.1 ടിൽറ്റ് അഡ്ജസ്റ്റ്മെൻ്റ്
The mount allows for a tilt range of +3° (upwards) to -15° (downwards). Loosen the tilt knobs or bolts on the TV brackets, adjust the TV to the desired angle, and then re-tighten the knobs/bolts to secure the position.

Image: Diagram showing the mount's extension capability from 2.5 to 14 inches and the tilt range of +3° to -15°.
6.2 സ്വിവൽ ക്രമീകരണം
The articulating arms allow the TV to swivel +60° to -60° horizontally. Gently push or pull the TV to the left or right to achieve your desired viewing angle. The friction joints will hold the TV in place.

Image: Illustration demonstrating the swivel range of +60° to -60° and the rotation range of +3° to -3° for comfortable viewing.
6.3 വിപുലീകരണവും പിൻവലിക്കലും
The mount can extend up to 14 inches (35.6 cm) from the wall and retract to a minimum of 2.6 inches (6.6 cm). Gently pull the TV away from the wall or push it back to adjust the distance as needed.
6.4 Leveling Adjustment
If your TV is slightly unlevel after installation, you can adjust the rotation by +3° to -3°. Loosen the leveling screws on the TV brackets, adjust the TV until it is level, and then re-tighten the screws.
7. പരിപാലനം
പതിവ് അറ്റകുറ്റപ്പണികൾ നിങ്ങളുടെ ടിവി വാൾ മൗണ്ടിന്റെ ദീർഘായുസ്സും സുരക്ഷിതമായ പ്രവർത്തനവും ഉറപ്പാക്കുന്നു.
- വൃത്തിയാക്കൽ: പൊടി നീക്കം ചെയ്യാൻ മൃദുവായതും ഉണങ്ങിയതുമായ തുണി ഉപയോഗിച്ച് മൗണ്ട് തുടയ്ക്കുക. അബ്രസീവ് ക്ലീനറുകളോ ലായകങ്ങളോ ഉപയോഗിക്കരുത്.
- ആനുകാലിക പരിശോധനകൾ: Every few months, check all screws and bolts to ensure they are still tight and secure. Re-tighten if necessary.
- ചലന പരിശോധന: Periodically test the tilt, swivel, and extension movements to ensure they operate smoothly. If any stiffness is noted, ensure no debris is obstructing the joints.
8. പ്രശ്നപരിഹാരം
ഇൻസ്റ്റാളേഷൻ സമയത്തോ അതിനുശേഷമോ നിങ്ങൾക്ക് പ്രശ്നങ്ങൾ നേരിടുകയാണെങ്കിൽ, താഴെ പറയുന്ന പൊതുവായ പ്രശ്നങ്ങളും പരിഹാരങ്ങളും പരിശോധിക്കുക.
| പ്രശ്നം | സാധ്യമായ കാരണം | പരിഹാരം |
|---|---|---|
| ടിവി നിലവാരമില്ലാത്തതാണ് | Wall plate not level or leveling screws loose. | Use the +3°/-3° leveling adjustment. Loosen leveling screws, adjust TV, then re-tighten. If the wall plate is significantly off, you may need to re-install. |
| മൗണ്ട് അസ്ഥിരമായി തോന്നുന്നു | Lag bolts not fully tightened or incorrect wall type. | Ensure all lag bolts are securely tightened. Verify that the mount is installed on appropriate wood studs, brick, or concrete, not drywall alone. |
| TV cannot be tilted/swiveled | Tilt/swivel knobs/bolts are too tight. | Loosen the tilt knobs or bolts slightly to allow movement. Do not loosen excessively to maintain stability. |
| Missing parts from hardware kit | പാക്കേജിംഗ് പിശക്. | Contact WALI customer support immediately for replacement parts. |
| Screws for TV do not fit | Incorrect screw size selected. | Refer to your TV's manual for correct VESA screw size. Use the appropriate screws from the provided hardware kit. If none fit, you may need to purchase specific screws. |
9. വാറന്റി & ഉപഭോക്തൃ പിന്തുണ
WALI products come with a limited warranty. Please refer to the warranty information provided with your purchase or visit the official WALI webവിശദാംശങ്ങൾക്ക് സൈറ്റ്.
For technical assistance, missing parts, or any questions regarding your WALI TV Wall Mount, please contact our experienced and friendly US-based customer support team. They are available to assist 7 days a week.
WALI Customer Support:
Webസൈറ്റ്: www.walielectric.com
ഇമെയിൽ: support@walielectric.com
Phone: (Specific phone number not provided, please check product packaging or webസൈറ്റ്)


