ആമുഖം
Thank you for choosing the ROPVACNIC Robot Vacuum Cleaner S1. This advanced 2-in-1 robot vacuum and mop combo is designed to provide efficient and comprehensive cleaning for your home. Featuring powerful 4000Pa suction, intelligent navigation, and personalized cleaning adjustments, the S1 ensures a spotless environment with minimal effort. This manual provides essential information for setup, operation, maintenance, and troubleshooting to help you get the most out of your device.
ബോക്സിൽ എന്താണുള്ളത്

Image: All components included in the ROPVACNIC S1 package, neatly laid out.
- Robotic Vacuum and Mop Cleaner (S1 Unit)
- മോപ്പ് പാഡ് ഹോൾഡർ
- ചാർജിംഗ് അടിസ്ഥാനം
- പവർ അഡാപ്റ്റർ
- Electrically Controlled Water Tank
- മോപ്പിംഗ് തുണി
- സ്പെയർ HEPA ഫിൽട്ടർ
- 4 സൈഡ് ബ്രഷുകൾ
- ക്ലീനിംഗ് ബ്രഷ്
- ഉപയോക്തൃ മാനുവൽ
- APP നിർദ്ദേശം
ഉൽപ്പന്നം കഴിഞ്ഞുview

Image: The ROPVACNIC S1 robot vacuum, its charging dock, and a smartphone displaying the companion app.
The ROPVACNIC S1 is designed for optimal cleaning performance. Key features include:
- 2-in-1 Mopping and Vacuuming: Integrated electronically controlled mopping technology for enhanced cleaning.
- 4000Pa ശക്തമായ സക്ഷൻ: A 3-point cleaning system ensures thorough removal of dirt, dust, and crumbs.
- ഇന്റലിജന്റ് ഓട്ടോമേഷൻ: Advanced high-coverage sensing system for autonomous cleaning, obstacle avoidance, and self-recharge.
- Personalized Cleaning Adjustments: നാല്-സെtage water adjustment for mopping and multiple cleaning modes via app control.
- വളർത്തുമൃഗ ഉടമകൾക്കായി രൂപകൽപ്പന ചെയ്തത്: No-entanglement design and dual rotating electric side brushes efficiently collect pet hair.
- ശബ്ദ നിയന്ത്രണ അനുയോജ്യത: Works with Amazon Alexa and Google Assistant for hands-free operation.
- സ്ലിം ഡിസൈൻ: At 2.99 inches high, it can clean under furniture and in hard-to-reach areas.
സജ്ജമാക്കുക
1. ചാർജിംഗ് ബേസ് പ്ലേസ്മെന്റ്
Place the charging base against a wall in an open, uncluttered area. Ensure there is at least 0.5 meters (1.6 feet) of clear space on both sides of the base and 1.5 meters (4.9 feet) in front of it. Connect the power adapter to the charging base and plug it into a wall outlet. Ensure the power indicator on the charging base lights up.

Image: The robot vacuum automatically returning to its charging base.
2. പ്രാരംഭ ചാർജിംഗ്
Place the robot onto the charging base, ensuring the charging contacts align. The robot will begin charging automatically. For first-time use, fully charge the robot before operation. A full charge typically takes 4-5 hours.

Image: An illustration showing the robot vacuum's 4400 mAh battery capacity and 2683 sqft cleaning area.
3. ആപ്പ് ഇൻസ്റ്റാളേഷനും കണക്ഷനും
For full control and advanced features, download the "ROPVACNIC Smart" app.
- Refer to the APP Instruction in the package first.
- Download the "ROPVACNIC Smart" app from your app market or scan the QR code provided in the APP instruction manual. You can also visit https://a.smart321.com/ropvacnicsmart ഡൗൺലോഡ് ചെയ്യാൻ.
- റോബോട്ടിലെ പവർ ബട്ടൺ ഓണാക്കാൻ 5 സെക്കൻഡ് അമർത്തിപ്പിടിക്കുക.
- Long press the "power" and "home" buttons for 5 seconds until the green light flashes to enter pairing mode.
- 2.4GHz വൈഫൈ നെറ്റ്വർക്കിലേക്ക് നിങ്ങളുടെ സ്മാർട്ട്ഫോൺ ബന്ധിപ്പിക്കുക.
- Open the "ROPVACNIC Smart" app, follow the on-screen instructions to add your S1 robot vacuum to the app.

Image: A step-by-step visual guide showing how to connect the ROPVACNIC robot to the mobile app, including screenshots of the app interface.

Image: The robot vacuum, a smartphone, and a remote control, highlighting the upgraded Bluetooth Quick Connect technology for stable connections.
4. Voice Control Setup
The ROPVACNIC S1 is compatible with Amazon Alexa and Google Assistant. Once connected to the app, follow the instructions within your Alexa or Google Home app to enable the ROPVACNIC skill/action and link your account. You can then use voice commands like "Alexa, turn on vacuum cleaner" to start cleaning.
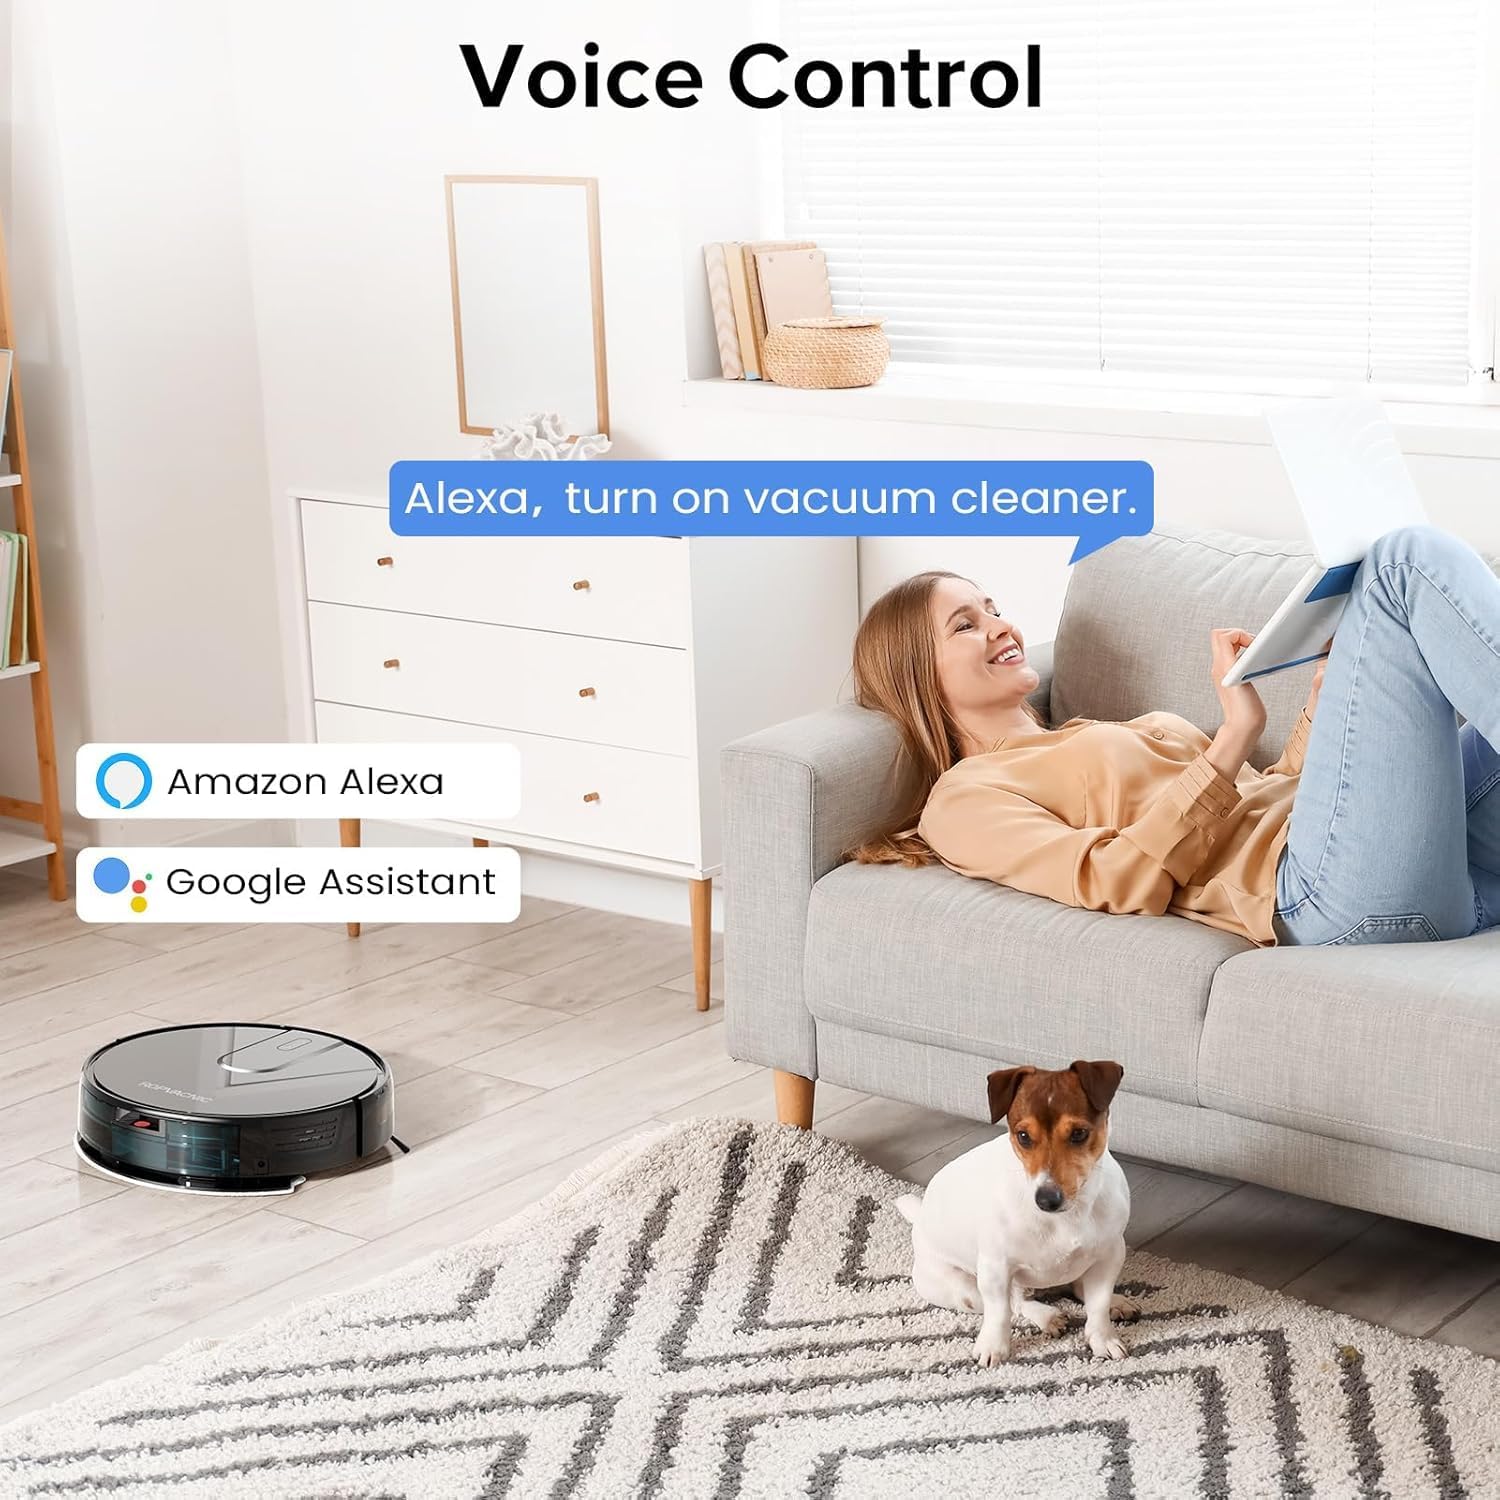
Image: A woman relaxing on a couch, using voice commands to control the robot vacuum, with Amazon Alexa and Google Assistant logos visible.

Image: A woman on a sofa with her phone, while the robot vacuum cleans, demonstrating voice-controlled cleaning with Alexa and Google Assistant.
പ്രവർത്തന നിർദ്ദേശങ്ങൾ
ക്ലീനിംഗ് മോഡുകൾ
The ROPVACNIC S1 offers multiple cleaning modes to suit different needs. These can be selected via the mobile app or the included remote control.

Image: Screenshots of the mobile app interface demonstrating various cleaning modes (Smart, Edge, Scheduled, Spot, Manual) and water flow adjustment options (Low, Medium, High).
- Smart Cleaning: റോബോട്ട് ബുദ്ധിപൂർവ്വം സഞ്ചരിച്ച് മുഴുവൻ പ്രദേശവും വൃത്തിയാക്കുന്നു.
- സ്പോട്ട് ക്ലീനിംഗ്: ഒരു പ്രത്യേക വൃത്തികെട്ട പ്രദേശത്ത് ശ്രദ്ധ കേന്ദ്രീകരിക്കുന്നു, സർപ്പിള പാറ്റേണിൽ വൃത്തിയാക്കുന്നു.
- എഡ്ജ് ക്ലീനിംഗ്: ചുവരുകളിലും ഫർണിച്ചറിന്റെ അരികുകളിലും വൃത്തിയാക്കുന്നു.
- ഷെഡ്യൂൾ ചെയ്ത ക്ലീനിംഗ്: റോബോട്ട് യാന്ത്രികമായി വൃത്തിയാക്കൽ ആരംഭിക്കുന്നതിന് നിർദ്ദിഷ്ട സമയം സജ്ജമാക്കുക.
- സ്വമേധയാലുള്ള നിയന്ത്രണം: Use the app or remote control to manually steer the robot.
സക്ഷൻ ലെവൽ അഡ്ജസ്റ്റ്മെന്റ്
Adjust the suction power based on your cleaning needs and floor type (e.g., higher suction for carpets, lower for hard floors). This can be done through the mobile app.

Image: The robot vacuum cleaning a floor, with an illustration of 4000Pa suction power pulling in dust, hair, snacks, and particles.

Image: The ROPVACNIC S1 robot vacuum demonstrating its 4000Pa powerful suction, effectively cleaning various debris from the floor.
Water Flow Adjustment (Mopping)
The S1 features an upgraded high-capacity water tank with a four-stage personalized water adjustment system. Adjust the water flow for mopping via the app to suit different floor types and stain levels.

Image: The robot vacuum simultaneously performing vacuuming and mopping functions, with indicators for multi-stage water flow setting and mopping area.

Image: The robot vacuum mopping a floor, highlighting its electric mopping technology, 250ml built-in water tank, and maximum mopping range of 2683 sqft.

Image: A detailed diagram showing the internal structure of the efficient composite cleaning module, including the electrically controlled water tank and mopping pad.
Starting and Stopping Cleaning
- ആരംഭിക്കുക: Press the power button on the robot, use the "Clean" button on the remote control, or initiate cleaning via the mobile app.
- താൽക്കാലികമായി നിർത്തുക/നിർത്തുക: Press the power button again, use the pause button on the remote, or stop via the app. The robot will return to its charging base automatically when cleaning is complete or battery is low.
ബുദ്ധിപരമായ നാവിഗേഷനും തടസ്സം ഒഴിവാക്കലും
The S1 is equipped with an advanced high-coverage sensing system and multiple algorithmic data points. This enables it to navigate autonomously, detect obstacles, adjust direction, and switch modes as needed. Its slim design allows it to clean under furniture effectively.

Image: The robot vacuum navigating a room, illustrating its intelligent automation and advanced sensing system for obstacle detection.

Image: A visual representation of the robot vacuum's intelligent instant sensing system, showing how it detects and navigates around furniture and obstacles.
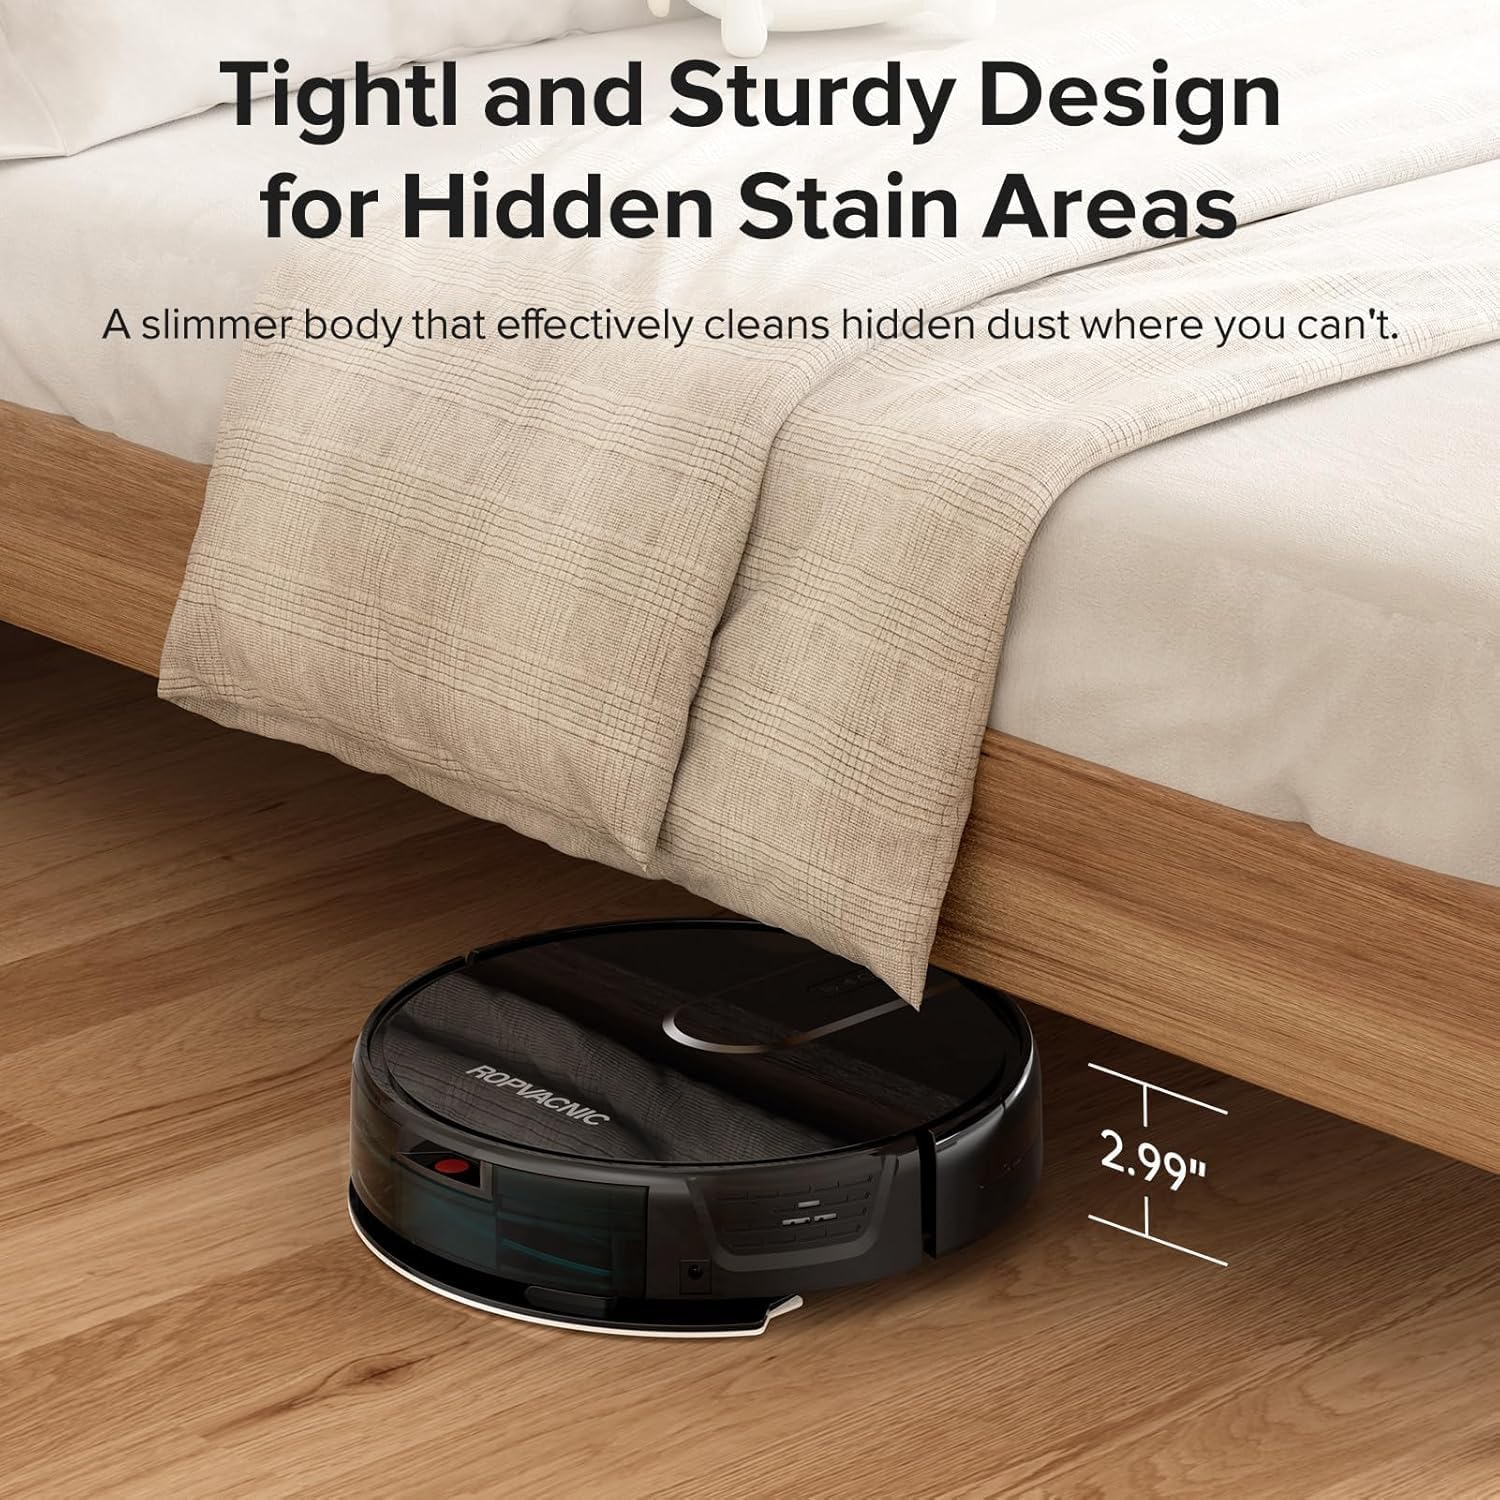
Image: The robot vacuum cleaning under a bed, demonstrating its slim 2.99-inch height for accessing hard-to-reach areas.

Image: The robot vacuum cleaning under a piece of furniture, emphasizing its compact design for reaching hidden areas.
റിമോട്ട് കൺട്രോൾ ഉപയോഗം
An extra remote control is included for convenient operation without needing your smartphone. Refer to the APP instruction manual for detailed functions of each button on the remote.

Image: A child sitting on the floor, using the remote control to operate the robot vacuum, illustrating the ease of use.
മെയിൻ്റനൻസ്
Regular maintenance ensures optimal performance and extends the lifespan of your ROPVACNIC S1. Always turn off the robot and disconnect it from the charging base before performing any maintenance.
1. ഡസ്റ്റ് ബിൻ കാലിയാക്കൽ
Empty the dust bin after each cleaning cycle or when the "dust bin full" indicator appears. Open the top cover of the robot, remove the dust bin, open its lid, and discard the collected debris. Rinse the dust bin with water if necessary, and ensure it is completely dry before reinserting.
2. Cleaning/Replacing the Filter
The S1 uses a multi-layer optimized high-efficiency filtration system. Tap off excess dirt from the HEPA filter after every 1-2 uses. Replace the HEPA filter every 3-6 months, or more frequently depending on usage and pet hair presence. Do not wash the HEPA filter with water.
3. Cleaning/Replacing Side Brushes
Inspect the side brushes regularly for tangled hair or debris. Use the included cleaning brush to remove any tangles. If brushes are worn or damaged, replace them with new ones (4 spare side brushes are included).

Image: The robot vacuum cleaning pet hair from a carpet, emphasizing its no-entanglement design specifically for pet owners.
4. Cleaning the Mopping Cloth and Water Tank
After mopping, remove the mopping cloth from the holder and wash it thoroughly. Allow it to air dry completely before reattaching. Empty any remaining water from the electrically controlled water tank and rinse it. Ensure the tank is dry before storage or next use.
5. സെൻസറുകൾ വൃത്തിയാക്കലും കോൺടാക്റ്റുകൾ ചാർജ് ചെയ്യലും
Wipe the cliff sensors, wall sensors, and charging contacts on both the robot and the charging base with a clean, dry cloth. This ensures proper navigation and charging.
ട്രബിൾഷൂട്ടിംഗ്
| പ്രശ്നം | സാധ്യമായ കാരണം | പരിഹാരം |
|---|---|---|
| റോബോട്ട് ഓണാക്കുന്നില്ല. | ബാറ്ററി കുറവാണ്; പവർ സ്വിച്ച് ഓഫ്. | Charge the robot; Ensure power switch is ON. |
| Robot cannot charge. | Charging contacts dirty; Charging base not powered. | Clean charging contacts; Ensure charging base is plugged in and powered. |
| റോബോട്ട് ഇടയ്ക്കിടെ കുടുങ്ങിപ്പോകാറുണ്ട്. | Too many obstacles; Sensors dirty. | Clear obstacles from cleaning path; Clean all sensors. |
| മോശം ക്ലീനിംഗ് പ്രകടനം. | Dust bin full; Filter clogged; Brushes tangled/worn. | Empty dust bin; Clean/replace filter; Clean/replace side brushes. |
| വൈഫൈ/ആപ്പിലേക്ക് കണക്റ്റ് ചെയ്യാൻ കഴിയുന്നില്ല. | Incorrect Wi-Fi password; Not 2.4GHz network; Robot not in pairing mode. | Verify password; Connect to 2.4GHz Wi-Fi; Re-enter pairing mode (long press power and home buttons). |
സ്പെസിഫിക്കേഷനുകൾ
| ഫീച്ചർ | വിശദാംശങ്ങൾ |
|---|---|
| ബ്രാൻഡ് | ROPVACNIC |
| മോഡലിൻ്റെ പേര് | S1 |
| പ്രത്യേക സവിശേഷതകൾ | Adjustable Electric Mopping, Intelligent Auto Docking, Advanced Obstacle Avoidance, 4000Pa Powerful Suction Power, Personalized Intensity Settings, Multiple Cleaning Modes, Specially Designed for Pet Hair, App & Remote & Voice Control |
| നിറം | ഇളം കറുപ്പ് |
| ഉൽപ്പന്ന അളവുകൾ | 12"L x 12"W x 2.99"H |
| ഫിൽട്ടർ തരം | Multi-layer Optimized High-Efficiency Filtration |
| ബാറ്ററി ലൈഫ് | 120 മിനിറ്റ് |
| പവർ ഉറവിടം | ബാറ്ററി പവർ |
| അനുയോജ്യമായ ഉപകരണങ്ങൾ | Amazon Echo, Google Home, Remote Control, Smartphones |
| യു.പി.സി | 762765895337 |
| ഇനത്തിൻ്റെ ഭാരം | 7.26 പൗണ്ട് |
| ബാറ്ററികൾ | 1 12V ബാറ്ററി (ഉൾപ്പെടുത്തിയിരിക്കുന്നു) |
സുരക്ഷാ വിവരങ്ങൾ
Please read all safety instructions carefully before using the ROPVACNIC S1 to prevent injury or damage.
- നനഞ്ഞ ചുറ്റുപാടുകളിലോ വെള്ളത്തിനടുത്തോ റോബോട്ട് ഉപയോഗിക്കരുത്.
- റോബോട്ടിനെ അതിന്റെ പാതയിൽ നിന്ന് അകറ്റി നിർത്താൻ സാധ്യതയുള്ള അയഞ്ഞ കേബിളുകൾ, കർട്ടനുകൾ, മറ്റ് വസ്തുക്കൾ എന്നിവ സൂക്ഷിക്കുക.
- Do not allow children or pets to operate the robot without supervision.
- Ensure the charging base is placed on a flat, stable surface.
- വലിയ അവശിഷ്ടങ്ങൾ, ദ്രാവകങ്ങൾ, അല്ലെങ്കിൽ കത്തുന്ന വസ്തുക്കൾ എന്നിവ എടുക്കാൻ റോബോട്ട് ഉപയോഗിക്കരുത്.
- Only use the original power adapter and charging base provided with the device.
- If the robot is not functioning correctly, refer to the troubleshooting section or contact customer support. Do not attempt to repair it yourself.
വാറൻ്റിയും പിന്തുണയും
For warranty information, please refer to the warranty card included in your product packaging or contact ROPVACNIC customer support. For technical assistance, troubleshooting, or spare parts, please visit the official ROPVACNIC website or contact their customer service team. Keep your purchase receipt as proof of purchase for warranty claims.
വിപുലീകൃത പരിരക്ഷയ്ക്കായി സംരക്ഷണ പദ്ധതികൾ ലഭ്യമാണ്:
- 2-വർഷ സംരക്ഷണ പദ്ധതി
- 3-വർഷ സംരക്ഷണ പദ്ധതി
- കംപ്ലീറ്റ് പ്രൊട്ടക്റ്റ് (പ്രതിമാസ പ്ലാൻ)
ഈ പ്ലാനുകൾ സ്റ്റാൻഡേർഡ് നിർമ്മാതാവിന്റെ വാറണ്ടിക്ക് പുറമേ കൂടുതൽ മനസ്സമാധാനം നൽകുന്നു.


