1. ആമുഖം
Thank you for choosing the USKEYVISION R01 Kit Vlogging System. This all-in-one kit is designed to enhance your content creation experience with its versatile features, including an auto face-tracking tripod, wireless lavalier microphones, and adjustable LED fill lights. This manual provides detailed instructions for setup, operation, maintenance, and troubleshooting to ensure you get the most out of your device.

ചിത്രം 1: ഓവർview of the USKEYVISION R01 Kit Vlogging System components.
2. ഉൽപ്പന്നം കഴിഞ്ഞുview
2.1 ബോക്സിൽ എന്താണുള്ളത്
- Auto Face Tracking Tripod R01 *1
- LED Fill Light *2
- റിമോട്ട് കൺട്രോൾ *1
- മൈക്രോഫോൺ ട്രാൻസ്മിറ്റർ *1
- മൈക്രോഫോൺ റിസീവർ *2
- USB-C ചാർജിംഗ് കേബിൾ *2
- ഉപയോക്തൃ മാനുവൽ *2
2.2 പ്രധാന സവിശേഷതകൾ
- All-in-One Vlogging Kit: Integrates a multifunctional face tracking tripod, professional microphone, and dual LED lights for comprehensive content creation.
- Auto Face Tracking Tripod (R01): Features smooth movement tracking for hands-free recording, controlled by simple gestures.
- Adjustable Fill Lights: Two LED lights with 3 adjustable brightness levels and switchable cold/warm color temperatures.
- Long Distance Remote Control: Detachable remote for framing shots and controlling recording/capture from a distance.
- Clear-Capture Wireless Microphones (2TX + 1 RX): Lavalier microphones with effective noise reduction for crisp audio, compatible with iPhone and Android devices up to 68 inches wirelessly.
3. സജ്ജീകരണ നിർദ്ദേശങ്ങൾ
3.1 ട്രൈപോഡ് കൂട്ടിച്ചേർക്കൽ
- Unfold the tripod legs from the base until they are fully extended and stable.
- Extend the telescopic pole to your desired height. Ensure all sections are securely locked.
- If using the ground spike for outdoor stability, rotate the black plastic part clockwise at the base, remove the ground spike, insert it into the ground, and rotate the plastic part counter-clockwise to secure it.

Figure 2: Steps for inserting the ground spike for enhanced stability.
3.2 Attaching the Fill Lights
- Locate the two detachable LED fill lights.
- Slide each fill light onto the designated clips on either side of the phone holder. Ensure they click securely into place.

Figure 3: Attaching the detachable fill lights to the phone holder.
3.3 വയർലെസ് മൈക്രോഫോൺ ബന്ധിപ്പിക്കുന്നു
- Plug the microphone receiver (RX) into your smartphone's charging port (USB-C or Lightning). The receiver will automatically turn on.
- Turn on the microphone transmitter (TX). It will automatically pair with the receiver. The default mode is noise reduction.
- Clip the transmitter to your clothing, ensuring it is close to your mouth for optimal audio capture.

Figure 4: Automatic pairing of the wireless microphone system.
3.4 നിങ്ങളുടെ സ്മാർട്ട്ഫോൺ മൌണ്ട് ചെയ്യുന്നു
- ഫോൺ ഹോൾഡർ പതുക്കെ വേർപെടുത്തുക.amps and insert your smartphone. Ensure it is centered and securely held. The holder supports smartphones with a width of 2.1"-2.87".
- The phone holder can be adjusted for both horizontal and vertical orientations.
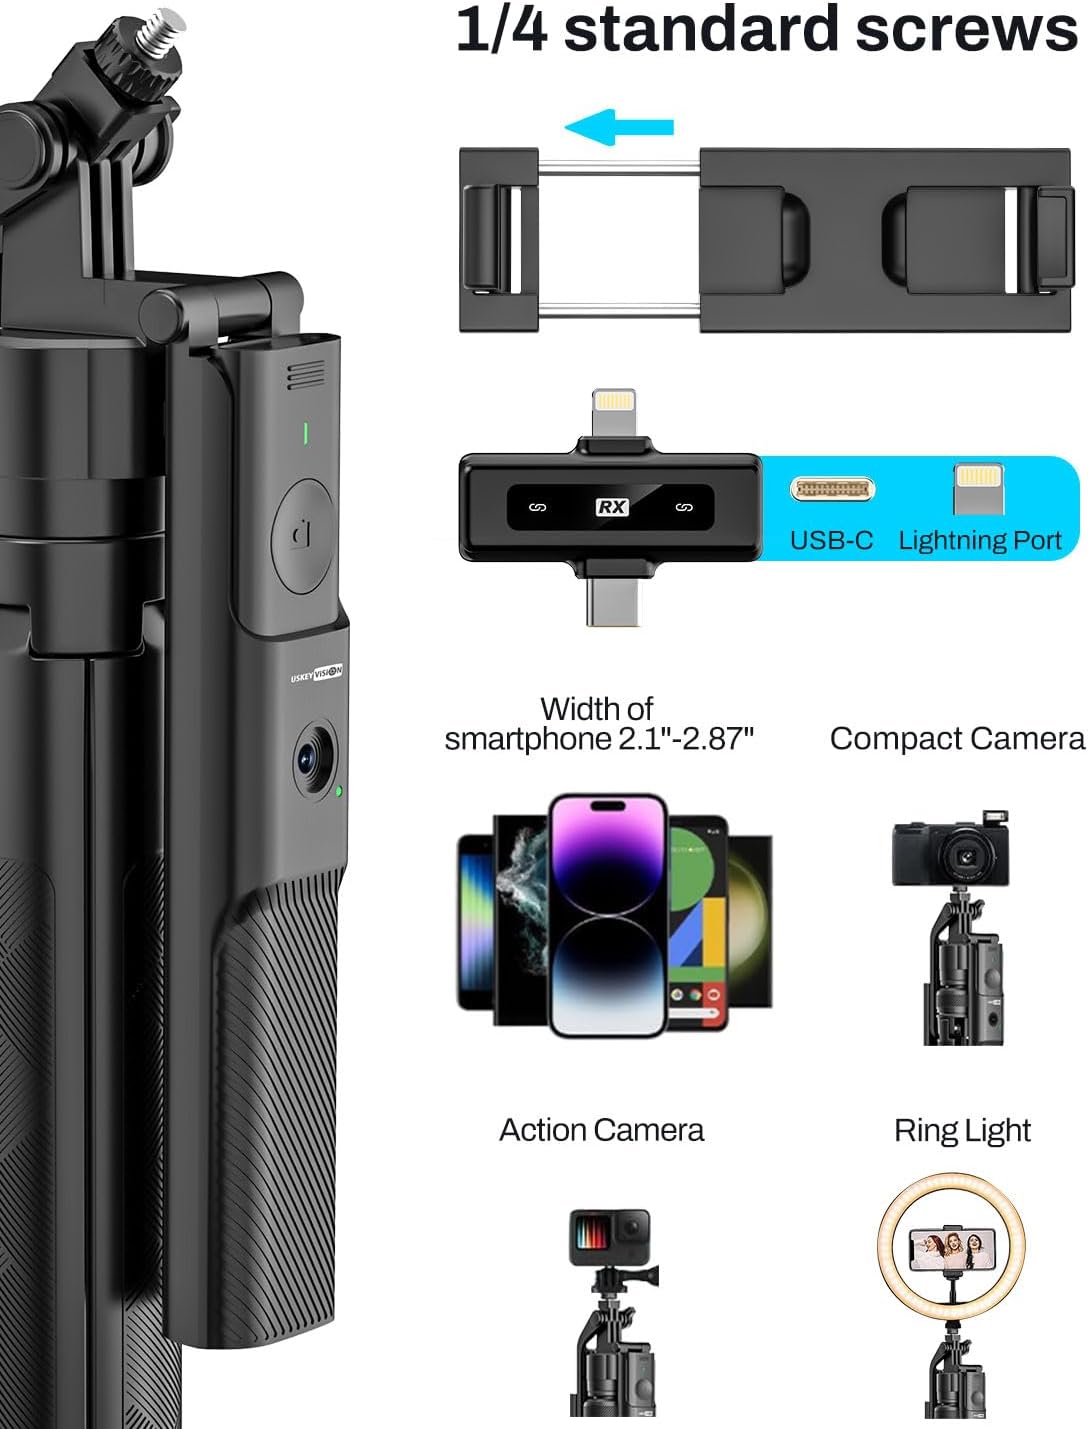
Figure 5: Wide compatibility of the phone holder and 1/4 inch screw mount.
4. പ്രവർത്തന നിർദ്ദേശങ്ങൾ
4.1 Auto Face Tracking
- Power on the face tracking tripod. The AI camera will activate.
- To start face tracking, make an "OK" gesture with your hand in front of the camera. The tripod will begin to follow your movements.
- To stop face tracking, make a "Palm" gesture with your hand in front of the camera.

Figure 6: Gesture controls for initiating and stopping face tracking.
4.2 Using the Fill Lights
- Press the power button on each LED fill light to turn it on/off.
- Single-press the button to cycle through 3 brightness levels.
- Double-press the button to switch between cold, natural, and warm color modes.

Figure 7: Adjusting brightness and color temperature of the detachable LED fill lights.
4.3 മൈക്രോഫോൺ പ്രവർത്തനം
- After pairing (as described in Section 3.3), the microphone defaults to noise reduction mode.
- Single-click the power button on the transmitter to switch to Original Sound mode.
- Double-click the power button to switch to Silent mode (mute).

Figure 8: Microphone status indicators and mode switching.
4.4 റിമോട്ട് കൺട്രോൾ ഉപയോഗം
- The remote control is detachable from the tripod handle.
- Pair the remote control with your smartphone via Bluetooth (look for 'Selfie' in your device's Bluetooth settings).
- Use the remote to trigger photo capture or start/stop video recording on your smartphone.

Figure 9: Detachable remote control for convenient operation.
4.5 ഉപയോഗ രീതികൾ
The R01 Kit supports various usage modes:
- ഡെസ്ക്ടോപ്പ് മോഡ്: Use the tripod on a flat surface for stable recording.
- ഹാൻഡ്ഹെൽഡ് മോഡ്: Collapse the tripod legs and use it as a monopod for mobile shooting.
- ഫ്ലോർ മോഡ്: Extend the tripod to its full height for standing shots.
- സെൽഫി സ്റ്റിക്ക് മോഡ്: Extend the pole and hold it for wider selfie shots.

Figure 10: Different operational modes of the USKEYVISION R01 Kit.
4.6 ഉൽപ്പന്ന പ്രദർശന വീഡിയോ
Video 1: A comprehensive demonstration of the USKEYVISION Vlogging Kit's features and functionalities, including auto face tracking, microphone usage, and various modes.
5. പരിപാലനം
- വൃത്തിയാക്കൽ: ഉപകരണം വൃത്തിയാക്കാൻ മൃദുവായതും ഉണങ്ങിയതുമായ തുണി ഉപയോഗിക്കുക. കഠിനമായ രാസവസ്തുക്കളോ ഉരച്ചിലുകളോ ഉള്ള വസ്തുക്കൾ ഉപയോഗിക്കുന്നത് ഒഴിവാക്കുക.
- സംഭരണം: Store the kit in a cool, dry place away from direct sunlight and extreme temperatures. Ensure all components are folded and packed securely.
- ബാറ്ററി കെയർ: Charge the internal batteries regularly, even if not in use, to maintain battery health. Use only the provided USB-C charging cables.
6. പ്രശ്നപരിഹാരം
| പ്രശ്നം | സാധ്യമായ കാരണം | പരിഹാരം |
|---|---|---|
| Fill light falls off easily. | Loose connection or worn clips. | Ensure the light is firmly clicked into place. If the issue persists, contact customer support. |
| Face tracking is slow or unresponsive. | Insufficient lighting, rapid movement, or obstruction. | Ensure adequate lighting. Perform gestures clearly and at a moderate pace. Avoid sudden, jerky movements. |
| Microphone not connecting or poor audio quality. | Improper connection, low battery, or interference. | Ensure receiver is fully inserted into smartphone. Check battery levels of transmitter and receiver. Move away from sources of strong electromagnetic interference. |
| Smartphone not stable in holder. | Incorrect phone placement or phone case interference. | Ensure phone is centered and securely gripped by both clamps. Remove bulky phone cases if necessary. |
7 സ്പെസിഫിക്കേഷനുകൾ
| ഫീച്ചർ | വിശദാംശങ്ങൾ |
|---|---|
| പാക്കേജ് അളവുകൾ | 14.02 x 4.8 x 3.11 ഇഞ്ച് |
| ഇനത്തിൻ്റെ ഭാരം | 2.16 പൗണ്ട് (0.98 കിലോഗ്രാം) |
| മോഡൽ നമ്പർ | R01 Kit |
| ബാറ്ററികൾ | 1 ലിഥിയം അയോൺ ബാറ്ററി ആവശ്യമാണ് (ഉൾപ്പെടുത്തിയിരിക്കുന്നു) |
| നിർമ്മാതാവ് | USKEYVISION |
| സ്മാർട്ട്ഫോൺ അനുയോജ്യത | Width 2.1"-2.87" (65mm-919mm) |
| മൈക്രോഫോൺ വയർലെസ് ശ്രേണി | 68 ഇഞ്ച് വരെ |
8. വാറൻ്റിയും പിന്തുണയും
For warranty information and customer support, please refer to the warranty card included in your product packaging or visit the official USKEYVISION webസൈറ്റ്. വാറൻ്റി ക്ലെയിമുകൾക്കായി നിങ്ങളുടെ വാങ്ങൽ രസീത് സൂക്ഷിക്കുക.


