1. ആമുഖം
This manual provides essential information for the safe installation, operation, and maintenance of your PowMr Hybrid Solar Inverter 12000W. Please read this manual thoroughly before installation and operation to ensure optimal performance and safety. Keep this manual for future reference.
2 സുരക്ഷാ വിവരങ്ങൾ
WARNING: This inverter generates high voltage. Installation and maintenance must be performed by qualified personnel only. Failure to follow these instructions may result in serious injury or death.
- Do not attempt to disassemble or repair the inverter yourself. Contact qualified service personnel.
- Ensure all wiring is correctly sized and installed according to local and national electrical codes.
- Disconnect all power sources (PV, battery, AC input) before performing any maintenance or wiring.
- Install the inverter in a well-ventilated, dry, and cool environment, away from flammable materials.
- ഇൻവെർട്ടറിൻ്റെ ശരിയായ ഗ്രൗണ്ടിംഗ് ഉറപ്പാക്കുക.
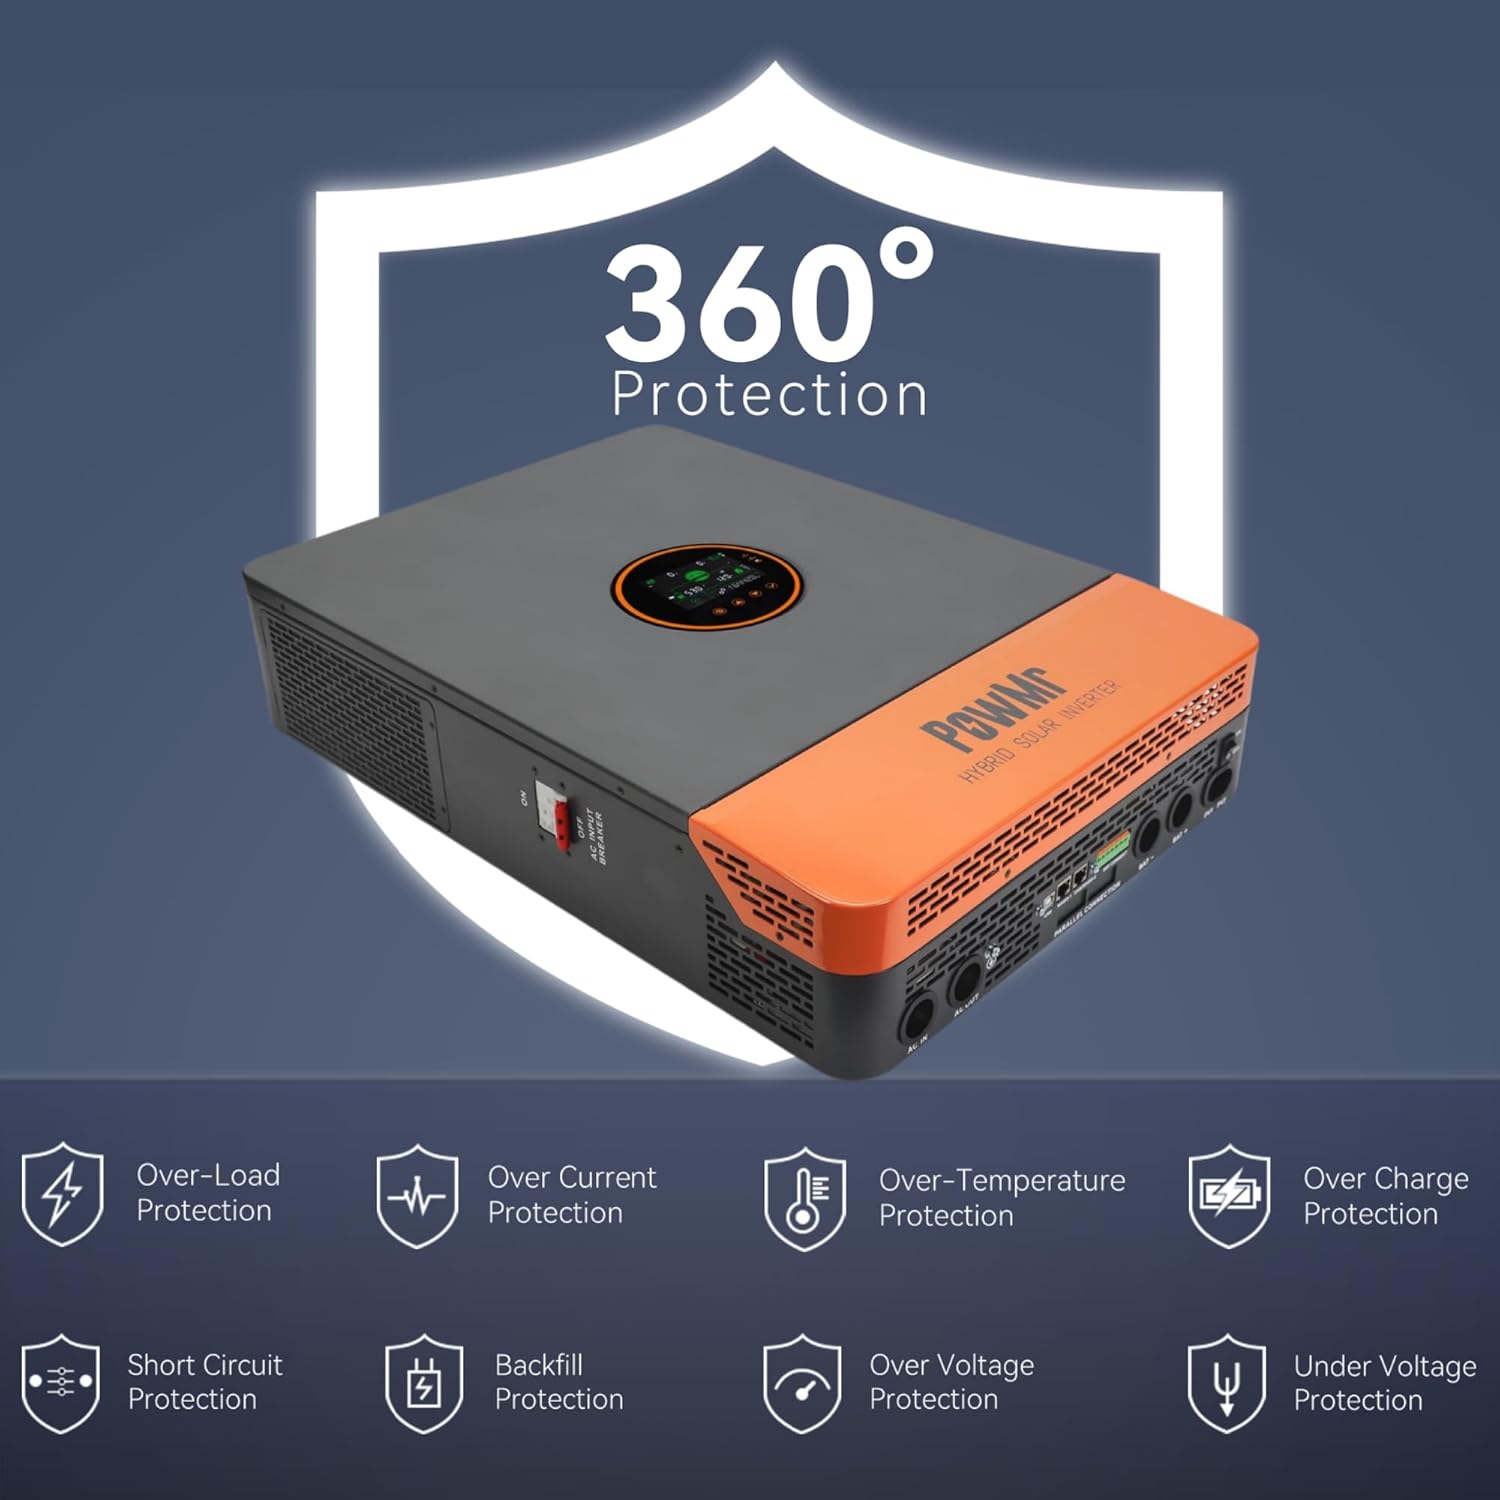
Figure 2.1: The inverter features comprehensive protection against over/under voltage, overload, short circuit, over-temperature, and anti-backfeed.
3. ഉൽപ്പന്നം കഴിഞ്ഞുview
3.1 പ്രധാന സവിശേഷതകൾ
- ഔട്ട്പുട്ട്: 12000W continuous (24000W peak), 120/240Vac split-phase output.
- പിവി ഇൻപുട്ട്: Maximum 6600W PV input power, 500V DC maximum, 22A. PV starting voltage: ≥150V.
- MPPT Charger: Dual 100A MPPT chargers, max 200A charge current.
- ബാറ്ററി അനുയോജ്യത: Supports 48V Li-ion, Lead-Acid, and user-defined battery types.
- Battery-Less Mode: Capable of powering loads directly from PV/AC without a battery connected.
- സമാന്തര പ്രവർത്തനം: Supports up to 6 units in parallel for increased power output.
- നിരീക്ഷണം: Large LCD display, dynamic flow diagrams, and optional WiFi for remote monitoring via mobile app.
- ആശയവിനിമയ തുറമുഖങ്ങൾ: RS485, CAN, USB interfaces for integration with battery BMS, generator ATS, and smart home systems.

ചിത്രം 3.1: ഓവർview of the 12KW Split-Phase Hybrid Solar Inverter's main features and capabilities.
3.2 Product Appearance and Components
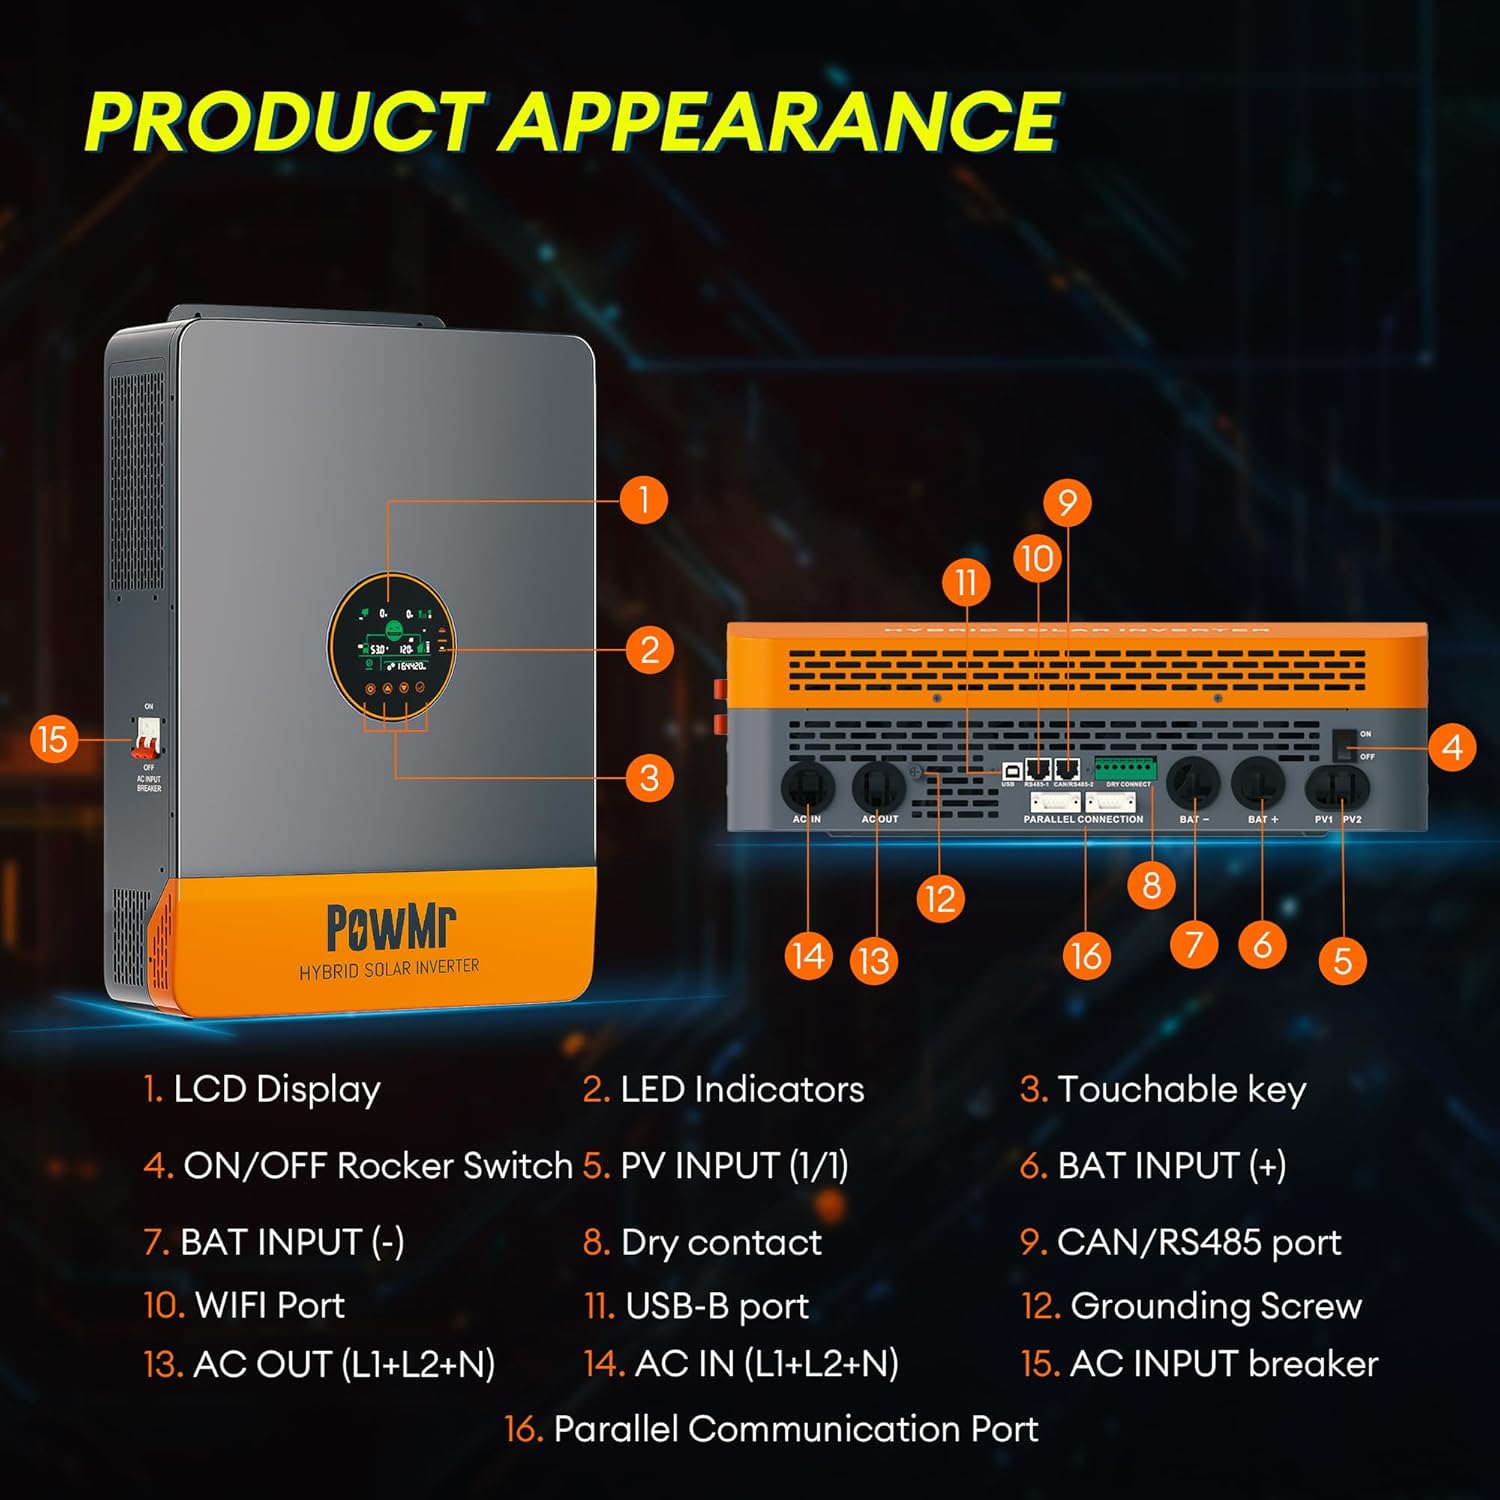
ചിത്രം 3.2: മുൻവശവും വശവും view of the inverter with labeled components.
- എൽസിഡി ഡിസ്പ്ലേ
- LED സൂചകങ്ങൾ
- Touchable Key
- റോക്കർ സ്വിച്ച് ഓൺ/ഓഫ്
- പിവി ഇൻപുട്ട് (1/1)
- ബാറ്റ് ഇൻപുട്ട് (+)
- ബാറ്റ് ഇൻപുട്ട് (-)
- ഡ്രൈ കോൺടാക്റ്റ്
- CAN/RS485 പോർട്ട്
- വൈഫൈ പോർട്ട്
- USB-B പോർട്ട്
- ഗ്ര round ണ്ടിംഗ് സ്ക്രീൻ
- AC OUT (L1+L2+N)
- AC IN (L1+L2+N)
- AC INPUT Breaker
- സമാന്തര കമ്മ്യൂണിക്കേഷൻ പോർട്ട്
4. സജ്ജീകരണവും ഇൻസ്റ്റാളേഷനും
4.1 അൺപാക്കിംഗും പരിശോധനയും
Upon receiving the inverter, carefully unpack it and inspect for any shipping damage. Ensure all components listed in the package contents are present:
- Solar inverter unit
- സമാന്തര ആശയവിനിമയ കേബിൾ
- 2 × battery terminal lugs
- 2 × M5 സ്ക്രൂകൾ
- ഉപയോക്തൃ മാനുവൽ
Note: WiFi module, batteries, adapters, solar/battery wires/cables are excluded and require additional purchase if needed.
4.2 ഇൻവെർട്ടർ ഘടിപ്പിക്കുന്നു
The inverter is designed for indoor (IP20) installation. Choose a mounting location that is:
- Vertical, on a solid surface capable of supporting the inverter's weight (approximately 27kg / 59.5lbs).
- ചൂട് പുറത്തുവിടാൻ അനുവദിക്കുന്നതിന് നന്നായി വായുസഞ്ചാരമുള്ളത്.
- Protected from direct sunlight, moisture, and dust.
- വയറിങ്ങിനും അറ്റകുറ്റപ്പണികൾക്കും ആക്സസ് ചെയ്യാവുന്നതാണ്.
4.3 വയറിംഗ് കണക്ഷനുകൾ
All wiring must comply with local electrical codes. Use appropriate wire gauges for all connections.
- ഗ്രൗണ്ടിംഗ്: Connect the grounding screw (12) to a reliable earth ground.
- ബാറ്ററി കണക്ഷൻ: Connect the 48V battery bank to the BAT INPUT (+) (6) and BAT INPUT (-) (7) terminals. Ensure correct polarity.
- പിവി ഇൻപുട്ട്: Connect the solar panel array to the PV INPUT (1/1) (5) terminals. Observe correct polarity and ensure PV voltage is within specified limits (Max 500V DC, starting voltage ≥150V). Use 10AWG PV wire.
- എസി ഇൻപുട്ട്: Connect the utility grid or generator AC input to the AC IN (L1+L2+N) (14) terminals.
- എസി putട്ട്പുട്ട്: Connect your loads to the AC OUT (L1+L2+N) (13) terminals. The inverter provides 120/240Vac split-phase output.
- Parallel Communication (Optional): If installing multiple inverters in parallel, connect the Parallel Communication Port (16) between units using the provided cable.
- മറ്റ് കണക്ഷനുകൾ: Utilize RS485, CAN, USB, and dry contact ports (8, 9, 10, 11) for external communication and control as needed.

ചിത്രം 4.1: ഉദാample of multiple inverters connected in parallel. Professional guidance is required for actual connections.
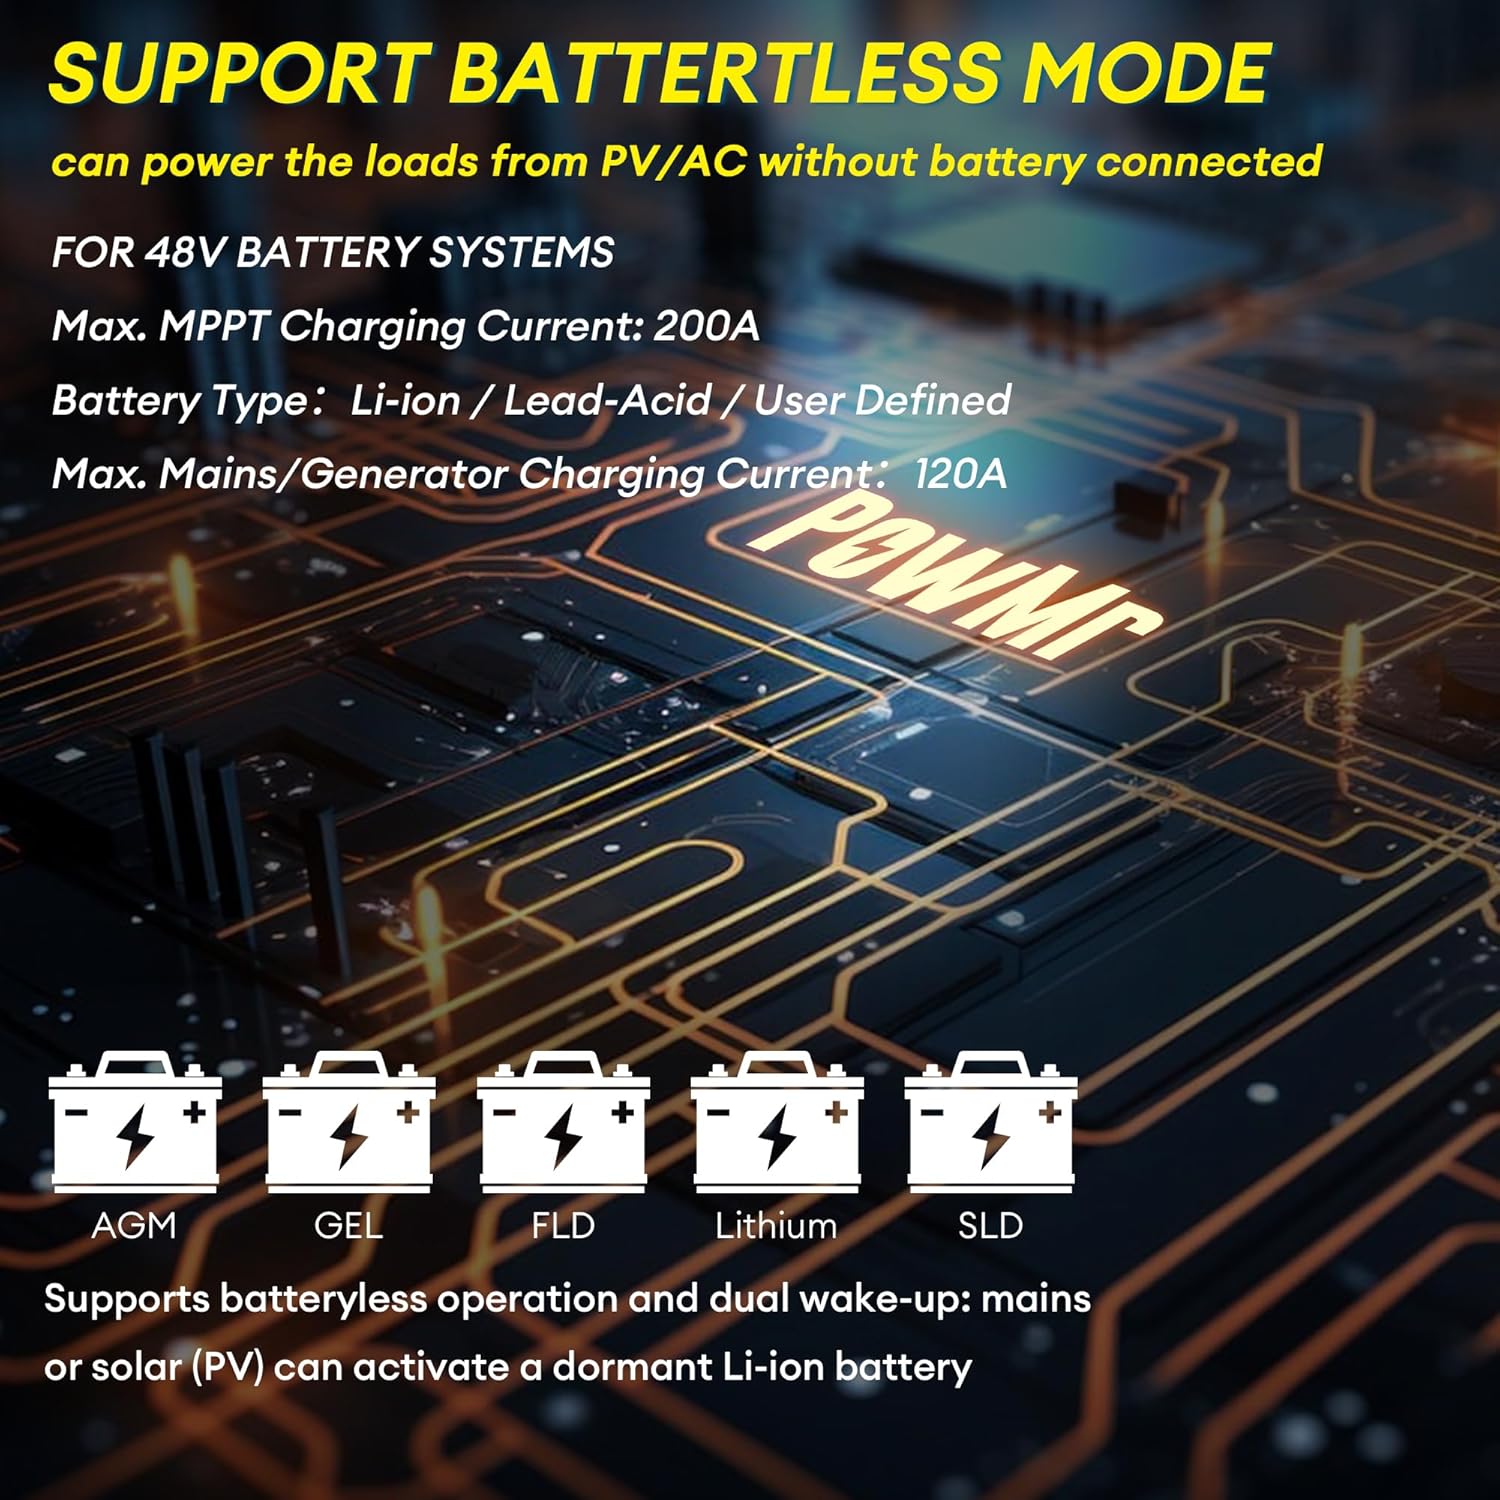
Figure 4.2: The inverter supports various 48V battery systems, including battery-less operation.
5. പ്രവർത്തന നിർദ്ദേശങ്ങൾ
5.1 പവർ ഓൺ/ഓഫ്
- എല്ലാ വയറിംഗ് കണക്ഷനുകളും സുരക്ഷിതവും കൃത്യവുമാണെന്ന് ഉറപ്പാക്കുക.
- Switch on the battery breaker, then the PV breaker.
- Flip the ON/OFF Rocker Switch (4) to the 'ON' position.
- Switch on the AC INPUT Breaker (15).
- To power off, reverse the sequence: AC INPUT Breaker off, ON/OFF Rocker Switch off, PV breaker off, battery breaker off.
5.2 എൽസിഡി ഡിസ്പ്ലേയും ക്രമീകരണങ്ങളും
The large LCD display (1) provides real-time energy visualization and system status. Use the touchable keys (3) to navigate menus and adjust settings. Refer to the detailed settings section in the full user manual for specific parameter configurations, including:
- Battery charging parameters (voltagഇ, നിലവിലെ)
- Putട്ട്പുട്ട് വോളിയംtagഇയും ആവൃത്തിയും
- Operating modes (e.g., Solar First, Utility First, Battery First)
- Time-of-Use (TOU) control for smart charging/discharging
5.3 Battery-Less Mode
The inverter supports battery-less operation, allowing it to power loads directly from solar PV and/or AC input without a connected battery. This mode is useful for specific applications or during battery maintenance. Ensure proper configuration through the LCD settings.
6. പരിപാലനം
പതിവ് അറ്റകുറ്റപ്പണികൾ നിങ്ങളുടെ ഇൻവെർട്ടറിന്റെ ദീർഘായുസ്സും മികച്ച പ്രകടനവും ഉറപ്പാക്കുന്നു.
- വൃത്തിയാക്കൽ: Periodically clean the inverter's exterior and ventilation openings to prevent dust buildup, which can impede cooling. Use a dry, soft cloth.
- കണക്ഷനുകൾ: Annually inspect all electrical connections for tightness and signs of corrosion. Re-tighten if necessary.
- പരിസ്ഥിതി: ഇൻസ്റ്റലേഷൻ പരിസ്ഥിതി നിശ്ചിത താപനിലയിലും ഈർപ്പത്തിലും ഉള്ളിലാണെന്ന് ഉറപ്പാക്കുക.
- ഫേംവെയർ: നിർമ്മാതാവ് പരിശോധിക്കുക website for any available firmware updates. Firmware updates can improve performance and address known issues.
WARNING: Always disconnect all power sources before performing any cleaning or inspection.
7. പ്രശ്നപരിഹാരം
ഈ വിഭാഗം പൊതുവായ പ്രശ്നങ്ങൾക്കുള്ള പരിഹാരങ്ങൾ നൽകുന്നു. ഇവിടെ പട്ടികപ്പെടുത്തിയിട്ടില്ലാത്ത പ്രശ്നങ്ങൾക്ക്, ഉപഭോക്തൃ പിന്തുണയുമായി ബന്ധപ്പെടുക.
| പ്രശ്നം | സാധ്യമായ കാരണം | പരിഹാരം |
|---|---|---|
| ഇൻവെർട്ടർ ഓണാകുന്നില്ല | ബാറ്ററി കണക്ഷൻ ഇല്ല അല്ലെങ്കിൽ ബാറ്ററി വോളിയം കുറവാണ്tage; DC breaker off; ON/OFF switch off. | ബാറ്ററി കണക്ഷനുകളും വോളിയവും പരിശോധിക്കുകtage; ensure DC breaker is on; turn ON/OFF switch to 'ON'. |
| എസി ഔട്ട്പുട്ട് ഇല്ല | Overload; short circuit; AC output breaker tripped; inverter fault. | Reduce load; check for short circuits; reset AC output breaker; check LCD for error codes. |
| PV input not charging batteries | പി.വിtage too low or too high; PV polarity reversed; PV breaker off; MPPT fault. | PV വോളിയം പരിശോധിക്കുകtage and polarity; ensure PV breaker is on; check LCD for PV error codes. |
| Unstable output in parallel mode | Incorrect parallel communication wiring; mismatched firmware versions; incompatible settings. | Ensure only one parallel communication cable is used between units. Verify all inverters have the same, latest firmware version. Check parallel settings on each inverter. Contact support if issues persist. |
| Inverter displays error code | Internal fault; external condition (e.g., over-temperature, over-voltagഒപ്പം). | Refer to the full manual's error code section for specific meanings and solutions. Address environmental conditions if applicable. |
8 സ്പെസിഫിക്കേഷനുകൾ
| പരാമീറ്റർ | മൂല്യം |
|---|---|
| മോഡലിൻ്റെ പേര് | BI-POW-SunSmart 12KP |
| റേറ്റുചെയ്ത put ട്ട്പുട്ട് പവർ | 12000W (12KW) |
| പീക്ക് പവർ | 24000W |
| റേറ്റുചെയ്ത putട്ട്പുട്ട് വോളിയംtage | 120/240Vac (Split-Phase/Single-Phase) |
| ബാറ്ററി വോളിയംtage | 48V |
| പരമാവധി പിവി ഇൻപുട്ട് പവർ | 6600W |
| പരമാവധി പിവി ഇൻപുട്ട് വോളിയംtage | 500V DC |
| പരമാവധി പിവി ഇൻപുട്ട് കറന്റ് | 22എ |
| പിവി സ്റ്റാർട്ടിംഗ് വോളിയംtage | ≥150V |
| MPPT ചാർജ് കറന്റ് | Dual 100A (Max 200A total) |
| പരമാവധി മെയിൻ/ജനറേറ്റർ ചാർജിംഗ് കറന്റ് | 120എ |
| ആശയവിനിമയ തുറമുഖങ്ങൾ | RS485, CAN, USB |
| അളവുകൾ (L×W×H) | 24.41 × 17.52 × 5.12 ഇഞ്ച് (62 × 44.5 × 13 സെ.മീ) |
| ഭാരം | 59.5 പൗണ്ട് (27 കി.ഗ്രാം) |
| സംരക്ഷണ റേറ്റിംഗ് | IP20 (ഇൻഡോർ ഉപയോഗം) |
9. വാറൻ്റിയും പിന്തുണയും
For warranty information, please refer to the documentation provided with your purchase or contact PowMr customer service. For technical support, troubleshooting assistance, or inquiries regarding parts and service, please visit the official PowMr webസൈറ്റ് ചെയ്യുക അല്ലെങ്കിൽ അവരുടെ ഉപഭോക്തൃ പിന്തുണ ചാനലുകളുമായി ബന്ധപ്പെടുക.
ഓൺലൈൻ ഉറവിടങ്ങൾ:
- PowMr Store on Amazon: Visit PowMr Store


