ആമുഖം
Thank you for choosing the VINGLI 5x5 Pop Up Canopy Tent with Sidewalls. This manual provides essential information for the safe and efficient setup, operation, and maintenance of your canopy tent. Please read these instructions carefully before assembly and retain them for future reference.

Image: The VINGLI 5x5 Pop Up Canopy Tent providing shade on a balcony, demonstrating its use for various outdoor activities.
സുരക്ഷാ വിവരങ്ങൾ
- Do not leave the canopy outside in storm conditions, strong winds, or heavy rain. Severe weather can cause damage to the tent and potential injury.
- Ensure the canopy is properly anchored to the ground using ropes and stakes, especially in windy conditions.
- എല്ലാ തീജ്വാലയും താപ സ്രോതസ്സുകളും മേലാപ്പ് തുണിയിൽ നിന്ന് അകറ്റി നിർത്തുക. തുണി തീപിടിക്കാത്തതല്ല.
- Always supervise children around the canopy.
- Inspect all components for damage before each use. Do not use if any parts are broken or missing.
പാക്കേജ് ഉള്ളടക്കം
അസംബ്ലി ആരംഭിക്കുന്നതിന് മുമ്പ് എല്ലാ ഘടകങ്ങളും ഉണ്ടെന്ന് ഉറപ്പാക്കുക:
- Pop-up frame (pre-assembled)
- Canopy top fabric
- Sidewalls (quantity may vary based on model)
- ക്യാരി ബാഗ്
- Stakes and ropes (for anchoring)
സജ്ജീകരണ നിർദ്ദേശങ്ങൾ
The VINGLI Pop Up Canopy Tent is designed for quick and easy assembly, typically requiring one or two people.
Step 1: Unpack and Expand Frame
Remove the fully assembled frame with the top fabric from the carry bag. Place the frame in the desired setup location. With a partner, gently pull the frame outwards from opposing corners to begin expanding it.

Image: Close-up details of the canopy's structural components, highlighting the iron frame, reinforced joints, and height adjusters.
Step 2: Attach Canopy Top (if not pre-attached)
If the canopy top is not already on the frame, drape it over the top of the partially expanded frame. Ensure the corners of the fabric align with the frame's corners. Secure the canopy top to the frame using the widened Velcro straps located on the underside of the fabric.
ഘട്ടം 3: ഫ്രെയിം പൂർണ്ണമായും നീട്ടുക
Continue pulling the frame outwards until it is fully expanded and the top locks into place. You may need to push up on the center hub of the canopy from underneath to fully extend the frame.
ഘട്ടം 4: ഉയരം ക്രമീകരിക്കുക
Each leg of the canopy has 3 height adjustment positions. Press the thumb button on each leg and extend the inner leg to the desired height. Ensure all four legs are set to the same height for stability.
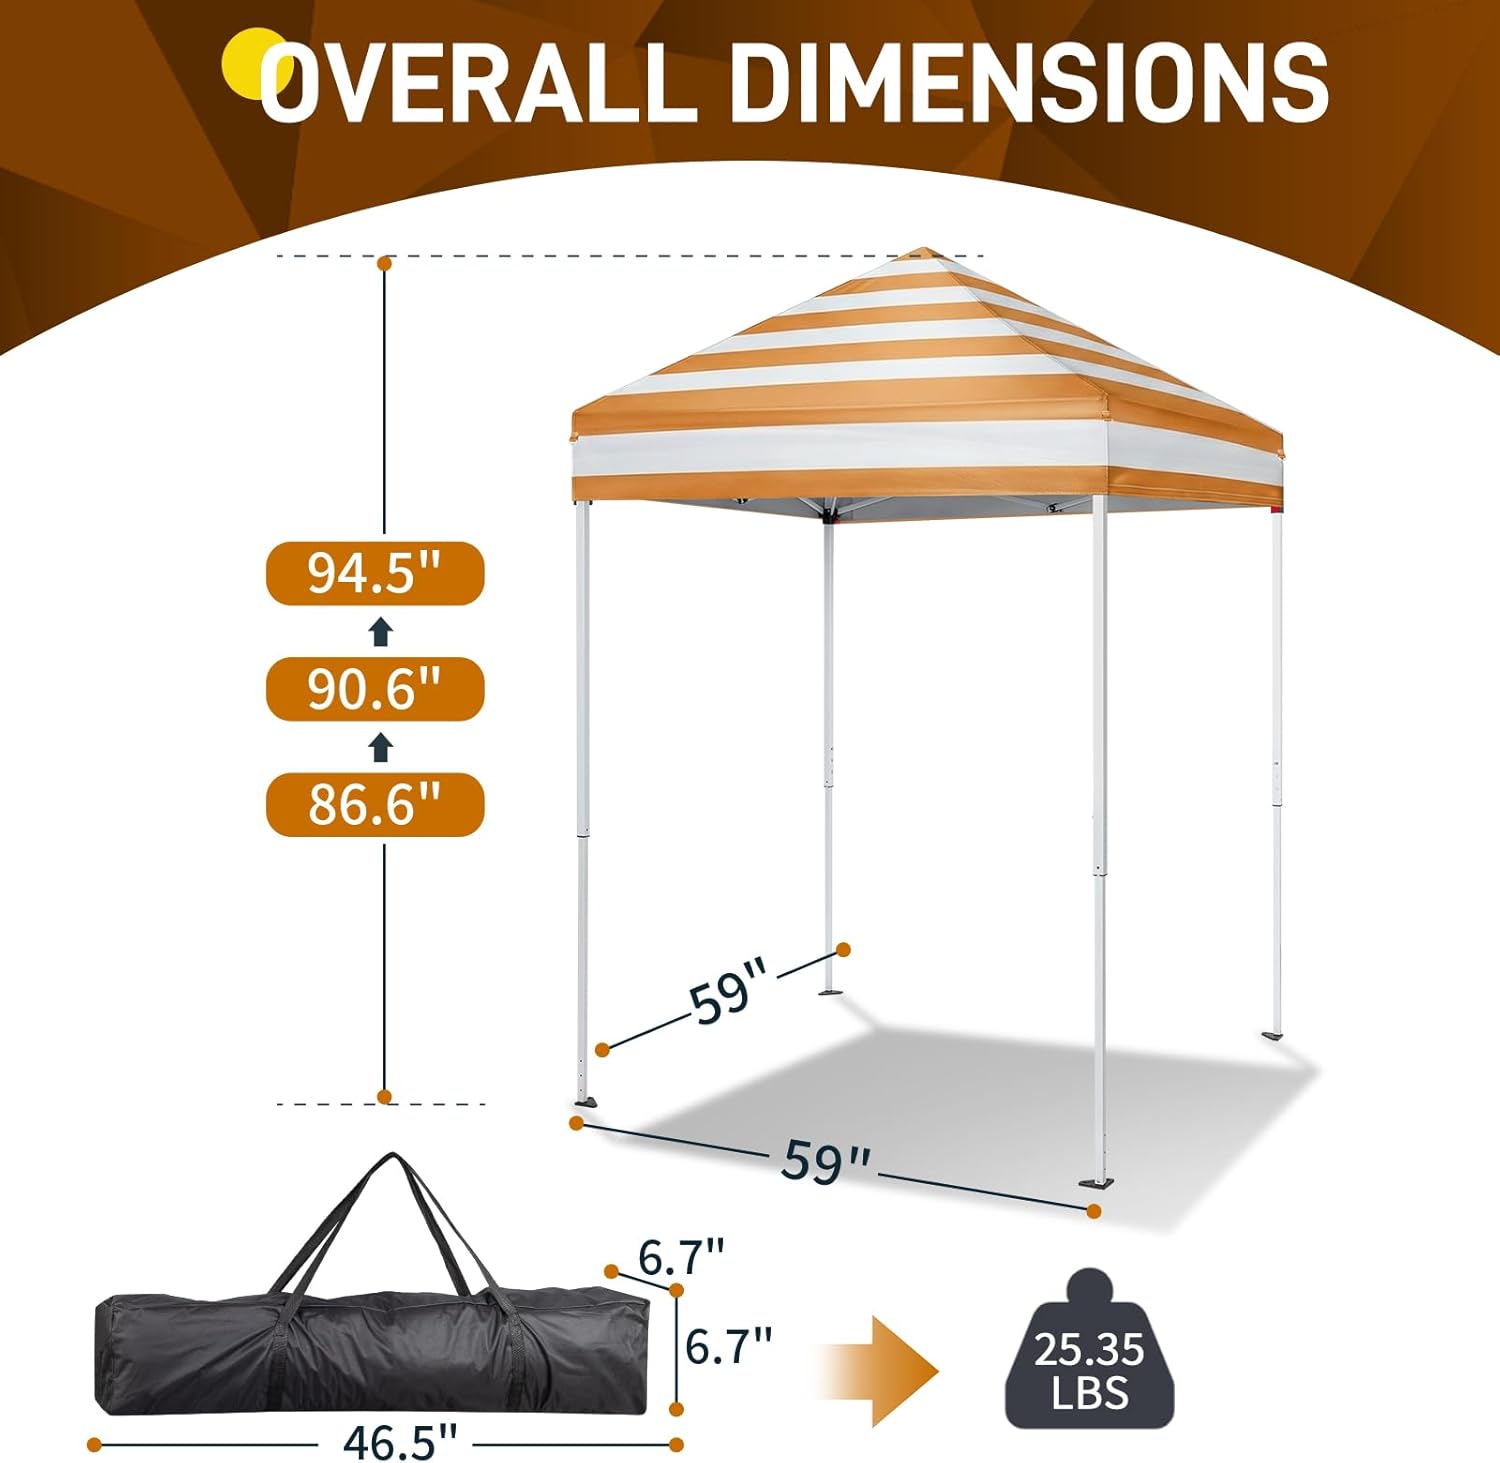
Image: Overall dimensions of the canopy, illustrating the adjustable height settings and compact storage size.
Step 5: Attach Sidewalls (Optional)
If using sidewalls, attach them to the canopy frame using the integrated Velcro fasteners. Ensure they are securely fastened to provide full enclosure.
ഘട്ടം 6: മേലാപ്പ് നങ്കൂരമിടുക
For maximum stability and safety, especially in outdoor conditions, use the provided ropes and stakes to anchor the canopy legs to the ground. Attach ropes to the canopy corners and secure them with stakes.

Image: Features of the canopy fabric, including windproof rope attachment points, opaque coating for UV protection, and waterproof material.
പ്രവർത്തന നിർദ്ദേശങ്ങൾ
ഉയരം ക്രമീകരിക്കുന്നു
To adjust the height, press the thumb button on each leg and slide the inner leg up or down to one of the three available positions. Ensure all legs are adjusted evenly.
Using Sidewalls
The sidewalls provide additional shelter and privacy. They can be rolled up and secured when not needed, or fully deployed for protection from sun, wind, or light rain. Some sidewalls may feature mesh pockets for storage or specific uses.

ചിത്രം: ഉദാamples of how the integrated mesh bags can be utilized for convenience, such as for a portable toilet or as a changing room.
എഴുതിയെടുക്കുക
To take down the canopy, reverse the setup steps: remove sidewalls, retract legs by pressing the thumb buttons, unlock the frame, and gently push the frame inwards until it collapses. Fold the canopy top and frame neatly into the carry bag.
മെയിൻ്റനൻസ്
- വൃത്തിയാക്കൽ: Clean the canopy fabric with mild soap and water. Do not use harsh chemicals or abrasive cleaners. Allow the fabric to air dry completely before storage to prevent mildew.
- ഫ്രെയിം കെയർ: പരസ്യം ഉപയോഗിച്ച് മെറ്റൽ ഫ്രെയിം തുടയ്ക്കുകamp cloth to remove dirt and debris. Ensure all moving parts are free of obstructions.
- സംഭരണം: Store the canopy tent in its carry bag in a cool, dry place, away from direct sunlight and extreme temperatures.
- പരിശോധന: Regularly inspect the frame, fabric, and connectors for any signs of wear, tear, or damage. Address any issues promptly to ensure continued safe use.
ട്രബിൾഷൂട്ടിംഗ്
| പ്രശ്നം | സാധ്യമായ കാരണം | പരിഹാരം |
|---|---|---|
| മേലാപ്പ് തുറക്കാനും അടയ്ക്കാനും പ്രയാസം | ഫ്രെയിം സന്ധികൾ കട്ടിയുള്ളതോ തെറ്റായി ക്രമീകരിച്ചതോ ആണ്. | Ensure frame is on a flat surface. Gently wiggle joints to loosen. Apply silicone spray to moving parts if necessary. |
| മേലാപ്പിന് മുകളിൽ വെള്ളം കെട്ടിക്കിടക്കുന്നു | Canopy not fully extended or legs unevenly adjusted. | Ensure the frame is fully locked and all legs are set to the same height. The pointed profile should prevent pooling. |
| Canopy unstable in wind | Not properly anchored or insufficient anchoring. | Always use provided stakes and ropes. Consider additional weight bags for legs in windy conditions. Do not use in strong winds. |
| Fabric tear or hole | Sharp objects, excessive tension, or material fatigue. | Patch small tears with a repair kit. For large tears, replacement of the canopy top may be necessary. |
സ്പെസിഫിക്കേഷനുകൾ
| ബ്രാൻഡ് | വിംഗ്ലി |
| മോഡൽ നമ്പർ | canopywithwall |
| വലിപ്പം | 5x5 |
| ഉൽപ്പന്ന അളവുകൾ (വികസിപ്പിച്ചത്) | 59"L x 59"W x 86.6"-94.5"H |
| Adjustable Peak Height | 86.6" - 94.5" |
| നിറം | Orange&White Stripes |
| ഫ്രെയിം മെറ്റീരിയൽ | Metal (Iron frame) |
| ഫാബ്രിക് മെറ്റീരിയൽ | Waterproof, UV Coated (50+ UV sun protection) |
| ഇനത്തിൻ്റെ ഭാരം | 21.99 Pounds (approx. 22 lbs) |
| അസംബ്ലി ആവശ്യമാണ് | അതെ |
| ശുപാർശ ചെയ്യുന്ന ഉപയോഗങ്ങൾ | Camping, Outdoor Activities, Party, Market Stall, Kids' Sporting Events |
വാറൻ്റി വിവരങ്ങൾ
Specific warranty details are not provided in the product information. Please refer to the retailer's return policy or contact VINGLI customer support for warranty inquiries.
പിന്തുണ
For further assistance, missing parts, or technical support, please contact VINGLI customer service through the retailer where the product was purchased or visit the official VINGLI webസൈറ്റ്.
ഓൺലൈൻ പിന്തുണ: Visit the VINGLI Store on Amazon


