BOTORRO RSPRO Rowing Machine

ഭാഗങ്ങളുടെ പട്ടിക
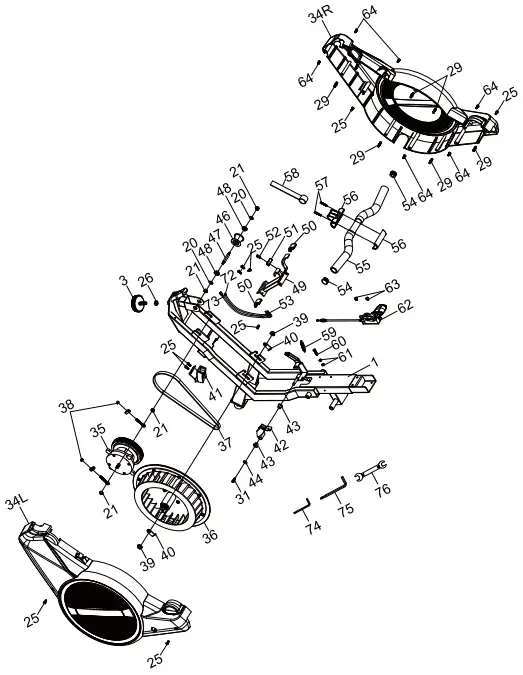

| ഇല്ല. 1 | NAME
പ്രധാന ഫ്രെയിം |
സ്പെക്ക്. |
1 |
| 2 | ഫ്രണ്ട് സ്റ്റെബിലൈസർ | 1 | |
| 3 | കുഷ്യൻ പാഡ് | 5 | |
| 4 | Decorative Cover L/R | 1/1 | |
| 5
6 7 8 9 10 |
Monitor Mounting Tube മോണിറ്റർ
Monitor Fixing Plate Tablet Holder Pedal L/R സ്ലൈഡ് റെയിൽ |
1
1 1 1 1/1 1 |
|
| 11 | പിൻ സ്റ്റെബിലൈസർ | 1 | |
| 12 | Tube PIUQ | 1 | |
| 13 | ഫിക്സിംഗ് പ്ലേറ്റ് | 1 | |
| 14
15 16 17 18 19 |
ഇരിപ്പിടം
Roller Mounting Frame Decorative Cover Fixing Plate Transportation Wheel വൃത്താകൃതി Head Hexagon Socket Screw |
M8 ″ 40 |
1
1 1 1 2 2 |
| 20 | ഫ്ലാറ്റ് ക്ലീനർ | 27 | |
| 21 | നൈലോൺ നട്ട് | M8 | 10 |
| 22 | Round Head Hexagon Socket Screw | M8*16 | 17 |
| 23
24 25 26 27 |
ആർക്ക് വാഷർ
ട്യൂബ് പ്ലഗ് Flat Head Philips Self-tapping Screw Nut Round Head Hexagon Socket Screw |
 8•20·1.s 8•20·1.s
ST5″16 M10 M6 ″ 15 |
2
4 15 5 1 |
| 28 | ഫ്ലാറ്റ് ക്ലീനർ | 6 ″ 17 ″ 1.5 |
1 |
| 29 | ട്യൂബ് പ്ലഗ് | 7 | |
| 30 | ബുഷിംഗ് | 2 | |
| 31 | ഫ്ലാറ്റ് ഹെഡ് സ്ക്രൂ | M5 ″ 15 | 5 |
| 32
33
36 |
വൃത്താകൃതി തല ഷഡ്ഭുജം സോക്കറ്റ് സ്ക്രൂ Round Head Hexagon Socket Screw ഇടത് കവർ
Coil Spring Box ഫ്ലൈ വീൽ |
M8″70 M12″140 | 1
4 1/1 1 1 |
| ട്രാൻസ്മിഷൻ ബെൽറ്റ് | 1 | ||
| 38 | ഫാസ്റ്റനർ | 2 |
| ഇല്ല. | NAME | സ്പെക്ക്. | QTY. |
| 39 | ഫ്ലേഞ്ച് നട്ട് | ||
| 40 | ഫിക്സിംഗ് പ്ലേറ്റ് | ||
| 41 | ഫിക്സിംഗ് ബ്രാക്കറ്റ് | 5 | |
| 42 | ഫിക്സിംഗ് ബ്രാക്കറ്റ് | 1/1 | |
| 43 | ബുഷിംഗ് | ||
| 44 | ഫ്ലാറ്റ് ക്ലീനർ | ||
| 45 | ഡാറ്റ വയർ | ||
| 46 | Ribbon Pulley | ||
| 47 | പുള്ളി ഷാഫ്റ്റ് | 1/1 | |
| 48 | സ്ലീവ് | ||
| 49 | ബ്രാക്കറ്റ് കൈകാര്യം ചെയ്യുക | ||
| 50 | ഫിക്സിംഗ് പ്ലേറ്റ് | ||
| 51 | അലങ്കാര കവർ | ||
| 52 | ഫ്ലാറ്റ് ഹെഡ് ഫിലിപ്സ് സ്ക്രൂ | ||
| 53 | സെൻസർ ബ്രാക്കറ്റ് | ||
| 54 | ട്യൂബ് പ്ലഗ് | ||
| 55 | കൈകാര്യം ചെയ്യുക | 1 | |
| 56 | അലങ്കാര കവർ | 2 | |
| 57 | റൗണ്ട് ഹെഡ് സ്വയം-ടാപ്പിംഗ് സ്ക്രൂ | Ma*40 | 2 |
| 58 | റിബൺ | *17*1.5 |
27 |
| 59 | ടെൻഷൻ സ്പ്രിംഗ് | M8 | 10 |
| 60 | Externa l Hexagon Screw | Ma*15 | 17 |
| 61 | നട്ട് | *20·1 .5 |
2 |
| 62 | Resistance Lever | 4 | |
| 63 | Countersunk Philips Screw | ST5 • 15 | 15 |
| 64 | Round Head Philips Self-tapping Screw | M10 | 5 |
| 65 | External Hexagon Partially Threaded Screw | M6*15 | |
| 66 | ലൈനർ | q,6•1r1.5 | |
| 67 | ബെയറിംഗ് | 7 | |
| 68 | ലൈനർ | 2 | |
| 69 | Upper Seat Roller | M5*15 | 5 |
| 70 | ലോവർ സീറ്റ് റോളർ | M8.70 | |
| 71 | ഷഡ്ഭുജ സോക്കറ്റ് സ്ക്രൂ | M12*140 | 4 |
| 72 | സെൻസർ വയർ എ | 1/1 | |
| 73 | സെൻസർ വയർ ബി | ||
| 74 | അല്ലൻ റെഞ്ച് | ||
| 75 | അല്ലൻ റെഞ്ച് | ||
| 76 | ഓപ്പൺ-എൻഡ് റെഞ്ച് | 2 |
പ്രധാനപ്പെട്ട മുൻകരുതലുകൾ
ഭാവി റഫറൻസിനായി ദയവായി ഈ മാനുവൽ സൂക്ഷിക്കുക
- റോവർ കൂട്ടിച്ചേർക്കുന്നതിനും ഉപയോഗിക്കുന്നതിനും മുമ്പ് ഈ മുഴുവൻ മാനുവലും ശ്രദ്ധാപൂർവ്വം വായിക്കേണ്ടത് പ്രധാനമാണ്. കൂട്ടിച്ചേർക്കുകയും പരിപാലിക്കുകയും ശരിയായി ഉപയോഗിക്കുകയും ചെയ്താൽ മാത്രമേ ഈ ഉപകരണം സുരക്ഷിതമായും കാര്യക്ഷമമായും ഉപയോഗിക്കുന്നത് ഉറപ്പാക്കാൻ കഴിയൂ. ഉപകരണത്തിന്റെ എല്ലാ ഉപയോക്താക്കളെയും എല്ലാ മുന്നറിയിപ്പുകളും മുൻകരുതലുകളും അറിയിച്ചിട്ടുണ്ടെന്ന് ഉറപ്പാക്കേണ്ടത് നിങ്ങളുടെ ഉത്തരവാദിത്തമാണ്.
- ഏതെങ്കിലും വ്യായാമ പരിപാടി ആരംഭിക്കുന്നതിന് മുമ്പ്, നിങ്ങളുടെ ആരോഗ്യത്തിനും സുരക്ഷയ്ക്കും അപകടമുണ്ടാക്കുന്ന ഏതെങ്കിലും ശാരീരികമോ ആരോഗ്യപരമോ ആയ അവസ്ഥകൾ നിങ്ങൾക്കുണ്ടോ എന്ന് നിർണ്ണയിക്കാൻ ഡോക്ടറെ സമീപിക്കുക, അല്ലെങ്കിൽ ഈ ഉപകരണം ഉപയോഗിക്കുന്നതിൽ നിന്ന് നിങ്ങളെ തടയുക. നിങ്ങൾ ഹൃദയമിടിപ്പ്, രക്തസമ്മർദ്ദം അല്ലെങ്കിൽ കൊളസ്ട്രോൾ എന്നിവയെ കുറിച്ചുള്ള മരുന്നുകൾ കഴിക്കുകയാണെങ്കിൽ നിങ്ങളുടെ ഡോക്ടറുടെ ഉപദേശം അത്യന്താപേക്ഷിതമാണ്.
- നിങ്ങളുടെ ശരീരത്തിന്റെ സിഗ്നലുകൾ അറിഞ്ഞിരിക്കുക. തെറ്റായ അല്ലെങ്കിൽ അമിതമായ വ്യായാമം നിങ്ങളുടെ ആരോഗ്യത്തെ നശിപ്പിക്കും. ഇനിപ്പറയുന്ന ലക്ഷണങ്ങളിൽ ഏതെങ്കിലും നിങ്ങൾക്ക് അനുഭവപ്പെടുകയാണെങ്കിൽ, വ്യായാമം ഉടനടി നിർത്തുക: വേദന, നിങ്ങളുടെ നെഞ്ചിലെ ഞെരുക്കം, ക്രമരഹിതമായ ഹൃദയമിടിപ്പ്, അങ്ങേയറ്റത്തെ ശ്വാസതടസ്സം, തലകറക്കം അല്ലെങ്കിൽ ഓക്കാനം, തലകറക്കം അല്ലെങ്കിൽ ഓക്കാനം. ഈ ലക്ഷണങ്ങളിൽ ഏതെങ്കിലും നിങ്ങൾക്ക് അനുഭവപ്പെട്ടിട്ടുണ്ടെങ്കിൽ, നിങ്ങളുടെ വ്യായാമ പരിപാടി തുടരുന്നതിന് മുമ്പ് ദയവായി ഡോക്ടറെ സമീപിക്കുക.
- കുട്ടികളെയും വളർത്തുമൃഗങ്ങളെയും ഉപകരണങ്ങളിൽ നിന്ന് അകറ്റി നിർത്തുക. ഉപകരണങ്ങൾ മുതിർന്നവർക്ക് മാത്രമാണ് ഉപയോഗിക്കുന്നത്.
- നിങ്ങൾ ഉപയോഗിക്കുമ്പോൾ തുഴച്ചിൽ ഘടിപ്പിച്ചതും പരന്നതുമായ നിലത്ത് വയ്ക്കുക, കൂടാതെ, നിങ്ങളുടെ തറയോ പരവതാനിയോ സംരക്ഷിക്കാൻ മെഷീന്റെ കീഴിൽ ഒരു വ്യായാമ പായ ഉപയോഗിക്കുന്നത് പരിഗണിക്കാം. സുരക്ഷയ്ക്കായി, ഉപകരണങ്ങൾക്ക് ചുറ്റുപാടും കുറഞ്ഞത് 0.5 മീറ്റർ സ്വതന്ത്ര ഇടം ഉണ്ടായിരിക്കണം.
- ഈ ഉപകരണം ഉപയോഗിക്കുന്നതിന് മുമ്പ് എല്ലാ നട്ടുകളും ബോൾട്ടുകളും സുരക്ഷിതമായി ശക്തമാക്കിയിട്ടുണ്ടെന്ന് ഉറപ്പാക്കുക. ഉപകരണങ്ങളുടെ കേടുപാടുകൾ അല്ലെങ്കിൽ തേയ്മാനങ്ങൾ പതിവായി പരിശോധിച്ചാൽ മാത്രമേ അവയുടെ സുരക്ഷിതമായ ഉപയോഗം നിലനിർത്താൻ കഴിയൂ.
- സൂചിപ്പിച്ചതുപോലെ എല്ലായ്പ്പോഴും ഉപകരണങ്ങൾ ഉപയോഗിക്കുക. ഉപകരണങ്ങൾ കൂട്ടിച്ചേർക്കുമ്പോഴോ പരിശോധിക്കുമ്പോഴോ എന്തെങ്കിലും തകരാറുള്ള ഘടകങ്ങൾ കണ്ടെത്തുകയോ ഉപയോഗിക്കുമ്പോൾ ഉപകരണങ്ങളിൽ നിന്ന് അസാധാരണമായ എന്തെങ്കിലും ശബ്ദം കേൾക്കുകയോ ചെയ്താൽ ദയവായി അത് ഉപയോഗിക്കുന്നത് ഉടൻ നിർത്തുക. പ്രശ്നം പരിഹരിക്കപ്പെടുന്നതുവരെ ഉപകരണങ്ങൾ ഉപയോഗിക്കരുത്.
- ഉപകരണങ്ങൾ ഉപയോഗിക്കുമ്പോൾ അനുയോജ്യമായ കായിക വസ്ത്രങ്ങൾ ധരിക്കുക. ഉപകരണങ്ങളിൽ കുടുങ്ങിയേക്കാവുന്ന അയഞ്ഞ വസ്ത്രങ്ങൾ ധരിക്കുന്നത് ഒഴിവാക്കുക, അല്ലെങ്കിൽ അത് സാധാരണഗതിയിൽ തുടരുന്നതിന് ചലനത്തെ പരിമിതപ്പെടുത്തിയേക്കാം.
- ഈ യന്ത്രം വീടിനുള്ളിൽ മാത്രമാണ് ഉപയോഗിക്കുന്നത്.
- The equipment is not applicable to therapy.
- ഉപകരണങ്ങൾ ഉയർത്തുമ്പോഴും ചലിപ്പിക്കുമ്പോഴും ശ്രദ്ധിക്കണം. എല്ലായ്പ്പോഴും ശരിയായ ലിഫ്റ്റിംഗ് സാങ്കേതികത ഉപയോഗിക്കുക, ആവശ്യമെങ്കിൽ സഹായം തേടുക.
- ഗാർഡുകളുടെയും സുരക്ഷാ ഉപകരണങ്ങളുടെയും സമഗ്രത പതിവായി പരിശോധിക്കുക.
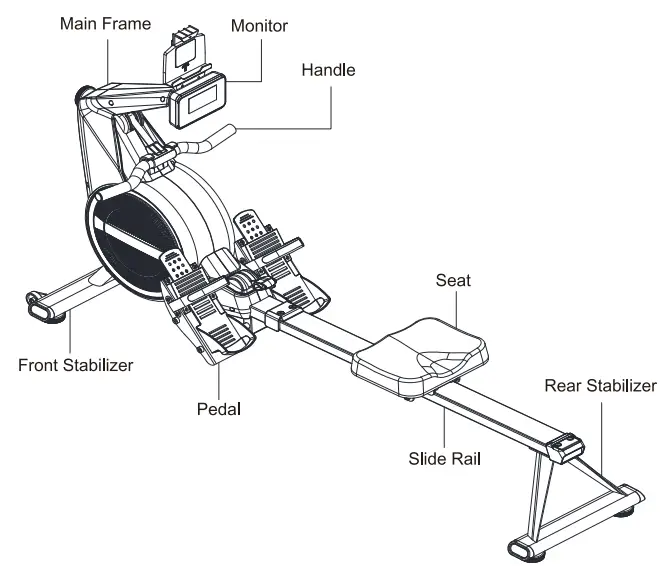
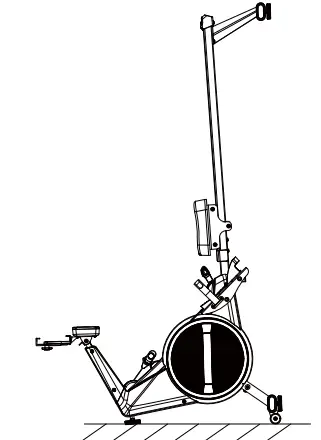
പൊതു ഡയഗ്രം
ടൂൾസ് കിറ്റ്

അസംബ്ലി നിർദ്ദേശം
ഘട്ടം 1
- Assemble the Transportation Wheel (No.18) onto the Front Stabilizer (No.2) with 2 PCS Round Head Hexagon Socket Screws (No.19), Flat Washers (No.20) and Nylon Nuts (No.21 ).
- Assemble 2 PCS Cushion Pads (No.3) onto the Front Stabilizer (No.2), 1 PCS Cushion Pad onto the Main Frame (No.1 ).
- Assemble the Front Stabilizer (No.2) onto the Main Frame (No.1) with 3PCS Round Head Hexagon Socket Screws (No.22), 2PCS Arc Washers (No.23) and 1 PCS Flat Washer (No.20).

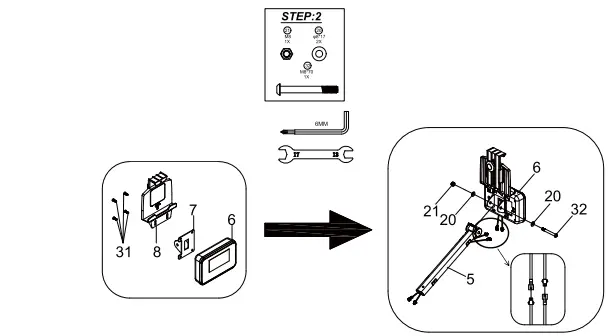
ഘട്ടം 2
- Assemble the Transportation Wheel (No.18) onto the Front Stabilizer (No.2) with 2 PCS Round Head Hexagon Socket Screws (No.19), Flat Washers (No.20) and Nylon Nuts (No.21 ).
- Assemble 2 PCS Cushion Pads (No.3) onto the Front Stabilizer (No.2), 1 PCS Cushion Pad onto the Main Frame (No.1 ).
- Assemble the Front Stabilizer (No.2) onto the Main Frame (No.1) with 3PCS Round Head Hexagon Socket Screws (No.22), 2PCS Arc Washers (No.23) and 1 PCS Flat Washer (No.20).
ഘട്ടം 3
- Assemble the Transportation Wheel (No.18) onto the Front Stabilizer (No.2) with 2 PCS Round Head Hexagon Socket Screws (No.19), Flat Washers (No.20) and Nylon Nuts (No.21 ).
- Assemble 2 PCS Cushion Pads (No.3) onto the Front Stabilizer (No.2), 1 PCS Cushion Pad onto the Main Frame (No.1 ).
- Assemble the Front Stabilizer (No.2) onto the Main Frame (No.1) with 3PCS Round Head Hexagon Socket Screws (No.22), 2PCS Arc Washers (No.23) and 1 PCS Flat Washer (No.20).

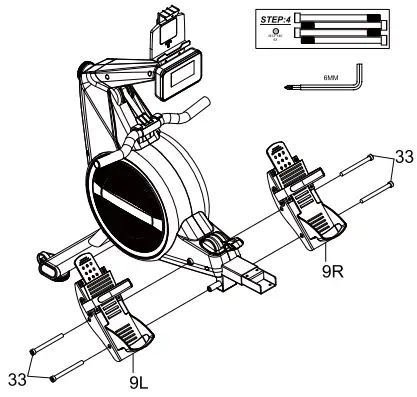
ഘട്ടം4
Assemble the Pedal UR (No.9) onto the Main Frame (No.1) with 4 PCS Round Head Hexagon Socket Screws (No.33).
ഘട്ടം 5
- Assemble the Rear Stabilizer (No.11) onto the Slide Rail (No.10) with 2PCS Round Head Hexagon Socket Screws (No.22) and 2PCS Flat Washers (No.20). Do not tighten them fully in this step.
- Assemble the Tube Plug (No.12) and Fixing Plate (No.13) onto the Slide Rail (No.10) with 4PCS Round Head Hexagon Socket Screws (No.22) and 4PCS Flat Washers (No.20).
- Tighten the 2PCS Round Head Hexagon Socket Screws (No.22) fully in Step 5.1.
- Assemble the Cushion Pads (No.3) onto the Rear Stabilizer (No.11 ).
- Insert the Seat (No.14) into the Slide Rail (No.10).

ഘട്ടം6
Assemble the Decorative Cover (No.16) and Slide Rail (No.10) onto the Main Frame (No.1) with 6 PCS Round Head Hexagon Socket Screws (No.22) and 6PCS Flat Washers (No.20). Installation Complete

സംഭരണ രീതി
പരിശീലന നിർദ്ദേശങ്ങൾ
ഈ റോയിംഗ് മെഷീൻ ഉപയോഗിക്കുക, നിങ്ങളുടെ ആകൃതി നിർമ്മിക്കാനും നിങ്ങളുടെ ശരീരത്തെ ശക്തിപ്പെടുത്താനും സഹായിക്കും, ആരോഗ്യകരമായ ഭക്ഷണത്തിലൂടെ ഇത് ശരീരഭാരം കുറയ്ക്കാൻ സഹായിക്കും.
- വാം-അപ്പ് എസ്TAGE
CR എന്ന അപകടസാധ്യത കുറയ്ക്കാൻ വാംഅപ്പ് സഹായിക്കുംamps അല്ലെങ്കിൽ പേശി ക്ഷതം. ചുവടെ കാണിച്ചിരിക്കുന്നതുപോലെ സ്ട്രെച്ചിംഗ് വ്യായാമം ശുപാർശ ചെയ്യുന്നു. ഓരോ നീട്ടലും ഏകദേശം 30 സെക്കൻഡ് ആയിരിക്കണം. നിങ്ങളുടെ ശരീരത്തിൻ്റെ അവസ്ഥയ്ക്ക് അനുസൃതമായി വലിച്ചുനീട്ടുന്നത് തുടരുക.-നിങ്ങൾക്ക് വേദന തോന്നുന്നുവെങ്കിൽ, ദയവായി നിർത്തുക.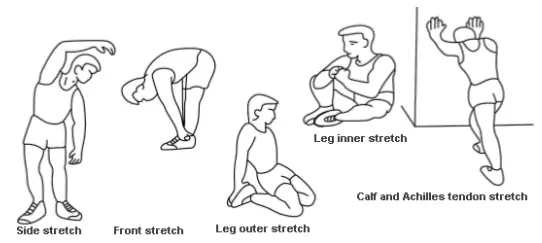
- വ്യായാമങ്ങൾTAGE
പരിശ്രമം ആവശ്യമാണ്. ഒരു കാലയളവിലേക്കുള്ള പതിവ് വ്യായാമത്തിന് ശേഷം നിങ്ങളുടെ ശരീരം കൂടുതൽ വഴക്കമുള്ളതായിരിക്കും. നിങ്ങളുടെ സ്വന്തം സ്ഥിരവും സ്വീകാര്യവുമായ കാഡൻസ് ഉപയോഗിച്ച് വ്യായാമം ചെയ്യുന്നത് വളരെ പ്രധാനമാണ്. വ്യായാമത്തിന്റെ തീവ്രത ലക്ഷ്യം ഹൃദയമിടിപ്പ് പരിധിയിലെത്താൻ നിങ്ങളെ അനുവദിക്കണം. ഇടത് ചിത്രം റഫർ ചെയ്യുക, x-കോർഡിനേറ്റിൽ നിങ്ങളുടെ പ്രായപരിധി കണ്ടെത്തുക, തുടർന്ന് നിങ്ങളുടെ ടാർഗെറ്റ് ഹൃദയമിടിപ്പ് പരിധി കണ്ടെത്തുക.
The target heart rate is suggested to last for at least 12 minutes to reach the exercise goal. It’s suggested to +/- exercise according to the condition of your body. It’s suggested to increase the intensity step by step.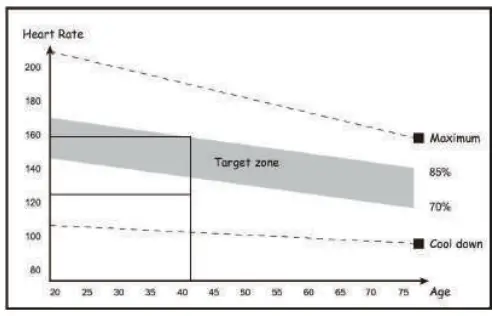
- ശാന്തം എസ്TAGE
After exercise, repeat the stretching like we do in the warm-up stagഇ. ഇത് നിങ്ങളുടെ ശരീരത്തെ വിശ്രമിക്കാൻ സഹായിക്കും. ഇത് ഏകദേശം 5 മിനിറ്റ് നീണ്ടുനിൽക്കാൻ നിർദ്ദേശിക്കുന്നു. നിങ്ങളുടെ ശരീരത്തിന്റെ അവസ്ഥ അനുസരിച്ച് സ്ട്രെച്ചിംഗ് നടത്തുക. നിങ്ങളുടെ പേശികളെ നിർബന്ധിക്കരുത്.
പരിശീലന തീവ്രത സ്വീകരിച്ച ശേഷം, ആഴ്ചയിൽ 3 തവണയെങ്കിലും പരിശീലനം നടത്താൻ നിർദ്ദേശിക്കുന്നു. - ഇൻഷേപ്പ്
ഒരു നിശ്ചിത പരിശീലന തീവ്രത ആവശ്യമാണ്. നിങ്ങളുടെ കാലിന്റെ പേശികളിൽ സമ്മർദ്ദം എന്നാണ് ഇതിനർത്ഥം. നിങ്ങളുടെ ശരീരത്തിന് കൈകാര്യം ചെയ്യാൻ കഴിയുന്ന തീവ്രതയിൽ വ്യായാമം ചെയ്യാൻ പരമാവധി ശ്രമിക്കുക. നിങ്ങളുടെ ഹൃദയമിടിപ്പ് ടാർഗെറ്റ് സോണിൽ നിലനിർത്തുകയും പരിശീലനത്തിന് ശേഷം വലിച്ചുനീട്ടുകയും ചെയ്യുക. - ഭാരം കുറയ്ക്കുക
നിങ്ങളുടെ വ്യായാമത്തിന്റെ ആവൃത്തിയും തീവ്രതയുമാണ് പ്രധാന ഘടകങ്ങൾ. കൂടുതൽ കഠിനാധ്വാനം ചെയ്യുക, കൂടുതൽ കലോറി കത്തിക്കുക. പരിശീലനത്തിലൂടെ നമ്മുടെ ആരോഗ്യം മെച്ചപ്പെടുത്താൻ ഞങ്ങൾ ആഗ്രഹിക്കുന്നു. പരിശീലന ലക്ഷ്യമാണ് വ്യത്യാസം.
മോണിറ്റർ നിർദ്ദേശം
- ഡാറ്റയുടെ പ്രദർശനം
- സമയം
The workout time. It can count up or count down after you set a target.* - COUNT
The strokes you made. It can count up or count down after you set a target.* - ദൂരം
The distance rowed. It can count up or count down after you set a target.* - CAL
The calories burned. I can count up or count down after you set a target.* - എസ്പിഎം
മിനിറ്റിൽ സ്ട്രോക്കുകൾ.
- സമയം
- GENERAL BUTTON INSTRUCTIONS
മോഡ്
1. Press to toggle between SCAN mode and individual continuous display of each data point.*
2. Press and hold to zero all data.
സെറ്റ്
Press to increase/decrease the exercise target values.*
പുനഃസജ്ജമാക്കുക Press to reset the exercise target values .* * Please see “3. The display logic of the monitor and two startup ways” for more details.
- THE LOGIC OF DATA DISPLAY AND TWO STARTUP WAYS
- Logic of Data Display
The monitor will be turned on when starting exercise or pressing any buttons and will automatically enter the SCAN mode. At this time, “SCAN” will blink on the left side. It will display Time, Count, Distance, Calories and SPM sequentially every few seconds. Pressing MODE key while in SCAN mode will exit the SCAN mode, and it will display currently selected data continuously. Pressing MODE key again will let the monitor sequentially display the next data, until it returns back to the SCAN mode and enter another cycle. - Two Startup Ways
You could start rowing directly to turn on the monitor and let the data count up. Or you could press any button to start the monitor and then set target Time, Count, Distance and Calories before starting. To set target values, please press MODE key to exit SCAN mode and let it display certain data continuously. When monitor displays Time, Count, Distance or Calories continuously, pressing the UP/DOWN key could increase/decrease the target value. Pressing Reset key could zero the data you are setting. You could set target Time, Count, Distance and Calories together or individually. The target values you set will count down to zero after starting rowing.
കുറിപ്പ്- If the battery symbol on the display lights up or the displayed content fades, please replace the battery.
- 2 മിനിറ്റിനുശേഷം സിഗ്നൽ ലഭിച്ചില്ലെങ്കിൽ മോണിറ്റർ യാന്ത്രികമായി അടയ്ക്കും.
- When you stop exercising for 4 seconds, the display will stop calculating and a “STOP” will be displayed on the screen. When you continue exercising, the display will automatically start calculating and the “STOP” will disappear.
- Logic of Data Display
സ്പെസിഫിക്കേഷനുകൾ
|
ഫങ്ഷൻ |
സ്കാൻ ചെയ്യുക | ഓരോ 6 സെക്കൻഡിലും |
| സമയം | 0:00- 99:59 | |
| COUNT | 0-9999 Strokes | |
| ദൂരം | 0.00-99.99 Miles or 0-9999 Meters | |
| കലോറികൾ | 0-9999 കലോറി | |
| എസ്പിഎം | 0-999 Strokes/Min | |
| ബാറ്ററി തരം | 2pcs of SIZE -AA or UM-3 | |
| ഓപ്പറേറ്റിംഗ് താപനില | 0°C - +40°C | |
| സംഭരണ താപനില | -10°C – +60°C | |
APP
- ആപ്പ് ഡൗൺലോഡ് ചെയ്യാൻ മൊബൈൽ ആപ്പ് സ്റ്റോറിൽ "KINOMAP" എന്ന് തിരയുക.

- ബ്ലൂടൂത്ത് കണക്ഷൻ നിർദ്ദേശങ്ങൾക്കായി ദയവായി QR കോഡ് സ്കാൻ ചെയ്യുക.

FCC മുന്നറിയിപ്പ്
ഈ ഉപകരണം FCC നിയമങ്ങളുടെ ഭാഗം 15 പാലിക്കുന്നു. പ്രവർത്തനം ഇനിപ്പറയുന്ന രണ്ട് വ്യവസ്ഥകൾക്ക് വിധേയമാണ്: (1) ഈ ഉപകരണം ഹാനികരമായ ഇടപെടലിന് കാരണമായേക്കില്ല, കൂടാതെ (2) അനാവശ്യമായ പ്രവർത്തനത്തിന് കാരണമായേക്കാവുന്ന ഇടപെടൽ ഉൾപ്പെടെയുള്ള ഏത് ഇടപെടലും ഈ ഉപകരണം സ്വീകരിക്കണം. അനുസരണത്തിൻ്റെ ഉത്തരവാദിത്തമുള്ള കക്ഷി വ്യക്തമായി അംഗീകരിക്കാത്ത മാറ്റങ്ങളോ പരിഷ്ക്കരണങ്ങളോ ഉപകരണം പ്രവർത്തിപ്പിക്കാനുള്ള ഉപയോക്താവിൻ്റെ അധികാരത്തെ അസാധുവാക്കും.
കുറിപ്പ്: This equipment has been tested and found to comply with the limits for a Class B digital device, pursuant to Part 15 of the FCC Rules. These limits are designed to provide reasonable protection against harmful interference in a residential installation. This equipment generates, uses and can radiate radio frequency energy and, if not installed and used in accordance with the instructions, may cause harmful interference to radio communications. However. there is no guarantee that interference will not occur in a particular installation.
If this equipment does cause harmful interference to radio or television reception which can be determined by turning the equipment off and on, the user is encouraged to try to correct the interference by one or more of the following measures:
- സ്വീകരിക്കുന്ന ആൻ്റിന പുനഃക്രമീകരിക്കുക അല്ലെങ്കിൽ മാറ്റി സ്ഥാപിക്കുക.
- ഉപകരണങ്ങളും റിസീവറും തമ്മിലുള്ള വേർതിരിവ് വർദ്ധിപ്പിക്കുക
- റിസീവർ ബന്ധിപ്പിച്ചിരിക്കുന്നതിൽ നിന്ന് വ്യത്യസ്തമായ ഒരു സർക്യൂട്ടിലെ ഒരു ഔട്ട്ലെറ്റിലേക്ക് ഉപകരണങ്ങൾ ബന്ധിപ്പിക്കുക.
- സഹായത്തിന് ഡീലറെയോ പരിചയസമ്പന്നനായ റേഡിയോ/ടിവി ടെക്നീഷ്യനെയോ സമീപിക്കുക
RF എക്സ്പോഷർ സ്റ്റേറ്റ്മെൻ്റ്
FCC-യുടെ RF എക്സ്പോഷർ മാർഗ്ഗനിർദ്ദേശങ്ങൾ പാലിക്കുന്നതിന്, ഈ ഉപകരണം ഇൻസ്റ്റാൾ ചെയ്യുകയും നിങ്ങളുടെ ശരീരത്തിന്റെ റേഡിയേറ്ററിന്റെ ഏറ്റവും കുറഞ്ഞ ദൂരത്തിൽ 20cm ദൂരത്തിൽ പ്രവർത്തിക്കുകയും വേണം. ഈ ഉപകരണവും അതിന്റെ ആന്റിന(കളും) മറ്റേതെങ്കിലും ആന്റിന എൻആർ ട്രാൻസ്മിറ്ററുമായി സംയോജിച്ച് പ്രവർത്തിക്കരുത്.
ISED കാനഡ പ്രസ്താവന:
ഈ ഉപകരണത്തിൽ ഇന്നൊവേഷൻ സയൻസ് ആൻഡ് ഇക്കണോമിക് ഡെവലപ്മെന്റ് കാനഡയുടെ ലൈസൻസ്-ഒഴിവാക്കപ്പെട്ട RSS(കൾ) അനുസരിക്കുന്ന ലൈസൻസ്-എക്സെംപ്റ്റ് ട്രാൻസ്മിറ്റർ(കൾ)/റിസീവർ(കൾ)/ അടങ്ങിയിരിക്കുന്നു. പ്രവർത്തനം ഇനിപ്പറയുന്ന രണ്ട് നിബന്ധനകൾക്ക് വിധേയമാണ്:
- ഈ ഉപകരണം ഇടപെടലിന് കാരണമായേക്കില്ല
- ഉപകരണത്തിൻ്റെ അനാവശ്യ പ്രവർത്തനത്തിന് കാരണമായേക്കാവുന്ന ഇടപെടൽ ഉൾപ്പെടെ ഏത് ഇടപെടലും ഈ ഉപകരണം അംഗീകരിക്കണം.
റേഡിയേഷൻ എക്സ്പോഷർ: ഈ ഉപകരണം കാനഡ റേഡിയേഷനുമായി പൊരുത്തപ്പെടുന്നു
exposure limits set forth for an uncontrolled environment. To maintain compliance with IC’s RF Exposure guidelines,
This equipment should be. installed and operated with a minimum distance of 20cm the radiator your body. This device and its antenna(s) must not be co-located or operate in conjunction with any other antenna or transmitter.

നിങ് ബോ റൂയി ക്വി ഷാങ് മാവോ യു സിയാൻ ഗോങ് എസ്.ഐ
ഫോൺ: 1-888-828-2521
ഇമെയിൽ: support@botorrofi.com
പ്രമാണങ്ങൾ / വിഭവങ്ങൾ
 |
BOTORRO RSPRO Rowing Machine [pdf] ഉപയോക്തൃ മാനുവൽ RSPRO, RSPRO Rowing Machine, Rowing Machine, Machine |