ഉപയോക്തൃ മാനുവൽ
![]()
VLVWIP2000-ENC ഡെവലപ്മെന്റ് സിസ്റ്റം
VLVWIP2000-ഡിസംബർ
JPEG2000 AVoIP എൻകോഡറും ഡീകോഡറും

എല്ലാ അവകാശങ്ങളും നിക്ഷിപ്തം
പതിപ്പ്: VLVWIP2000-ENC_2025V1.0
പതിപ്പ്: VLVWIP2000-DEC_2025V1.0
![]()
JPEG2000 AVoIP എൻകോഡറും ഡീകോഡറും
മുഖവുര
ഉൽപ്പന്നം ഉപയോഗിക്കുന്നതിന് മുമ്പ് ഈ ഉപയോക്തൃ മാനുവൽ ശ്രദ്ധാപൂർവ്വം വായിക്കുക. ഈ മാനുവലിൽ കാണിച്ചിരിക്കുന്ന ചിത്രങ്ങൾ റഫറൻസിനായി മാത്രം. വ്യത്യസ്ത മോഡലുകളും സവിശേഷതകളും യഥാർത്ഥ ഉൽപ്പന്നത്തിന് വിധേയമാണ്.
ഈ മാനുവൽ പ്രവർത്തന നിർദ്ദേശത്തിന് മാത്രമുള്ളതാണ്, മെയിന്റനൻസ് സഹായത്തിന് ദയവായി പ്രാദേശിക വിതരണക്കാരെ ബന്ധപ്പെടുക. ഉൽപ്പന്നം മെച്ചപ്പെടുത്താനുള്ള നിരന്തര ശ്രമത്തിൽ, അറിയിപ്പോ ബാധ്യതയോ ഇല്ലാതെ ഫംഗ്ഷനുകളോ പാരാമീറ്ററുകളോ മാറ്റാനുള്ള അവകാശം ഞങ്ങളിൽ നിക്ഷിപ്തമാണ്. ഏറ്റവും പുതിയ വിശദാംശങ്ങൾക്ക് ഡീലർമാരെ പരിശോധിക്കുക.
FCC പ്രസ്താവന
ഈ ഉപകരണം റേഡിയോ ഫ്രീക്വൻസി എനർജി ഉത്പാദിപ്പിക്കുകയും ഉപയോഗിക്കുകയും വികിരണം ചെയ്യുകയും ചെയ്യുന്നു, കൂടാതെ നിർദ്ദേശങ്ങൾക്കനുസൃതമായി ഇൻസ്റ്റാൾ ചെയ്യുകയും ഉപയോഗിക്കുകയും ചെയ്തില്ലെങ്കിൽ, റേഡിയോ ആശയവിനിമയങ്ങളിൽ ഹാനികരമായ ഇടപെടലിന് കാരണമായേക്കാം. FCC നിയമങ്ങളുടെ 15-ാം ഭാഗം അനുസരിച്ച്, ഒരു ക്ലാസ് ബി ഡിജിറ്റൽ ഉപകരണത്തിൻ്റെ പരിധികൾ പാലിക്കുന്നതായി ഇത് പരീക്ഷിക്കുകയും കണ്ടെത്തി. ഒരു വാണിജ്യ ഇൻസ്റ്റാളേഷനിൽ ദോഷകരമായ ഇടപെടലിനെതിരെ ന്യായമായ സംരക്ഷണം നൽകുന്നതിനാണ് ഈ പരിധികൾ രൂപകൽപ്പന ചെയ്തിരിക്കുന്നത്.
ഒരു റെസിഡൻഷ്യൽ ഏരിയയിൽ ഈ ഉപകരണത്തിൻ്റെ പ്രവർത്തനം ഇടപെടൽ ഉണ്ടാക്കാൻ സാധ്യതയുണ്ട്, ഈ സാഹചര്യത്തിൽ ഉപയോക്താവ് സ്വന്തം ചെലവിൽ ഇടപെടൽ ശരിയാക്കാൻ ആവശ്യമായ എല്ലാ നടപടികളും സ്വീകരിക്കേണ്ടതുണ്ട്.
നിർമ്മാണം വ്യക്തമായി അംഗീകരിക്കാത്ത ഏതെങ്കിലും മാറ്റങ്ങളോ പരിഷ്ക്കരണങ്ങളോ ഉപകരണം പ്രവർത്തിപ്പിക്കാനുള്ള ഉപയോക്താവിൻ്റെ അധികാരത്തെ അസാധുവാക്കും.
![]()

![]()
![]()
സുരക്ഷാ മുൻകരുതലുകൾ
ഉൽപ്പന്നത്തിൽ നിന്നുള്ള മികച്ച പ്രകടനം ഉറപ്പാക്കാൻ, ഉപകരണം ഉപയോഗിക്കുന്നതിന് മുമ്പ് ദയവായി എല്ലാ നിർദ്ദേശങ്ങളും ശ്രദ്ധാപൂർവ്വം വായിക്കുക. കൂടുതൽ റഫറൻസിനായി ഈ മാനുവൽ സംരക്ഷിക്കുക.
- ഉപകരണങ്ങൾ ശ്രദ്ധാപൂർവ്വം അൺപാക്ക് ചെയ്യുക, ഭാവിയിലെ ഷിപ്പ്മെൻ്റിനായി യഥാർത്ഥ ബോക്സും പാക്കിംഗ് മെറ്റീരിയലും സംരക്ഷിക്കുക.
- തീപിടുത്തം, വൈദ്യുതാഘാതം, ആളുകൾക്ക് പരിക്കേൽക്കാനുള്ള സാധ്യത എന്നിവ കുറയ്ക്കുന്നതിന് അടിസ്ഥാന സുരക്ഷാ മുൻകരുതലുകൾ പാലിക്കുക.
- ഭവനം പൊളിക്കുകയോ മൊഡ്യൂളിൽ മാറ്റം വരുത്തുകയോ ചെയ്യരുത്. ഇത് വൈദ്യുത ആഘാതം അല്ലെങ്കിൽ പൊള്ളൽ എന്നിവയ്ക്ക് കാരണമാകാം.
- ഉൽപ്പന്നങ്ങളുടെ സ്പെസിഫിക്കേഷനുകൾ പാലിക്കാത്ത സപ്ലൈകളോ ഭാഗങ്ങളോ ഉപയോഗിക്കുന്നത് കേടുപാടുകൾക്കോ കേടുപാടുകൾക്കോ തകരാറുകൾക്കോ കാരണമായേക്കാം.
- എല്ലാ സേവനങ്ങളും യോഗ്യതയുള്ള സേവന ഉദ്യോഗസ്ഥർക്ക് റഫർ ചെയ്യുക.
- തീയോ ഷോക്ക് അപകടമോ തടയാൻ, യൂണിറ്റ് മഴയോ ഈർപ്പമോ കാണിക്കരുത് അല്ലെങ്കിൽ ഈ ഉൽപ്പന്നം വെള്ളത്തിന് സമീപം സ്ഥാപിക്കരുത്.
- എക്സ്റ്റൻഷൻ കേബിളിൽ ഭാരമുള്ള വസ്തുക്കളൊന്നും പുറത്തെടുക്കുന്ന സാഹചര്യത്തിൽ ഇടരുത്.
- ഹൗസിംഗ് തുറക്കുകയോ നീക്കം ചെയ്യുകയോ ചെയ്യുന്നത് നിങ്ങളെ അപകടകരമായ വോളിയത്തിന് വിധേയമാക്കിയേക്കാമെന്നതിനാൽ ഉപകരണത്തിൻ്റെ ഹൗസിംഗ് നീക്കം ചെയ്യരുത്tagഇ അല്ലെങ്കിൽ മറ്റ് അപകടങ്ങൾ.
- ചൂട് മൂലമുണ്ടാകുന്ന കേടുപാടുകൾ ഒഴിവാക്കാൻ നല്ല വായുസഞ്ചാരമുള്ള സ്ഥലത്ത് ഉപകരണം ഇൻസ്റ്റാൾ ചെയ്യുക.
- മൊഡ്യൂൾ ദ്രാവകങ്ങളിൽ നിന്ന് അകറ്റി നിർത്തുക.
- ഭവനത്തിലേക്ക് ഒഴുകുന്നത് തീ, വൈദ്യുതാഘാതം അല്ലെങ്കിൽ ഉപകരണങ്ങൾക്ക് കേടുപാടുകൾ വരുത്തിയേക്കാം. ഒരു വസ്തുവോ ദ്രാവകമോ ഭവനത്തിലേക്ക് വീഴുകയോ ഒഴുകുകയോ ചെയ്താൽ, ഉടൻ തന്നെ മൊഡ്യൂൾ അൺപ്ലഗ് ചെയ്യുക.
- ഒപ്റ്റിക്കൽ കേബിളിൻ്റെ അറ്റത്ത് ബലപ്രയോഗത്തിലൂടെ വളച്ചൊടിക്കുകയോ വലിക്കുകയോ ചെയ്യരുത്. ഇത് തകരാർ ഉണ്ടാക്കാം.
- ഈ യൂണിറ്റ് വൃത്തിയാക്കാൻ ലിക്വിഡ് അല്ലെങ്കിൽ എയറോസോൾ ക്ലീനർ ഉപയോഗിക്കരുത്. വൃത്തിയാക്കുന്നതിന് മുമ്പ് എല്ലായ്പ്പോഴും ഉപകരണത്തിലേക്കുള്ള പവർ അൺപ്ലഗ് ചെയ്യുക.
- ദീർഘനേരം ഉപയോഗിക്കാതെ കിടക്കുമ്പോൾ പവർ കോർഡ് അൺപ്ലഗ് ചെയ്യുക.
- സ്ക്രാപ്പ് ചെയ്ത ഉപകരണങ്ങൾ നീക്കം ചെയ്യുന്നതിനെക്കുറിച്ചുള്ള വിവരങ്ങൾ: സാധാരണ ഗാർഹിക മാലിന്യങ്ങൾ കത്തിക്കുകയോ അതിൽ കലർത്തുകയോ ചെയ്യരുത്, ദയവായി അവയെ സാധാരണ വൈദ്യുത മാലിന്യങ്ങളായി പരിഗണിക്കുക.
വാങ്ങിയതിന് നന്ദി.asinഈ ഉൽപ്പന്നം
ഒപ്റ്റിമൽ പ്രകടനത്തിനും സുരക്ഷയ്ക്കും, ഈ ഉൽപ്പന്നം ബന്ധിപ്പിക്കുന്നതിനും പ്രവർത്തിപ്പിക്കുന്നതിനും ക്രമീകരിക്കുന്നതിനും മുമ്പ് ഈ നിർദ്ദേശങ്ങൾ ശ്രദ്ധാപൂർവ്വം വായിക്കുക. ഭാവി റഫറൻസിനായി ദയവായി ഈ മാനുവൽ സൂക്ഷിക്കുക.
സർജ് സംരക്ഷണ ഉപകരണം ശുപാർശ ചെയ്യുന്നു
ഈ ഉൽപ്പന്നത്തിൽ ഇലക്ട്രിക്കൽ സ്പൈക്കുകൾ, സർജുകൾ, ഇലക്ട്രിക് ഷോക്ക്, ലൈറ്റിംഗ് സ്ട്രൈക്കുകൾ മുതലായവ മൂലം കേടുപാടുകൾ സംഭവിച്ചേക്കാവുന്ന സെൻസിറ്റീവ് ഇലക്ട്രിക്കൽ ഘടകങ്ങൾ അടങ്ങിയിരിക്കുന്നു. നിങ്ങളുടെ ഉപകരണങ്ങളുടെ ആയുസ്സ് പരിരക്ഷിക്കുന്നതിനും വർദ്ധിപ്പിക്കുന്നതിനും സർജ് പ്രൊട്ടക്ഷൻ സിസ്റ്റങ്ങളുടെ ഉപയോഗം വളരെ ഉത്തമമാണ്.
1. ആമുഖം
ഈ ഉൽപ്പന്നം JPEG2000 സാങ്കേതികവിദ്യയെ അടിസ്ഥാനമാക്കിയുള്ളതാണ്. ഇത് ഒരു ബോക്സിനുള്ളിൽ കോപ്പർ പോർട്ടും ഫൈബർ പോർട്ടും സംയോജിപ്പിക്കുന്നു. എൻകോഡർ ഇൻപുട്ട് 4K60 4:4:4 വരെ പിന്തുണയ്ക്കുന്നു, ഓഡിയോ എംബെഡിംഗ് അല്ലെങ്കിൽ എക്സ്ട്രാക്റ്റിംഗ്. ഡീകോഡർ ഔട്ട്പുട്ട് 4K60 4:4:4 വരെ പിന്തുണയ്ക്കുന്നു, ഓഡിയോ എക്സ്ട്രാക്റ്റിംഗ്. ഉൽപ്പന്നം ARC/eARC/S/PDIF/അനലോഗ് ഓഡിയോ റിട്ടേൺ ഫംഗ്ഷനെയും USB2.0/KVM/ക്യാമറ, 1G ഇതർനെറ്റ്, ബൈഡയറക്ഷണൽ RS-232, ടു-വേ IR, POE ഫംഗ്ഷനെയും പിന്തുണയ്ക്കുന്നു. RS-232, IR, CEC എന്നിവയുടെ ഗസ്റ്റ് മോഡ് നിയന്ത്രണങ്ങൾ പിന്തുണയ്ക്കുന്നു. കോൺടാക്റ്റ് നിയന്ത്രണത്തിനായി ബിൽറ്റ്-ഇൻ രണ്ട് ചാനൽ റിലേ പോർട്ടുകളും രണ്ട് ചാനൽ I/O പോർട്ടുകളും. ഉൽപ്പന്നം ലൈസൻസ് സജീവമാക്കിയിട്ടുണ്ടെങ്കിൽ ഡാന്റേ AV-A മോഡ് പിന്തുണയ്ക്കുന്നു.
ഫ്ലെക്സിബിൾ കോൺഫിഗറേഷനുകൾ നേടുന്നതിന് ധാരാളം API കമാൻഡുകളെ പിന്തുണയ്ക്കുന്ന ബിൽറ്റ്-ഇൻ MJPEG സബ്സ്ട്രീം, മൂന്നാം കക്ഷി നിയന്ത്രണ ആപ്പുകൾക്ക് മുൻകൂട്ടി ഉപയോഗിക്കാൻ ഉപയോഗപ്രദമാണ്.view വീഡിയോ ഉള്ളടക്കം.
1G ഇഥർനെറ്റ് സ്വിച്ചിന്റെ ഇന്റലിജന്റ് നെറ്റ്വർക്കിംഗിനെ അടിസ്ഥാനമാക്കിയുള്ള, സോഫ്റ്റ്വെയർ വികസനത്തിനായുള്ള ലിനക്സിനെ അടിസ്ഥാനമാക്കിയുള്ളതാണ് സിസ്റ്റം, വഴക്കമുള്ള നിയന്ത്രണ രീതികൾ നൽകുന്നു.
2. സവിശേഷതകൾ
☆ HDCP 2.2 കംപ്ലയിന്റ്
☆ 18Gbps വീഡിയോ ബാൻഡ്വിഡ്ത്ത് പിന്തുണയ്ക്കുന്നു
☆ HDMI 2.0b-യിൽ വ്യക്തമാക്കിയിരിക്കുന്നതുപോലെ ഇൻപുട്ട്, ഔട്ട്പുട്ട് വീഡിയോ റെസല്യൂഷൻ 4K60 4:4:4 വരെയാണ്.
☆ CAT328E/100/5A/6 കേബിൾ വഴി സിഗ്നൽ ട്രാൻസ്മിഷൻ ദൂരം 6 അടി / 7 മീറ്റർ വരെ നീട്ടാം
☆ വീഡിയോ, അനലോഗ്/ഡിജിറ്റൽ ഓഡിയോ, IR, RS-232, CEC, USB എന്നിവ ഇതർനെറ്റിലൂടെ കൈമാറുക
☆ ഒരൊറ്റ ബോക്സിനുള്ളിൽ കോപ്പർ പോർട്ടും ഫൈബർ പോർട്ടും സംയോജിപ്പിക്കുക
☆ ARC/eARC/S/PDIF/അനലോഗ് ഓഡിയോ റിട്ടേൺ ഫംഗ്ഷൻ
☆ ലൈസൻസ് സജീവമാക്കിയിട്ടുണ്ടെങ്കിൽ ഡാന്റേ എവി-എ മോഡ് പിന്തുണയ്ക്കുന്നു
☆ ഫ്രണ്ട് പാനൽ ബട്ടണുകളും LED സ്ക്രീനും വഴിയുള്ള ചാനൽ കോൺഫിഗറേഷൻ
☆ കോൺടാക്റ്റ് നിയന്ത്രണത്തിനായി ബിൽറ്റ്-ഇൻ രണ്ട് ചാനൽ റിലേ പോർട്ടുകളും രണ്ട് ചാനൽ I/O പോർട്ടുകളും
☆ യൂണികാസ്റ്റ്, മൾട്ടികാസ്റ്റ് ഫംഗ്ഷനുകൾ പിന്തുണയ്ക്കുക
☆ പോയിൻ്റ്-ടു-പോയിൻ്റ്, വീഡിയോ മാട്രിക്സ്, വീഡിയോ വാൾ ഫംഗ്ഷനുകൾ എന്നിവ പിന്തുണയ്ക്കുക (വീഡിയോ വാൾ 9×9 വരെ പിന്തുണയ്ക്കുന്നു)
☆ ഇന്റലിജന്റ് വീഡിയോ വാൾ ക്ലാസ് മാനേജ്മെന്റ്
☆ MJPEG സബ്സ്ട്രീം തത്സമയ പ്രീ-നെ പിന്തുണയ്ക്കുകview
☆ 1G ഇഥർനെറ്റ് സ്വിച്ച്
☆ POE ഫംഗ്ഷനെ പിന്തുണയ്ക്കുക
☆ ബിൽറ്റ്-ഇൻ web പേജ് കോൺഫിഗറേഷനും നിയന്ത്രണവും, ടെൽനെറ്റ്, എസ്എസ്എച്ച് എന്നിവയും
☆ HDMI ഓഡിയോ ഫോർമാറ്റുകൾ: LPCM 2.0/5.1/7.1CH, ഡോൾബി ഡിജിറ്റൽ/പ്ലസ്/EX, ഡോൾബി ട്രൂ HD, DTS, DTS-96/24, DTS-EX DSD, DTS ഹൈ റെസ്, DTS-HD മാസ്റ്റർ
☆ എളുപ്പവും വഴക്കമുള്ളതുമായ ഇൻസ്റ്റാളേഷനായി സ്മാർട്ട് നെറ്റ്വർക്കിംഗ് ഡിസൈൻ
3. പാക്കേജ് ഉള്ളടക്കം
| Qty | ഇനം |
| 1 | IP 4GbE എൻകോഡറിലൂടെ 60K1 |
| 1 | ഐആർ റിസീവർ കേബിൾ (1.5 മീറ്റർ) |
| 1 | ഐആർ ബ്ലാസ്റ്റർ കേബിൾ (1.5 മീറ്റർ) |
| 3 | 3-പിൻ 3.81 എംഎം ഫീനിക്സ് കണക്റ്റർ |
| 2 | 4-പിൻ 3.81 എംഎം ഫീനിക്സ് കണക്റ്റർ |
| 1 | 12V/2.5A ലോക്കിംഗ് പവർ അഡാപ്റ്റർ |
| 2 | മൗണ്ടിംഗ് ചെവി |
| 4 | മെഷീൻ സ്ക്രൂ (KM3*4) |
| 1 | ഉപയോക്തൃ മാനുവൽ |
or
| Qty | ഇനം |
| 1 | IP 4GbE ഡീകോഡറിലൂടെ 60K1 |
| 1 | ഐആർ റിസീവർ കേബിൾ (1.5 മീറ്റർ) |
| 1 | ഐആർ ബ്ലാസ്റ്റർ കേബിൾ (1.5 മീറ്റർ) |
| 3 | 3-പിൻ 3.81 എംഎം ഫീനിക്സ് കണക്റ്റർ |
| 2 | 4-പിൻ 3.81 എംഎം ഫീനിക്സ് കണക്റ്റർ |
| 1 | 12V/2.5A ലോക്കിംഗ് പവർ അഡാപ്റ്റർ |
| 2 | മൗണ്ടിംഗ് ചെവി |
| 4 | മെഷീൻ സ്ക്രൂ (KM3*4) |
| 1 | ഉപയോക്തൃ മാനുവൽ |
4 സ്പെസിഫിക്കേഷനുകൾ
സാങ്കേതിക
| HDMI കംപ്ലയിന്റ് | HDMI 2.0b |
| HDCP കംപ്ലയിൻ്റ് | HDCP 2.2 |
| വീഡിയോ ബാൻഡ്വിഡ്ത്ത് | 18Gbps |
| വീഡിയോ കംപ്രഷൻ സ്റ്റാൻഡേർഡ് | JPEG2000 |
| വീഡിയോ നെറ്റ്വർക്ക് ബാൻഡ്വിഡ്ത്ത് | 1G |
| വീഡിയോ റെസല്യൂഷൻ | 4K@60Hz 4:4:4 വരെ |
| വർണ്ണ ആഴം | ഇൻപുട്ട്: 8/10/12-ബിറ്റ് ഔട്ട്പുട്ട്: 8-ബിറ്റ് |
| കളർ സ്പേസ് | RGB 4:4:4, YCbCr 4:4:4 / 4:2:2 / 4:2:0 |
| എച്ച്ഡിഎംഐ ഓഡിയോ ഫോർമാറ്റുകൾ | LPCM 2.0/5.1/7.1CH, ഡോൾബി ഡിജിറ്റൽ/പ്ലസ്/EX, ഡോൾബി ട്രൂ HD, DTS, DTS-96/24, DTS-EX DSD, DTS ഹൈ റെസ്, DTS-HD മാസ്റ്റർ |
| ട്രാൻസ്മിഷൻ ദൂരം | 100M CAT5E/6/6A/7 |
| IR ലെവൽ | ഡിഫോൾട്ട് 12V, ഓപ്ഷണൽ 5V |
| ഐആർ ഫ്രീക്വൻസി | വൈഡ്ബാൻഡ് 20K – 60KHz |
| ESD സംരക്ഷണം | IEC 61000-4-2: ±8kV (എയർ-ഗാപ്പ് ഡിസ്ചാർജ്) & ±4kV (കോൺടാക്റ്റ് ഡിസ്ചാർജ്) |
കണക്ഷൻ
| എൻകോഡർ | ഇൻപുട്ട്: 1 x HDMI IN [ടൈപ്പ് A, 19-പിൻ സ്ത്രീ] 1 x L/R ഓഡിയോ ഇൻ [3-പിൻ 3.81mm ഫീനിക്സ് കണക്റ്റർ] ഔട്ട്പുട്ട്: 1 x HDMI ഔട്ട് [ടൈപ്പ് A, 19-പിൻ സ്ത്രീ] 1 x L/R ഓഡിയോ ഔട്ട് [3-പിൻ 3.81mm ഫീനിക്സ് കണക്റ്റർ] 1 x SPDIF ഔട്ട് [ഒപ്റ്റിക്കൽ ഓഡിയോ കണക്റ്റർ] നിയന്ത്രണം: 1 x RS-232 [3-പിൻ 3.81mm ഫീനിക്സ് കണക്റ്റർ] 1 x LAN (POE) [RJ45 ജാക്ക്] 1 x ഫൈബർ [ഒപ്റ്റിക്കൽ ഫൈബർ സ്ലോട്ട്] 1 x USB 2.0 ഹോസ്റ്റ് [ടൈപ്പ് B, 4-പിൻ സ്ത്രീ] 2 x USB 2.0 ഉപകരണം [ടൈപ്പ്-A, 4pin സ്ത്രീ] 2 x റിലേകൾ [3.81mm ഫീനിക്സ് കണക്റ്റർ] 2 x ഡിജിറ്റൽ IO [3.81mm ഫീനിക്സ് കണക്റ്റർ] 1 x IR IN [3.5mm ഓഡിയോ ജാക്ക്] 1 x IR ഔട്ട് [3.5mm ഓഡിയോ ജാക്ക്] |
| ഡീകോഡർ | ഇൻപുട്ട്: 1 x SPDIF IN [ഒപ്റ്റിക്കൽ ഓഡിയോ കണക്റ്റർ] 1 x L/R ഓഡിയോ ഇൻ [3-പിൻ 3.81mm ഫീനിക്സ് കണക്റ്റർ] ഔട്ട്പുട്ട്: 1 x HDMI ഔട്ട് [ടൈപ്പ് എ, 19-പിൻ ഫീമെയിൽ] 1 x L/R ഓഡിയോ ഔട്ട് [3-പിൻ 3.81mm ഫീനിക്സ് കണക്റ്റർ] നിയന്ത്രണം: 1 x RS-232 [3.81mm ഫീനിക്സ് കണക്റ്റർ] 1 x LAN (POE) [RJ45 ജാക്ക്] 1 x ഫൈബർ [ഒപ്റ്റിക്കൽ ഫൈബർ സ്ലോട്ട്] 2 x USB 1.1 ഉപകരണം [ടൈപ്പ്-എ, 4-പിൻ ഫീമെയിൽ] 2 x USB 2.0 ഉപകരണം [ടൈപ്പ്-എ, 4-പിൻ ഫീമെയിൽ] 2 x റിലേകൾ [3.81mm ഫീനിക്സ് കണക്റ്റർ] 2 x ഡിജിറ്റൽ IO [3.81mm ഫീനിക്സ് കണക്റ്റർ] 1 x IR IN [3.5mm ഓഡിയോ ജാക്ക്] 1 x IR ഔട്ട് [3.5mm ഓഡിയോ ജാക്ക്] |
മെക്കാനിക്കൽ
| പാർപ്പിടം | മെറ്റൽ വലയം |
| നിറം | കറുപ്പ് |
| അളവുകൾ | എൻകോഡർ/ഡീകോഡർ: 204mm [W] x 136mm [D] x 25.5mm [H] |
| ഭാരം | എൻകോഡർ: 631g, ഡീകോഡർ: 626g |
| വൈദ്യുതി വിതരണം | ഇൻപുട്ട്: AC100 – 240V 50/60Hz, ഔട്ട്പുട്ട്: DC 12V/2.5A (US/EU മാനദണ്ഡങ്ങൾ, CE/FCC/UL സർട്ടിഫൈഡ്) |
| വൈദ്യുതി ഉപഭോഗം | എൻകോഡർ: 8.52W, ഡീകോഡർ: 7.08W (പരമാവധി.) |
| പ്രവർത്തന താപനില | 32 - 104 ° F / 0 - 40 ° C. |
| സംഭരണ താപനില | -4 - 140 ° F / -20 - 60. C. |
| ആപേക്ഷിക ആർദ്രത | 20 - 90% RH (കണ്ടൻസിങ് ഇല്ല) |
| റെസല്യൂഷൻ / കേബിൾ ദൈർഘ്യം | 4K60 - അടി / മീറ്റർ | 4K30 - അടി / മീറ്റർ | 1080P60 - അടി / മീറ്റർ |
| എച്ച്ഡിഎംഐ ഇൻ / U ട്ട് | 16 അടി / 5 എം | 32 അടി / 10 എം | 50 അടി / 15 എം |
| "പ്രീമിയം ഹൈ സ്പീഡ് HDMI" കേബിൾ ഉപയോഗിക്കുന്നത് വളരെ ശുപാർശ ചെയ്യപ്പെടുന്നു. | |||
5. പ്രവർത്തന നിയന്ത്രണങ്ങളും പ്രവർത്തനങ്ങളും
5.1 എൻകോഡർ പാനൽ


| ഇല്ല. | പേര് | പ്രവർത്തന വിവരണം |
| 1 | പുനഃസജ്ജമാക്കുക | ഉപകരണം പവർ ചെയ്ത ശേഷം, പവർ എൽഇഡിയും ലിങ്ക് എൽഇഡിയും ഒരേ സമയം ഫ്ലാഷാകുന്നതുവരെ റീസെറ്റ് ബട്ടൺ അമർത്തിപ്പിടിക്കുക, ഉപകരണം ഫാക്ടറി ക്രമീകരണത്തിലേക്ക് പുനഃസജ്ജമാക്കാൻ ബട്ടൺ വിടുക. |
| 2 | പവർ എൽഇഡി (ചുവപ്പ്) |
|
| 3 | ലിങ്ക് LED (പച്ച) | കണക്ഷൻ നില LED.
|
| 4 | LED സ്ക്രീൻ | എൻകോഡർ ഐഡി ഡിഫോൾട്ടായി കാണിക്കുന്നു. എൻകോഡർ കോൺഫിഗറേഷനുകൾ ക്രമീകരിക്കുമ്പോൾ കോൺഫിഗറേഷൻ ഫംഗ്ഷനുകളുടെ അനുബന്ധ ഓപ്ഷനുകൾ പ്രദർശിപ്പിക്കുന്നു. |
| 5 | CH തിരഞ്ഞെടുക്കുക | എൻകോഡർ ഐഡിയും മറ്റ് ക്രമീകരണങ്ങളും സജ്ജമാക്കാൻ ഉപയോഗിക്കുന്നു. |
| 6 | USB 2.0 ഉപകരണം | USB 2.0 ഉപകരണങ്ങളിലേക്ക് കണക്റ്റുചെയ്യുക. |
| 7 | USB HOST | ഒരു പിസി ബന്ധിപ്പിക്കുന്നതിനുള്ള USB-B കണക്റ്റർ. |
| 8 | ഐആർ ഔട്ട് | ഐആർ സിഗ്നൽ ഔട്ട്പുട്ട് പോർട്ട്. പാനൽ ബട്ടണുകൾ വഴി IR ലെവൽ 5V അല്ലെങ്കിൽ 12V (ഡിഫോൾട്ട്) ആയി സജ്ജീകരിക്കാം. |
| 9 | IR IN | IR സിഗ്നൽ ഇൻപുട്ട് പോർട്ട്. പാനൽ ബട്ടണുകൾ വഴി IR ലെവൽ 5V അല്ലെങ്കിൽ 12V (ഡിഫോൾട്ട്) ആയി സജ്ജീകരിക്കാം. |
| 10 | റിലേകൾ I ഡിജിറ്റൽ ഐഒ | VCC: പവർ ഔട്ട്പുട്ട് (12V അല്ലെങ്കിൽ 5V കോൺഫിഗർ ചെയ്യാവുന്നതാണ്), പരമാവധി 12V @50mA വരെ, 5V@ 100mA ലോഡിംഗ്. ഡിഫോൾട്ട് ഔട്ട്പുട്ട് 12V ആണ്. റിലേകൾ: 2 ചാനൽ ലോ-വോളിയംtagഇ റിലേ പോർട്ടുകൾ, ഓരോ ഗ്രൂപ്പും സ്വതന്ത്രവും ഒറ്റപ്പെട്ടതുമാണ്, പരമാവധി 1A 30VDC ലോഡിംഗ്. കോൺടാക്റ്റുകൾ ഡിഫോൾട്ടായി വിച്ഛേദിക്കപ്പെട്ടിരിക്കുന്നു. ഡിജിറ്റൽ IO: 2 ചാനൽ GPIO പോർട്ടുകൾ, ഡിജിറ്റൽ ലെവൽ സിഗ്നൽ ഔട്ട്പുട്ട് നിയന്ത്രണത്തിനോ ഇൻപുട്ട് കണ്ടെത്തലിനോ വേണ്ടി (12V ലെവൽ കണ്ടെത്തൽ വരെ). ഔട്ട്പുട്ട് കൺട്രോൾ മോഡ് (ഡിഫോൾട്ട് മോഡ്, ഡിഫോൾട്ട് ഔട്ട്പുട്ടായി താഴ്ന്ന നില) അല്ലെങ്കിൽ ഇൻപുട്ട് ഡിറ്റക്ഷൻ മോഡ് കോൺഫിഗർ ചെയ്യാവുന്നതാണ്. ഡിജിറ്റൽ IO ആന്തരിക പുൾ-അപ്പ് വോളിയംtagഇ വിസിസി പിന്തുടരുന്നു. ഔട്ട്പുട്ട് നിയന്ത്രണ മോഡ്: എ. ലോ ലെവൽ ഔട്ട്പുട്ട് ചെയ്യുമ്പോൾ പരമാവധി താങ്ങാവുന്ന സിങ്ക് കറന്റ് 50mA ആണ്. ബി. VCC 5V ആയിരിക്കുമ്പോൾ ഉയർന്ന ലെവൽ ഔട്ട്പുട്ട് ആകുമ്പോൾ, പരമാവധി നിലവിലെ ഡ്രൈവിംഗ് ശേഷി 2mA ആണ്. സി. VCC 12V ഉം ഉയർന്ന ലെവൽ ഔട്ട്പുട്ടും ആയിരിക്കുമ്പോൾ, പരമാവധി നിലവിലെ ഡ്രൈവിംഗ് ശേഷി 5mA ആണ്. ഇൻപുട്ട് കണ്ടെത്തൽ മോഡ്: എ. VCC 5V ആയിരിക്കുമ്പോൾ, DIGITAL IO 5K ഓം റെസിസ്റ്ററിലൂടെ ആന്തരികമായി 2.2V വരെ വലിക്കുന്നു. ബി. VCC 12V ആയിരിക്കുമ്പോൾ, DIGITAL IO 12K ഓം റെസിസ്റ്ററിലൂടെ ആന്തരികമായി 2.2V വരെ വലിക്കുന്നു. |
| 11 | RS-232 | RS-232 സീരിയൽ പോർട്ട്, RS-232 കമാൻഡ് പാസ്-ത്രൂ, ലോക്കൽ സീരിയൽ പോർട്ട് കൺട്രോൾ എന്നിവയെ പിന്തുണയ്ക്കുന്നു. |
| 12 | ഓഡിയോ ഇൻ/ഔട്ട് | ഓഡിയോ ഇൻ: അനലോഗ് ഓഡിയോ ഇൻപുട്ട് പോർട്ട്, HDMI ഔട്ട്പുട്ടിലേക്കും ഡീകോഡറിൽ ഓഡിയോ ഔട്ട് ചെയ്യുന്നതിനും HDMI സിഗ്നലിലേക്ക് ഓഡിയോ ഉൾച്ചേർക്കാൻ കഴിയും, അല്ലെങ്കിൽ എൻകോഡറിലെ ഓഡിയോ ഔട്ട് പോർട്ട് വഴി ലൂപ്പ് ഔട്ട് ചെയ്യാം. |
| ഓഡിയോ ഔട്ട്പുട്ട്: അനലോഗ് ഓഡിയോ ഔട്ട്പുട്ട് പോർട്ട്. ഇതിന് HDMI IN പോർട്ടിൽ നിന്ന് വേർതിരിച്ചെടുത്ത ഓഡിയോ (LPCM ആണെങ്കിൽ) ഔട്ട്പുട്ട് ചെയ്യാൻ കഴിയും. കൂടാതെ ഡീകോഡറിന്റെ AUDIO IN പോർട്ടിൽ നിന്ന് പ്രക്ഷേപണം ചെയ്യുന്ന ഓഡിയോ യൂണികാസ്റ്റ് മോഡിൽ (പോയിന്റ്-ടു-പോയിന്റ് ഡയറക്ട് കണക്ഷൻ) ഔട്ട്പുട്ട് ചെയ്യാനും ഇതിന് കഴിയും. | ||
| 13 | SPDIF പുറത്ത് | S/PDIF സിഗ്നൽ ഔട്ട്പുട്ട് പോർട്ട്. എൻകോഡറും ഡീകോഡറും യഥാക്രമം ARC അല്ലെങ്കിൽ S/PDIF ഓഡിയോ റിട്ടേൺ മോഡിലേക്ക് സജ്ജമാക്കുമ്പോൾ ഡീകോഡറിൽ നിന്ന് തിരികെ ലഭിച്ച ARC അല്ലെങ്കിൽ S/PDIF ഓഡിയോ ഔട്ട്പുട്ട് ചെയ്യാൻ ഇതിന് കഴിയും (മൾട്ടികാസ്റ്റ് മോഡിൽ കൺട്രോളർ ബോക്സ് അല്ലെങ്കിൽ API കമാൻഡുകൾ വഴി സജ്ജമാക്കുക; യൂണികാസ്റ്റ് മോഡിൽ ഫ്രണ്ട് പാനൽ ബട്ടണുകൾ വഴി സജ്ജമാക്കുക). |
| 14 | HDMI ഔട്ട് | HDMI ലോക്കൽ ലൂപ്പ് ഔട്ട്പുട്ട് പോർട്ട്, ടിവി അല്ലെങ്കിൽ മോണിറ്റർ പോലുള്ള ഒരു HDMI ഡിസ്പ്ലേ ഉപകരണത്തിലേക്ക് കണക്റ്റ് ചെയ്തിരിക്കുന്നു. |
| 15 | HDMI-IN | HDMI സിഗ്നൽ ഇൻപുട്ട് പോർട്ട്, ഒരു HDMI കേബിൾ ഉപയോഗിച്ച് ബ്ലൂ-റേ പ്ലെയർ അല്ലെങ്കിൽ സെറ്റ്-ടോപ്പ് ബോക്സ് പോലുള്ള ഒരു HDMI ഉറവിട ഉപകരണവുമായി ബന്ധിപ്പിച്ചിരിക്കുന്നു. |
| 16 | ഫൈബർ | ഒപ്റ്റിക്കൽ ഫൈബർ മൊഡ്യൂളുമായി ബന്ധിപ്പിച്ച് ഒപ്റ്റിക്കൽ ഫൈബർ കേബിൾ ഉപയോഗിച്ച് നേരിട്ടോ സ്വിച്ച് വഴിയോ ഡീകോഡറിലേക്ക് സിഗ്നലുകൾ കൈമാറുക. |
| 17 | LAN (POE) | 1G LAN പോർട്ട്, കണക്റ്റ് നെറ്റ്വർക്ക് സ്വിച്ച് ഒരു ഡിസ്ട്രിബ്യൂഡ് സിസ്റ്റം രൂപീകരിക്കുക. ശ്രദ്ധിക്കുക: നെറ്റ്വർക്ക് സ്വിച്ച് POE പവർ സപ്ലൈ നൽകുമ്പോൾ, DC 12V അഡാപ്റ്റർ യൂണിറ്റിൽ പ്രയോഗിക്കേണ്ടതില്ല. |
| 18 | ഡാറ്റ സിഗ്നൽ ഇൻഡിക്കേറ്റർ എൽamp (മഞ്ഞ) | ലൈറ്റ് ഫ്ലാഷിങ്ങ്: ഡാറ്റ ട്രാൻസ്മിഷൻ ഉണ്ട്. ▪ ലൈറ്റ് ഓഫ്: ഡാറ്റ ട്രാൻസ്മിഷൻ ഇല്ല. |
| 19 | ലിങ്ക് സിഗ്നൽ ഇൻഡിക്കേറ്റർ എൽamp (പച്ച) | ലൈറ്റ് ഓൺ: നെറ്റ്വർക്ക് കേബിൾ സാധാരണയായി ബന്ധിപ്പിച്ചിരിക്കുന്നു. ▪ ലൈറ്റ് ഓഫ്: നെറ്റ്വർക്ക് കേബിൾ നന്നായി ബന്ധിപ്പിച്ചിട്ടില്ല. |
| 20 | DC 12V | രണ്ട് രീതികളിലൂടെ ഉപകരണം പ്രവർത്തിപ്പിക്കാൻ കഴിയും:
സ്വിച്ച് POE ഫംഗ്ഷനെ പിന്തുണയ്ക്കുമ്പോൾ, DC പവർ സപ്ലൈ ആവശ്യമില്ല. |
LED സ്ക്രീനിന്റെയും CH SELECT ബട്ടണുകളുടെയും പ്രവർത്തന വിവരണം (എൻകോഡറിനായി).
1, ENC ഐഡി: സിസ്റ്റം പവർ ചെയ്ത ശേഷം, എൻകോഡറിന്റെ LED സ്ക്രീൻ ENC ഐഡി കാണിക്കും (സജ്ജീകരിച്ചിട്ടില്ലെങ്കിൽ സ്ഥിരസ്ഥിതിയായി 000).
2, IP വിലാസം: UP ബട്ടൺ 5 സെക്കൻഡ് അമർത്തിപ്പിടിക്കുക, എൻകോഡറിൻ്റെ LED സ്ക്രീൻ “IPx”, “xxx”, “xxx”, “xxx”, “xxx” എന്നീ ക്രമത്തിൽ കാണിക്കും, അവ എൻകോഡറിൻ്റെ IP മോഡും IP വിലാസവുമാണ്.
3, കോൺഫിഗറേഷൻ മോഡ്: 5 സെക്കൻഡ് നേരത്തേക്ക് UP + DOWN ബട്ടണുകൾ അമർത്തിപ്പിടിക്കുക, തുടർന്ന് LED സ്ക്രീനിൽ പ്രദർശിപ്പിക്കുന്ന "CFN" ഉപയോഗിച്ച് കോൺഫിഗറേഷൻ മോഡിലേക്ക് പ്രവേശിക്കാൻ വിടുക.
4, ഉപകരണ ഐഡി ക്രമീകരണങ്ങൾ: കോൺഫിഗറേഷൻ മോഡിൽ പ്രവേശിച്ച ശേഷം, LED സ്ക്രീനിൽ (ഡിഫോൾട്ടായി 000) നിലവിലെ ID നമ്പർ (ഉദാ. 001) പ്രദർശിപ്പിക്കുന്ന ആദ്യ പേജ് നൽകുന്നതിന് UP/DOWN ബട്ടൺ അമർത്തുക. 5 സെക്കൻഡ് നേരത്തേക്ക് UP + DOWN ബട്ടണുകൾ അമർത്തിപ്പിടിക്കുക, തുടർന്ന് ID ക്രമീകരണ മോഡിലേക്ക് പ്രവേശിക്കാൻ റിലീസ് ചെയ്യുക, അതിൽ LED സ്ക്രീനിലെ ID നമ്പർ (ഉദാ. 001) 1Hz-ൽ മിന്നും, തുടർന്ന് നിങ്ങൾക്ക് ആവശ്യമുള്ള ഉപകരണ ID തിരഞ്ഞെടുക്കാൻ UP/DOWN ബട്ടൺ അമർത്തുക (ID ശ്രേണി: 000~762), തുടർന്ന് ക്രമീകരണം സ്ഥിരീകരിക്കുന്നതിനും മിന്നുന്നത് നിർത്തുന്നതിനും UP + DOWN ബട്ടണുകൾ 5 സെക്കൻഡ് അമർത്തിപ്പിടിക്കുക. സജ്ജീകരിച്ചതിനുശേഷം, യൂണിറ്റ് യാന്ത്രികമായി റീബൂട്ട് ചെയ്യും.
കുറിപ്പ്: കൺട്രോളർ ബോക്സ് മോഡിൽ ഉപകരണ ഐഡി പരിഷ്കരിക്കാനാകില്ല.
5, EDID ക്രമീകരണങ്ങൾ: കോൺഫിഗറേഷൻ മോഡിൽ പ്രവേശിച്ച ശേഷം, "E00" (ഇതിൽ "E" എന്നത് EDID-യെ സൂചിപ്പിക്കുന്നു, "00" എന്നത് EDID ID-യെ സൂചിപ്പിക്കുന്നു) അല്ലെങ്കിൽ "COP" (ഇത് copy EDID-യെ സൂചിപ്പിക്കുന്നു) LED സ്ക്രീനിൽ പ്രദർശിപ്പിക്കുന്നതിന് (ഡിഫോൾട്ടായി E15) രണ്ടാമത്തെ പേജിലേക്ക് പ്രവേശിക്കാൻ UP/DOWN ബട്ടൺ അമർത്തുക.
UP + DOWN ബട്ടണുകൾ 5 സെക്കൻഡ് അമർത്തിപ്പിടിക്കുക, തുടർന്ന് EDID ക്രമീകരണ മോഡിലേക്ക് പ്രവേശിക്കാൻ റിലീസ് ചെയ്യുക, അതിൽ LED സ്ക്രീനിലെ EDID ID നമ്പർ (ഉദാ. E01) 1Hz-ൽ മിന്നും, തുടർന്ന് നിങ്ങൾക്ക് ആവശ്യമുള്ള EDID ID തിരഞ്ഞെടുക്കാൻ UP/DOWN ബട്ടൺ അമർത്തുക, തുടർന്ന് ക്രമീകരണം സ്ഥിരീകരിക്കാനും മിന്നുന്നത് നിർത്താനും UP + DOWN ബട്ടണുകൾ 5 സെക്കൻഡ് അമർത്തിപ്പിടിക്കുക.
അനുബന്ധ EDID ഐഡി ഇപ്രകാരമാണ്:
| EDID ഐഡി | EDID വിവരണം |
| E00 | 1080P_Stereo_Audio_2.0_SDR |
| E01 | 1080P_DolbyDTS_5.1_SDR |
| E02 | 1080P_HD_Audio_7.1_SDR |
| E03 | 1080I_Stereo_Audio_2.0_SDR |
| E04 | 1080I_DolbyDTS_5.1_SDR |
| E05 | 1080I_HD_Audio_7.1_SDR |
| E06 | 3D_Stereo_Audio_2.0_SDR |
| E07 | 3D_DolbyDTS_5.1_SDR |
| E08 | 3D_HD_Audio_7.1_SDR |
| E09 | 4K2K30_444_Stereo_Audio_2.0_SDR |
| E10 | 4K2K30_444_DolbyDTS_5.1_SDR |
| E11 | 4K2K30_444_HD_Audio_7.1_SDR |
| E12 | 4K2K60_420_Stereo_Audio_2.0_SDR |
| E13 | 4K2K60_420_DolbyDTS_5.1_SDR |
| E14 | 4K2K60_420_HD_Audio_7.1_SDR |
| E15 | 4K2K60_444_Stereo_Audio_2.0_SDR |
| E16 | 4K2K60_444_DolbyDTS_5.1_SDR |
| E17 | 4K2K60_444_HD_Audio_7.1_SDR |
| E18 | 4K2K60_444_Stereo_Audio_2.0_HDR_10-bit |
| E19 | 4K2K60_444_DolbyDTS_5.1_HDR_10-bit |
| E20 | 4K2K60_444_HD_Audio_7.1_HDR_10-bit |
| E21 | DVI_1280x1024 |
| E22 | DVI_1920x1080 |
| E23 | DVI_1920x1200 |
കുറിപ്പ്: പോയിന്റ്-ടു-പോയിന്റ് കണക്ഷൻ മോഡിൽ, EDID കോപ്പി ഫംഗ്ഷൻ ഉപയോഗിക്കുന്നതിന് മുമ്പ്, എല്ലാ കോഡെക്കുകളും CA1 യൂണികാസ്റ്റ് മോഡിലേക്ക് സജ്ജമാക്കേണ്ടതുണ്ട്, കൂടാതെ സജ്ജീകരിച്ചതിനുശേഷം, ടിവിയുടെ EDID എൻകോഡറിലേക്ക് റിപ്പോർട്ട് ചെയ്യുന്നതിന് ഡീകോഡറിന്റെ HDMI കേബിൾ വീണ്ടും പ്ലഗ് ചെയ്യേണ്ടതുണ്ട്.
6, IR മോഡ് ക്രമീകരണങ്ങൾ: കോൺഫിഗറേഷൻ മോഡിൽ പ്രവേശിച്ച ശേഷം, മൂന്നാം പേജിൽ പ്രവേശിക്കാൻ UP/DOWN ബട്ടൺ അമർത്തുക, അതിൽ "IR2" (ഇതിൽ "IR" എന്നത് IR നെ സൂചിപ്പിക്കുന്നു, "2" മുതൽ 12V വരെ) LED സ്ക്രീനിൽ (ഡിഫോൾട്ടായി IR2) പ്രദർശിപ്പിക്കുന്നു. 5 സെക്കൻഡ് നേരത്തേക്ക് UP + DOWN ബട്ടണുകൾ അമർത്തിപ്പിടിക്കുക, തുടർന്ന് ക്രമീകരണ മോഡിലേക്ക് പ്രവേശിക്കാൻ റിലീസ് ചെയ്യുക, അതിൽ LED സ്ക്രീനിലെ IR മോഡ് (IR1 അല്ലെങ്കിൽ IR2) 1Hz-ൽ ഫ്ലാഷ് ചെയ്യും, തുടർന്ന് IR മോഡ് തിരഞ്ഞെടുക്കാൻ UP/DOWN ബട്ടൺ അമർത്തുക, തുടർന്ന് ക്രമീകരണം സ്ഥിരീകരിക്കുന്നതിനും മിന്നുന്നത് നിർത്തുന്നതിനും UP + DOWN ബട്ടണുകൾ 5 സെക്കൻഡ് അമർത്തിപ്പിടിക്കുക.
അനുബന്ധ IR മോഡ് ഓപ്ഷനുകൾ ഇപ്രകാരമാണ്:
IR1: 5V IR വയർ
IR2: 12V IR വയർ
7, ഓഡിയോ എംബെഡിംഗ് മോഡ് ക്രമീകരണങ്ങൾ: കോൺഫിഗറേഷൻ മോഡിൽ പ്രവേശിച്ച ശേഷം, LED സ്ക്രീനിൽ "HDI/ANA" പ്രദർശിപ്പിക്കുന്ന നാലാമത്തെ പേജിലേക്ക് പ്രവേശിക്കാൻ UP/DOWN ബട്ടൺ അമർത്തുക (ഡിഫോൾട്ടായി HDI). 5 സെക്കൻഡ് നേരത്തേക്ക് UP + DOWN ബട്ടണുകൾ അമർത്തിപ്പിടിക്കുക, തുടർന്ന് ക്രമീകരണ മോഡിലേക്ക് പ്രവേശിക്കാൻ റിലീസ് ചെയ്യുക, അതിൽ LED സ്ക്രീനിലെ ഓഡിയോ റിട്ടേൺ മോഡ് (HDI/ANA) 1Hz-ൽ ഫ്ലാഷ് ചെയ്യും, തുടർന്ന് മോഡ് തിരഞ്ഞെടുക്കാൻ UP/DOWN ബട്ടൺ അമർത്തുക, തുടർന്ന് ക്രമീകരണം സ്ഥിരീകരിക്കുന്നതിനും മിന്നുന്നത് നിർത്തുന്നതിനും UP + DOWN ബട്ടണുകൾ 5 സെക്കൻഡ് അമർത്തിപ്പിടിക്കുക.
അനുബന്ധ ഓഡിയോ എംബെഡിംഗ് മോഡ് ഓപ്ഷനുകൾ ഇപ്രകാരമാണ്:
HDI: HDMI ഓഡിയോ എംബെഡിംഗ്
ANA: അനലോഗ് ഓഡിയോ എംബെഡിംഗ്
8, IP മോഡ് ക്രമീകരണങ്ങൾ: കോൺഫിഗറേഷൻ മോഡിൽ പ്രവേശിച്ച ശേഷം, LED സ്ക്രീനിൽ (ഡിഫോൾട്ടായി IP3) "IP1/IP2/IP3" പ്രദർശിപ്പിച്ചുകൊണ്ട് അഞ്ചാമത്തെ പേജിലേക്ക് പ്രവേശിക്കാൻ UP/DOWN ബട്ടൺ അമർത്തുക.
5 സെക്കൻഡ് നേരത്തേക്ക് UP + DOWN ബട്ടണുകൾ അമർത്തിപ്പിടിക്കുക, തുടർന്ന് ക്രമീകരണ മോഡിലേക്ക് പ്രവേശിക്കാൻ റിലീസ് ചെയ്യുക, അതിൽ LED സ്ക്രീനിലെ IP മോഡ് (IP1/IP2/IP3) 1Hz-ൽ മിന്നും, തുടർന്ന് മോഡ് തിരഞ്ഞെടുക്കാൻ UP/DOWN ബട്ടൺ അമർത്തുക, തുടർന്ന് ക്രമീകരണം സ്ഥിരീകരിക്കാനും മിന്നുന്നത് നിർത്താനും UP + DOWN ബട്ടണുകൾ 5 സെക്കൻഡ് അമർത്തിപ്പിടിക്കുക. സജ്ജീകരിച്ചതിനുശേഷം, യൂണിറ്റ് യാന്ത്രികമായി റീബൂട്ട് ചെയ്യും.
അനുബന്ധ IP മോഡ് ഓപ്ഷനുകൾ ഇപ്രകാരമാണ്:
IP1: സ്റ്റാറ്റിക് IP മോഡ് (ഡിഫോൾട്ട് IP വിലാസം: 169.254.100.254)
IP2: DHCP IP മോഡ്
IP3: ഓട്ടോ IP മോഡ് (ഡിഫോൾട്ട് അസൈൻ ചെയ്ത നെറ്റ്വർക്ക് സെഗ്മെന്റ്: 169.254.xxx.xxx)
കുറിപ്പ്: കൺട്രോളർ ബോക്സ് മോഡിൽ IP മോഡ് പരിഷ്കരിക്കാൻ കഴിയില്ല.
9, ഫൈബർ/കോപ്പർ മോഡ് ക്രമീകരണങ്ങൾ: കോൺഫിഗറേഷൻ മോഡിൽ പ്രവേശിച്ച ശേഷം, LED സ്ക്രീനിൽ (ഡിഫോൾട്ടായി CPP) "CPP/FIB" പ്രദർശിപ്പിക്കുന്ന ആറാമത്തെ പേജിലേക്ക് പ്രവേശിക്കാൻ UP/DOWN ബട്ടൺ അമർത്തുക. 5 സെക്കൻഡ് നേരത്തേക്ക് UP + DOWN ബട്ടണുകൾ അമർത്തിപ്പിടിക്കുക, തുടർന്ന് ക്രമീകരണ മോഡിലേക്ക് പ്രവേശിക്കാൻ റിലീസ് ചെയ്യുക, അതിൽ LED സ്ക്രീനിലെ ഫൈബർ/കോപ്പർ മോഡ് (CPP/FIB) 1Hz-ൽ മിന്നും, തുടർന്ന് മോഡ് തിരഞ്ഞെടുക്കാൻ UP/DOWN ബട്ടൺ അമർത്തുക, തുടർന്ന് ക്രമീകരണം സ്ഥിരീകരിക്കാനും മിന്നുന്നത് നിർത്താനും UP + DOWN ബട്ടണുകൾ 5 സെക്കൻഡ് അമർത്തിപ്പിടിക്കുക. സജ്ജീകരിച്ചതിനുശേഷം, യൂണിറ്റ് യാന്ത്രികമായി റീബൂട്ട് ചെയ്യും.
അനുബന്ധ ഫൈബർ/കോപ്പർ മോഡ് ഓപ്ഷനുകൾ ഇപ്രകാരമാണ്:
സിപിപി: കോപ്പർ മോഡ്
FIB: ഫൈബർ മോഡ്
10, മൾട്ടികാസ്റ്റ് മോഡ് ക്രമീകരണങ്ങൾ: കോൺഫിഗറേഷൻ മോഡിൽ പ്രവേശിച്ച ശേഷം, LED സ്ക്രീനിൽ "CA1/CA2" പ്രദർശിപ്പിക്കുന്ന ഏഴാമത്തെ പേജിലേക്ക് പ്രവേശിക്കാൻ UP/DOWN ബട്ടൺ അമർത്തുക (ഡിഫോൾട്ടായി CA1). 5 സെക്കൻഡ് നേരത്തേക്ക് UP + DOWN ബട്ടണുകൾ അമർത്തിപ്പിടിക്കുക, തുടർന്ന് ക്രമീകരണ മോഡിലേക്ക് പ്രവേശിക്കാൻ റിലീസ് ചെയ്യുക, അതിൽ LED സ്ക്രീനിലെ മൾട്ടികാസ്റ്റ് മോഡ് (CA1/CA2) 1Hz-ൽ മിന്നും, തുടർന്ന് മോഡ് തിരഞ്ഞെടുക്കാൻ UP/DOWN ബട്ടൺ അമർത്തുക, തുടർന്ന് ക്രമീകരണം സ്ഥിരീകരിക്കാനും മിന്നുന്നത് നിർത്താനും UP + DOWN ബട്ടണുകൾ 5 സെക്കൻഡ് അമർത്തിപ്പിടിക്കുക. സജ്ജീകരണത്തിന് ശേഷം, യൂണിറ്റ് യാന്ത്രികമായി റീബൂട്ട് ചെയ്യും.
അനുബന്ധ മൾട്ടികാസ്റ്റ് മോഡ് ഓപ്ഷനുകൾ താഴെ പറയുന്നവയാണ്:
CA1: യൂണികാസ്റ്റ് മോഡ്
CA2: മൾട്ടികാസ്റ്റ് മോഡ്
11, ഓഡിയോ റിട്ടേൺ മോഡ് ക്രമീകരണങ്ങൾ: കോൺഫിഗറേഷൻ മോഡിൽ പ്രവേശിച്ച ശേഷം, LED സ്ക്രീനിൽ "C2C/A2A" പ്രദർശിപ്പിക്കുന്ന എട്ടാമത്തെ പേജിലേക്ക് പ്രവേശിക്കാൻ UP/DOWN ബട്ടൺ അമർത്തുക (സ്ഥിരസ്ഥിതിയായി C2C). 5 സെക്കൻഡ് നേരത്തേക്ക് UP + DOWN ബട്ടണുകൾ അമർത്തിപ്പിടിക്കുക, തുടർന്ന് ക്രമീകരണ മോഡിലേക്ക് പ്രവേശിക്കാൻ റിലീസ് ചെയ്യുക, അതിൽ LED സ്ക്രീനിലെ ഓഡിയോ റിട്ടേൺ മോഡ് (C2C/A2A) 1Hz-ൽ മിന്നും, തുടർന്ന് മോഡ് തിരഞ്ഞെടുക്കാൻ UP/DOWN ബട്ടൺ അമർത്തുക, തുടർന്ന് ക്രമീകരണം സ്ഥിരീകരിക്കാനും മിന്നുന്നത് നിർത്താനും UP + DOWN ബട്ടണുകൾ 5 സെക്കൻഡ് അമർത്തിപ്പിടിക്കുക. സജ്ജീകരിച്ചതിനുശേഷം, യൂണിറ്റ് യാന്ത്രികമായി റീബൂട്ട് ചെയ്യും.
അനുബന്ധ ഓഡിയോ റിട്ടേൺ മോഡ് ഓപ്ഷനുകൾ താഴെ പറയുന്നവയാണ്:
C2C: ഡീകോഡറിൽ നിന്നുള്ള eARC/ARC അല്ലെങ്കിൽ S/PDIF ഓഡിയോ എൻകോഡറിന്റെ HDMI IN അല്ലെങ്കിൽ SPDIF OUT പോർട്ടിലേക്ക് തിരികെ ട്രാൻസ്മിറ്റ് ചെയ്യപ്പെടുന്നു.
A2A: ഡീകോഡറിൽ ഉൾച്ചേർത്ത അനലോഗ് ഓഡിയോ എൻകോഡറിന്റെ ഓഡിയോ ഔട്ട് അനലോഗ് ഓഡിയോ പോർട്ടിലേക്ക് തിരികെ ട്രാൻസ്മിറ്റ് ചെയ്യപ്പെടുന്നു.
കുറിപ്പ്:
(1) കൺട്രോളർ ബോക്സിലോ മൾട്ടികാസ്റ്റ് മോഡിലോ ഉള്ള ഫ്രണ്ട് പാനൽ ബട്ടണുകൾ വഴി ഓഡിയോ റിട്ടേൺ മോഡ് പരിഷ്ക്കരിക്കാനാകില്ല.
(2) യൂണികാസ്റ്റ് മോഡിൽ എൻകോഡറും ഡീകോഡറും യഥാക്രമം C2C/A2A ഓഡിയോ റിട്ടേൺ മോഡിലേക്ക് സജ്ജമാക്കുമ്പോൾ മാത്രമേ ഓഡിയോ റിട്ടേൺ സാക്ഷാത്കരിക്കാൻ കഴിയൂ.
(3) A2A ഓഡിയോ റിട്ടേൺ മോഡ് യൂണികാസ്റ്റ് മോഡിൽ മാത്രമേ ലഭ്യമാകൂ.
(4) ARC, ARC ഓഡിയോ എപ്പോൾ ഉപയോഗിക്കണം ampഎൻകോഡർ HDMI IN പോർട്ടിൽ lifier, ഡീകോഡർ HDMI OUT പോർട്ടിൽ ARC TV എന്നിവ ഉപയോഗിക്കണം.
eARC, eARC ഓഡിയോ എപ്പോൾ ഉപയോഗിക്കണം ampഎൻകോഡർ HDMI IN പോർട്ടിൽ lifier, ഡീകോഡർ HDMI OUT പോർട്ടിൽ eARC TV എന്നിവ ഉപയോഗിക്കണം.
(5) വിവിധ ക്രമീകരണ മോഡുകൾ നൽകിയ ശേഷം, നിലവിലെ ഇൻ്റർഫേസിൽ നിന്ന് വേഗത്തിൽ പുറത്തുകടക്കാൻ നിങ്ങൾക്ക് ഡൗൺ ബട്ടൺ അമർത്തിപ്പിടിക്കാം, അല്ലെങ്കിൽ 5 സെക്കൻഡിനുള്ളിൽ നിങ്ങൾ ഒരു പ്രവർത്തനവും നടത്തിയില്ലെങ്കിൽ, അത് സ്വയമേവ മുമ്പത്തെ ഇൻ്റർഫേസിലേക്ക് മടങ്ങും.
5.2 ഡീകോഡർ പാനൽ


| ഇല്ല. | പേര് | പ്രവർത്തന വിവരണം |
| 1 | പുനഃസജ്ജമാക്കുക | ഉപകരണം പവർ ചെയ്ത ശേഷം, പവർ എൽഇഡിയും ലിങ്ക് എൽഇഡിയും ഒരേ സമയം ഫ്ലാഷാകുന്നതുവരെ റീസെറ്റ് ബട്ടൺ അമർത്തിപ്പിടിക്കുക, ഉപകരണം ഫാക്ടറി ക്രമീകരണത്തിലേക്ക് പുനഃസജ്ജമാക്കാൻ ബട്ടൺ വിടുക. |
| 2 | പവർ എൽഇഡി (ചുവപ്പ്) |
|
| 3 | ലിങ്ക് LED (പച്ച) | കണക്ഷൻ നില LED.
|
| 4 | LED സ്ക്രീൻ | തിരഞ്ഞെടുത്ത എൻകോഡർ ഐഡി ഡിഫോൾട്ടായി കാണിക്കുന്നു. ഡീകോഡർ കോൺഫിഗറേഷനുകൾ ക്രമീകരിക്കുമ്പോൾ കോൺഫിഗറേഷൻ ഫംഗ്ഷനുകളുടെ അനുബന്ധ ഓപ്ഷനുകൾ പ്രദർശിപ്പിക്കുന്നു. |
| 5 | CH തിരഞ്ഞെടുക്കുക | ഡീകോഡർ ഐഡിയും മറ്റ് ക്രമീകരണങ്ങളും സജ്ജമാക്കാൻ ഉപയോഗിക്കുന്നു. |
| 6 | USB 1.1 ഉപകരണം | കീബോർഡ് അല്ലെങ്കിൽ മൗസ് പോലുള്ള USB 1.1 ഉപകരണങ്ങളിലേക്ക് കണക്റ്റുചെയ്യുക. |
| 7 | USB 2.0 ഉപകരണം | USB ഫ്ലാഷ് ഡിസ്ക് അല്ലെങ്കിൽ USB ക്യാമറ പോലുള്ള USB 2.0 ഉപകരണങ്ങളിലേക്ക് കണക്റ്റുചെയ്യുക. |
| 8 | ഐആർ ഔട്ട് | ഐആർ സിഗ്നൽ ഔട്ട്പുട്ട് പോർട്ട്. പാനൽ ബട്ടണുകൾ വഴി IR ലെവൽ 5V അല്ലെങ്കിൽ 12V (ഡിഫോൾട്ട്) ആയി സജ്ജീകരിക്കാം. |
| 9 | IR IN | IR സിഗ്നൽ ഇൻപുട്ട് പോർട്ട്. പാനൽ ബട്ടണുകൾ വഴി IR ലെവൽ 5V അല്ലെങ്കിൽ 12V (ഡിഫോൾട്ട്) ആയി സജ്ജീകരിക്കാം. |
| 10 | റിലേകൾ I ഡിജിറ്റൽ ഐഒ | VCC: പവർ ഔട്ട്പുട്ട് (12V അല്ലെങ്കിൽ 5V കോൺഫിഗർ ചെയ്യാവുന്നത്), പരമാവധി 12V@50mA, 5V@ 100mA ലോഡിംഗ്. ഡിഫോൾട്ട് ഔട്ട്പുട്ട് 12V ആണ്. റിലേകൾ: 2 ചാനൽ ലോ-വോളിയംtagഇ റിലേ പോർട്ടുകൾ, ഓരോ ഗ്രൂപ്പും സ്വതന്ത്രവും ഒറ്റപ്പെട്ടതുമാണ്, പരമാവധി 1A 30VDC ലോഡിംഗ്. കോൺടാക്റ്റുകൾ ഡിഫോൾട്ടായി വിച്ഛേദിക്കപ്പെട്ടിരിക്കുന്നു. ഡിജിറ്റൽ IO: ഡിജിറ്റൽ ലെവൽ സിഗ്നൽ ഔട്ട്പുട്ട് നിയന്ത്രണത്തിനോ ഇൻപുട്ട് കണ്ടെത്തലിനോ (12V വരെ ലെവൽ കണ്ടെത്തൽ) 2 ചാനൽ GPIO പോർട്ടുകൾ. ഔട്ട്പുട്ട് നിയന്ത്രണ മോഡ് (ഡിഫോൾട്ട് മോഡ്, ഡിഫോൾട്ട് ഔട്ട്പുട്ടായി ലോ ലെവൽ) അല്ലെങ്കിൽ ഇൻപുട്ട് ഡിറ്റക്ഷൻ മോഡ് കോൺഫിഗർ ചെയ്യാവുന്നതാണ്. ഡിജിറ്റൽ IO ഇന്റേണൽ പുൾ-അപ്പ് വോളിയംtagഇ വിസിസി പിന്തുടരുന്നു. ഔട്ട്പുട്ട് നിയന്ത്രണ മോഡ്: എ. ലോ ലെവൽ ഔട്ട്പുട്ട് ചെയ്യുമ്പോൾ പരമാവധി താങ്ങാവുന്ന സിങ്ക് കറന്റ് 50mA ആണ്. ബി. VCC 5V ആയിരിക്കുമ്പോൾ ഉയർന്ന ലെവൽ ഔട്ട്പുട്ട് ആകുമ്പോൾ, പരമാവധി നിലവിലെ ഡ്രൈവിംഗ് ശേഷി 2mA ആണ്. സി. VCC 12V ഉം ഉയർന്ന ലെവൽ ഔട്ട്പുട്ടും ആയിരിക്കുമ്പോൾ, പരമാവധി നിലവിലെ ഡ്രൈവിംഗ് ശേഷി 5mA ആണ്. ഇൻപുട്ട് കണ്ടെത്തൽ മോഡ്: എ. VCC 5V ആയിരിക്കുമ്പോൾ, DIGITAL IO 5K ഓം റെസിസ്റ്ററിലൂടെ ആന്തരികമായി 2.2V വരെ വലിക്കുന്നു. ബി. VCC 12V ആയിരിക്കുമ്പോൾ, DIGITAL IO 12K ഓം റെസിസ്റ്ററിലൂടെ ആന്തരികമായി 2.2V വരെ വലിക്കുന്നു. |
| 11 | RS-232 | RS-232 സീരിയൽ പോർട്ട്, RS-232 കമാൻഡ് പാസ്-ത്രൂ, ലോക്കൽ സീരിയൽ പോർട്ട് കൺട്രോൾ എന്നിവയെ പിന്തുണയ്ക്കുന്നു. |
| 12 | ഓഡിയോ ഇൻ/ഔട്ട് | ഓഡിയോ ഇൻ: അനലോഗ് ഓഡിയോ ഇൻപുട്ട് പോർട്ട്, യൂണികാസ്റ്റ് മോഡിൽ (പോയിന്റ്-ടു-പോയിന്റ് ഡയറക്ട് കണക്ഷൻ) ഓഡിയോ എൻകോഡർ ഓഡിയോ ഔട്ട്-ലേക്ക് കൈമാറാൻ കഴിയും. |
| ഓഡിയോ ഔട്ട്: അനലോഗ് ഓഡിയോ ഔട്ട്പുട്ട് പോർട്ട്. ഓഡിയോ ഫോർമാറ്റ് LPCM ആണെങ്കിൽ HDMI OUT-ൽ അതിൻ്റെ അതേ ഓഡിയോ ഇത് ഔട്ട്പുട്ട് ചെയ്യുന്നു. | ||
| 13 | SPDIF IN | S/PDIF സിഗ്നൽ ഇൻപുട്ട് പോർട്ട്. |
| 14 | HDMI ഔട്ട് | HDMI സിഗ്നൽ ഔട്ട്പുട്ട് പോർട്ട്, ടിവി അല്ലെങ്കിൽ മോണിറ്റർ പോലെയുള്ള HDMI ഡിസ്പ്ലേ ഉപകരണത്തിലേക്ക് കണക്റ്റുചെയ്തിരിക്കുന്നു. |
| 15 | ഫൈബർ | ഒപ്റ്റിക്കൽ ഫൈബർ മൊഡ്യൂളുമായി ബന്ധിപ്പിക്കുക, കൂടാതെ ഒപ്റ്റിക്കൽ ഫൈബർ കേബിൾ ഉപയോഗിച്ച് എൻകോഡറിൽ നിന്ന് നേരിട്ടോ സ്വിച്ച് വഴിയോ സിഗ്നലുകൾ സ്വീകരിക്കുക. |
| 16 | LAN (POE) | 1G LAN പോർട്ട്, കണക്റ്റ് നെറ്റ്വർക്ക് സ്വിച്ച് ഒരു ഡിസ്ട്രിബ്യൂഡ് സിസ്റ്റം രൂപീകരിക്കുക. ശ്രദ്ധിക്കുക: നെറ്റ്വർക്ക് സ്വിച്ച് POE പവർ സപ്ലൈ നൽകുമ്പോൾ, DC 12V അഡാപ്റ്റർ യൂണിറ്റിൽ പ്രയോഗിക്കേണ്ടതില്ല. |
| 17 | ഡാറ്റ സിഗ്നൽ ഇൻഡിക്കേറ്റർ എൽamp (മഞ്ഞ) |
|
| 18 | ലിങ്ക് സിഗ്നൽ ഇൻഡിക്കേറ്റർ എൽamp (പച്ച) |
|
| 19 | DC 12V | രണ്ട് രീതികളിലൂടെ ഉപകരണം പ്രവർത്തിപ്പിക്കാൻ കഴിയും:
സ്വിച്ച് POE ഫംഗ്ഷനെ പിന്തുണയ്ക്കുമ്പോൾ, DC പവർ സപ്ലൈ ആവശ്യമില്ല. |
LED സ്ക്രീനിന്റെയും CH SELECT ബട്ടണുകളുടെയും പ്രവർത്തന വിവരണം (ഡീകോഡറിനായി).
1, ENC കണക്ഷൻ: സിസ്റ്റം പവർ ചെയ്ത ശേഷം, ഡീകോഡറിൻ്റെ LED സ്ക്രീൻ സജ്ജീകരിച്ചിട്ടില്ലെങ്കിൽ സ്ഥിരസ്ഥിതിയായി 000 കാണിക്കും. കണക്ഷൻ പൂർത്തിയാക്കാൻ കണക്റ്റുചെയ്ത എൻകോഡറിൻ്റെ (ഐഡി ശ്രേണി: 000~762) ചാനൽ ഐഡി തിരഞ്ഞെടുക്കാൻ മുകളിലേക്കു/താഴ്ന്ന ബട്ടൺ നേരിട്ട് അമർത്തുക.
2, IP വിലാസം: UP ബട്ടൺ 5 സെക്കൻഡ് അമർത്തിപ്പിടിക്കുക, ഡീകോഡറിൻ്റെ LED സ്ക്രീൻ “IPx”, “xxx”, “xxx”, “xxx”, “xxx” എന്നീ ക്രമത്തിൽ കാണിക്കും, അവ ഡീകോഡറിൻ്റെ IP മോഡും IP വിലാസവുമാണ്.
3, കോൺഫിഗറേഷൻ മോഡ്: 5 സെക്കൻഡ് നേരത്തേക്ക് UP + DOWN ബട്ടണുകൾ അമർത്തിപ്പിടിക്കുക, തുടർന്ന് LED സ്ക്രീനിൽ പ്രദർശിപ്പിക്കുന്ന "CFN" ഉപയോഗിച്ച് കോൺഫിഗറേഷൻ മോഡിലേക്ക് പ്രവേശിക്കാൻ വിടുക.
4, ഉപകരണ ഐഡി ക്രമീകരണങ്ങൾ: കോൺഫിഗറേഷൻ മോഡിൽ പ്രവേശിച്ച ശേഷം, LED സ്ക്രീനിൽ (ഡിഫോൾട്ടായി 000) നിലവിലെ ID നമ്പർ (ഉദാ. 001) പ്രദർശിപ്പിക്കുന്ന ആദ്യ പേജ് നൽകുന്നതിന് UP/DOWN ബട്ടൺ അമർത്തുക. 5 സെക്കൻഡ് നേരത്തേക്ക് UP + DOWN ബട്ടണുകൾ അമർത്തിപ്പിടിക്കുക, തുടർന്ന് ID ക്രമീകരണ മോഡിലേക്ക് പ്രവേശിക്കാൻ റിലീസ് ചെയ്യുക, അതിൽ LED സ്ക്രീനിലെ ID നമ്പർ (ഉദാ. 001) 1Hz-ൽ മിന്നും, തുടർന്ന് നിങ്ങൾക്ക് ആവശ്യമുള്ള ഉപകരണ ID തിരഞ്ഞെടുക്കാൻ UP/DOWN ബട്ടൺ അമർത്തുക (ID ശ്രേണി: 000~762), തുടർന്ന് ക്രമീകരണം സ്ഥിരീകരിക്കുന്നതിനും മിന്നുന്നത് നിർത്തുന്നതിനും UP + DOWN ബട്ടണുകൾ 5 സെക്കൻഡ് അമർത്തിപ്പിടിക്കുക. സജ്ജീകരിച്ചതിനുശേഷം, യൂണിറ്റ് യാന്ത്രികമായി റീബൂട്ട് ചെയ്യും.
കുറിപ്പ്: കൺട്രോളർ ബോക്സ് മോഡിൽ ഉപകരണ ഐഡി പരിഷ്കരിക്കാനാകില്ല.
5, ഔട്ട്പുട്ട് സ്കെയിലിംഗ് ക്രമീകരണങ്ങൾ: കോൺഫിഗറേഷൻ മോഡിൽ പ്രവേശിച്ച ശേഷം, LED സ്ക്രീനിൽ (ഡിഫോൾട്ടായി S00) പ്രദർശിപ്പിക്കുന്ന "S00" (ഇതിൽ "S" എന്നത് സ്കെയിലിംഗിനെ സൂചിപ്പിക്കുന്നു, കൂടാതെ "00" എന്നത് റെസല്യൂഷൻ ഐഡിയെ സൂചിപ്പിക്കുന്നു) ഉപയോഗിച്ച് രണ്ടാമത്തെ പേജിൽ പ്രവേശിക്കാൻ UP/DOWN ബട്ടൺ അമർത്തുക. 5 സെക്കൻഡ് നേരത്തേക്ക് UP + DOWN ബട്ടണുകൾ അമർത്തിപ്പിടിക്കുക, തുടർന്ന് ക്രമീകരണ മോഡിലേക്ക് പ്രവേശിക്കാൻ റിലീസ് ചെയ്യുക, അതിൽ LED സ്ക്രീനിലെ Sxx 1Hz-ൽ ഫ്ലാഷ് ചെയ്യും, തുടർന്ന് നിങ്ങൾക്ക് ആവശ്യമുള്ള ഐഡി തിരഞ്ഞെടുക്കാൻ UP/DOWN ബട്ടൺ അമർത്തുക, തുടർന്ന് ക്രമീകരണം സ്ഥിരീകരിക്കുന്നതിനും മിന്നുന്നത് നിർത്തുന്നതിനും UP + DOWN ബട്ടണുകൾ 5 സെക്കൻഡ് അമർത്തിപ്പിടിക്കുക.
സ്കെയിലിംഗ് ക്രമീകരണങ്ങൾ താഴെ പട്ടികപ്പെടുത്തിയിരിക്കുന്നു:
| സ്കെയിലിംഗ് എസ്എക്സ്എക്സ് | റെസല്യൂഷൻ വിവരണം |
| എസ് 00 | ബൈപാസ് |
| എസ് 01 | 1080P50 |
| എസ് 02 | 1080P60 |
| എസ് 03 | 720P50 |
| എസ് 04 | 720P60 |
| എസ് 05 | 2160P24 |
| എസ് 06 | 2160P30 |
| എസ് 07 | 2160P50 |
| എസ് 08 | 2160P60 |
| എസ് 09 | 1280×1024 |
| എസ് 10 | 1360×768 |
| എസ് 11 | 1440×900 |
| എസ് 12 | 1680×1050 |
| എസ് 13 | 1920×1200 |
6, IR മോഡ് ക്രമീകരണങ്ങൾ: കോൺഫിഗറേഷൻ മോഡിൽ പ്രവേശിച്ച ശേഷം, മൂന്നാം പേജിൽ പ്രവേശിക്കാൻ UP/DOWN ബട്ടൺ അമർത്തുക, അതിൽ "IR2" (ഇതിൽ "IR" എന്നത് IR നെ സൂചിപ്പിക്കുന്നു, "2" മുതൽ 12V വരെ) LED സ്ക്രീനിൽ (ഡിഫോൾട്ടായി IR2) പ്രദർശിപ്പിക്കുന്നു. 5 സെക്കൻഡ് നേരത്തേക്ക് UP + DOWN ബട്ടണുകൾ അമർത്തിപ്പിടിക്കുക, തുടർന്ന് ക്രമീകരണ മോഡിലേക്ക് പ്രവേശിക്കാൻ റിലീസ് ചെയ്യുക, അതിൽ LED സ്ക്രീനിലെ IR മോഡ് (IR1 അല്ലെങ്കിൽ IR2) 1Hz-ൽ ഫ്ലാഷ് ചെയ്യും, തുടർന്ന് IR മോഡ് തിരഞ്ഞെടുക്കാൻ UP/DOWN ബട്ടൺ അമർത്തുക, തുടർന്ന് ക്രമീകരണം സ്ഥിരീകരിക്കുന്നതിനും മിന്നുന്നത് നിർത്തുന്നതിനും UP + DOWN ബട്ടണുകൾ 5 സെക്കൻഡ് അമർത്തിപ്പിടിക്കുക.
അനുബന്ധ IR മോഡ് ഓപ്ഷനുകൾ ഇപ്രകാരമാണ്:
IR1: 5V IR വയർ
IR2: 12V IR വയർ
7, eARC/ARC അല്ലെങ്കിൽ S/PDIF ഓഡിയോ റിട്ടേൺ ക്രമീകരണങ്ങൾ: കോൺഫിഗറേഷൻ മോഡിൽ പ്രവേശിച്ച ശേഷം, LED സ്ക്രീനിൽ "ARC/SPD" പ്രദർശിപ്പിക്കുന്ന നാലാമത്തെ പേജിലേക്ക് പ്രവേശിക്കാൻ UP/DOWN ബട്ടൺ അമർത്തുക (സ്ഥിരസ്ഥിതിയായി ARC). 5 സെക്കൻഡ് നേരത്തേക്ക് UP + DOWN ബട്ടണുകൾ അമർത്തിപ്പിടിക്കുക, തുടർന്ന് ഓഡിയോ റിട്ടേൺ സെറ്റിംഗ്സ് മോഡിലേക്ക് പ്രവേശിക്കാൻ റിലീസ് ചെയ്യുക, അതിൽ LED സ്ക്രീനിലെ ഓഡിയോ റിട്ടേൺ മോഡ് (ARC/SPD) 1Hz-ൽ ഫ്ലാഷ് ചെയ്യും, തുടർന്ന് മോഡ് തിരഞ്ഞെടുക്കാൻ UP/DOWN ബട്ടൺ അമർത്തുക, തുടർന്ന് ക്രമീകരണം സ്ഥിരീകരിക്കാനും ഫ്ലാഷിംഗ് നിർത്താനും UP + DOWN ബട്ടണുകൾ 5 സെക്കൻഡ് അമർത്തിപ്പിടിക്കുക. അനുബന്ധ ഓഡിയോ റിട്ടേൺ മോഡ് ഓപ്ഷനുകൾ ഇപ്രകാരമാണ്:
ARC: eARC/ARC ഓഡിയോ റിട്ടേൺ (ഡീകോഡറിന്റെ HDMI OUT പോർട്ടിൽ നിന്നുള്ള ഓഡിയോ എൻകോഡറിന്റെ HDMI IN പോർട്ടിലേക്ക് തിരികെ ട്രാൻസ്മിറ്റ് ചെയ്യപ്പെടുന്നു.)
SPD: S/PDIF ഓഡിയോ റിട്ടേൺ (ഡീകോഡറിന്റെ S/PDIF IN പോർട്ടിൽ നിന്നുള്ള ഓഡിയോ എൻകോഡറിന്റെ S/PDIF OUT പോർട്ടിലേക്ക് തിരികെ ട്രാൻസ്മിറ്റ് ചെയ്യപ്പെടുന്നു.)
കുറിപ്പ്:
(1) കൺട്രോളർ ബോക്സിലോ മൾട്ടികാസ്റ്റ് മോഡിലോ ഉള്ള ഫ്രണ്ട് പാനൽ ബട്ടണുകൾ വഴി ഓഡിയോ റിട്ടേൺ മോഡ് പരിഷ്ക്കരിക്കാനാകില്ല.
(2) എൻകോഡറും ഡീകോഡറും C2C ഓഡിയോ റിട്ടേൺ മോഡിലേക്ക് സജ്ജമാക്കുമ്പോൾ മാത്രമേ eARC/ARC അല്ലെങ്കിൽ S/PDIF ഓഡിയോ റിട്ടേൺ സാക്ഷാത്കരിക്കാൻ കഴിയൂ.
(3) ARC, ARC ഓഡിയോ എപ്പോൾ ഉപയോഗിക്കണം ampഎൻകോഡർ HDMI IN പോർട്ടിൽ lifier, ഡീകോഡർ HDMI OUT പോർട്ടിൽ ARC TV എന്നിവ ഉപയോഗിക്കണം.
eARC, eARC ഓഡിയോ എപ്പോൾ ഉപയോഗിക്കണം ampഎൻകോഡർ HDMI IN പോർട്ടിൽ lifier, ഡീകോഡർ HDMI OUT പോർട്ടിൽ eARC TV എന്നിവ ഉപയോഗിക്കണം.
8, IP മോഡ് ക്രമീകരണങ്ങൾ: കോൺഫിഗറേഷൻ മോഡിൽ പ്രവേശിച്ച ശേഷം, LED സ്ക്രീനിൽ (ഡിഫോൾട്ടായി IP3) "IP1/IP2/IP3" പ്രദർശിപ്പിച്ചുകൊണ്ട് അഞ്ചാമത്തെ പേജിലേക്ക് പ്രവേശിക്കാൻ UP/DOWN ബട്ടൺ അമർത്തുക.
5 സെക്കൻഡ് നേരത്തേക്ക് UP + DOWN ബട്ടണുകൾ അമർത്തിപ്പിടിക്കുക, തുടർന്ന് ക്രമീകരണ മോഡിലേക്ക് പ്രവേശിക്കാൻ റിലീസ് ചെയ്യുക, അതിൽ LED സ്ക്രീനിലെ IP മോഡ് (IP1/IP2/IP3) 1Hz-ൽ മിന്നും, തുടർന്ന് മോഡ് തിരഞ്ഞെടുക്കാൻ UP/DOWN ബട്ടൺ അമർത്തുക, തുടർന്ന് ക്രമീകരണം സ്ഥിരീകരിക്കാനും മിന്നുന്നത് നിർത്താനും UP + DOWN ബട്ടണുകൾ 5 സെക്കൻഡ് അമർത്തിപ്പിടിക്കുക. സജ്ജീകരിച്ചതിനുശേഷം, യൂണിറ്റ് യാന്ത്രികമായി റീബൂട്ട് ചെയ്യും.
അനുബന്ധ IP മോഡ് ഓപ്ഷനുകൾ ഇപ്രകാരമാണ്:
IP1: സ്റ്റാറ്റിക് IP മോഡ് (ഡിഫോൾട്ട് IP വിലാസം: 169.254.100.253)
IP2: DHCP IP മോഡ്
IP3: ഓട്ടോ IP മോഡ് (ഡിഫോൾട്ട് അസൈൻ ചെയ്ത നെറ്റ്വർക്ക് സെഗ്മെന്റ്: 169.254.xxx.xxx)
കുറിപ്പ്: കൺട്രോളർ ബോക്സ് മോഡിൽ IP മോഡ് പരിഷ്കരിക്കാൻ കഴിയില്ല.
9, ഫൈബർ/കോപ്പർ മോഡ് ക്രമീകരണങ്ങൾ: കോൺഫിഗറേഷൻ മോഡിൽ പ്രവേശിച്ച ശേഷം, LED സ്ക്രീനിൽ (ഡിഫോൾട്ടായി CPP) "CPP/FIB" പ്രദർശിപ്പിക്കുന്ന ആറാമത്തെ പേജിലേക്ക് പ്രവേശിക്കാൻ UP/DOWN ബട്ടൺ അമർത്തുക. 5 സെക്കൻഡ് നേരത്തേക്ക് UP + DOWN ബട്ടണുകൾ അമർത്തിപ്പിടിക്കുക, തുടർന്ന് ക്രമീകരണ മോഡിലേക്ക് പ്രവേശിക്കാൻ റിലീസ് ചെയ്യുക, അതിൽ LED സ്ക്രീനിലെ കോപ്പർ/ഫൈബർ മോഡ് (CPP/FIB) 1Hz-ൽ മിന്നും, തുടർന്ന് മോഡ് തിരഞ്ഞെടുക്കാൻ UP/DOWN ബട്ടൺ അമർത്തുക, തുടർന്ന് ക്രമീകരണം സ്ഥിരീകരിക്കാനും മിന്നുന്നത് നിർത്താനും UP + DOWN ബട്ടണുകൾ 5 സെക്കൻഡ് അമർത്തിപ്പിടിക്കുക. സജ്ജീകരിച്ചതിനുശേഷം, യൂണിറ്റ് യാന്ത്രികമായി റീബൂട്ട് ചെയ്യും.
അനുബന്ധ ഫൈബർ/കോപ്പർ മോഡ് ഓപ്ഷനുകൾ ഇപ്രകാരമാണ്:
സിപിപി: കോപ്പർ മോഡ്
FIB: ഫൈബർ മോഡ്
10, മൾട്ടികാസ്റ്റ് മോഡ് ക്രമീകരണങ്ങൾ: കോൺഫിഗറേഷൻ മോഡിൽ പ്രവേശിച്ച ശേഷം, LED സ്ക്രീനിൽ "CA1/CA2" പ്രദർശിപ്പിച്ചുകൊണ്ട് ഏഴാമത്തെ പേജിലേക്ക് പ്രവേശിക്കാൻ UP/DOWN ബട്ടൺ അമർത്തുക (ഡിഫോൾട്ടായി CA1). 5 സെക്കൻഡ് നേരത്തേക്ക് UP + DOWN ബട്ടണുകൾ അമർത്തിപ്പിടിക്കുക, തുടർന്ന് ക്രമീകരണ മോഡിലേക്ക് പ്രവേശിക്കാൻ റിലീസ് ചെയ്യുക, അതിൽ LED സ്ക്രീനിലെ മൾട്ടികാസ്റ്റ് മോഡ് (CA1/CA2) 1Hz-ൽ മിന്നും, തുടർന്ന് മോഡ് തിരഞ്ഞെടുക്കാൻ UP/DOWN ബട്ടൺ അമർത്തുക, തുടർന്ന് ക്രമീകരണം സ്ഥിരീകരിക്കാനും മിന്നുന്നത് നിർത്താനും UP + DOWN ബട്ടണുകൾ 5 സെക്കൻഡ് അമർത്തിപ്പിടിക്കുക. സജ്ജീകരിച്ചതിനുശേഷം, യൂണിറ്റ് യാന്ത്രികമായി റീബൂട്ട് ചെയ്യും.
അനുബന്ധ മൾട്ടികാസ്റ്റ് മോഡ് ഓപ്ഷനുകൾ താഴെ പറയുന്നവയാണ്:
CA1: യൂണികാസ്റ്റ് മോഡ്
CA2: മൾട്ടികാസ്റ്റ് മോഡ്
11, ഓഡിയോ റിട്ടേൺ മോഡ് ക്രമീകരണങ്ങൾ: കോൺഫിഗറേഷൻ മോഡിൽ പ്രവേശിച്ച ശേഷം, LED സ്ക്രീനിൽ "C2C/A2A" പ്രദർശിപ്പിക്കുന്ന എട്ടാമത്തെ പേജിലേക്ക് പ്രവേശിക്കാൻ UP/DOWN ബട്ടൺ അമർത്തുക (സ്ഥിരസ്ഥിതിയായി C2C). 5 സെക്കൻഡ് നേരത്തേക്ക് UP + DOWN ബട്ടണുകൾ അമർത്തിപ്പിടിക്കുക, തുടർന്ന് ക്രമീകരണ മോഡിലേക്ക് പ്രവേശിക്കാൻ റിലീസ് ചെയ്യുക, അതിൽ LED സ്ക്രീനിലെ ഓഡിയോ റിട്ടേൺ മോഡ് (C2C/A2A) 1Hz-ൽ മിന്നും, തുടർന്ന് മോഡ് തിരഞ്ഞെടുക്കാൻ UP/DOWN ബട്ടൺ അമർത്തുക, തുടർന്ന് ക്രമീകരണം സ്ഥിരീകരിക്കാനും മിന്നുന്നത് നിർത്താനും UP + DOWN ബട്ടണുകൾ 5 സെക്കൻഡ് അമർത്തിപ്പിടിക്കുക. സജ്ജീകരിച്ചതിനുശേഷം, യൂണിറ്റ് യാന്ത്രികമായി റീബൂട്ട് ചെയ്യും.
അനുബന്ധ ഓഡിയോ റിട്ടേൺ മോഡ് ഓപ്ഷനുകൾ താഴെ പറയുന്നവയാണ്:
C2C: ഡീകോഡറിൽ നിന്നുള്ള eARC/ARC അല്ലെങ്കിൽ S/PDIF ഓഡിയോ എൻകോഡറിന്റെ HDMI IN അല്ലെങ്കിൽ S/PDIF OUT പോർട്ടിലേക്ക് തിരികെ ട്രാൻസ്മിറ്റ് ചെയ്യപ്പെടുന്നു.
A2A: ഡീകോഡറിൽ ഉൾച്ചേർത്ത അനലോഗ് ഓഡിയോ എൻകോഡറിന്റെ ഓഡിയോ ഔട്ട് അനലോഗ് ഓഡിയോ പോർട്ടിലേക്ക് തിരികെ ട്രാൻസ്മിറ്റ് ചെയ്യപ്പെടുന്നു.
കുറിപ്പ്:
(1) കൺട്രോളർ ബോക്സിലോ മൾട്ടികാസ്റ്റ് മോഡിലോ ഉള്ള ഫ്രണ്ട് പാനൽ ബട്ടണുകൾ വഴി ഓഡിയോ റിട്ടേൺ മോഡ് പരിഷ്ക്കരിക്കാനാകില്ല.
(2) യൂണികാസ്റ്റ് മോഡിൽ എൻകോഡറും ഡീകോഡറും യഥാക്രമം C2C/A2A ഓഡിയോ റിട്ടേൺ മോഡിലേക്ക് സജ്ജമാക്കുമ്പോൾ മാത്രമേ ഓഡിയോ റിട്ടേൺ സാക്ഷാത്കരിക്കാൻ കഴിയൂ.
(3) A2A ഓഡിയോ റിട്ടേൺ മോഡ് യൂണികാസ്റ്റ് മോഡിൽ മാത്രമേ ലഭ്യമാകൂ.
(4) ARC, ARC ഓഡിയോ എപ്പോൾ ഉപയോഗിക്കണം ampഎൻകോഡർ HDMI IN പോർട്ടിൽ lifier, ഡീകോഡർ HDMI OUT പോർട്ടിൽ ARC TV എന്നിവ ഉപയോഗിക്കണം.
eARC, eARC ഓഡിയോ എപ്പോൾ ഉപയോഗിക്കണം ampഎൻകോഡർ HDMI IN പോർട്ടിൽ lifier, ഡീകോഡർ HDMI OUT പോർട്ടിൽ eARC TV എന്നിവ ഉപയോഗിക്കണം.
(5) വിവിധ ക്രമീകരണ മോഡുകൾ നൽകിയ ശേഷം, നിലവിലെ ഇൻ്റർഫേസിൽ നിന്ന് വേഗത്തിൽ പുറത്തുകടക്കാൻ നിങ്ങൾക്ക് ഡൗൺ ബട്ടൺ അമർത്തിപ്പിടിക്കാം, അല്ലെങ്കിൽ 5 സെക്കൻഡിനുള്ളിൽ നിങ്ങൾ ഒരു പ്രവർത്തനവും നടത്തിയില്ലെങ്കിൽ, അത് സ്വയമേവ മുമ്പത്തെ ഇൻ്റർഫേസിലേക്ക് മടങ്ങും.
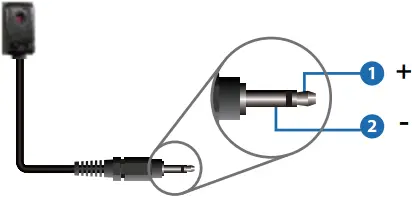
5.3 ഐആർ പിൻ നിർവചനം
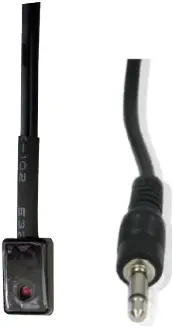
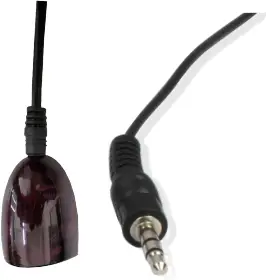
IR ബ്ലാസ്റ്റർ IR റിസീവർ
ഐആർ ബ്ലാസ്റ്റർ
ഐആർ റിസീവർ
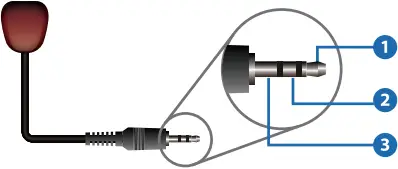
(1) ഐആർ സിഗ്നൽ
(2) ഗ്രൗണ്ടിംഗ്
(3) പവർ 12V
6. റാക്ക് മൗണ്ടിംഗ് നിർദ്ദേശം
6.1 6U V2 റാക്ക് മൗണ്ടിംഗ്
ഈ ഉൽപ്പന്നം ഒരു സ്റ്റാൻഡേർഡ് 6U V2 റാക്കിൽ ഘടിപ്പിക്കാം (6U V2 റാക്ക് വിൽപ്പനയ്ക്കായി നിങ്ങളുടെ വിതരണക്കാരനെ ബന്ധപ്പെടുക). മൗണ്ടിംഗ് ഘട്ടങ്ങൾ ഇപ്രകാരമാണ്:
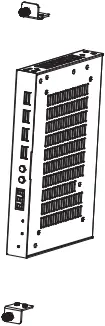
ഘട്ടം 1: ചുവടെയുള്ള ചിത്രത്തിൽ കാണിച്ചിരിക്കുന്നതുപോലെ, ഉൽപ്പന്നത്തിൽ രണ്ട് മൗണ്ടിംഗ് ചെവികൾ ശരിയാക്കാൻ ഉൾപ്പെടുത്തിയിരിക്കുന്ന സ്ക്രൂകൾ ഉപയോഗിക്കുക:
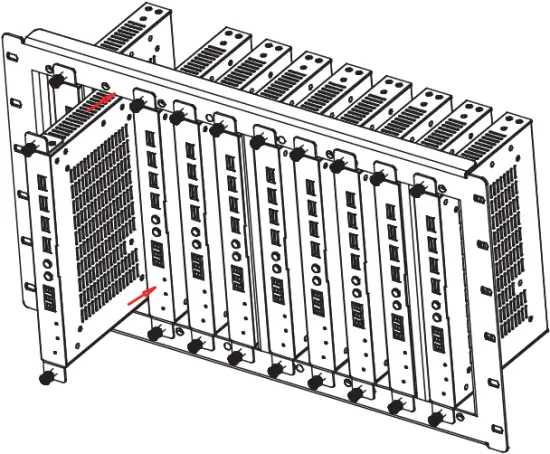
ഘട്ടം 2: താഴെയുള്ള ചിത്രത്തിൽ കാണിച്ചിരിക്കുന്നതുപോലെ, മൗണ്ടിംഗ് ചെവികളുള്ള ഉൽപ്പന്നം 6U V2 റാക്കിലേക്ക് ചേർക്കുക (6/8/10 യൂണിറ്റുകൾ ലംബമായി ഇൻസ്റ്റാൾ ചെയ്യാം):
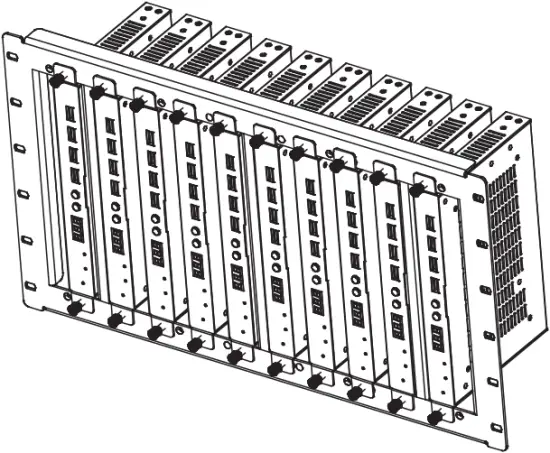
ഘട്ടം 3: താഴെയുള്ള ചിത്രത്തിൽ കാണിച്ചിരിക്കുന്നതുപോലെ, മൗണ്ടിംഗ് പൂർത്തിയാക്കാൻ റാക്കിൽ മൗണ്ടിംഗ് ചെവികൾ ശരിയാക്കാൻ സ്ക്രൂകൾ ഉപയോഗിക്കുക:
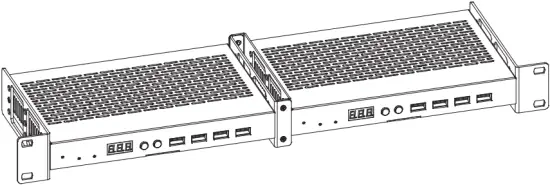
6.2 1U V2 റാക്ക് മൗണ്ടിംഗ്
ഈ ഉൽപ്പന്നം ഒരു സ്റ്റാൻഡേർഡ് 1U V2 റാക്കിലും ഘടിപ്പിക്കാം (2 യൂണിറ്റുകൾ തിരശ്ചീനമായി ഇൻസ്റ്റാൾ ചെയ്യാൻ കഴിയും). മൗണ്ടിംഗ് ഘട്ടങ്ങൾ ഇപ്രകാരമാണ്:
ഘട്ടം 1: ചുവടെയുള്ള ചിത്രത്തിൽ കാണിച്ചിരിക്കുന്നതുപോലെ, രണ്ട് ഉൽപ്പന്നങ്ങളിൽ യഥാക്രമം രണ്ട് 1U V2 റാക്ക് ബ്രാക്കറ്റുകൾ ശരിയാക്കാൻ ഉൾപ്പെടുത്തിയിരിക്കുന്ന സ്ക്രൂകൾ ഉപയോഗിക്കുക:
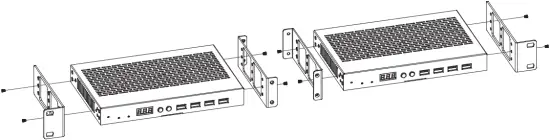
ഘട്ടം 2: ചുവടെയുള്ള ചിത്രത്തിൽ കാണിച്ചിരിക്കുന്നതുപോലെ രണ്ട് 1U V2 റാക്ക് ബ്രാക്കറ്റുകൾ ഒരുമിച്ച് ശരിയാക്കാൻ സ്ക്രൂകൾ ഉപയോഗിക്കുക:

ഘട്ടം 3: രണ്ട് 1U V2 റാക്ക് ബ്രാക്കറ്റുകൾക്കിടയിൽ സ്ക്രൂകൾ ഉറപ്പിക്കുക, അതുവഴി രണ്ട് ഉൽപ്പന്നങ്ങൾ ഒരു 1U V2 റാക്കിൽ ഘടിപ്പിച്ചിരിക്കുന്നു, ചുവടെയുള്ള ചിത്രത്തിൽ കാണിച്ചിരിക്കുന്നത് പോലെ:
7. MJPEG സബ്സ്ട്രീം ഓപ്പറേഷൻ ആമുഖം
7.1 MJPEG സബ്സ്ട്രീം പ്രീview/ കോൺഫിഗറേഷൻ വഴി Web പേജ്
പോലുള്ള അനുബന്ധ സോഫ്റ്റ്വെയർ വഴി കമ്പ്യൂട്ടറിൽ MJPEG സബ്സ്ട്രീം പ്ലേ ചെയ്യാൻ ഉൽപ്പന്നം പിന്തുണയ്ക്കുന്നു വിഎൽസി മീഡിയ പ്ലെയർ, ഒരേസമയം നിങ്ങൾക്ക് ആക്സസ് ചെയ്യാൻ കഴിയും Web MJPEG സബ്സ്ട്രീം ക്രമീകരിക്കുന്നതിനുള്ള പേജ്.
പ്രീ ചെയ്യാൻ താഴെയുള്ള ഘട്ടങ്ങൾ പാലിക്കുകview കൂടാതെ MJPEG സബ്സ്ട്രീം കോൺഫിഗർ ചെയ്യുക.
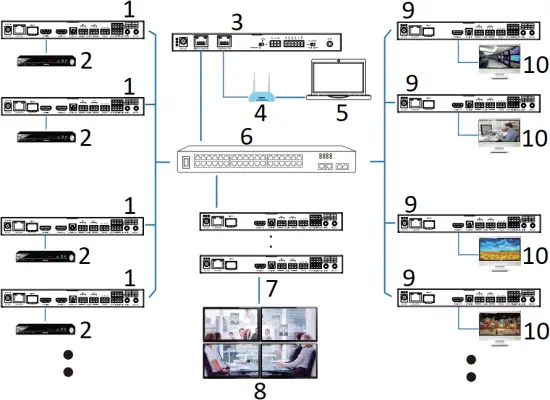
ഘട്ടം 1: എൻകോഡർ, ഡീകോഡർ, PC എന്നിവ ഒരേ സ്വിച്ചറിലേക്ക് കണക്റ്റുചെയ്യുക, തുടർന്ന് HDMI ഉറവിട ഉപകരണവും വൈദ്യുതി വിതരണവും ബന്ധിപ്പിക്കുക. കണക്ഷൻ ഡയഗ്രം താഴെ കാണിച്ചിരിക്കുന്നു.
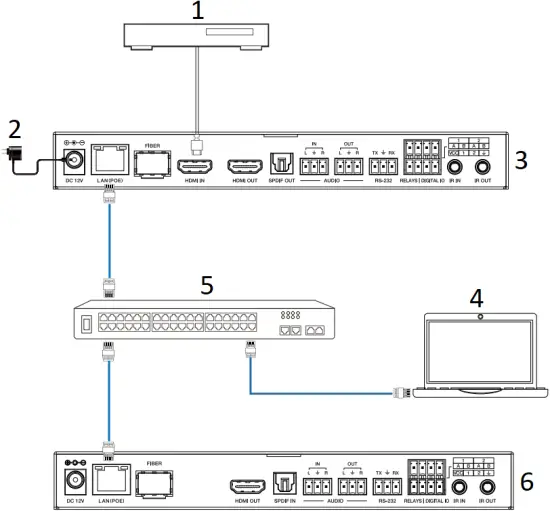
- ബ്ലൂ-റേ പ്ലെയർ
- പവർ അഡാപ്റ്റർ
- എൻകോഡർ
- PC
- 1G ഇഥർനെറ്റ് സ്വിച്ച്
- ഡീകോഡർ
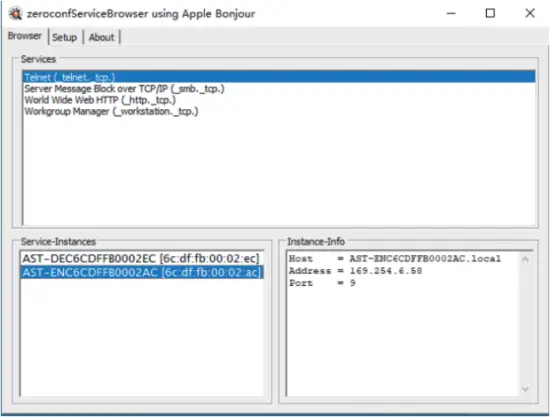
ഘട്ടം 2: എൻകോഡറിന്റെ/ഡീകോഡറിന്റെ ഐപി വിലാസം കണ്ടെത്താൻ പിസിയിൽ ഒരു ബോൺജോർ പ്രോട്ടോക്കോൾ ചെക്കിംഗ് ടൂൾ (zeroconfService ബ്രൗസർ പോലുള്ളവ) ഇൻസ്റ്റാൾ ചെയ്യുക.
ഒരു മുൻ എന്ന നിലയിൽ zeroconfServiceBrowser എടുക്കുകample. സോഫ്റ്റ്വെയർ തുറന്നതിന് ശേഷം, നിങ്ങൾക്ക് ബ്രൗസറിന്റെ സേവനങ്ങളിൽ "വർക്ക്ഗ്രൂപ്പ് മാനേജർ" തിരഞ്ഞെടുക്കാം, സേവന-ഇൻസ്റ്റൻസുകളിൽ ഹോസ്റ്റ് നാമം തിരഞ്ഞെടുക്കുക, കൂടാതെ Instance-Info എന്നതിലെ വിലാസ ഇനത്തിൽ IP വിലാസം കണ്ടെത്തുക.
കുറിപ്പ്:
(1) താഴെ ഇടത് കോണിലുള്ള വിൻഡോ നിലവിലെ നെറ്റ്വർക്കിലെ എല്ലാ ഉപകരണങ്ങളുടെയും ഹോസ്റ്റ് നാമങ്ങൾ പ്രദർശിപ്പിക്കുന്നു.
(2) താഴെ വലത് കോണിലുള്ള വിൻഡോ ഉപകരണത്തിന്റെ ഹോസ്റ്റ് നാമം, ഐപി വിലാസം, പോർട്ട് നമ്പർ എന്നിവ പ്രദർശിപ്പിക്കുന്നു.
(3) എൻകോഡറിന്റെ ഹോസ്റ്റ് നാമം AST-ENC-ൽ ആരംഭിക്കുന്നു; ഡീകോഡറിന്റെ ഹോസ്റ്റ് നാമം AST-DEC-ൽ ആരംഭിക്കുന്നു.
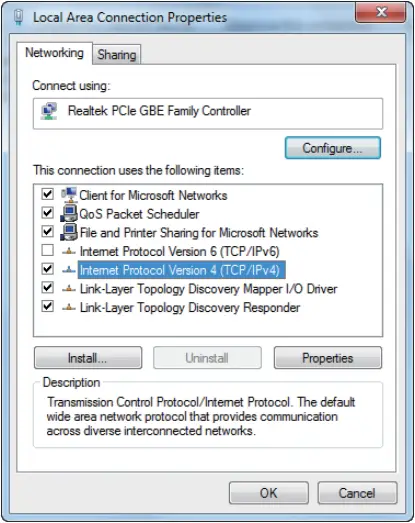
ഘട്ടം 3: ഘട്ടം 2-ൽ കാണുന്ന എൻകോഡറിൻ്റെ/ഡീകോഡറിൻ്റെ ഐപി വിലാസം ഉപയോഗിച്ച് പിസിയുടെ ഐപി വിലാസം അതേ നെറ്റ്വർക്ക് സെഗ്മെൻ്റിലേക്ക് സജ്ജമാക്കുക.

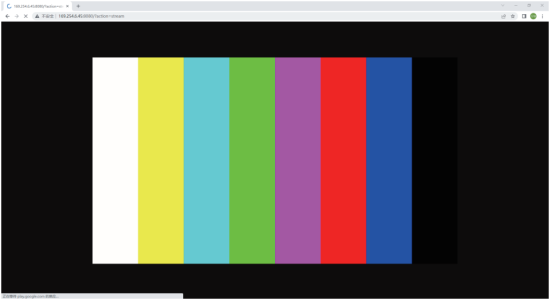
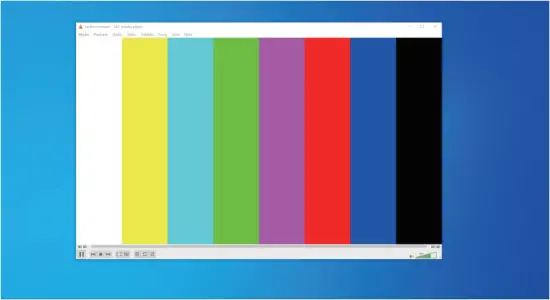
ഘട്ടം 4: ബോൺജൂർ പ്രോട്ടോക്കോൾ ചെക്കിംഗ് ടൂൾ വഴി കണ്ടെത്തിയ എൻകോഡറിന്റെ/ഡീകോഡറിന്റെ ഐപി വിലാസം അനുസരിച്ച്, "http://IP:PORT/?action=stream" എന്നതിലേക്ക് ഇൻപുട്ട് ചെയ്യുക web പിസിയിൽ ബ്രൗസർ ഉപയോഗിക്കുക. താഴെയുള്ള ചിത്രത്തിൽ കാണിച്ചിരിക്കുന്നതുപോലെ, MJPEG സബ്സ്ട്രീം ഡിഫോൾട്ട് റെസല്യൂഷനിൽ പ്രദർശിപ്പിക്കും.
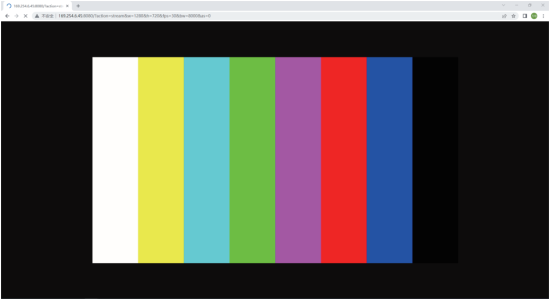
ഘട്ടം 5: ലഭിച്ച എൻകോഡർ/ഡീകോഡർ ഐപി വിലാസത്തിന്റെ മിഴിവ് ഇനിപ്പറയുന്ന ഫോർമാറ്റിൽ മാറ്റുക.
http://IP:PORT/?action=stream&w=x&h=x&fps=x&bw=x&as=x&mq=x
- വീതി: [ഓപ്ഷണൽ] ചിത്രത്തിന്റെ വീതി. പിക്സലിൽ. 'x' എന്നാൽ മാറ്റമില്ല.
സ്ഥിരസ്ഥിതി 640 ആണ്. - ഉയരം: [ഓപ്ഷണൽ] ചിത്രത്തിന്റെ ഉയരം. പിക്സലിൽ. 'x' എന്നാൽ മാറ്റമില്ല.
സ്ഥിരസ്ഥിതി 360 ആണ്. - ഫ്രെയിം: ഉപ-സ്ട്രീമിന്റെ [ഓപ്ഷണൽ] ഫ്രെയിം നിരക്ക്.
യൂണിറ്റ്: fps (ഫ്രെയിം പെർ സെക്കൻഡ്). 'x' എന്നാൽ മാറ്റമില്ല. സ്ഥിരസ്ഥിതി 30 ആണ്. - BW: [ഓപ്ഷണൽ] ഉപ-സ്ട്രീം ട്രാഫിക്കിന്റെ പരമാവധി ബാൻഡ്വിഡ്ത്ത്.
യൂണിറ്റ്: Kbps (Kbits per second). 'x' എന്നാൽ മാറ്റമില്ല. സ്ഥിരസ്ഥിതി 8000 (8Mbps) ആണ്. - AS: [ഓപ്ഷണൽ] വീക്ഷണാനുപാത കോൺഫിഗറേഷൻ. 'x' എന്നാൽ മാറ്റമില്ല. സ്ഥിരസ്ഥിതി 0 ആണ്.
- 0: "WIDTH", "HEIGHT" എന്നിവ ക്രമീകരിച്ചിരിക്കുന്നതിലേക്ക് നീട്ടുക
- 1: [A1 മാത്രം] യഥാർത്ഥ വീക്ഷണാനുപാതം നിലനിർത്തി ഔട്ട്പുട്ടിന്റെ മധ്യത്തിൽ സ്ഥാപിക്കുക (ലെറ്റർബോക്സിംഗ് അല്ലെങ്കിൽ പില്ലർബോക്സിംഗ്)
- MINQ: [ഓപ്ഷണൽ] ഏറ്റവും കുറഞ്ഞ ഇമേജ് ക്വാളിറ്റി നമ്പർ. ശ്രേണി: 10, 20, ..., 90, 100, ഉയർന്ന ക്രമീകരണം എന്നാൽ മികച്ച ചിത്ര നിലവാരം എന്നാണ് അർത്ഥമാക്കുന്നത്. 'x' എന്നാൽ മാറ്റമില്ല. ഡിഫോൾട്ട് മൂല്യം 10 ആണ്. ഡ്രൈവർ ഓട്ടോ ബാൻഡ്വിഡ്ത്ത് നിയന്ത്രണത്തിൻ്റെ ഏറ്റവും കുറഞ്ഞ ഗുണനിലവാര നമ്പർ പരിമിതപ്പെടുത്തുക. MINQ മൂല്യത്തേക്കാൾ ഗുണനിലവാരം കുറവാണെങ്കിൽ, 0 വലുപ്പം നൽകിക്കൊണ്ട് ഡ്രൈവർ ഫ്രെയിം ഡ്രോപ്പ് ചെയ്യും file.
മാറ്റിയ ശേഷം, പുതിയ എൻകോഡർ/ഡീകോഡർ ഐപി വിലാസം ഇതിലേക്ക് നൽകുക web പിസിയിലെ ബ്രൗസറിൽ, താഴെയുള്ള ചിത്രത്തിൽ കാണിച്ചിരിക്കുന്നതുപോലെ, ആവശ്യമുള്ള റെസല്യൂഷനിൽ MJPEG സബ്സ്ട്രീം പ്രദർശിപ്പിക്കപ്പെടും.
7.2 വിഎൽസി മീഡിയ പ്ലെയർ നിർദ്ദേശം
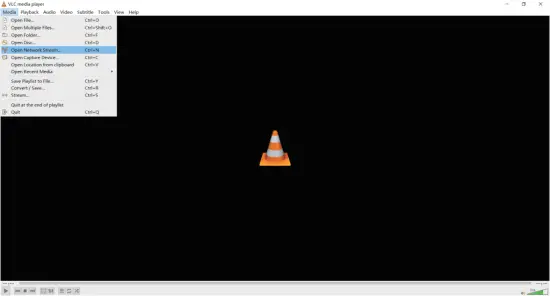
ആദ്യം, അദ്ധ്യായം 1 ൽ വിവരിച്ചിരിക്കുന്നതുപോലെ ഘട്ടം 3~7.1 നടപ്പിലാക്കുക, തുടർന്ന് പിസിയിൽ VLC മീഡിയ പ്ലെയർ തുറക്കുക. ദയവായി ഇനിപ്പറയുന്ന ഐക്കൺ കാണുക.

"മീഡിയ > ഓപ്പൺ നെറ്റ്വർക്ക് സ്ട്രീം" ക്ലിക്ക് ചെയ്യുക
"ഓപ്പൺ നെറ്റ്വർക്ക് സ്ട്രീം" ഓപ്ഷൻ ക്ലിക്ക് ചെയ്ത ശേഷം, ഇനിപ്പറയുന്ന പേജ് ദൃശ്യമാകും.
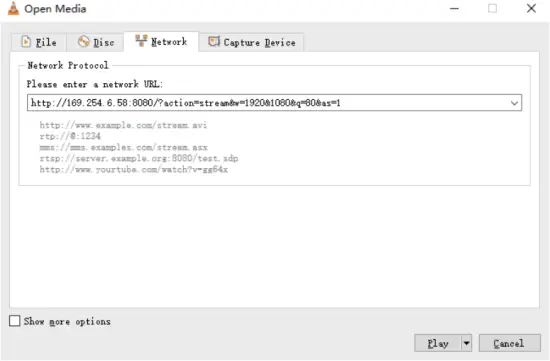
MJPEG സബ്സ്ട്രീം നെറ്റ്വർക്ക് നൽകുക URL, എന്നിട്ട് ക്ലിക്ക് ചെയ്യുക "കളിക്കുക” ബട്ടൺ.
തിരഞ്ഞെടുക്കുക"ടൂളുകൾ>കോഡെക് വിവരങ്ങൾ“, താഴെയുള്ള ചിത്രത്തിൽ കാണിച്ചിരിക്കുന്നതുപോലെ, ഒരു പോപ്പ്-അപ്പ് വിൻഡോ നിങ്ങൾക്ക് സ്ട്രീം വിവരങ്ങൾ പ്രദർശിപ്പിക്കുകയും കാണിക്കുകയും ചെയ്യും.

തിരഞ്ഞെടുക്കുക"ഉപകരണങ്ങൾ>കോഡെക് വിവരങ്ങൾ> സ്ഥിതിവിവരക്കണക്കുകൾനിലവിലെ ബിറ്റ്റേറ്റ് പരിശോധിക്കാൻ ”. ദയവായി ഇനിപ്പറയുന്ന ചിത്രം കാണുക.

ശ്രദ്ധിക്കുക: നിങ്ങൾ പരിശോധിക്കുമ്പോൾ ബിട്രേറ്റ് മുകളിലേക്കും താഴേക്കും ഒഴുകുന്നു. ഇതൊരു സാധാരണ പ്രതിഭാസമാണ്.
8. സ്വിച്ച് മോഡൽ
സിസ്റ്റം സജ്ജീകരിക്കാൻ ഉപയോഗിക്കുന്ന ഒരു നെറ്റ്വർക്ക് സ്വിച്ച് ഇനിപ്പറയുന്ന സവിശേഷതകളെ പിന്തുണയ്ക്കണം:
- ലെയർ 3/നിയന്ത്രിത നെറ്റ്വർക്ക് സ്വിച്ച് തരം.
- ഗിഗാബിറ്റ് ബാൻഡ്വിഡ്ത്ത്.
- 8KB ജംബോ ഫ്രെയിം ശേഷി.
- ഐജിഎംപി സ്നൂപ്പിംഗ്.
ഇനിപ്പറയുന്ന സ്വിച്ച് മോഡലുകൾ വളരെ ശുപാർശ ചെയ്യുന്നു.
| നിർമ്മാതാവ് | മോഡൽ നമ്പർ |
| സിസ്കോ | CISCO SG500 |
| സിസ്കോ | CATALYST സീരീസ് |
| ഹുവായ് | S5720S-28X-PWR-LI-AC |
| ZyXEL | GS2210 |
| ലക്ഷ്വൽ | AMS-4424P |
9. IP സിസ്റ്റം നിയന്ത്രണത്തിലൂടെ 4K
കൺട്രോളർ ബോക്സ് അല്ലെങ്കിൽ മൂന്നാം കക്ഷി കൺട്രോളർ വഴി ഈ ഉൽപ്പന്നം നിയന്ത്രിക്കാനാകും. 4K ഓവർ IP സിസ്റ്റം നിയന്ത്രണത്തിന്റെ വിശദാംശങ്ങൾക്ക്, "വീഡിയോ ഓവർ IP കൺട്രോളർ" എന്ന ഉപയോക്തൃ മാനുവൽ പരിശോധിക്കുക.
10. ആപ്ലിക്കേഷൻ Example
- മൃഗനടപടി
- ഡിവിഡി
- കൺട്രോളർ ബോക്സ്
- റൂട്ടർ (ഓപ്ഷണൽ)
- PC
- 1G ഇഥർനെറ്റ് സ്വിച്ച്
- 4 × ഡിസംബർ
- വീഡിയോ വാൾ
- ഡി.ഇ.സി
- TV
കുറിപ്പ്:
(1) കൺട്രോളർ ബോക്സിലെ കൺട്രോൾ ലാൻ പോർട്ടിന്റെ ഡിഫോൾട്ട് ഐപി മോഡ് DHCP ആണെങ്കിൽ, പിസി "ഒരു ഐപി വിലാസം സ്വയമേവ നേടുക" മോഡിലേക്ക് സജ്ജീകരിക്കേണ്ടതുണ്ട്, കൂടാതെ സിസ്റ്റത്തിൽ ഒരു DHCP സെർവർ (ഉദാ: നെറ്റ്വർക്ക് റൂട്ടർ) ആവശ്യമാണ്.
(2) സിസ്റ്റത്തിൽ DHCP സെർവർ ഇല്ലെങ്കിൽ, കൺട്രോൾ LAN പോർട്ടിന്റെ IP വിലാസമായി 192.168.0.225 ഉപയോഗിക്കും. PC യുടെ IP വിലാസം അതേ നെറ്റ്വർക്ക് സെഗ്മെന്റിലായിരിക്കാൻ നിങ്ങൾ സജ്ജമാക്കേണ്ടതുണ്ട്. ഉദാഹരണത്തിന്ample, PC-യുടെ IP വിലാസം 192.168.0.88 ആയി സജ്ജമാക്കുക.
(3) നിങ്ങൾക്ക് ആക്സസ് ചെയ്യാൻ കഴിയും Web കൺട്രോൾ ലാൻ പോർട്ട് ഐപി വിലാസം (192.168.0.225) ഇൻപുട്ട് ചെയ്തുകൊണ്ട് GUI അല്ലെങ്കിൽ URL നിങ്ങളുടെ കമ്പ്യൂട്ടറിന്റെ ബ്രൗസറിൽ "http://controller.local".
(4) കൺട്രോളർ ബോക്സിന്റെ വീഡിയോ ലാൻ പോർട്ടിന്റെ ക്രമീകരണങ്ങളെക്കുറിച്ച് ശ്രദ്ധിക്കേണ്ടതില്ല, അവ സ്വയമേവ കൺട്രോളർ നിയന്ത്രിക്കുന്നു (സ്ഥിരസ്ഥിതി).
(5) നെറ്റ്വർക്ക് സ്വിച്ച് PoE പിന്തുണയ്ക്കാത്തപ്പോൾ, എൻകോഡർ, ഡീകോഡർ, കൺട്രോളർ ബോക്സ് എന്നിവ DC പവർ അഡാപ്റ്റർ ഉപയോഗിച്ച് പവർ ചെയ്യണം.
![]()
HDMI, HDMI ഹൈ-ഡെഫനിഷൻ മൾട്ടിമീഡിയ ഇൻ്റർഫേസ്, HDMI ലോഗോ എന്നീ പദങ്ങൾ യുണൈറ്റഡ് സ്റ്റേറ്റ്സിലെയും മറ്റ് രാജ്യങ്ങളിലെയും HDMI ലൈസൻസിംഗ് LLC-യുടെ വ്യാപാരമുദ്രകളോ രജിസ്റ്റർ ചെയ്ത വ്യാപാരമുദ്രകളോ ആണ്.
കസ്റ്റമർ സർവീസ്
ഞങ്ങളുടെ ഉപഭോക്തൃ സേവനത്തിലേക്ക് ഒരു ഉൽപ്പന്നം തിരികെ നൽകുന്നത്, ഇനിയുള്ള നിബന്ധനകളുടെയും വ്യവസ്ഥകളുടെയും പൂർണ്ണമായ ധാരണയെ സൂചിപ്പിക്കുന്നു. അവിടെ മുൻകൂർ അറിയിപ്പ് കൂടാതെ നിബന്ധനകളും വ്യവസ്ഥകളും മാറ്റാവുന്നതാണ്.
1) വാറന്റി
ഉൽപ്പന്നത്തിന്റെ പരിമിതമായ വാറന്റി കാലയളവ് മൂന്ന് വർഷമാണ്.
2) വ്യാപ്തി
ഉപഭോക്തൃ സേവനത്തിന്റെ ഈ നിബന്ധനകളും വ്യവസ്ഥകളും ഉൽപ്പന്നങ്ങൾക്കോ അല്ലെങ്കിൽ അംഗീകൃത വിതരണക്കാരൻ മാത്രം വിൽക്കുന്ന മറ്റേതെങ്കിലും ഇനങ്ങൾക്കോ നൽകുന്ന ഉപഭോക്തൃ സേവനത്തിന് ബാധകമാണ്.
3) വാറന്റി ഒഴിവാക്കൽ:
- വാറൻ്റി കാലഹരണപ്പെടുന്നു.
- ഫാക്ടറിയിൽ പ്രയോഗിച്ച സീരിയൽ നമ്പർ ഉൽപ്പന്നത്തിൽ നിന്ന് മാറ്റുകയോ നീക്കം ചെയ്യുകയോ ചെയ്തു.
- ഇനിപ്പറയുന്ന കാരണങ്ങളാൽ ഉണ്ടാകുന്ന കേടുപാടുകൾ, അപചയം അല്ലെങ്കിൽ തകരാറുകൾ:
Wear സാധാരണ തേയ്മാനം.
Specific സാധനങ്ങളുടെ ഉപയോഗം അല്ലെങ്കിൽ ഞങ്ങളുടെ പ്രത്യേകതകൾ പാലിക്കാത്ത ഭാഗങ്ങൾ.
War വാറണ്ടിയുടെ തെളിവായി സർട്ടിഫിക്കറ്റോ ഇൻവോയ്സോ ഇല്ല.
War വാറന്റി കാർഡിൽ കാണിച്ചിരിക്കുന്ന ഉൽപ്പന്ന മോഡൽ റിപ്പയർ ചെയ്യുന്നതിനുള്ള ഉൽപ്പന്നത്തിന്റെ മോഡലുമായി പൊരുത്തപ്പെടുന്നില്ല അല്ലെങ്കിൽ മാറ്റം വരുത്തിയിട്ടുണ്ട്.
Force ബലപ്രയോഗം മൂലമുണ്ടാകുന്ന നാശം.
V സേവനത്തിന് വിതരണക്കാരൻ അംഗീകാരം നൽകിയിട്ടില്ല.
Product ഒരു ഉൽപ്പന്ന വൈകല്യവുമായി ബന്ധമില്ലാത്ത മറ്റേതെങ്കിലും കാരണങ്ങൾ. - ഉൽപ്പന്നത്തിന്റെ ഇൻസ്റ്റാളേഷനോ സജ്ജീകരണത്തിനോ ഉള്ള ഷിപ്പിംഗ് ഫീസ്, ഇൻസ്റ്റാളേഷൻ അല്ലെങ്കിൽ ലേബർ ചാർജുകൾ.
4) ഡോക്യുമെന്റേഷൻ:
കസ്റ്റമർ സർവീസ് വാറന്റി കവറേജിന്റെ പരിധിയിലുള്ള വികലമായ ഉൽപ്പന്നം(കൾ) തോൽവി വ്യക്തമായി നിർവചിച്ചിരിക്കുന്ന ഏക വ്യവസ്ഥയിൽ സ്വീകരിക്കും, കൂടാതെ രേഖകൾ അല്ലെങ്കിൽ ഇൻവോയ്സിന്റെ പകർപ്പ് സ്വീകരിക്കുമ്പോൾ, വാങ്ങിയ തീയതി, ഉൽപ്പന്നത്തിന്റെ തരം, സീരിയൽ നമ്പർ, വിതരണക്കാരന്റെ പേര്.
അഭിപ്രായങ്ങൾ: കൂടുതൽ സഹായത്തിനോ പരിഹാരത്തിനോ ദയവായി നിങ്ങളുടെ പ്രാദേശിക വിതരണക്കാരനെ ബന്ധപ്പെടുക.
പ്രമാണങ്ങൾ / വിഭവങ്ങൾ
 |
VIVO ലിങ്ക് JPEG2000 AVoIP എൻകോഡറും ഡീകോഡറും [pdf] ഉപയോക്തൃ മാനുവൽ VLVWIP2000-ENC, VLVWIP2000-DEC, JPEG2000 AVoIP എൻകോഡറും ഡീകോഡറും, JPEG2000, AVoIP എൻകോഡറും ഡീകോഡറും, എൻകോഡറും ഡീകോഡറും, ഡീകോഡറും |