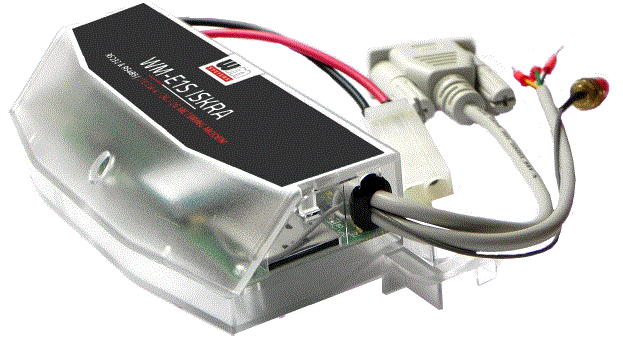
WM സിസ്റ്റംസ് WM-E1S ഇസ്ക്ര മോഡം
സ്പെസിഫിക്കേഷനുകൾ
- ഹാർഡ്വെയർ തരം/പതിപ്പ്: 31 ഫൈനൽ
- ഹാർഡ്വെയർ പതിപ്പ്: 17-02-2025
ഉൽപ്പന്ന വിവരം
- വയർലെസ് ആശയവിനിമയത്തിനും ഡാറ്റാ ട്രാൻസ്മിഷനുമായി രൂപകൽപ്പന ചെയ്തിരിക്കുന്ന ഒരു വൈവിധ്യമാർന്ന ഉപകരണമാണ് മോഡം. ഇത് LTE Cat.4, 3G, 2G, 2G ഫാൾബാക്കോടുകൂടിയ LTE Cat.1, 2G ഫാൾബാക്കോടുകൂടിയ LTE Cat.M/NB എന്നിവയുൾപ്പെടെ വിവിധ സെല്ലുലാർ മൊഡ്യൂൾ തരങ്ങളെ പിന്തുണയ്ക്കുന്നു.
- ഉപയോക്തൃ ക്രമീകരണങ്ങൾ, മൾട്ടി-ഓപ്പറേറ്റർ സിം കാർഡുകൾ, റോമിംഗ് സവിശേഷതകൾ എന്നിവയെ പിന്തുണയ്ക്കുന്ന വ്യത്യസ്ത നെറ്റ്വർക്കുകളിൽ മോഡത്തിന് പ്രവർത്തിക്കാൻ കഴിയും. മെഷർമെന്റ് ഡാറ്റ, ഇവന്റ് ലോഗുകൾ, ലോഡ് കർവ് ഡാറ്റ എന്നിവ വീണ്ടെടുക്കുന്നതിനും മീറ്റർ പാരാമീറ്ററുകൾ വിദൂരമായി കൈകാര്യം ചെയ്യുന്നതിനും ഇത് അനുയോജ്യമാണ്.
- കൂടാതെ, മോഡം പവർ അല്ലെങ്കിൽtagചെറിയ വൈദ്യുതി തടസ്സങ്ങൾ ഉണ്ടാകുമ്പോഴും തുടർച്ചയായ പ്രവർത്തനം ഉറപ്പാക്കുന്ന ഒരു ഓപ്ഷണൽ സൂപ്പർകപ്പാസിറ്റർ ഘടകത്തിലൂടെ ഇ-സംരക്ഷണം.
- കോൺഫിഗറേഷനും ഫേംവെയർ അപ്ഡേറ്റുകളും പോർട്ടുകൾ വഴി പ്രാദേശികമായി അല്ലെങ്കിൽ വിവിധ കണക്ഷൻ രീതികൾ വഴി വിദൂരമായി ചെയ്യാൻ കഴിയും, അതുല്യമായ പാസ്വേഡുകളും TLS പ്രോട്ടോക്കോളും ഉപയോഗിച്ച് സുരക്ഷ വർദ്ധിപ്പിക്കുന്നു.
ഡോക്യുമെന്റ് സ്പെസിഫിക്കേഷനുകൾ
WM-E1S ISKRA® എനർജി മീറ്ററിംഗ് മോഡത്തിന്റെ ഇൻസ്റ്റാളേഷനും കോൺഫിഗറേഷൻ ഘട്ടങ്ങളും അവതരിപ്പിക്കുന്നതിനാണ് ഈ ഡോക്യുമെന്റേഷൻ നിർമ്മിച്ചിരിക്കുന്നത്.
| പ്രമാണ പതിപ്പ്: | REV 2.77.5 |
| ഹാർഡ്വെയർ തരം/പതിപ്പ്: | WM-E1S® ഇസ്ക്രയ്ക്കുള്ള മോഡം® എംടി830, MT831 വൈദ്യുതി മീറ്ററുകൾ |
| ഹാർഡ്വെയർ പതിപ്പ്: | V 5.x (V 5.10 SIMCOM, V5.11 SIMCOM, V5.21 SIMCOM / V 5.30 TELIT / V
5.42 ക്വക്റ്റൽ / വി5.52 ക്വക്റ്റൽ) |
| ഫേംവെയർ പതിപ്പ്: |
|
| WM-E ടേം® കോൺഫിഗറേഷൻ. സോഫ്റ്റ്വെയർ പതിപ്പ്: | വി 1.4.3.5 |
| പേജുകൾ: | 31 |
| നില: | ഫൈനൽ |
| സൃഷ്ടിച്ചത്: | 17-02-2025 |
| അവസാനം പരിഷ്കരിച്ചത്: | 07-08-2025 |
അധ്യായം 1. ആമുഖം
- LTE-അധിഷ്ഠിത സെല്ലുലാർ നെറ്റ്വർക്കുകളിൽ വൈദ്യുതി മീറ്ററുകളുടെ വിദൂര വായനയ്ക്ക് WM-E1S ISKRA® മോഡം അനുയോജ്യമാണ്.
- ഞങ്ങളുടെ മോഡം ഉപയോഗിക്കുന്നതിലൂടെ നിങ്ങൾക്ക് പണം ലാഭിക്കാൻ കഴിയും, കാരണം മീറ്റർ സിസ്റ്റങ്ങളുടെ മാനുവൽ റീഡ്ഔട്ട് ആവശ്യമില്ല.
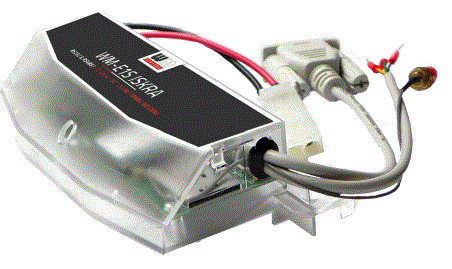
വയർലെസ് ആശയവിനിമയം
വ്യത്യസ്ത സെല്ലുലാർ മൊഡ്യൂൾ തരങ്ങൾ ഉപയോഗിച്ച് മോഡം ഓർഡർ ചെയ്യാവുന്നതാണ്:
- LTE Cat.4 / 3G / 2G മൊഡ്യൂൾ
- 1G "ഫാൾബാക്ക്" ഉള്ള LTE Cat.2 മൊഡ്യൂൾ
- 2G "ഫാൾബാക്ക്" ഉള്ള LTE Cat.M / Cat.NB മൊഡ്യൂൾ
- LTE 4G ആശയവിനിമയത്തിലൂടെ, ഉപകരണത്തിൻ്റെ എല്ലാ പതിപ്പുകളിലും 2G മോഡ് അല്ലെങ്കിൽ 2G "ഫാൾബാക്ക്" സവിശേഷതയുണ്ട്, അതിനാൽ outagഎൽടിഇ 4ജി നെറ്റ്വർക്കിൻ്റെ ഇ/അപ്രാപ്യത, അത് 2ജി നെറ്റ്വർക്കിൽ കൂടുതൽ ആശയവിനിമയം നടത്തുന്നു.
- ക്ലയന്റിന്റെ ആവശ്യങ്ങൾക്കനുസരിച്ച്, മോഡം ഏത് നെറ്റ്വർക്കിലേക്ക് ഉപയോഗിക്കണമെന്ന് (ഉദാ: LTE 4G അല്ലെങ്കിൽ 3G മാത്രം) അല്ലെങ്കിൽ ലഭ്യമായ ഏറ്റവും മികച്ച നെറ്റ്വർക്കിലേക്ക് (ഓട്ടോ മോഡ്) സജ്ജമാക്കാൻ കഴിയും.
- CSData കോളുകൾ ആരംഭിച്ചുകൊണ്ട്, GSM-CSData കണക്ഷൻ മാത്രമാണെന്ന് സജ്ജമാക്കാനും കഴിയും - ഉദാഹരണത്തിന് CSData പിന്തുണയ്ക്കുന്ന മൊഡ്യൂളിന്റെ കാര്യത്തിൽ.
- മോഡം മൾട്ടി-ഓപ്പറേറ്റർ സിമ്മും റോമിംഗ് സവിശേഷതയും പിന്തുണയ്ക്കുന്നു.
- ഈ ഉപകരണം ഒരു സിം-കാർഡ് സ്വതന്ത്രവും മൊബൈൽ ഓപ്പറേറ്റർ സ്വതന്ത്രവുമായ പരിഹാരം നൽകുന്നു.
രൂപകൽപ്പനയും ഇൻസ്റ്റാളേഷനും
- ഈ മോഡം വിവിധ Iskra® MT830, MT831 തരം 3-ഫേസ് വൈദ്യുതി മീറ്ററുകൾക്കായി പ്രത്യേകം വികസിപ്പിച്ചെടുത്തതാണ്.
- മോഡം വ്യത്യസ്ത തരം ഡാറ്റ കണക്ടറുകൾക്കൊപ്പം ലഭ്യമാണ്, അതിനാൽ ഇത് വ്യത്യസ്ത കണക്ഷൻ മോഡുകൾക്ക് അനുയോജ്യമാണ്. അതിന്റെ രൂപകൽപ്പനയും കണക്ഷൻ ഇന്റർഫേസും ഉപയോഗിച്ച് അതിന്റെ RS232, RS485 ഇന്റർഫേസ് വഴി മീറ്ററുമായി ഇത് ബന്ധിപ്പിക്കാൻ കഴിയും.
- ആദ്യ പരിശോധന സാക്ഷ്യപ്പെടുത്തുന്ന സീൽ അല്ലെങ്കിൽ നോൺ-ഡിസ്ട്രക്റ്റീവ്ലി സീൽ ചെയ്ത മെഷറിംഗ് ഹൗസിംഗ് മാറ്റിസ്ഥാപിക്കാതെ തന്നെ വൈദ്യുതി മീറ്ററിന്റെ സീൽ ചെയ്ത ടെർമിനൽ കവറിനു കീഴിൽ ഉപകരണം ഇൻസ്റ്റാൾ ചെയ്യാൻ കഴിയും.
- ഈ പരിഹാരം ഭാവിയിൽ വികസിപ്പിക്കാനുള്ള സാധ്യതയും അർത്ഥമാക്കുന്നു, പ്രത്യേകിച്ച് ഇൻസ്റ്റാളേഷൻ സ്ഥലം കുറവുള്ള സന്ദർഭങ്ങളിൽ ഇത് ഒരു വലിയ സഹായമാണ്.
- മോഡം കുടുംബത്തിലെ ഓരോ മോഡലും ഓരോ മീറ്റർ തരത്തിലും ശരിയായി യോജിക്കുന്നതും മൌണ്ട് ചെയ്യുന്നതുമായ ഒരു ഹൗസിംഗ് ഉപയോഗിച്ച് ഓർഡർ ചെയ്യാവുന്നതാണ്.
- ഏത് സ്റ്റാൻഡേർഡ് കണക്ടറും ഉള്ള ഒരു യൂണിവേഴ്സൽ മീറ്ററിന് - ഒരു ബാഹ്യ മോഡം ആയും ഇത് ഉപയോഗിക്കാം, കൂടാതെ ഒരു ഓപ്ഷണൽ 35mm DIN-റെയിൽ അഡാപ്റ്റർ (ഓർഡർ ഓപ്ഷൻ) ഉപയോഗിച്ച് ഇത് ഉറപ്പിക്കാം.
പ്രവർത്തന സവിശേഷതകൾ, സവിശേഷതകൾ
- അതിനാൽ, നിലവിലുള്ളതും സംഭരിച്ചിരിക്കുന്നതുമായ മെഷർമെൻ്റ് ഡാറ്റ വീണ്ടെടുക്കുന്നതിനും റെക്കോർഡ് ചെയ്ത ഇവൻ്റ് ലോഗും ലോഡ് കർവ് ഡാറ്റയും വായിക്കുന്നതിനും മീറ്റർ പാരാമീറ്റർ വിദൂരമായി കൈകാര്യം ചെയ്യുന്നതിനും മോഡം അനുയോജ്യമാണ്. files.
- മോഡം "പുൾ" ഓപ്പറേറ്റിംഗ് മോഡ് നൽകുന്നതിനാണ് രൂപകൽപ്പന ചെയ്തിരിക്കുന്നത്, അതായത് മീറ്ററിൽ നിന്ന് HES (സ്മാർട്ട് മീറ്ററിംഗ് സെന്റർ/സെർവർ) ലേക്ക് അയയ്ക്കുന്ന സുതാര്യമായ ആശയവിനിമയ ഡാറ്റ മോഡമിന് ഉണ്ട്.
- മൊബൈൽ നെറ്റ്വർക്ക് വഴി ഈ ഉപകരണം വിദൂരമായി ആക്സസ് ചെയ്യാൻ കഴിയും, കൂടാതെ ഒരു APN ഉപയോഗിച്ച് ഇന്റർനെറ്റിലൂടെ ഡാറ്റ അയയ്ക്കാൻ ഇതിന് കഴിയും.
- മീറ്ററിംഗ് സെർവറിനോ മീറ്ററിംഗ് സേവന ദാതാവിനോ ഇടയിലുള്ള സുതാര്യമായ ഡാറ്റാ ട്രാൻസ്മിഷനു വേണ്ടിയാണ് മോഡം അടിസ്ഥാനപരമായി തയ്യാറാക്കിയിരിക്കുന്നത്, CSData കോൾ (2G നെറ്റ്വർക്ക് സജ്ജീകരണത്തിന് മാത്രം!), വൈദ്യുതി മീറ്റർ രജിസ്റ്ററുകൾക്ക് അനുയോജ്യമായ മൊബൈൽ ഇന്റർനെറ്റ് (TCP) കണക്ഷൻ (“PULL” മോഡ്) വഴി. ലോഡ് കർവുകളുടെ റിമോട്ട് റീഡിംഗ്, സ്റ്റാൻഡേർഡ് റീഡിംഗ് കമാൻഡുകളുടെ ഉപയോഗം, മീറ്റർ / പാരാമീറ്ററുകളുടെ റിമോട്ട് റീഡിംഗ്, പരിഷ്ക്കരണം, മീറ്റർ ആപ്ലിക്കേഷൻ ഫേംവെയറിന്റെ അപ്ഡേറ്റ് എന്നിവ ഇതിൽ ഉൾപ്പെടുന്നു.
- RS232/RS485 അനുയോജ്യമായ ഡാറ്റ കണക്ഷനിലൂടെ
കണക്ഷനുകൾ
ഇനിപ്പറയുന്ന കണക്ഷൻ വസ്ത്രങ്ങൾ ഉപയോഗിച്ച് ഉപകരണം ഓർഡർ ചെയ്യാൻ കഴിയും:
- RS232 (DSUB-9 കണക്ടർ / 2-വോർ കണക്ടർ ഇന്റർഫേസ്) – മോഡം കോൺഫിഗറേഷനും മീറ്റർ കണക്ഷനും
- RS485 (2 അല്ലെങ്കിൽ 4-വയർ കണക്റ്റർ) - മീറ്റർ കണക്ഷനായി
പവർ ഉറവിടവും പവർ outage
മീറ്ററിൻ്റെ മെയിൻ കണക്ഷനിൽ നിന്ന് ഉപകരണം പവർ ചെയ്യാൻ കഴിയും (പൊതുവായ 100V-240V എസി വോള്യം പ്രകാരംtagഒപ്പം).
ഇനിപ്പറയുന്ന മോഡുകൾ വഴി മോഡം ബന്ധിപ്പിക്കാൻ കഴിയും:
- മീറ്റർ 57.7/100V എസി പവർ നെറ്റ്വർക്കുമായി ബന്ധിപ്പിച്ചിരിക്കുന്നു: മോഡം ലൈൻ വോള്യവുമായി ബന്ധിപ്പിച്ചിരിക്കണംtage (100V, L1..L2 അല്ലെങ്കിൽ L2..L3 അല്ലെങ്കിൽ L1..L3)
- മീറ്റർ 230/400V എസി പവർ നെറ്റ്വർക്കുമായി ബന്ധിപ്പിച്ചിരിക്കുന്നു: മോഡം ഘട്ടം വോള്യവുമായി ബന്ധിപ്പിച്ചിരിക്കണംtage (230V, L1..N അല്ലെങ്കിൽ L2..N അല്ലെങ്കിൽ L3..N)
Supercapacitor
- മോഡം ഒരു പവർ ou കൂടെ ലഭ്യമാണ്tagഒരു ഓപ്ഷണൽ സൂപ്പർകപ്പാസിറ്റർ ഘടകം മുഖേനയുള്ള ഇ സംരക്ഷണം, ചെറിയ പവർ ou സാഹചര്യത്തിൽ മോഡം പ്രവർത്തനം തുടരാൻ അനുവദിക്കുന്നുtagഇ(കൾ).
- ഒരു പവർ ഈtagഇ, സൂപ്പർകപ്പാസിറ്ററുകൾ സമയത്തിനനുസരിച്ച് ഡിസ്ചാർജ് ചെയ്യും, മോഡം ഷട്ട്ഡൗൺ ചെയ്യും. വൈദ്യുതി വിതരണം തിരികെ വരുമ്പോൾ, മോഡം പുനരാരംഭിക്കുകയും സെല്ലുലാർ നെറ്റ്വർക്കിലൂടെ ഡാറ്റ അയയ്ക്കുകയും ചെയ്യുന്നു, കൂടാതെ കപ്പാസിറ്റർ ഘടകങ്ങൾ ചാർജ് ചെയ്യപ്പെടും).
കോൺഫിഗറേഷനും ഫേംവെയർ പുതുക്കലും
- മോഡം RS232 പോർട്ട് അല്ലെങ്കിൽ ഒപ്റ്റിക്കൽ പോർട്ട് വഴി ലോക്കലായി കോൺഫിഗർ ചെയ്യാൻ കഴിയും, ഒരു CSData കോൾ ഉപയോഗിച്ച് (നിങ്ങൾ 2G നെറ്റ്വർക്ക് ഉപയോഗിക്കുന്ന ഒരു ക്രമീകരണം ഉപയോഗിക്കുകയാണെങ്കിൽ മാത്രം!) അല്ലെങ്കിൽ ഒരു മൊബൈൽ ഇന്റർനെറ്റ് (TCP) കണക്ഷൻ വഴി റിമോട്ടായി കോൺഫിഗർ ചെയ്യാൻ കഴിയും, കൂടാതെ അതിന്റെ ഫേംവെയർ അപ്ഡേറ്റ് ചെയ്യാനും കഴിയും. TCP പോർട്ട് വഴി റിമോട്ടായി (അല്ലെങ്കിൽ ലോക്കൽ സീരിയൽ കണക്ഷൻ വഴി) മോഡം കോൺഫിഗർ ചെയ്യാവുന്നതാണ്, കൂടാതെ APN, ഉപയോക്തൃനാമം, പാസ്വേഡ് (APN വിവരങ്ങൾ നിങ്ങളുടെ പ്രാദേശിക മൊബൈൽ ഓപ്പറേറ്റർ നൽകുന്നു) കോൺഫിഗർ ചെയ്തുകൊണ്ട് വയർലെസ് നെറ്റ്വർക്കിൽ പ്രവർത്തിക്കുന്നു.
- എല്ലാ ക്രമീകരണങ്ങളും ഞങ്ങളുടെ അഡ്മിനിസ്ട്രേഷൻ ടൂൾ (WM-E Term® സോഫ്റ്റ്വെയർ) ഉപയോഗിച്ച് കോൺഫിഗർ ചെയ്യാൻ കഴിയും, മാത്രമല്ല API-യും ലഭ്യമാണ്, അതിനാൽ ഞങ്ങളുടെ പങ്കാളിക്ക് അവരുടെ നിലവിലെ അഡ്മിനിസ്ട്രേഷൻ പരിതസ്ഥിതി എളുപ്പത്തിൽ പൊരുത്തപ്പെടുത്താൻ കഴിയും.
- ഒരു ഉപകരണത്തിനോ ഒരു കൂട്ടം ഉപകരണങ്ങൾക്കോ കോൺഫിഗറേഷൻ സാധ്യമാണ്.
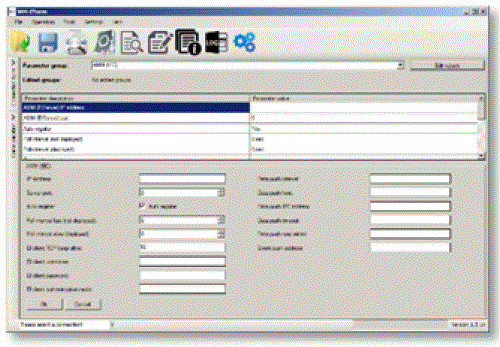
- WM-E Term® ടൂൾ പാസ്വേഡ് പരിരക്ഷിതമാണ്, ഉപയോക്തൃ മാനേജ്മെന്റും സാധ്യമാണ്. കോൺഫിഗറേഷൻ ടൂൾ പ്രവർത്തിപ്പിക്കുന്നതിന് Windows® പ്ലാറ്റ്ഫോം ആവശ്യമാണ്. ഇത് ഇംഗ്ലീഷിലും ചില പ്രാദേശിക ഭാഷകളിലും (ഫ്രഞ്ച്, ജർമ്മൻ, സ്പാനിഷ്, ചെക്ക്, ഹംഗേറിയൻ ഭാഷകളിലും) ലഭ്യമാണ്.
ഫേംവെയർ പുതുക്കൽ
WM-E Term® ഒരു ഉപകരണത്തിനോ ഒരു കൂട്ടം ഉപകരണങ്ങൾക്കോ - പ്രാദേശികമായോ വിദൂരമായോ സുരക്ഷിതമായ ഫേംവെയർ മാറ്റം നൽകുന്നു.
സുരക്ഷ
- ഫേംവെയർ മാറ്റിസ്ഥാപിക്കുമ്പോഴും അതിന്റെ പ്രവർത്തനം ആരംഭിക്കുമ്പോഴും മോഡം HW ഐഡന്റിഫിക്കേഷൻ നടത്തുന്നു. മൂന്നാം കക്ഷി നിർമ്മിതമായതോ പരിഷ്കരിച്ചതോ ആയ ഫേംവെയർ ഇൻസ്റ്റാൾ ചെയ്യുന്നതിനെതിരെ മോഡത്തിന് സംരക്ഷണം നൽകിയിട്ടുണ്ട്. അതുപോലെ, സമഗ്രതയും അനുയോജ്യതയും പരിശോധിക്കുന്നതിനാൽ മൂന്നാം കക്ഷി നിർമ്മിതമായതോ പരിഷ്കരിച്ചതോ ആയ ഫേംവെയറിൽ നിന്ന് മോഡം പ്രവർത്തിപ്പിക്കാൻ കഴിയില്ല.
- ബാഹ്യ ഫ്ലാഷും ഉപകരണത്തിൻ്റെ ആന്തരിക ഫ്ലാഷ് ഉള്ളടക്കവും എൻക്രിപ്റ്റ് ചെയ്തിരിക്കുന്നു.
- ഈ ഉൽപ്പന്നത്തിന്റെ ഫേംവെയർ എൻക്രിപ്റ്റ് ചെയ്തിരിക്കുന്നു, അതുല്യമായ ഒരു AES എൻക്രിപ്ഷൻ കീ ഉപയോഗിച്ചിരിക്കുന്നതിനാൽ, മൂന്നാം കക്ഷി നിർമ്മിച്ചതോ പരിഷ്കരിച്ചതോ ആയ ഫേംവെയറുകൾ മറ്റ് ഉപകരണങ്ങളിൽ നിന്ന് അപ്ലോഡ് ചെയ്യുന്നതോ ഉപയോഗിക്കുന്നതോ ഇത് തടയുന്നു. മറ്റ് മൂന്നാം കക്ഷി ഫേംവെയറുകൾ ഉപയോഗിച്ച് മോഡം അപ്ഗ്രേഡ് ചെയ്യാൻ കഴിയില്ല - അത് സുരക്ഷിതമാണ്.
- മോഡം ഒരു പ്രത്യേകവും അതുല്യവുമായ ആശയവിനിമയ പ്രോട്ടോക്കോൾ ഉപയോഗിക്കുന്നു. ഏതെങ്കിലും ആശയവിനിമയ പാക്കേജ് അല്ലെങ്കിൽ ഡാറ്റ ടെലിഗ്രാം സ്വീകരിക്കുമ്പോൾ പ്രയോഗിക്കുന്ന ഇരട്ട ചെക്ക്സം കാരണം മീറ്ററുമായും മീറ്റർ റീഡൗട്ടുമായും ഉള്ള ഡാറ്റ ആശയവിനിമയം സുരക്ഷിതമാണ്.
- മോഡത്തിന്റെ കൺട്രോൾ പോർട്ട് AES ഉപയോഗിച്ച് എൻക്രിപ്റ്റ് ചെയ്തിരിക്കുന്നു - ഓപ്ഷണൽ.
- ഉയർന്ന നിലവാരത്തിലേക്ക് സുരക്ഷ വർദ്ധിപ്പിക്കുന്നതിനായി, മോഡം പ്രവർത്തന സമയത്ത് ഒരു അദ്വിതീയ കോൺഫിഗറേഷൻ പാസ്വേഡും ഒരു ഓപ്ഷണൽ കമ്മ്യൂണിക്കേഷൻ പാസ്വേഡും ഉപയോഗിച്ച് ഉപയോഗിക്കുന്നതിന് കോൺഫിഗർ ചെയ്യാവുന്നതാണ്.
- സുരക്ഷ പരമാവധി വർദ്ധിപ്പിക്കുന്നതിന് TLS പ്രോട്ടോക്കോൾ പ്രൊട്ടക്ടഡ് ഫേംവെയർ തിരഞ്ഞെടുത്ത് (അഭ്യർത്ഥന പ്രകാരം) അപ്ലോഡ് ചെയ്യാം.
നിലയും അറിയിപ്പും
- മോഡം മൊബൈൽ നെറ്റ്വർക്കും ഉപകരണ ആശയവിനിമയ ആരോഗ്യവും തുടർച്ചയായി നിരീക്ഷിച്ചുകൊണ്ടിരിക്കുകയാണ്, കൂടാതെ സ്റ്റാറ്റസ് വിവരങ്ങൾ (സിഗ്നൽ ശക്തി, QoS) അയയ്ക്കാനും കഴിയും.
- കോൺഫിഗർ ചെയ്ത സവിശേഷതകൾ ഉപയോഗിച്ച്, ഉപയോഗിക്കുന്ന സെല്ലുലാർ നെറ്റ്വർക്കിനെയും മൊബൈൽ ഓപ്പറേറ്റർമാരെയും ആശ്രയിച്ച്, ഉപകരണത്തിന് SMS അലാറം അറിയിപ്പ്, ലാസ്റ്റ് ഗ്യാസ്പ് അറിയിപ്പ് എന്നിവ അയയ്ക്കാൻ കഴിയും (നെറ്റ്വർക്കിൽ SMS അറിയിപ്പ് അനുവദനീയമല്ലെങ്കിൽ, അത് ഉപയോഗിക്കാൻ കഴിയും).
സർട്ടിഫിക്കറ്റ്
CE സർട്ടിഫിക്കേഷൻ അനുസരിച്ച്, മോഡം 2014/53/EU - ഭാഗം 3.a, 3.b, 3.c, ഭാഗം 3.d എന്നീ റേഡിയോ എക്യുപ്മെന്റ് ഡയറക്റ്റീവ് (ReD) സ്റ്റാൻഡേർഡ് പാലിക്കുന്നു. ഉൽപ്പന്നം RoHS, CE സർട്ടിഫൈഡ് ആണ്.
പാഠം 2. കണക്ടറുകൾ, ഇന്റർഫേസുകൾ
ആന്തരികം view 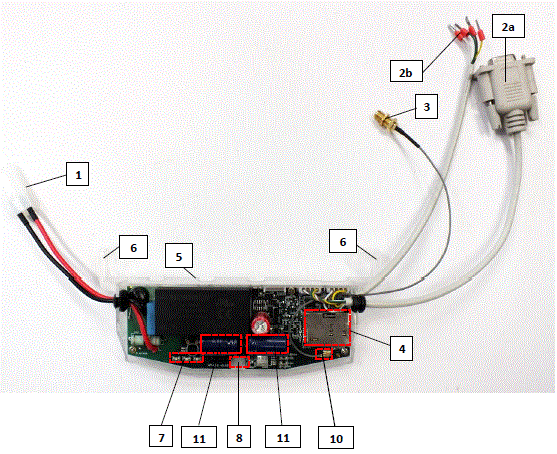
- മെയിൻ കണക്റ്റർ (പിഗ്ടെയിൽ കണക്റ്റർ, മീറ്ററിന്റെ എസി പവറിന്)
- RS232 കണക്ടർ (DSUB9 അല്ലെങ്കിൽ 2-വയർ ഓർഡർ ഓപ്ഷൻ, സ്ലീവ് ഉള്ള വയർ)
- RS485 കണക്റ്റർ (2-പിൻ അല്ലെങ്കിൽ 4-പിൻ - ഓർഡർ ഓപ്ഷൻ, സ്ലീവ് ഉള്ള വയർ)
- ആന്റിന കണക്റ്റർ (SMA-M, 50 ഓം)
- സിം കാർഡ് സ്ലോട്ട് (പുഷ്-ഇൻസേർട്ട്)
- പ്ലാസ്റ്റിക് ഹോൾഡർ (താഴത്തെ പ്ലാസ്റ്റിക് കെയ്സ് മുകളിലെ പ്ലാസ്റ്റിക് കെയ്സിലേക്കുള്ള ഫിക്സേഷൻ)
- പ്ലാസ്റ്റിക് കൊളുത്തുകൾ (ടെർമിനൽ കവറിനു കീഴിൽ, ഹണിവെൽ® / എൽസ്റ്റർ® വൈദ്യുതി മീറ്ററിൽ മോഡം ഘടിപ്പിക്കുന്നതിന്)
- സ്റ്റാറ്റസ് എൽഇഡികൾ
- ടോപ്പ് മോഡം എൻക്ലോഷറിന്റെ ഫിക്സേഷൻ സ്ക്രൂ
- U.FL ആന്റിന കണക്റ്റർ
- സൂപ്പർകപ്പാസിറ്ററുകൾ (ഓർഡർ ഓപ്ഷൻ)
ഇൻസ്റ്റലേഷൻ ഘട്ടങ്ങൾ
- ഘട്ടം #1: മീറ്റർ ടെർമിനൽ കവർ നീക്കം ചെയ്യുക, സ്ക്രൂകൾ അഴിക്കുക.
- ഘട്ടം #2: ഉപകരണം ഓണാക്കിയിട്ടില്ലെന്ന് ഉറപ്പാക്കുക, മീറ്ററിൽ നിന്ന് എസി കണക്റ്റർ (1) നീക്കം ചെയ്യുക.
- ഘട്ടം #3: മാറ്റിസ്ഥാപിക്കാവുന്നതും സജീവവുമായ ഒരു സിം കാർഡ് (APN ഉള്ള) സിം-ഹോൾഡറിലേക്ക് (4) ഇടുക - ചിപ്പ് താഴേക്ക് നോക്കുന്നു, സിമ്മിന്റെ മുറിച്ച അറ്റം മോഡമിലേക്ക് നോക്കുന്നു. സിം ഉറപ്പിക്കുന്നത് വരെ അത് അമർത്തുക (നിങ്ങൾക്ക് ഒരു ക്ലിക്ക് ശബ്ദം കേൾക്കും).
(ആവശ്യമെങ്കിൽ, കാർഡ് വീണ്ടും അമർത്തിയാൽ സിം കാർഡ് എളുപ്പത്തിൽ നീക്കം ചെയ്യാൻ കഴിയും, അങ്ങനെ കാർഡ് ട്രേയിൽ നിന്ന് പുറത്തേക്ക് പോകും.) - ഘട്ടം #4: മോഡം എൻക്ലോഷർ ഇൻസ്റ്റാൾ ചെയ്യുക (5) മീറ്ററിന് സമീപം ഉറപ്പിക്കുക - അല്ലെങ്കിൽ ഒരു നിശ്ചിത സ്ഥാനത്ത് മതിലിലേക്ക് കയറ്റുക. മീറ്റർ ടെർമിനൽ കവറിനു കീഴിൽ (18) - മീറ്ററിൻ്റെ ഇൻ്റേണൽ മൗണ്ടിംഗ് പോയിൻ്റുകളിലേക്ക് ഉപകരണം തിരുകുകയും മീറ്ററിൻ്റെ ഉപയോക്തൃ ഗൈഡ് അനുസരിച്ച് അത് മീറ്റർ ടെർമിനൽ കവറിൽ അറ്റാച്ചുചെയ്യുകയും ചെയ്യാം.
- ഘട്ടം #5: ആശയവിനിമയവുമായി ബന്ധപ്പെട്ട ആന്റിന കണക്ടറിലേക്ക് (3) ഒരു ബാഹ്യ മാഗ്നറ്റിക് ബേസ് അല്ലെങ്കിൽ സ്റ്റിക്ക് ആന്റിന മൌണ്ട് ചെയ്യുക - ഉദാ: LTE ആന്റിന.
- ഘട്ടം #6: RS232 കേബിളും (2a) ഒരു RS232/USB DONGLE കൺവെർട്ടറും ഉപയോഗിച്ച് മോഡം നിങ്ങളുടെ കമ്പ്യൂട്ടറുമായി ബന്ധിപ്പിക്കുക.
- ഘട്ടം #7: മോഡമിൻ്റെ എസി പവർ കണക്റ്റർ (1) – വയർ സോക്കറ്റ് കണക്ഷൻ അല്ലെങ്കിൽ പതിപ്പിനെ ആശ്രയിച്ച് “പിഗ്ടെയിൽ” കണക്റ്റർ – മീറ്റർ പവർ ഇൻപുട്ടിലേക്കോ (100-230V എസിക്ക്) അല്ലെങ്കിൽ ഒരു ബാഹ്യ 230V പവർ സപ്ലൈയിലേക്കോ ബന്ധിപ്പിക്കുക.
- ഘട്ടം #8: WM-E Term® സോഫ്റ്റ്വെയർ ഉപയോഗിച്ച് മോഡം കോൺഫിഗർ ചെയ്യുക.
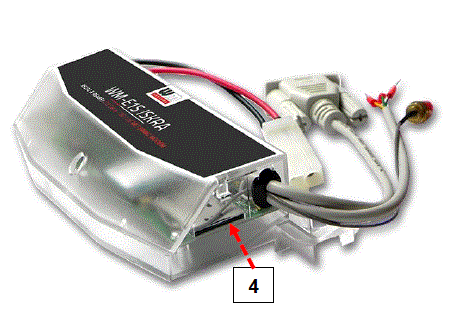
മോഡം അതിൻ്റെ RS232 പോർട്ട് വഴി മാത്രമേ കോൺഫിഗർ ചെയ്യാൻ കഴിയൂ എന്നത് ശ്രദ്ധിക്കുക!
- ഘട്ടം #9: കോൺഫിഗറേഷൻ പൂർത്തിയാക്കിയ ശേഷം, USB അഡാപ്റ്ററിൽ നിന്ന് "2a" എന്ന് ലേബൽ ചെയ്തിരിക്കുന്ന R232 കേബിൾ നീക്കം ചെയ്യുക.
- ഘട്ടം #10: മീറ്ററിൽ നിന്ന് (അല്ലെങ്കിൽ പവർ സ്രോതസ്സിൽ നിന്ന്) മോഡം എസി പവർ കണക്റ്റർ (1) വിച്ഛേദിക്കുക. മോഡം ഷട്ട് ഡൗൺ ആകും.
- ഘട്ടം #11: നിങ്ങൾ ഉപയോഗിക്കാൻ ആഗ്രഹിക്കുന്ന ഇന്റർഫേസിൽ മോഡത്തിനും മീറ്ററിനും ഇടയിൽ ഒരു ഡാറ്റ കണക്ഷൻ ഉണ്ടാക്കുക (പോർട്ട് നമ്പർ. ഡാറ്റ കണക്ഷൻ "2a" മീറ്റർ RS232 ഡാറ്റ കണക്ടറിലേക്ക് ("G" ഒപ്പിട്ടത്).
- ഘട്ടം #12: മോഡത്തിന് RS485 വയറുകളുണ്ടെങ്കിൽ, കണക്റ്റുചെയ്ത ഡാറ്റ കേബിൾ ഉപയോഗിച്ച് RS485 (2b) കണക്റ്റർ ഉപയോഗിച്ച് മോഡത്തിനും മീറ്ററിനും ഇടയിൽ ഡാറ്റ കണക്ഷൻ ഉണ്ടാക്കുക.
- ഘട്ടം #13: മോഡത്തിന്റെ എസി പവർ കണക്റ്റർ (1) - വയർ സോക്കറ്റ് കണക്ഷൻ അല്ലെങ്കിൽ പതിപ്പിനെ ആശ്രയിച്ച് “പിഗ്ടെയിൽ” കണക്റ്റർ - മീറ്ററിന്റെ പവർ ഇൻപുട്ടിലേക്ക് (100-230V എസിക്ക്) തിരികെ ബന്ധിപ്പിക്കുക.
അപ്പോൾ മീറ്ററാണ് മോഡത്തിന് പവർ നൽകുന്നത്, മോഡം അതിന്റെ പ്രവർത്തനം ആരംഭിക്കുകയും LED സിഗ്നലുകൾ നിലവിലെ പ്രവർത്തനത്തെ ഒപ്പിടുകയും ചെയ്യുന്നു. - ഘട്ടം #14: മീറ്ററിന്റെ ടെർമിനൽ കവർ പിന്നിലേക്ക് വയ്ക്കുകയും രണ്ട് സ്ക്രൂകൾ ഉപയോഗിച്ച് ഉറപ്പിക്കുകയും ചെയ്യുക.
മോഡം മീറ്ററുമായി ബന്ധിപ്പിക്കുന്നു (Iskra® MT830, MT831 മീറ്റർ)
- ഘട്ടം #1: Iskra® MT830 അല്ലെങ്കിൽ MT831 മീറ്ററിന്റെ കമ്മ്യൂണിക്കേഷൻ മൊഡ്യൂൾ പ്ലാസ്റ്റിക് കേസ്, ഹൗസിംഗിന്റെ മുകളിൽ നിന്ന് 2 സ്ക്രൂകൾ വിടുവിച്ചുകൊണ്ട് നീക്കം ചെയ്യുക.
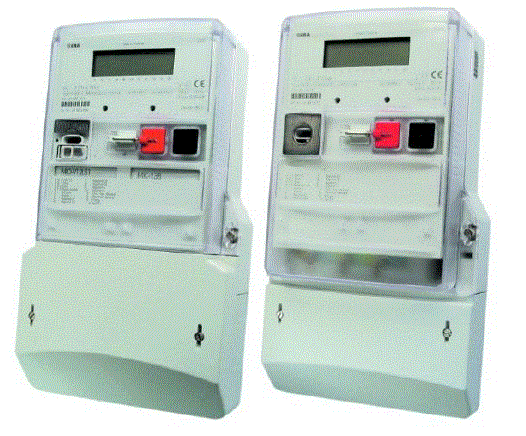
- ഘട്ടം #2: ഡാറ്റ കണക്റ്റർ ഉപയോഗിച്ച് മീറ്ററിലേക്ക് ബന്ധിപ്പിക്കുക.
- RS485 ("2b" സൈൻ ചെയ്ത കേബിൾ 2-പിൻ വയർ/സ്ലീവ് (തവിട്ട്, വെള്ള വയറുകൾ) മീറ്ററിന്റെ RS485 ഇൻപുട്ടുമായി ബന്ധിപ്പിക്കുക.
- ഇൻപുട്ടിന് 4-പിന്നുകൾ ഉണ്ടെങ്കിൽ, "D" എന്ന് അടയാളപ്പെടുത്തിയിരിക്കുന്ന സ്ഥലത്തേക്ക് നിങ്ങൾക്ക് നാല് കേബിളുകളും ബന്ധിപ്പിക്കാനും കഴിയും.
- ചിത്രത്തിൽ സ്ലീവ് വയർ കണക്ഷൻ കാണിക്കുന്നു, പക്ഷേ മോഡം ഒരു "പിഗ്ടെയിൽ" കണക്ഷൻ ഉപയോഗിച്ചും ഓർഡർ ചെയ്യാൻ കഴിയും. ചില മീറ്ററുകൾ ഒരു ടെർമിനൽ ബ്ലോക്ക് സ്വീകരിക്കാൻ തയ്യാറാണ്, ഈ സാഹചര്യത്തിൽ ഒരു 2- അല്ലെങ്കിൽ 4-പിൻ ടെർമിനൽ ബ്ലോക്ക് സ്ലീവുകളുമായി ബന്ധിപ്പിക്കുന്നു.

- ഘട്ടം #3: മോഡത്തിൻ്റെ പ്ലാസ്റ്റിക് പവർ പ്ലഗ് (1) മീറ്ററിൻ്റെ ടു വയർ കണക്ഷനുമായി ബന്ധിപ്പിക്കുക (ഇനിപ്പറയുന്ന ചിത്രത്തിൽ "E" എന്ന് അടയാളപ്പെടുത്തിയിരിക്കുന്നു). എസി പവർ കണക്റ്റർ ഒരു പവർ പ്ലഗ് അല്ല, വയർ എൻഡ് ഫെറൂൾ ആണെങ്കിൽ, വയറുകളെ മീറ്റർ ഘട്ടത്തിലേക്കും ഗ്രൗണ്ടിലേക്കും ബന്ധിപ്പിക്കുക.

- ഘട്ടം #4: നിങ്ങൾ ഇതിനകം ചെയ്തിട്ടില്ലെങ്കിൽ, ഉചിതമായ ആന്റിന (3) മോഡം സ്വിംഗ് കണക്ടറുമായി ബന്ധിപ്പിക്കുക.
- ഘട്ടം #5: മോഡം എസി കേബിളിൻ്റെ (1) വയർ എൻഡ് സോക്കറ്റുകൾ മീറ്ററിലേക്കും എസി പവർ കണക്ഷൻ പോയിൻ്റുകളിലേക്കും (ചുവപ്പ്, കറുപ്പ് വയറുകൾ) ബന്ധിപ്പിക്കുക - ശ്രദ്ധാപൂർവ്വം, കാരണം ഈ സമയത്ത്, മീറ്ററിന് 100-240V എസി വിതരണ വോള്യത്തിന് താഴെയാകാം.tagഇ! ഇപ്പോൾ മുതൽ, മോഡത്തിന് പവർ ലഭിക്കുന്നത് മീറ്ററിൽ നിന്നാണ്.
ശ്രദ്ധ! മോഡം ഓണായിരിക്കുമ്പോൾ ഒരിക്കലും ഉപകരണത്തിൻ്റെ കവർ നീക്കം ചെയ്യരുത്! - ഘട്ടം #6: മീറ്ററിന്റെ ടെർമിനൽ കവറിനു കീഴിൽ, അതിനായി രൂപകൽപ്പന ചെയ്ത ഭാഗത്തേക്ക് (ടാബുകളിലേക്ക് (“H” എന്ന് അടയാളപ്പെടുത്തിയിരിക്കുന്നു), അല്ലെങ്കിൽ മറ്റൊരു അറ്റാച്ച്മെന്റ് പോയിന്റിലേക്ക് മോഡം (“G” എന്ന് ഒപ്പിട്ടത്) ഘടിപ്പിക്കുക.

- ഘട്ടം #7: മീറ്ററിലെ ടെർമിനൽ കവർ മാറ്റി, അത് സ്ലൈഡ് ചെയ്ത്, രണ്ട് സ്ക്രൂകൾ ഉപയോഗിച്ച് ഉറപ്പിക്കുക.
ആൻ്റിന കണക്ഷൻ
ശരിയായ പ്രവർത്തനത്തിനും നല്ല ആശയവിനിമയത്തിനും മോഡത്തിന് സെല്ലുലാർ നെറ്റ്വർക്കിന്റെ മതിയായ സിഗ്നൽ ശക്തിയും LTE അല്ലെങ്കിൽ സമാനമായ ആന്റിനയും ആവശ്യമാണ്. സെല്ലുലാർ നെറ്റ്വർക്കിന്റെ സിഗ്നൽ ശക്തി ആവശ്യത്തിന് ഉള്ളിടത്ത്, ഒരു ആന്തരിക ആന്റിന ഉപയോഗിക്കാൻ മതിയാകും. എന്നിരുന്നാലും, സിഗ്നൽ ശക്തി കുറവോ മോശമോ ആയ സ്ഥലങ്ങളിൽ, നിങ്ങൾ ഒരു ബാഹ്യ ആന്റിന (50 ഓം, SMA കണക്റ്റർ) ഉപയോഗിക്കണം, അത് മോഡത്തിൽ ഘടിപ്പിക്കാം - മീറ്ററിന്റെ മുകളിലെ കവറിനുള്ളിൽ പോലും നിങ്ങൾക്ക് അത് സ്ഥാപിക്കാം.
ഓപ്പറേഷൻ എൽഇഡികൾ
മോഡം പാനലിലെ LED ലേബലുകൾക്ക് സമാനമാണ് LED നമ്പറിംഗ്: ഇടത്തുനിന്ന് വലത്തോട്ട് ക്രമത്തിൽ: LED1 (നീല, ഇടത്), LED3 (പച്ച, മധ്യഭാഗം), LED2 (ചുവപ്പ്, വലത്). 
ഫാക്ടറി ഡിഫോൾട്ട് LED സിഗ്നലുകൾ
| LED ഐഡൻ്റിഫയർ | ഇവൻ്റുകൾ |
| എൽഇഡി 1 GSM / GPRS നില |
|
|
|
| LED 3 ഇ-മീറ്റർ നില |
|
| LED 2 സിം പദവി / സിം പരാജയം or പിൻ പിശക് |
|
ഫാക്ടറി ഡിഫോൾട്ടുകൾക്ക് മുകളിൽ, സ്റ്റാൻഡേർഡ് മീറ്റർ ഇൻ്റർഫേസ് പാരാമീറ്റർ ഗ്രൂപ്പിലെ WM-E Term® കോൺഫിഗറേഷൻ ടൂൾ ഉപയോഗിച്ച് LED സിഗ്നലുകളുടെ പ്രവർത്തനവും ക്രമവും മാറ്റാൻ കഴിയും, അവിടെ നിങ്ങൾക്ക് ഇനിപ്പറയുന്ന ലെഡ്സിൻ്റെ പ്രവർത്തനങ്ങളിലൊന്ന് നിർവചിക്കാം (LED1. .LED3) അടുത്ത ലിസ്റ്റ് അനുസരിച്ച്:
| തിരഞ്ഞെടുക്കാവുന്ന LED നില (WM-E ടേമിൽ) |
| അല്ല ഉപയോഗിച്ചു |
| GSM / GPRS നില (മുകളിൽ കാണുക) |
| സിം നില (മുകളിൽ കാണുക) |
| ഇ-മീറ്റർ നില (മുകളിൽ കാണുക) |
| ഇ-മീറ്റർ റിലേ നില - WM-E3S CIR പതിപ്പിൻ്റെ കാര്യത്തിൽ (ഇ-മീറ്റർ റിലേ ഔട്ട്പുട്ട് നില) |
| എം-ബസ് നില |
| ഫേംവെയർ നില |
| നെറ്റ്വർക്ക് നിലയും ആക്സസ് സാങ്കേതികവിദ്യയും - നെറ്റ്വർക്ക് നിലയും ആക്സസ് ചെയ്യാവുന്ന സാങ്കേതിക വിവരങ്ങളും |
| IEC പോളിംഗിനൊപ്പം മീറ്റർ നില - IEC ആശയവിനിമയത്തിൻ്റെ കാര്യത്തിൽ മീറ്റർ നില |
| AMM (IEC) ക്ലയൻ്റ് സ്റ്റേറ്റ് |
കൂടുതൽ സ്റ്റാറ്റസ് LED സിഗ്നലുകൾ (കോൺഫിഗർ ചെയ്യാനും കഴിയും):
| LED ഐഡൻ്റിഫയർ | ഇവൻ്റുകൾ |
| ഇ-മീറ്റർ റിലേ നില - ഇ-മീറ്റർ റിലേ* ഔട്ട്പുട്ട് നില (WM-E3S CIR-ൻ്റെ കാര്യത്തിൽ മാത്രം) |
|
| എം-ബസ് നില | · ഉപയോഗിച്ചിട്ടില്ല |
| ഫേംവെയർ പദവി |
|
| നെറ്റ്വർക്ക് നിലയും ആക്സസ് സാങ്കേതികവിദ്യയും |
|
| IEC പോളിംഗിനൊപ്പം മീറ്റർ നില |
|
| AMM (IEC) ക്ലയൻ്റ് സ്റ്റേറ്റ് |
|
- ഇവിടെ ലിസ്റ്റുചെയ്തിരിക്കുന്ന റിലേ ഉപയോഗിച്ച് ഇ-മീറ്ററിൻ്റെ വൈദ്യുതി വിതരണം നിയന്ത്രിക്കാനാകും. താരിഫ് മാറ്റത്തിന് ഉപയോഗിക്കാൻ കഴിയില്ല!
- മോഡത്തിൽ നിന്ന് EI സെർവറിലേക്ക് പോകുന്ന ഒരു സുതാര്യമായ TCP ചാനലാണ് EI ക്ലയന്റ്.
- അടുത്ത ചിത്രത്തിൽ കാണിച്ചിരിക്കുന്നതുപോലെ, റിലേ സ്റ്റാറ്റസിൽ അത് "ഡിസ്കണക്റ്റഡ്" ആണ്, അത് "ആക്റ്റീവ്" മോഡാണ് (റിലേ പിൻവലിക്കുന്നു, ഈ സാഹചര്യത്തിൽ LED ഓണാക്കുന്നു).
- "കണക്റ്റഡ്" എന്നത് "സാധാരണ" മോഡിലാണ് (റിലേ റിലീസ്), LED ഓഫാക്കി.
- “കണക്ഷന് തയ്യാറാണ്” എന്നതാണെങ്കിൽ, ഓരോ സെക്കൻഡിലും എൽഇഡി ഫ്ലാഷ് ചെയ്യുമ്പോൾ അത് “റെഡി” എന്ന നിലയിലാണ്.
- ഫേംവെയർ അപ്ലോഡ് സമയത്ത്, LED- കൾ സാധാരണ പ്രവർത്തനത്തെ സൂചിപ്പിക്കുന്നു - FW അപ്ഡേറ്റ് സമയത്ത് പ്രത്യേക സൂചനകളൊന്നുമില്ല. FW ഇൻസ്റ്റാൾ ചെയ്ത ശേഷം, മൂന്ന് LED- കൾ 5 സെക്കൻഡ് പ്രകാശിക്കുന്നു, തുടർന്ന് മൂന്നും പ്രകാശിക്കുന്നു. തുടർന്ന് മോഡം പുനരാരംഭിക്കുകയും പുതിയ ഫേംവെയർ ഉപയോഗിക്കുകയും ചെയ്യും. തുടർന്ന് ഓരോ എൽഇഡിയും ലിസ്റ്റുചെയ്ത സംസ്ഥാനങ്ങൾക്കനുസരിച്ച് മിന്നുന്നത് തുടരും.
ആന്തരിക കണക്ടറുകൾ
- RS232 – 4-പിൻ ഇന്റേണൽ കണക്റ്റർ, CN500-ലേക്ക് ബന്ധിപ്പിച്ചിരിക്കുന്നു. DSUB-9 തരം കണക്ടറിലേക്കുള്ള സീരിയൽ കേബിൾ ഔട്ട്ഫിറ്റ് (പകരം ഇത് 2-വയർ തരം കണക്റ്റർ ഔട്ട്ഫിറ്റ് ഉപയോഗിച്ച് ഓർഡർ ചെയ്യാവുന്നതാണ്).
- RS485 – 4-പിൻ ഇന്റേണൽ കണക്റ്റർ, CN501-ലേക്ക് ബന്ധിപ്പിച്ചിരിക്കുന്നു. RS485 കേബിൾ ഔട്ട്ഫിറ്റ് 2- അല്ലെങ്കിൽ 4-വയർ കണക്ടറിലേക്ക് നയിക്കുന്നു.
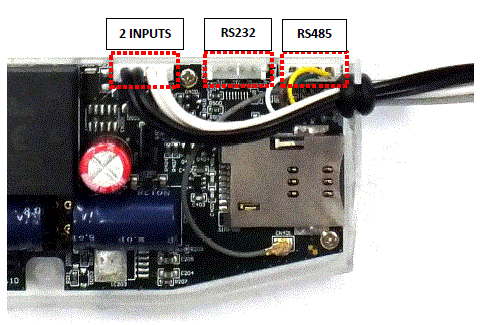
ഓർഡർ ഓപ്ഷൻ: 2 ഇൻപുട്ടുകൾ – ഓർഡർ ഓപ്ഷൻ – 4-പിൻ കണക്റ്റർ, CN502-ലേക്ക് ബന്ധിപ്പിച്ചിരിക്കുന്നു. ബാഹ്യ ഉപകരണങ്ങളുമായി ബന്ധിപ്പിക്കുന്നതിന് കേബിൾ ഔട്ട്ഫിറ്റ് ഒരു 4-വയർ കണക്ടറിലേക്ക് നയിക്കുന്നു. പിൻഔട്ട്: കറുത്ത വയർ ഇൻപുട്ട് നമ്പർ #1 മായി ബന്ധപ്പെട്ടിരിക്കുന്നു, വെളുത്ത വയർ ഇൻപുട്ട് നമ്പർ #2 മായി ബന്ധപ്പെട്ടിരിക്കുന്നു.
RS232 കണക്റ്റർ പിൻഔട്ട് (ആന്തരിക CS5 കണക്റ്റർ)
| നിറം | ബദൽ നിറം | അടയാളപ്പെടുത്തുക | അർത്ഥം | മീറ്റർ RS232 പോർട്ട് കണക്റ്റർ സൈഡ് |
| വെള്ള | കറുപ്പ് | ജിഎൻഡി | ഗ്രൗണ്ട് | മീറ്റർ_ജിഎൻഡി |
| ബ്രൗൺ | ചുവപ്പ് | RX | ഡാറ്റ സ്വീകരിക്കുന്നു | മീറ്റർ_TX |
| പച്ച | പച്ച | TX | ഡാറ്റ അയയ്ക്കുന്നു | മീറ്റർ_ആർഎക്സ് |
| മഞ്ഞ | മഞ്ഞ | ഡിസിഡി | ഡിസിഡി (അനുയോജ്യമായ മീറ്ററാണെങ്കിൽ) | മീറ്റർ_ഡിസിഡി |
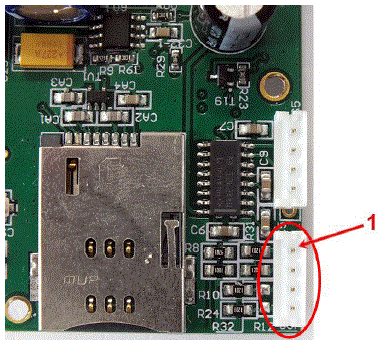
CS5 കണക്ടറിൽ - ഫോട്ടോയിൽ ചുവന്ന വൃത്തം കൊണ്ട് അടയാളപ്പെടുത്തിയിരിക്കുന്നു - പിൻ nr. "1" എന്നത് GND കണക്ടറാണ്. 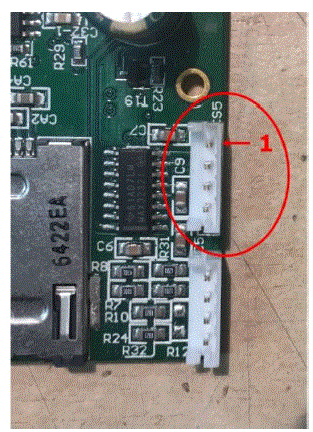
RS485 കണക്റ്റർ പിൻഔട്ട് (ആന്തരിക CS7 കണക്റ്റർ)
| നിറം | ബദൽ നിറം | അടയാളപ്പെടുത്തുക | അർത്ഥം | മീറ്റർ RS485 പോർട്ട് കണക്റ്റർ സൈഡ് |
| വെള്ള | കറുപ്പ് | RX+ | ഡാറ്റ സ്വീകരിക്കുന്നു | മീറ്റർ_TX+ |
| ബ്രൗൺ | ചുവപ്പ് | RX- | ഡാറ്റ സ്വീകരിക്കുന്നു | മീറ്റർ_TX- |
| മഞ്ഞ | മഞ്ഞ | TX- | ഡാറ്റ അയയ്ക്കുന്നു | മീറ്റർ_RX- |
| പച്ച | പച്ച | TX+ | ഡാറ്റ അയയ്ക്കുന്നു | മീറ്റർ_RX+ |
CS7 കണക്ടറിൽ - ഫോട്ടോയിൽ ചുവന്ന വൃത്തം കൊണ്ട് അടയാളപ്പെടുത്തിയിരിക്കുന്നു - പിൻ nr. "1" എന്നത് RX+ കണക്ടറാണ്.
പവർ യൂtagഇ മാനേജ്മെന്റ് - സൂപ്പർകപ്പാസിറ്റർ വികാസത്തിനായി!
- സൂപ്പർകപ്പാസിറ്ററുകൾ പിസിബി ബോർഡിൽ പ്രദർശിപ്പിച്ചിട്ടുണ്ടെങ്കിൽ, മോഡത്തിന്റെ ഫേംവെയർ LastGASP സവിശേഷതയെ പിന്തുണയ്ക്കും. ഇതിനർത്ഥം വൈദ്യുതിയുടെ കാര്യത്തിൽ outage മോഡത്തിൻ്റെ സൂപ്പർ കപ്പാസിറ്റർ കുറച്ച് സമയത്തേക്ക് (കുറച്ച് മിനിറ്റ്) മോഡം പ്രവർത്തിപ്പിക്കാൻ അനുവദിക്കുന്നു.
- മെയിൻ/ഇൻപുട്ട് പവർ സോഴ്സിൻ്റെ നഷ്ടം കണ്ടെത്തുന്ന സാഹചര്യത്തിൽ, മോഡം ഒരു "പവർ ലോസ്റ്റ്" ഇവൻ്റ് സൃഷ്ടിക്കുകയും കോൺഫിഗർ ചെയ്ത ഫോൺ നമ്പറിലേക്ക് സന്ദേശം ഉടൻ ഒരു SMS ടെക്സ്റ്റായി കൈമാറുകയും ചെയ്യും.
- മെയിൻ/പവർ സ്രോതസ്സ് വീണ്ടെടുക്കുന്ന സാഹചര്യത്തിൽ മോഡം "പവർ റിട്ടേൺ" സന്ദേശം ജനറേറ്റ് ചെയ്യുകയും SMS ടെക്സ്റ്റ് വഴി അയയ്ക്കുകയും ചെയ്യുന്നു.
- AMM (IEC) പാരാമീറ്റർ ഗ്രൂപ്പ് ഭാഗത്ത് - WM-E Term® ആപ്ലിക്കേഷൻ വഴി LastGASP സന്ദേശ ക്രമീകരണങ്ങൾ പ്രവർത്തനക്ഷമമാക്കാം.
പുഷ് ഓപ്പറേഷൻ രീതി
- കോൺഫിഗറേഷൻ, മെയിൻ്റനൻസ് ജോലികൾക്കായി കേന്ദ്രത്തിലേക്കും മറ്റ് ദിശകളിലേക്കും പൂർണ്ണമായ വായനയും ഡാറ്റ അയയ്ക്കാനുള്ള സംവിധാനവും നിർവചിക്കപ്പെട്ട പാതകളിൽ സാക്ഷാത്കരിക്കാനാകും.

- മോഡം നെറ്റ്വർക്കിൽ തുടർച്ചയായി പ്രവർത്തിക്കുന്നില്ല.
- അതിനാൽ, മുൻകൂട്ടി നിശ്ചയിച്ച ഇടവേളകളിൽ സ്വയമേവ റിമോട്ട് റീഡ്ഔട്ട് ആരംഭിക്കുന്നതിന് മറ്റൊരു ഓപ്ഷനും മീറ്റർ ഡാറ്റ അയയ്ക്കൽ മോഡും ഉണ്ട്. എന്തായാലും, വ്യത്യസ്ത സംഭവങ്ങളുടെ (ഉദാ: മീറ്റർ കവർ നീക്കംചെയ്യൽ, കേന്ദ്രത്തിൽ നിന്നുള്ള ഇൻകമിംഗ് SMS സന്ദേശം) സന്ദർഭങ്ങളിൽ ഡാറ്റ അയയ്ക്കുന്നത് ആരംഭിക്കാനും കഴിയും.
- ഈ സാഹചര്യത്തിൽ, ഡാറ്റാ ട്രാൻസ്മിഷൻ സമയത്ത് മാത്രമേ മോഡം മൊബൈൽ ഡാറ്റ നെറ്റ്വർക്കിലേക്ക് കണക്റ്റുചെയ്തിട്ടുള്ളൂ.
- ഉപകരണം GSM നെറ്റ്വർക്കിലേക്ക് കണക്റ്റുചെയ്ത് GPRS-ലേക്ക് കണക്റ്റുചെയ്യാൻ തയ്യാറായിരിക്കണം, എന്നാൽ സജീവമായ IP കണക്ഷൻ ഇല്ലാതെ.
ഡാറ്റ പുഷ് - മുൻകൂട്ടി നിശ്ചയിച്ച സമയങ്ങളിൽ ആരംഭിക്കുന്നു
- ഡാറ്റ പുഷ് രീതി FTP ട്രിഗർ ചെയ്യുന്നു file അപ്ലോഡ്, പ്ലെയിൻ ടെക്സ്റ്റ് അല്ലെങ്കിൽ എൻക്രിപ്റ്റ്.
- അതുല്യമായ fileപേരും file യാന്ത്രികമായി ജനറേറ്റുചെയ്യുന്നു.
- നിലവിൽ ഉപയോഗിക്കുന്ന മൊബൈൽ നെറ്റ്വർക്കിൽ നിന്ന് ആക്സസ് ചെയ്യാവുന്ന ഡാറ്റ സ്വീകരിക്കുന്നതിന് ftp ഫംഗ്ഷന് ഒരു ftp സെർവറും ആവശ്യമാണ്.
- ftp നിഷ്ക്രിയ മോഡിലേക്ക് സജ്ജമാക്കിയിരിക്കണം.
- അതുല്യമായ file പേരുകൾ സ്വയമേവ സൃഷ്ടിക്കപ്പെടുന്നു.
- ദി file എല്ലായ്പ്പോഴും രണ്ട് ഭാഗങ്ങൾ ഉൾക്കൊള്ളുന്നു, ആദ്യം ഒരു സാധാരണ രജിസ്റ്റർ റീഡും തുടർന്ന് ഒരു ഇവൻ്റ് ലോഗും (കഴിഞ്ഞ 31 ദിവസത്തെ ഇവൻ്റുകൾ ഉൾക്കൊള്ളുന്നു).
- STX ETX പോലുള്ള ചില ASCII നിയന്ത്രണ പ്രതീകങ്ങൾ ഉൾപ്പെടെയുള്ള സാധാരണ IEC ഫോർമാറ്റായി റീഡിംഗുകൾ കാണിക്കുന്നു.
അലാറം പുഷ് (അലാറങ്ങൾ അയയ്ക്കുന്നു) - മീറ്ററിൽ നിന്ന് പുതിയ ഇവന്റ് വായിക്കാൻ കഴിയുമ്പോൾ മുതൽ
- അലാറം പുഷ് രീതി ഒരു DLMS WPDU-ൻ്റെ TCP അയയ്ക്കൽ ട്രിഗർ ചെയ്യുന്നു, IP വിലാസം അടങ്ങിയിരിക്കുന്നു,
- സുതാര്യമായ സേവനത്തിനുള്ള ലിസണിംഗ് പോർട്ട് നമ്പറും മീറ്റർ ഐഡിയും.
SMS ഉപയോഗിച്ച് ട്രിഗർ ചെയ്യുന്നു
- ഏത് കോൾ നമ്പറിൽ നിന്നും നിർവചിച്ച SMS ഉപയോഗിച്ച് GPRS കണക്ഷൻ വിദൂരമായി സജീവമാക്കാം.
- SMS ടെക്സ്റ്റ് ശൂന്യമായിരിക്കണം.
- SMS ലഭിച്ചതിന് ശേഷം, മോഡം IP നെറ്റ്വർക്കിലേക്ക് കണക്റ്റ് ചെയ്യും, കോൺഫിഗറേഷനിൽ നിർവചിച്ചിരിക്കുന്ന സമയത്തേക്ക് ഒരു IP സെർവറായി ആക്സസ് ചെയ്യാനാകും. file.
- Exampലെ കോൺഫിഗർ file 30 മിനിറ്റ് ക്രമീകരണം നൽകും.
CSD കോളിനിടെ LED പ്രവർത്തനം
CSD കോളിൽ രണ്ട് ഭാഗങ്ങൾ അടങ്ങിയിരിക്കുന്നു:
- സുതാര്യമായ മോഡിൽ ഒരു മീറ്റർ വായിക്കാനും ക്രമീകരിക്കാനും ഞങ്ങൾ ആഗ്രഹിക്കുന്നു
- ഞങ്ങൾ ഒരു മോഡം കോൺഫിഗറേഷൻ / ഫേംവെയർ അപ്ഡേറ്റ് നടത്താൻ ആഗ്രഹിക്കുന്നു
സുതാര്യമായ മോഡിൽ ഒരു മീറ്റർ വായിക്കാനും ക്രമീകരിക്കാനും:
- GSM / GPRS സ്റ്റാറ്റസിനായി കോൺഫിഗർ ചെയ്തിരിക്കുന്ന എൽഇഡി CSD കോളിനിടയിൽ തുടർച്ചയായി പ്രകാശിക്കും.
- ഇ-മീറ്റർ സ്റ്റാറ്റസിനായി കോൺഫിഗർ ചെയ്തിരിക്കുന്ന എൽഇഡി സിഎസ്ഡി കോൾ സ്റ്റാറ്റസ് അനുസരിച്ച് ഫ്ലാഷ് ചെയ്യും:
- കണക്ഷൻ്റെ തുടക്കം മുതൽ കണക്ഷൻ്റെ അവസാനം വരെ ഓരോ അര സെക്കൻഡിലും ഇത് ഫ്ലാഷ് ചെയ്യും / അളക്കുന്ന ഇൻ്റർഫേസ് 9600 എന്ന ബോഡ് നിരക്കിനായി കോൺഫിഗർ ചെയ്തിട്ടില്ലെങ്കിൽ, കണക്ഷൻ്റെ തുടക്കം മുതൽ അവസാനം വരെ LED തുടർച്ചയായി പ്രകാശിക്കും
- കണക്ഷൻ അടച്ച ശേഷം, LED ഓഫാകും
നിങ്ങൾക്ക് ഒരു മോഡം കോൺഫിഗറേഷൻ / ഫേംവെയർ അപ്ഡേറ്റ് വേണമെങ്കിൽ:
- GSM / GPRS സ്റ്റാറ്റസിനായി കോൺഫിഗർ ചെയ്തിരിക്കുന്ന എൽഇഡി CSD കോളിനിടയിൽ തുടർച്ചയായി പ്രകാശിക്കും.
- ഈ സാഹചര്യത്തിൽ, CSD മോഡ് കാരണം മറ്റ് LED- കൾ മാറില്ല.
CSD കണക്ഷനിൽ നിന്ന് കോൺഫിഗർ ചെയ്യുന്നു
തെറ്റായ കോൺഫിഗറേഷൻ കാരണം മോഡം പുനരാരംഭിക്കുകയാണെങ്കിൽ, ഒരു CSD കോൾ ഉപയോഗിച്ച് അത് ആക്സസ് ചെയ്യാൻ സാധിക്കും. APN പാരാമീറ്റർ ഗ്രൂപ്പിലെ PDP കണക്ഷൻ കാലതാമസം ഫീൽഡിൽ വ്യക്തമാക്കാൻ കഴിയുന്ന ഒരു മൂല്യമുള്ള WM-E ടേം സോഫ്റ്റ്വെയറിൽ ഇതിൻ്റെ പ്രവർത്തനം മികച്ചതാക്കാൻ കഴിയും. കൂടുതൽ വിവരങ്ങൾക്ക്, WM-E ടേം യൂസർ മാനുവലിൻ്റെ അധ്യായം 3.1 കാണുക.
യാന്ത്രിക നെറ്റ്വർക്ക് വീണ്ടും കണക്ഷൻ
ഉപകരണത്തിന്റെ നെറ്റ്വർക്ക് നിഷ്ക്രിയത്വം കാരണം മൊബൈൽ നെറ്റ്വർക്ക് ദാതാവ് സെല്ലുലാർ നെറ്റ്വർക്കിൽ നിന്ന് മോഡം ഉപേക്ഷിക്കുകയാണെങ്കിൽ, ഇവ സജ്ജീകരിച്ചിട്ടുണ്ടെങ്കിൽ ലഭ്യമായ പാരാമീറ്ററുകൾ ഉണ്ട്, തുടർന്ന് യാന്ത്രികവും ആനുകാലികവുമായ കണക്ഷൻ പുനർനിർമ്മാണത്തിന് കാരണമാകും. ഡാറ്റ കണക്ഷൻ നഷ്ടപ്പെട്ടതായി നെറ്റ്വർക്ക് ദാതാവ് മോഡമിലേക്ക് ഒരു സന്ദേശം അയച്ചാൽ, കണക്ഷൻ യാന്ത്രികമായി പുനഃസ്ഥാപിക്കപ്പെടും. നിങ്ങൾ ഒരു സന്ദേശം അയയ്ക്കുന്നില്ലെങ്കിൽ, പിന്തുടരേണ്ട രണ്ട് പരിഹാരങ്ങളിൽ നിന്ന് നിങ്ങൾക്ക് തിരഞ്ഞെടുക്കാം:
സജീവ മോഡ് - ആനുകാലിക പിംഗ് ഉപയോഗിക്കുക, പിംഗ് സജ്ജമാക്കുക:
- ഇത് സജ്ജീകരിക്കുന്നതിന്, വാച്ച്ഡോഗ് പാരാമീറ്റർ ഗ്രൂപ്പിൻ്റെ പിംഗ് പാരാമീറ്ററുകൾ പിംഗ് ഐപി വിലാസം, പിംഗ് വീണ്ടും ശ്രമിക്കുന്നതിൻ്റെ എണ്ണം, പിംഗ് കാത്തിരിപ്പ് സമയം (മറുപടിയ്ക്കായി), കാത്തിരിപ്പ് സമയം (അടുത്തതിന്) എന്നിങ്ങനെ സജ്ജമാക്കുക.
- പിംഗ് പ്രതികരണമില്ലെങ്കിൽ, സെക്കൻഡുകളിൽ വ്യക്തമാക്കിയ സമയ ഇടവേളയ്ക്ക് ശേഷം അത് നെറ്റ്വർക്കുമായി വീണ്ടും കണക്റ്റുചെയ്യുന്നു, ഈ സമയ പാരാമീറ്ററിന് ശേഷം GPRS കണക്ഷൻ അടച്ച് പുനഃസ്ഥാപിക്കും.
ശ്രദ്ധ! പതിവായി പിംഗ് ഉപയോഗിക്കുന്ന സാഹചര്യത്തിൽ, ഡാറ്റ ട്രാഫിക് കൂടുതലായിരിക്കും, എന്നാൽ ഉപകരണം സെല്ലുലാർ നെറ്റ്വർക്കിൽ തുടരാനുള്ള സാധ്യത കൂടുതലാണ്.
നിഷ്ക്രിയ മോഡ് – നിങ്ങൾ പിംഗ് ഉപയോഗിക്കുന്നില്ലെങ്കിൽ – കണക്ഷൻ പുനഃശ്രമം സജ്ജമാക്കുക:
- ഇത് ക്രമീകരിക്കുന്നതിന്, വാച്ച്ഡോഗ് പാരാമീറ്റർ ഗ്രൂപ്പിൻ്റെ സെക്കൻഡ് ഉപയോഗിക്കുക, gprs കണക്ഷൻ അടച്ചു, ഈ സമയ പാരാമീറ്ററിന് ശേഷം പുനഃസ്ഥാപിച്ചു.
- നെറ്റ്വർക്ക് മോഡം ഉപേക്ഷിച്ചതിന് ശേഷം, മൊബൈൽ നെറ്റ്വർക്കിലേക്ക് വീണ്ടും കണക്റ്റുചെയ്യാൻ ശ്രമിക്കുന്നതിന് മുമ്പ് മോഡം എത്രനേരം കാത്തിരിക്കുമെന്ന് ഇവിടെ നിങ്ങൾക്ക് നിർവചിക്കാം. ഓഫർ ചെയ്ത ക്രമീകരണങ്ങളെക്കുറിച്ച് നിങ്ങളുടെ മൊബൈൽ ദാതാവിനോട് ചോദിക്കുക.
ശ്രദ്ധ! ഡാറ്റ ട്രാഫിക് കുറവാണെങ്കിൽ, പിംഗ് കോൺഫിഗർ ചെയ്തിട്ടില്ലെങ്കിൽ, ഉപകരണം വളരെക്കാലം നെറ്റ്വർക്കിൽ നിലനിൽക്കില്ല.
- ഈ പാരാമീറ്റർ താഴ്ന്ന മൂല്യത്തിലേക്ക് സജ്ജമാക്കിയാൽ അത് ഇടയ്ക്കിടെ നെറ്റ്വർക്ക് വീണ്ടും കണക്ഷനുകൾക്ക് കാരണമാകും.
- അതിനാൽ, ഒരു സാഹചര്യത്തിലും നിങ്ങളുടെ മൊബൈൽ സേവന ദാതാവ് ശുപാർശ ചെയ്യുന്നതിനേക്കാൾ കുറഞ്ഞ മൂല്യം നിങ്ങൾ സജ്ജമാക്കരുത്. (ഉദാഹരണത്തിന്, ഒരു നിശ്ചിത സമയത്ത് ഒരു മോഡത്തിന് നെറ്റ്വർക്കിലേക്ക് ലോഗിൻ ചെയ്യാൻ കഴിയുന്ന തവണകളുടെ എണ്ണം പരിമിതപ്പെടുത്തുന്ന മൊബൈൽ നെറ്റ്വർക്ക് ദാതാക്കളുണ്ട്).
രണ്ട് മീറ്റർ റീഡ്ഔട്ട് പോർട്ടുകൾ
- മീറ്റർ കമ്മ്യൂണിക്കേഷൻ, കോൺഫിഗറേഷൻ, FW അപ്ഡേറ്റുകൾ എന്നിവയ്ക്കായി എല്ലാ WM-E മോഡമിനും രണ്ട് പോർട്ടുകൾ ഉണ്ട്. അവയുടെ മുൻഗണന അനുസരിച്ച് അവയുടെ പ്രവർത്തനം നിയന്ത്രിക്കുന്നതിന് നിങ്ങൾക്ക് രണ്ടിനെയും കോൺഫിഗർ ചെയ്യാം.
- ആദ്യത്തെ പോർട്ട്, (പ്രൈമറി) എന്നതിനായുള്ള യൂട്ടിലിറ്റി കമ്മ്യൂണിക്കേഷൻ പോർട്ട് ആണ്, ഇത് നിങ്ങൾക്ക് മീറ്റർ റീഡ്ഔട്ടിനും കോൺഫിഗറേഷനും ഉപയോഗിക്കാം. സെക്കൻഡറി പോർട്ടിനേക്കാൾ മീറ്റർ റീഡ്ഔട്ടിന് ഈ പോർട്ടിന് ഉയർന്ന മുൻഗണനയുണ്ട്, അതിനാൽ ഈ പ്രാഥമിക പോർട്ടിന്റെ പ്രവർത്തനം എല്ലായ്പ്പോഴും സെക്കൻഡറി പോർട്ടിന്റെ പ്രവർത്തനത്തെ മറികടക്കും (ഉദാ. നിങ്ങൾ ഈ പോർട്ടുകൾ കോൺഫിഗർ ചെയ്തിട്ടുണ്ടെങ്കിൽ, പ്രാഥമിക പോർട്ട് വഴി മീറ്റർ എപ്പോൾ റീഡ് ഔട്ട് ചെയ്യപ്പെടും (യൂട്ടിലിറ്റി കമ്മ്യൂണിക്കേഷൻ പോർട്ട്), സെക്കൻഡറി പോർട്ടിന്റെ പ്രവർത്തനം (കസ്റ്റമർ കമ്മ്യൂണിക്കേഷൻ പോർട്ട്) ഹാംഗ് ആയിരിക്കും - ഉദാ. മീറ്റർ റീഡിംഗ് - പ്രാഥമിക പോർട്ട് കറന്റ് റീഡ് ഔട്ട് ഉപയോഗിച്ച് പൂർത്തിയാകുന്നതുവരെ.
- പ്രവർത്തനത്തിലെ ഈ മുൻഗണനാക്രമീകരണം മോഡത്തിന്റെ ഫേംവെയർ അപ്ഡേറ്റുകളെയോ കോൺഫിഗറേഷൻ പ്രക്രിയകളെയോ ബാധിക്കുന്നില്ല.
- രണ്ടാമത്തെ പോർട്ട്. (സെക്കൻഡറി)* യ്ക്കുള്ള കസ്റ്റമർ കമ്മ്യൂണിക്കേഷൻ പോർട്ട് മീറ്റർ കമ്മ്യൂണിക്കേഷൻ, കോൺഫിഗറേഷൻ, FW അപ്ഡേറ്റുകൾ എന്നിവയ്ക്ക് കുറഞ്ഞ മുൻഗണനയോടെ ഉപയോഗിക്കാം.
- പ്രധാനം! രണ്ട് പോർട്ടുകളും വ്യത്യസ്ത പോർട്ട് നമ്പറുകളിലേക്ക് സജ്ജമാക്കണം.
- ഈ സവിശേഷത WM-E ടേം സോഫ്റ്റ്വെയറിൽ സ്റ്റാൻഡേർഡ് സെറ്റിംഗ്സ് മോഡിൽ കോൺഫിഗർ ചെയ്യാൻ കഴിയും, അല്ലെങ്കിൽ M2M പാരാമീറ്റർ ഗ്രൂപ്പിലെ അഡ്വാൻസ്ഡ് സെറ്റിംഗ്സ് മോഡിലും നിങ്ങൾക്ക് ഇത് എഡിറ്റ് ചെയ്യാൻ കഴിയും.
- പ്രധാനം! ശ്രദ്ധിക്കുക, ഈ സവിശേഷത മോഡം ഫേംവെയർ v5.3.4.1 അല്ലെങ്കിൽ പുതിയ ഫേംവെയർ പതിപ്പുകളിൽ ലഭ്യമാണ്!
യാന്ത്രിക പ്രോട്ടോക്കോൾ കണ്ടെത്തി മാറുക
- മീറ്റർ മൂല്യത്തിനായുള്ള ഡാറ്റ ഫോർമാറ്റ് (ഇ-മീറ്റർ സീരിയൽ പോർട്ട്) WM-E ടേം സോഫ്റ്റ്വെയറിൽ സ്റ്റാൻഡേർഡ് സെറ്റിംഗ്സ് മോഡിൽ കോൺഫിഗർ ചെയ്യാൻ കഴിയും, അല്ലെങ്കിൽ ട്രാൻസ്പ്. / NTA പാരാമീറ്റർ ഗ്രൂപ്പിലെ അഡ്വാൻസ്ഡ് സെറ്റിംഗ്സ് മോഡിൽ നിങ്ങൾക്ക് അത് എഡിറ്റ് ചെയ്യാനും കഴിയും.
- സാധാരണ ഡാറ്റ ഫോർമാറ്റുകളിൽ (7E1, 8N1, 7O1, 7N2, 8E1, 8O1, 8N2 പോലുള്ളവ) നിങ്ങൾക്ക് 'ഓട്ടോ' മോഡ് ക്രമീകരണം തിരഞ്ഞെടുക്കാം.
- ഈ സാഹചര്യത്തിൽ, ഇൻകമിംഗ് കണക്ഷന്റെ ആദ്യ ഡാറ്റ പാക്കറ്റ് ഫേംവെയർ പരിശോധിക്കുന്നു. ഇത് ഇൻകമിംഗ് ആശയവിനിമയങ്ങളെ യാന്ത്രികമായി ഡീകോഡ് ചെയ്യും, അത് IEC പ്രോട്ടോക്കോൾ ആയി കണ്ടെത്തുകയാണെങ്കിൽ, മോഡം മീറ്ററിലേക്ക് ഡാറ്റ മോഡ് 7E1 ലേക്ക് മാറും. മറ്റെല്ലാ സാഹചര്യങ്ങളിലും, ഡാറ്റ മോഡ് 8N1 മോഡിൽ തന്നെ തുടരും.
- കുറിപ്പ്, WM-E1S തരം മോഡമുകളുടെ കാര്യത്തിൽ, മീറ്റർ ഏത് പോർട്ടിലേക്കാണ് ബന്ധിപ്പിച്ചിരിക്കുന്നതെന്ന് അറിയാത്തതിനാൽ, ഫേംവെയർ രണ്ട് പോർട്ടുകളുടെയും (RS232, RS485 പോർട്ടുകൾ) ഡാറ്റ മോഡും മാറ്റുന്നു.
- ഈ സാഹചര്യത്തിൽ, മോഡം പ്രോട്ടോക്കോളുമായി പൊരുത്തപ്പെടുന്ന ഫോർമാറ്റ് കണ്ടെത്തുന്നു, അതിനാൽ അത് മീറ്ററിലേക്ക് ആവശ്യമായ ആശയവിനിമയം മാത്രമേ അയയ്ക്കൂ, കൂടാതെ കോൺഫിഗറേഷൻ എപ്പോൾ സംഭവിക്കുമെന്ന് യാന്ത്രികമായി അറിയുകയും ചെയ്യും.
- പ്രധാനം! ശ്രദ്ധിക്കുക, ഈ സവിശേഷത മോഡം ഫേംവെയർ v5.3.4.1 അല്ലെങ്കിൽ പുതിയ ഫേംവെയർ പതിപ്പുകളിൽ ലഭ്യമാണ്!
അധ്യായം 3. മോഡം കോൺഫിഗറേഷൻ
കോൺഫിഗറേഷൻ
- സാധാരണ പ്രവർത്തനത്തിനും ഉപയോഗത്തിനും മുമ്പ് നിർവ്വഹിക്കേണ്ട പാരാമീറ്ററുകൾ കോൺഫിഗർ ചെയ്തുകൊണ്ട് WM-E Term® സോഫ്റ്റ്വെയർ ഉപയോഗിച്ചാണ് മോഡം കോൺഫിഗർ ചെയ്യേണ്ടത്.
- മീറ്റർ, മോഡം, കമ്മ്യൂണിക്കേഷൻ മുതലായവയുടെ പാരാമീറ്റർ ക്രമീകരണങ്ങളിലൂടെ, കോൺഫിഗറേഷൻ പ്രോഗ്രാം ഉപയോഗിച്ച് നിങ്ങൾക്ക് മോഡം കമ്മ്യൂണിക്കേഷൻ പരിശോധിക്കാനും കഴിയും.
പ്രധാനം! RS232 കണക്ഷൻ വഴി മാത്രമേ മോഡം കോൺഫിഗർ ചെയ്യാൻ കഴിയൂ!
കോൺഫിഗറേഷൻ സമയത്ത്, നിങ്ങൾ മീറ്റർ-മോഡം ഡാറ്റ കണക്ഷൻ (2a) നീക്കം ചെയ്യണം, കൂടാതെ താഴെ പറയുന്ന സൂചനകൾ ഉപയോഗിച്ച് മോഡം നിങ്ങളുടെ കമ്പ്യൂട്ടറുമായി ബന്ധിപ്പിക്കേണ്ടതുണ്ട്.
പ്രധാനം!
- മോഡം കോൺഫിഗറേഷൻ പൂർത്തിയാകുന്നതുവരെ മീറ്ററുമായി ബന്ധിപ്പിച്ചിട്ടില്ല, അതിനാൽ RS232 ഇന്റർഫേസിലൂടെ പാരാമീറ്റർ മൂല്യങ്ങൾ റീഡ് ഔട്ട് ചെയ്യാൻ കഴിയില്ല. അതിനായി മറ്റൊരു കോൺഫിഗറേഷൻ പോർട്ട് തിരഞ്ഞെടുക്കണം - ഉദാ: ഒപ്റ്റിക്കൽ അല്ലെങ്കിൽ TCP/IP പോർട്ട്.
- USB DONGLE അഡാപ്റ്റർ ഉപയോഗിച്ച് നിങ്ങളുടെ കമ്പ്യൂട്ടറിലേക്ക് നേരിട്ട് മോഡം RS232 കേബിളുമായി (2a) ബന്ധിപ്പിക്കാൻ കഴിയും.
ശ്രദ്ധ!
- കോൺഫിഗറേഷൻ സമയത്ത്, മോഡത്തിന്റെ പവർ സപ്ലൈ ഒരു ബാഹ്യ പവർ സ്രോതസ്സിൽ നിന്നുള്ള എസി പ്ലഗ് വഴി ഉറപ്പാക്കണം (100-230V AC മുതൽ അല്ലെങ്കിൽ മീറ്റർ 57-100V AC വരെ).
- കോൺഫിഗറേഷനായി WM-E ടേം പ്രോഗ്രാം ഉപയോഗിക്കുക - WM-E ടേം യൂസർ മാനുവൽ ഉപയോഗിക്കുക.
- മോഡത്തിന്റെ ശരിയായ ആശയവിനിമയത്തിന്, നിങ്ങൾ സിമ്മിന്റെ APN ക്രമീകരണങ്ങൾ കോൺഫിഗർ ചെയ്യണം - പിൻ കോഡ്, APN, ഉപയോക്തൃനാമം, പാസ്വേഡ് എന്നിങ്ങനെ. സീരിയൽ ലിങ്ക് കണക്ഷൻ വഴി WM-E Term® സോഫ്റ്റ്വെയർ ഉപയോഗിച്ച് ഇവയെല്ലാം കോൺഫിഗർ ചെയ്യാൻ കഴിയും.
- ആശയവിനിമയ മൊഡ്യൂളിൻ്റെ വിജയകരമായ പ്രവർത്തനത്തിന് ഉചിതമായ സിഗ്നൽ ശക്തി ഉണ്ടായിരിക്കേണ്ടത് ആവശ്യമാണ്.
- സിഗ്നൽ ശക്തി ശക്തമായ സ്ഥലങ്ങളിൽ, ആന്തരിക ആൻ്റിന ഉപയോഗിക്കാൻ കഴിയും, മോശം സ്വീകരണമുള്ള പ്രദേശങ്ങളിൽ, ഉപകരണത്തിൻ്റെ ആൻ്റിന കണക്റ്ററിലേക്ക് (50 Ohm SMA കണക്ഷൻ) ഒരു ബാഹ്യ ആൻ്റിന (3 Ohm SMA കണക്ഷൻ) മൌണ്ട് ചെയ്യാം, അത് നിങ്ങൾക്ക് ഉള്ളിൽ പോലും സ്ഥാപിക്കാം. മീറ്റർ ചുറ്റളവ് (പ്ലാസ്റ്റിക് ഭവനത്തിന് കീഴിൽ).
- നിങ്ങൾ നടത്തിയ RS232- കോൺഫിഗറേഷന് ശേഷം, PC-മോഡം കണക്ഷനിൽ മീറ്റർ പാരാമീറ്റർ മൂല്യങ്ങൾ വായിക്കണമെങ്കിൽ, മീറ്ററിലേക്ക് TCP/IP അല്ലെങ്കിൽ Optical എന്നിങ്ങനെ വ്യത്യസ്തമായ ഒരു കോൺഫിഗറേഷൻ പോർട്ട് തിരഞ്ഞെടുക്കണം.
WM-E Term® പ്രകാരം മോഡം കോൺഫിഗർ ചെയ്യുന്നു
- നിങ്ങളുടെ കമ്പ്യൂട്ടറിൽ Microsoft .NET ഫ്രെയിംവർക്ക് റൺടൈം എൻവയോൺമെൻ്റ് ആവശ്യമാണ്.
- ഒരു ബ്രൗസർ ഉപയോഗിച്ച് ഇനിപ്പറയുന്ന സ്ഥലത്ത് നിന്ന് നിങ്ങളുടെ കമ്പ്യൂട്ടറിലേക്ക് WM-E Term® സോഫ്റ്റ്വെയർ ഡൗൺലോഡ് ചെയ്യുക: https://m2mserver.com/m2m-downloads/WM-ETerm_v1_4.zip
- എന്നിട്ട് .zip അൺസിപ്പ് ചെയ്യുക file ഒരു ഡയറക്ടറിയിലേക്ക് WM-ETerm.exe എക്സിക്യൂട്ട് ചെയ്യുക file.
- കോൺഫിഗറേഷൻ സോഫ്റ്റ്വെയർ ഉപയോക്തൃ അക്കൗണ്ട് മാനേജ്മെൻ്റിനെയും പാസ്വേഡ് മാറ്റത്തെയും പിന്തുണയ്ക്കുന്നു. നിങ്ങൾക്ക് ഒരു പാസ്വേഡ് ഉപയോഗിച്ച് പ്രോഗ്രാമിലേക്ക് ലോഗിൻ ചെയ്യാൻ കഴിയും! WM-E Term® കോൺഫിഗറേഷൻ സോഫ്റ്റ്വെയറിൻ്റെ ഉപയോക്തൃ ഗൈഡ് പിന്തുടരുക!
- ഉപകരണത്തിലെ LED-കൾ മോഡത്തിൻ്റെ നിലവിലെ അവസ്ഥയെക്കുറിച്ച് എപ്പോഴും നിങ്ങളെ അറിയിക്കുന്നു.
- ഫാക്ടറി കോൺഫിഗറേഷൻ file sample (WM-E ടേമിന്): https://m2mserver.com/m2m-downloads/WM-E1S_STD_v5210_default.zip
- മോഡം സെല്ലുലാർ നെറ്റ്വർക്ക് കമ്മ്യൂണിക്കേഷൻ്റെ പ്രവർത്തനത്തിനും സിം കാർഡ് ക്രമീകരണങ്ങളും (APN, പാസ്വേഡ്, അക്കൗണ്ട് എന്നിവ പോലുള്ളവ) ആവശ്യമാണ്.
- കൂടാതെ, വീണ്ടും ഉറപ്പാക്കുകview കൂടാതെ RS232, RS485 ക്രമീകരണങ്ങൾക്കായി WM-E ടേം പ്രോഗ്രാമിൽ സുതാര്യമായ മോഡ് ഡാറ്റ സ്പീഡ് ഫംഗ്ഷനുകൾ സംരക്ഷിക്കുക. കൂടാതെ, കോൺഫിഗറേഷൻ സോഫ്റ്റ്വെയറിൻ്റെ ഉപയോക്തൃ മാനുവൽ ഡോക്യുമെൻ്റ് അനുസരിച്ച് - പ്രോഗ്രാം ഉപയോഗിച്ച് കോൺഫിഗർ ചെയ്ത കോൺഫിഗറേഷൻ മോഡത്തിലേക്ക് അയയ്ക്കണം.
- കോൺഫിഗറേഷൻ സോഫ്റ്റ്വെയർ ഉപയോഗിച്ച് നിങ്ങൾക്ക് മോഡത്തിന്റെ ഫേംവെയർ അപ്ഡേറ്റ് ചെയ്യാനും കഴിയും. തുടർന്ന് മോഡം പുനരാരംഭിക്കുകയും പുതിയ ക്രമീകരണങ്ങൾക്കനുസരിച്ച് പ്രവർത്തിക്കുകയും ചെയ്യും.
- WM-E ടേം യൂസർ മാനുവൽ: https://m2mserver.com/m2m-downloads/WM-E-TERM_User_Manual_V1_97.pdf
മീറ്ററിൽ നിന്ന് ഒരു SMS അയയ്ക്കുന്നു
- മീറ്റർ കോൺഫിഗറേഷൻ അനുസരിച്ച്, മോഡം ഉപയോഗിച്ച്, മീറ്ററിന് സ്റ്റാൻഡേർഡ് AT കമാൻഡുകൾക്ക് അനുയോജ്യമായ SMS സന്ദേശം മീറ്ററിന്റെ വശത്ത് ക്രമീകരിച്ചിരിക്കുന്ന ഫോൺ നമ്പറിലേക്ക് അയയ്ക്കാൻ കഴിയും.
- മീറ്ററിന്റെ കഴിവുകൾക്കനുസരിച്ച്, അലാറങ്ങൾക്കും പ്രത്യേക പരിപാടികൾക്കുമായി ഇത് പ്രാഥമികമായി ക്രമീകരിക്കുന്നത് മൂല്യവത്താണ്.
- WM-E Term®-ൽ മറ്റ് ക്രമീകരണങ്ങളൊന്നും ആവശ്യമില്ല.
സിഗ്നൽ ശക്തി
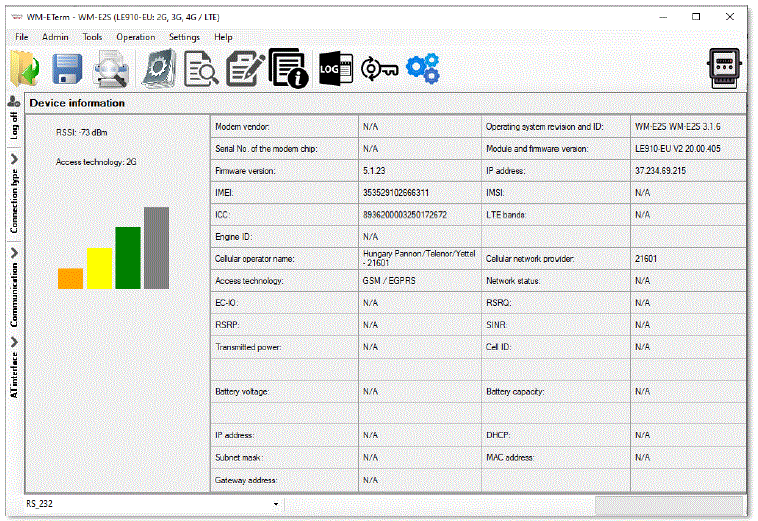
- WM-E Term® സോഫ്റ്റ്വെയർ ഉപകരണ വിവര മെനുവിൽ അല്ലെങ്കിൽ ഇത് ഉപയോഗിച്ച് സെല്ലുലാർ നെറ്റ്വർക്കിൻ്റെ സിഗ്നൽ ശക്തി പരിശോധിക്കുക
 ഐക്കൺ. പ്രക്രിയയുടെ അവസാനം, നിലവിലെ സ്റ്റാറ്റസ് വിവരങ്ങൾ അപ്ഡേറ്റ് ചെയ്യും.
 - RSSI മൂല്യം പരിശോധിക്കുക (കുറഞ്ഞത് മഞ്ഞ ആയിരിക്കണം - അതായത് ശരാശരി സിഗ്നൽ ശക്തി - അല്ലെങ്കിൽ അത് പച്ചയാണെങ്കിൽ നല്ലത്).
- നിങ്ങൾക്ക് മികച്ച dBm മൂല്യങ്ങൾ ലഭിക്കാത്ത സമയത്ത് നിങ്ങൾക്ക് ആൻ്റിന സ്ഥാനം മാറ്റാം (പുതുക്കലിനായി സ്റ്റാറ്റസ് വീണ്ടും വായിക്കണം).
പവർ യൂtagഇ മാനേജ്മെന്റ്
- മോഡത്തിൻ്റെ ഫേംവെയർ പതിപ്പ് LastGASP സവിശേഷതയെ പിന്തുണയ്ക്കുന്നു, അതായത് പവർ ou ആണെങ്കിൽtage മോഡത്തിൻ്റെ സൂപ്പർ കപ്പാസിറ്റർ കുറച്ച് സമയത്തേക്ക് (കുറച്ച് മിനിറ്റ്) മോഡം പ്രവർത്തിപ്പിക്കാൻ അനുവദിക്കുന്നു.
- മെയിൻ/ഇൻപുട്ട് പവർ സോഴ്സിൻ്റെ നഷ്ടം കണ്ടെത്തുന്ന സാഹചര്യത്തിൽ, മോഡം ഒരു "പവർ ലോസ്റ്റ്" ഇവൻ്റ് സൃഷ്ടിക്കുകയും കോൺഫിഗർ ചെയ്ത ഫോൺ നമ്പറിലേക്ക് സന്ദേശം ഉടൻ ഒരു SMS ടെക്സ്റ്റായി കൈമാറുകയും ചെയ്യും.
- മെയിൻ/പവർ സ്രോതസ്സ് വീണ്ടെടുക്കുന്ന സാഹചര്യത്തിൽ മോഡം "പവർ റിട്ടേൺ" സന്ദേശം ജനറേറ്റ് ചെയ്യുകയും SMS ടെക്സ്റ്റ് വഴി അയയ്ക്കുകയും ചെയ്യുന്നു.
- AMM (IEC) പാരാമീറ്റർ ഗ്രൂപ്പ് ഭാഗത്ത് - WM-E Term® ആപ്ലിക്കേഷൻ വഴി LastGASP സന്ദേശ ക്രമീകരണങ്ങൾ പ്രവർത്തനക്ഷമമാക്കാം.
മോഡം പുനരാരംഭിക്കുക
ഡബ്ല്യുഎം-ഇ ടേമിൽ മോഡം പുനരാരംഭിക്കുന്നതിനുള്ള നേരിട്ടുള്ള ഓപ്ഷൻ കണ്ടെത്താൻ കഴിയില്ല. എന്നാൽ പുനരാരംഭിക്കുന്നതിന് മോഡം തള്ളുന്നത് വളരെ എളുപ്പമാണ്.
- റീഡ്ഔട്ട് മൂല്യങ്ങളിൽ നിന്ന് ഏതെങ്കിലും പാരാമീറ്റർ തിരഞ്ഞെടുക്കുക.
- ഒരു പാരാമീറ്റർ മൂല്യം മാറ്റുക
- സേവ് ബട്ടണിലേക്ക് അമർത്തുക.
- പാരാമീറ്ററുകൾ എഴുതുക വഴി ക്രമീകരണങ്ങൾ അയയ്ക്കുക
 മോഡമിലേക്കുള്ള ഐക്കൺ.
 - എഴുത്ത് പ്രക്രിയയുടെ അവസാനം, മോഡം പുനരാരംഭിക്കും.
- ഉപകരണത്തിൻ്റെ പുനരാരംഭം എൽഇഡി 3 സൈൻ ചെയ്തിരിക്കുന്നു, അത് 15 സെക്കൻഡ് നേരത്തേക്ക് പച്ച നിറത്തിൽ വേഗത്തിൽ മിന്നുന്നു. മോഡം അതിൻ്റെ ഇൻ്റർഫേസുകളിൽ ലഭ്യമാകുമ്പോൾ ആരംഭിക്കുന്നതിന് 2-3 മിനിറ്റ് ആവശ്യമാണ്.
- എല്ലാത്തിനുമുപരി, LED പ്രവർത്തന സ്വഭാവ വിവരണത്തിൽ പട്ടികപ്പെടുത്തിയിരിക്കുന്നതുപോലെ LED സാധാരണ നിലയിലായിരിക്കും പ്രവർത്തിക്കുന്നത്.
അധ്യായം 4. പിന്തുണ
ഉപയോഗവുമായി ബന്ധപ്പെട്ട് നിങ്ങൾക്ക് ഒരു സാങ്കേതിക ചോദ്യമുണ്ടെങ്കിൽ, ഇനിപ്പറയുന്ന കോൺടാക്റ്റ് സാധ്യതകളിൽ നിങ്ങൾക്ക് ഞങ്ങളെ കണ്ടെത്താനാകും:
- ഇമെയിൽ: support@m2mserver.com
- ഫോൺ: +36 20 333-1111
പിന്തുണ
- ഉൽപ്പന്നത്തിന് ഒരു തിരിച്ചറിയൽ ശൂന്യതയുണ്ട്, അതിൽ സപ്പോർട്ട് ലൈനിനായി ഉൽപ്പന്നവുമായി ബന്ധപ്പെട്ട പ്രധാനപ്പെട്ട വിവരങ്ങൾ അടങ്ങിയിരിക്കുന്നു.
- മുന്നറിയിപ്പ്! ശൂന്യമായ സ്റ്റിക്കറിന് കേടുപാടുകൾ വരുത്തുകയോ നീക്കം ചെയ്യുകയോ ചെയ്യുന്നത് ഉൽപ്പന്ന ഗ്യാരണ്ടി നഷ്ടപ്പെടുന്നു എന്നാണ്.
- ഓൺലൈൻ ഉൽപ്പന്ന പിന്തുണ ഇവിടെ ലഭ്യമാണ്: https://www.m2mserver.com/en/support/
ഉൽപ്പന്ന പിന്തുണ
ഉൽപ്പന്നവുമായി ബന്ധപ്പെട്ട രേഖകളും വിവരങ്ങളും ഇവിടെ ലഭ്യമാണ്. https://www.m2mserver.com/en/product/wm-e1s-iskra/
അധ്യായം 5. നിയമപരമായ അറിയിപ്പ്
- ©2025. WM സിസ്റ്റംസ് LLC.
- ഈ പ്രമാണത്തിൽ അവതരിപ്പിച്ചിരിക്കുന്ന വാചകവും ചിത്രീകരണങ്ങളും പകർപ്പവകാശത്തിന് കീഴിലാണ്. ഒറിജിനൽ ഡോക്യുമെന്റിന്റെയോ അതിന്റെ ഭാഗങ്ങളുടെയോ പകർത്തൽ, ഉപയോഗം, പകർപ്പ് അല്ലെങ്കിൽ പ്രസിദ്ധീകരണം എന്നിവ ഡബ്ല്യുഎം സിസ്റ്റംസ് എൽഎൽസിയുടെ കരാറും അനുമതിയും ഉപയോഗിച്ച് സാധ്യമാണ്. മാത്രം.
- ഈ പ്രമാണത്തിലെ കണക്കുകൾ ചിത്രീകരണങ്ങളാണ്, അവ യഥാർത്ഥ രൂപത്തിൽ നിന്ന് വ്യത്യസ്തമായിരിക്കും.
- ഈ ഡോക്യുമെന്റിലെ ടെക്സ്റ്റ് കൃത്യതയില്ലാത്തതിന് WM Systems LLC ഒരു ഉത്തരവാദിത്തവും ഏറ്റെടുക്കുന്നില്ല.
- അവതരിപ്പിച്ച വിവരങ്ങൾ ഒരു അറിയിപ്പും കൂടാതെ മാറ്റാവുന്നതാണ്.
- ഈ പ്രമാണത്തിലെ അച്ചടിച്ച വിവരങ്ങൾ വിജ്ഞാനപ്രദം മാത്രമാണ്. കൂടുതൽ വിവരങ്ങൾക്ക് ഞങ്ങളെ ബന്ധപ്പെടുക.
മുന്നറിയിപ്പ്
സോഫ്റ്റ്വെയർ അപ്ലോഡ്/പുതുക്കൽ സമയത്ത് എന്തെങ്കിലും തകരാർ അല്ലെങ്കിൽ വരാനിരിക്കുന്ന പിശക് ഉപകരണത്തിന്റെ തകർച്ചയിലേക്ക് നയിച്ചേക്കാം. ഈ സാഹചര്യം സംഭവിക്കുമ്പോൾ, ഞങ്ങളുടെ സ്പെഷ്യലിസ്റ്റുകളെ വിളിക്കുക.
പതിവുചോദ്യങ്ങൾ
ഒപ്റ്റിമൽ പ്രകടനത്തിനായി മോഡം എങ്ങനെ കോൺഫിഗർ ചെയ്യാം?
RS232 അല്ലെങ്കിൽ ഒപ്റ്റിക്കൽ പോർട്ട് വഴിയോ, അല്ലെങ്കിൽ CSData കോളുകൾ അല്ലെങ്കിൽ മൊബൈൽ ഇന്റർനെറ്റ് (TCP) കണക്ഷൻ ഉപയോഗിച്ച് റിമോട്ടായി മോഡം ലോക്കലായി കോൺഫിഗർ ചെയ്യാം. സുരക്ഷ വർദ്ധിപ്പിക്കുന്നതിന് അദ്വിതീയ പാസ്വേഡുകൾ സജ്ജീകരിക്കുന്നത് ഉറപ്പാക്കുക.
ഒരു ശക്തിയുടെ കാര്യത്തിൽ ഞാൻ എന്തുചെയ്യണംtage?
ഒരു ശക്തി ഉണ്ടെങ്കിൽ outage, മോഡമിലെ ഓപ്ഷണൽ സൂപ്പർകപ്പാസിറ്റർ ഘടകം അതിനെ താൽക്കാലികമായി പ്രവർത്തനം തുടരാൻ അനുവദിക്കുന്നു. പവർ പുനഃസ്ഥാപിച്ചുകഴിഞ്ഞാൽ, മോഡം യാന്ത്രികമായി പുനരാരംഭിക്കുകയും സെല്ലുലാർ നെറ്റ്വർക്കിലൂടെ ഡാറ്റ അയയ്ക്കുന്നത് പുനരാരംഭിക്കുകയും ചെയ്യും.
പ്രമാണങ്ങൾ / വിഭവങ്ങൾ
 |
WM സിസ്റ്റംസ് WM-E1S ഇസ്ക്ര മോഡം [pdf] ഉപയോക്തൃ മാനുവൽ WM-E1S Iskra മോഡം, WM-E1S, Iskra മോഡം, മോഡം |
